1. Introduction
Thank you for choosing the KOSUMOSU Digital LED Mirror Alarm Clock, Model ACD-330. This stylish and functional clock features a large 6.7-inch mirror display, dual alarm settings, 12/24-hour time format, date, day of the week, and temperature display. It also offers adjustable brightness for optimal viewing comfort. Please read this manual carefully to ensure proper setup and operation.
2. Package Contents
- KOSUMOSU Digital LED Mirror Alarm Clock (Gold)
- USB Power Cable (1.5 meters)
- User Manual
- Bracket Base

3. Product Overview
Familiarize yourself with the clock's display and control buttons.
3.1. Front Display

The 6.7-inch mirror display clearly shows:
- Time: Large digital numbers (12H/24H format).
- AM/PM Indicator: For 12-hour format.
- Date: Month and Day.
- Day of the Week: Indicated by highlighted text (Sun, Mon, Tue, Wed, Thu, Fri, Sat).
- Temperature: In Celsius (°C) or Fahrenheit (°F).
- Alarm Icons: To indicate active alarms.
3.2. Back Panel and Buttons
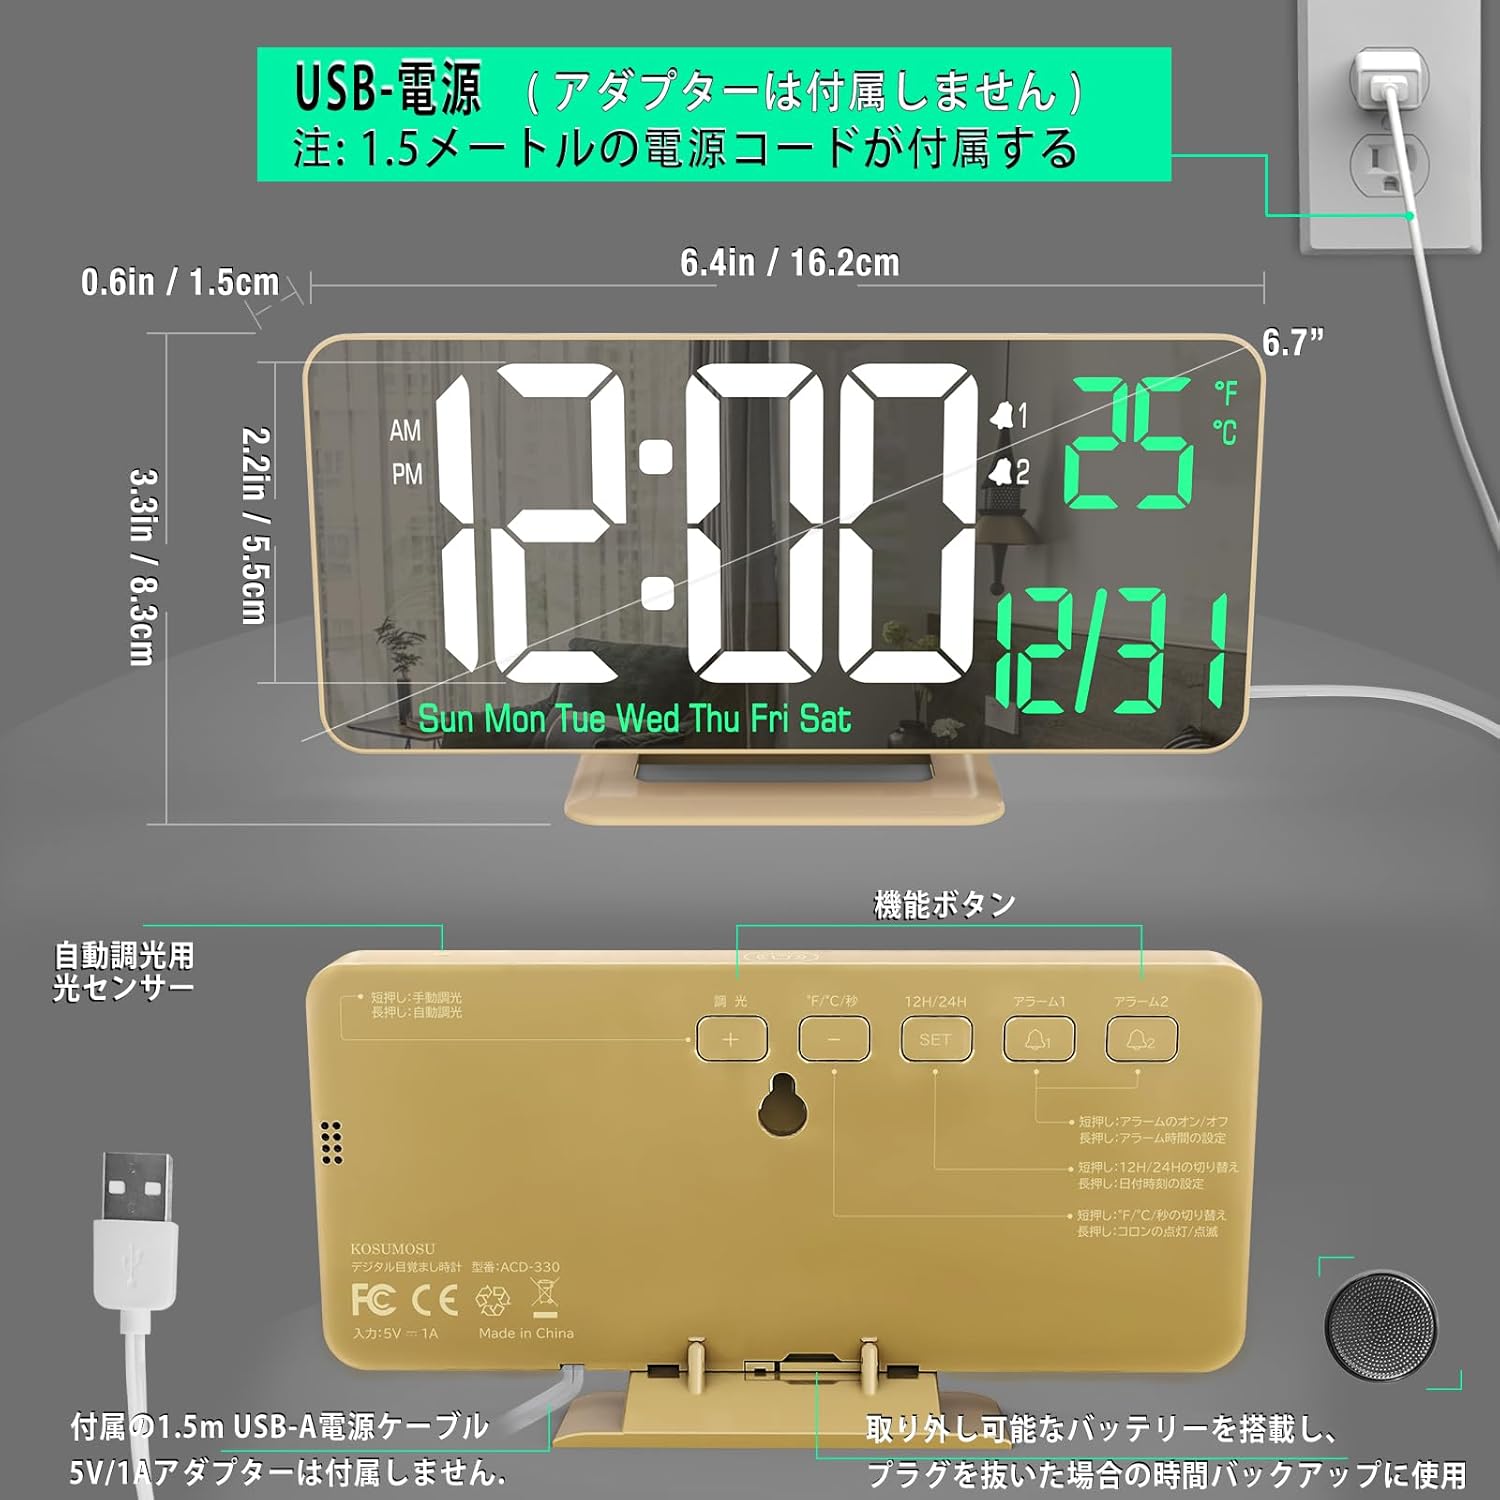
The back of the clock features the following controls:
- SET Button: Used to enter and confirm settings.
- UP Button: Adjusts values upwards or cycles through options.
- DOWN Button: Adjusts values downwards or cycles through options.
- ALARM Button: Used to set and activate alarms.
- SNOOZE/LIGHT Button: Activates snooze during an alarm or adjusts display brightness.
- USB Power Input: For connecting the power cable.
- Battery Compartment: For the button battery (memory backup).
4. Setup
4.1. Power Connection
- Connect the provided USB power cable to the USB Power Input port on the back of the clock.
- Plug the other end of the USB cable into a 5V/1A AC adapter (not included).
- The clock will power on and the display will light up.

Note: A button battery (included) is installed in the battery compartment. This battery serves as a memory backup to retain time settings during a power outage. It is not intended for continuous operation of the clock.
4.2. Initial Time and Date Setting
- Press and hold the SET button for 3 seconds to enter time setting mode. The hour digits will flash.
- Use the UP or DOWN buttons to adjust the hour.
- Press SET again to confirm the hour and move to minute setting. The minute digits will flash.
- Use the UP or DOWN buttons to adjust the minutes.
- Press SET again to confirm the minutes and move to year setting.
- Continue using UP/DOWN to adjust the year, then SET to move to month, then SET to move to day.
- After setting the day, press SET to exit the time/date setting mode.
5. Operating Instructions
5.1. 12/24-Hour Format
In normal time display mode, press the UP button to toggle between 12-hour (AM/PM) and 24-hour formats.
5.2. Temperature Unit (°C/°F)
In normal time display mode, press the DOWN button to switch the temperature display between Celsius (°C) and Fahrenheit (°F).
5.3. Alarm Settings (Dual Alarms)
The clock supports two independent alarms (AL1 and AL2).

- Press the ALARM button once to select Alarm 1 (AL1). The AL1 icon will appear.
- Press and hold the ALARM button for 3 seconds. The hour digits for AL1 will flash.
- Use the UP or DOWN buttons to adjust the alarm hour. Press ALARM to confirm.
- The minute digits will flash. Use UP or DOWN to adjust the alarm minutes. Press ALARM to confirm.
- Next, select the alarm cycle: 1-5 (Monday-Friday), 1-7 (Every day), or 6-7 (Saturday-Sunday). Use UP or DOWN to choose, then press ALARM to confirm and exit.
- Repeat steps 1-5 for Alarm 2 (AL2) by pressing ALARM twice to select AL2.
To activate/deactivate an alarm, press the ALARM button repeatedly until the desired alarm icon (AL1 or AL2) appears or disappears from the display.
5.4. Snooze Function
When an alarm sounds, press the SNOOZE/LIGHT button to activate the snooze function. The alarm will pause for 5 minutes and then sound again. To turn off the alarm completely, press any other button.
5.5. Brightness Adjustment
The clock offers both manual and automatic brightness adjustment.
- Manual Adjustment: In normal time display mode, short press the SNOOZE/LIGHT button to cycle through brightness levels: Weak, Medium, High, and Off.
- Automatic Adjustment: Long press the SNOOZE/LIGHT button to activate automatic brightness adjustment. The clock will automatically adjust its display brightness based on the ambient light conditions.
5.6. Mirror Function
The clock's 6.7-inch display surface also functions as a mirror, making it a versatile addition to any room.

6. Media Resources
6.1. Product Video
7. Maintenance
- Cleaning: Use a soft, dry cloth to clean the clock's surface. Avoid abrasive cleaners or solvents.
- Battery Replacement: If the clock loses time during a power outage, the button battery may need replacement. Open the battery compartment on the back of the clock and replace the battery with a new one of the same type.
8. Troubleshooting
- Display is blank: Ensure the USB power cable is securely connected to both the clock and a working 5V/1A AC adapter.
- Alarm does not sound: Check if the alarm is activated (AL1 or AL2 icon visible on display). Ensure the volume is not set to zero (if applicable, though this model does not specify volume control).
- Time is incorrect after power outage: The button battery for memory backup might be depleted. Replace the battery and reset the time.
9. Specifications
| Feature | Detail |
|---|---|
| Brand | KOSUMOSU technology |
| Model Number | ACD-330 |
| Display Type | Digital LED Mirror |
| Display Size | 6.7 inches |
| Color | Gold |
| Material | Plastic (ABS Frame) |
| Power Source | Corded Electric (USB 5V/1A) |
| Battery Type (Backup) | Manganese Dioxide Lithium (Internal) |
| Product Dimensions | 16.2 cm (Width) x 8.3 cm (Height) |
| Item Weight | 170 grams |
| Special Features | Dual Alarm, Snooze, 12/24H, Date, Day, Temperature, Auto/Manual Brightness |
10. Warranty and Support
This KOSUMOSU product comes with a 2-year warranty. If you encounter any quality issues or have questions regarding the use or setup of your alarm clock, please contact our customer service immediately. We are committed to providing assistance, including product exchange or guidance on usage and settings.


