Introduction
The AIKE Wall Mount Automatic Soap Dispenser, Model AK1216, is designed for hygienic and convenient liquid soap dispensing in both home and public environments. This battery-operated dispenser features touchless operation, adjustable dispensing volumes, and a secure, easy-to-refill design. Its compact form factor and versatile installation options make it a practical addition to any bathroom or kitchen.

Image: The AIKE AK1216 automatic soap dispenser in silver, shown dispensing liquid soap into a hand. This illustrates the primary function of the device.
Product Features
- Versatile Installation: Offers both nail-free adhesive installation for smooth, flat surfaces and drilled installation for uneven or peeling walls, ensuring long-lasting stability.
- Safety-Conscious Design: Engineered with soft aesthetics and no sharp edges to prevent injury, making it suitable for various environments.
- Optimized Capacity: Recommended capacity of 22 fl. oz (650 ml) with a maximum fill of 24 fl. oz (700 ml) for efficient usage.
- Secure Locking Lid: Features an easy-to-refill lid designed to prevent tampering, ideal for public spaces.
- Energy Efficient: Operates on 4 AA batteries (not included), providing 4-6 months of use in medium-traffic areas and even longer for home use due to low power consumption.
- Adjustable Dispensing: Equipped with 5 adjustable settings to control the amount of soap dispensed, accommodating different needs and liquid types.
Packing List
Please verify that all components are present in the package before proceeding with installation.
- Soap Dispenser x 1
- User Manual x 1
- Key x 1
- Mounting Plate x 1
- Mounting Screw x 2
- Expansion Anchor x 2
- Safety Screw x 2

Image: A visual representation of the AIKE AK1216 soap dispenser and its included accessories, such as the user manual, key, mounting plate, screws, and anchors.
Setup and Installation
Proper installation is crucial for the stability and longevity of your soap dispenser. Choose between nail-free adhesive installation or drilled installation based on your wall surface.
Important Pre-Installation Notes:
- Ensure the installation surface is at least 10 inches (25cm) above the countertop or sink to allow for proper sensor function and dispensing clearance.
- For adhesive installation, the wall surface must be smooth, flat, and non-peeling.
- Thoroughly clean and dry the wall surface with a paper towel before applying adhesive. Do not use water, alcohol, or other liquids for cleaning the surface immediately prior to adhesive application.

Image: A diagram illustrating the recommended minimum installation height of 10 inches (25cm) above the countertop for the soap dispenser.
Nail-Free Adhesive Installation (for Smooth Surfaces):
- Clean and dry the wall surface as instructed above.
- Remove the protective film from the adhesive mounting plate.
- Firmly press the adhesive plate onto the desired wall location, ensuring no air bubbles are trapped.
- Allow the adhesive to set for at least 3 hours before hanging the soap dispenser to ensure maximum stability.
- Slide the soap dispenser onto the mounted plate.

Image: A step-by-step visual guide demonstrating the adhesive installation process: removing the protective film, attaching the mounting plate to the wall, and finally hanging the soap dispenser onto the plate.
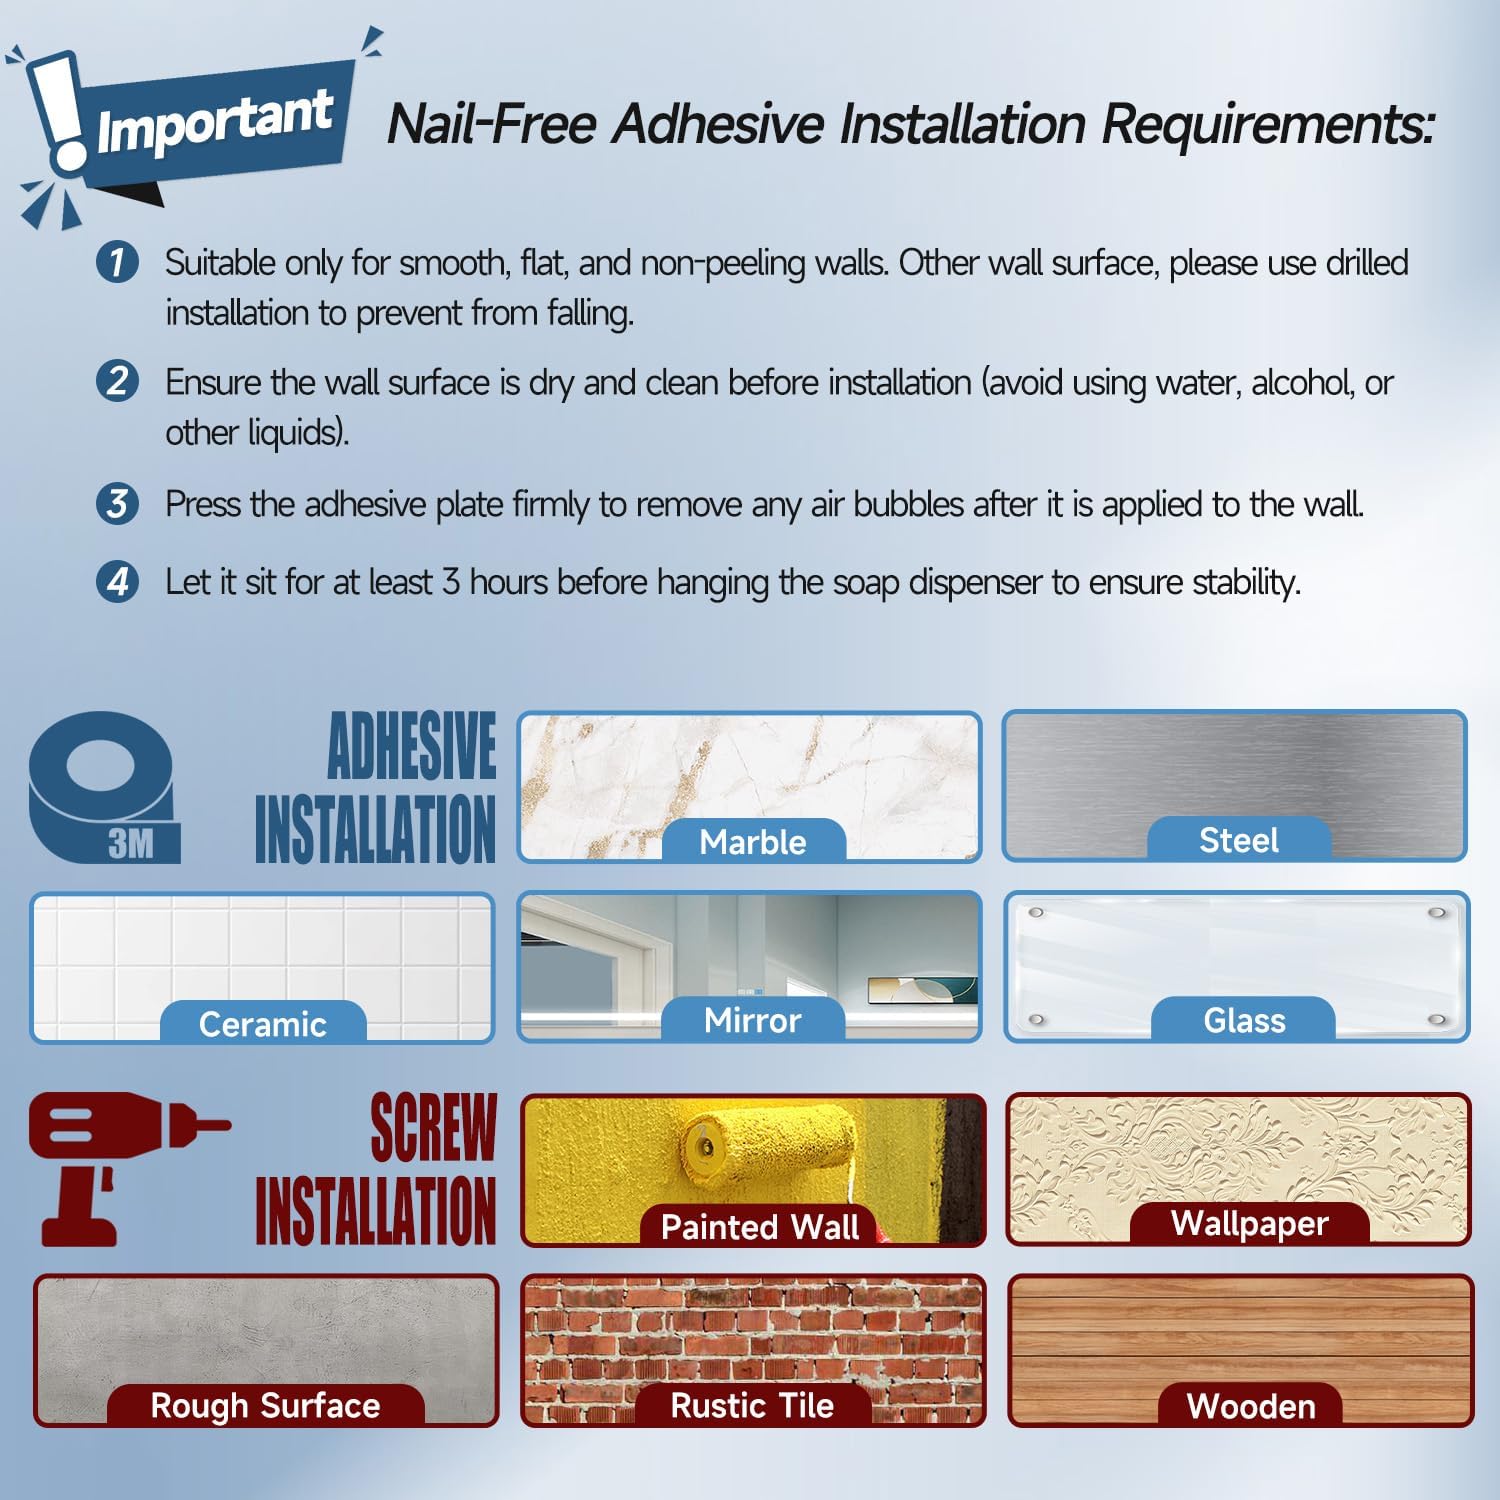
Image: A chart detailing suitable surfaces for adhesive installation (marble, steel, ceramic, mirror, glass) and screw installation (painted wall, wallpaper, rough surface, brick, rustic tile, wooden).
Drilled Installation (for Uneven or Peeling Surfaces):
- Mark the desired drilling points on the wall using the mounting plate as a template.
- Drill holes at the marked points.
- Insert the expansion anchors into the drilled holes.
- Align the mounting plate with the holes and secure it to the wall using the mounting screws.
- Slide the soap dispenser onto the mounted plate. For added security, use the safety screws provided.
Battery Installation:
The dispenser requires 4 AA batteries (not included).
- Locate the battery compartment, typically at the bottom or rear of the dispenser.
- Open the battery compartment cover.
- Insert 4 AA batteries, ensuring correct polarity (+/-).
- Close the battery compartment cover securely.

Image: A composite image demonstrating the process of unlocking the dispenser lid with the key, opening the lid for refilling, and installing AA batteries into the battery compartment.
Operating Instructions
Power On/Off:
Press and hold the control button for a few seconds until the blue light flashes to turn the dispenser on. Repeat the process to turn it off.
Dispensing Soap:
Place your hand under the sensor located at the bottom of the dispenser. The dispenser will automatically dispense a pre-set amount of liquid soap.
Adjusting Dispensing Volume:
The dispenser offers 5 adjustable dispensing levels. Briefly press the control button to cycle through the different volume settings. The indicator light may change or flash to indicate the current setting.
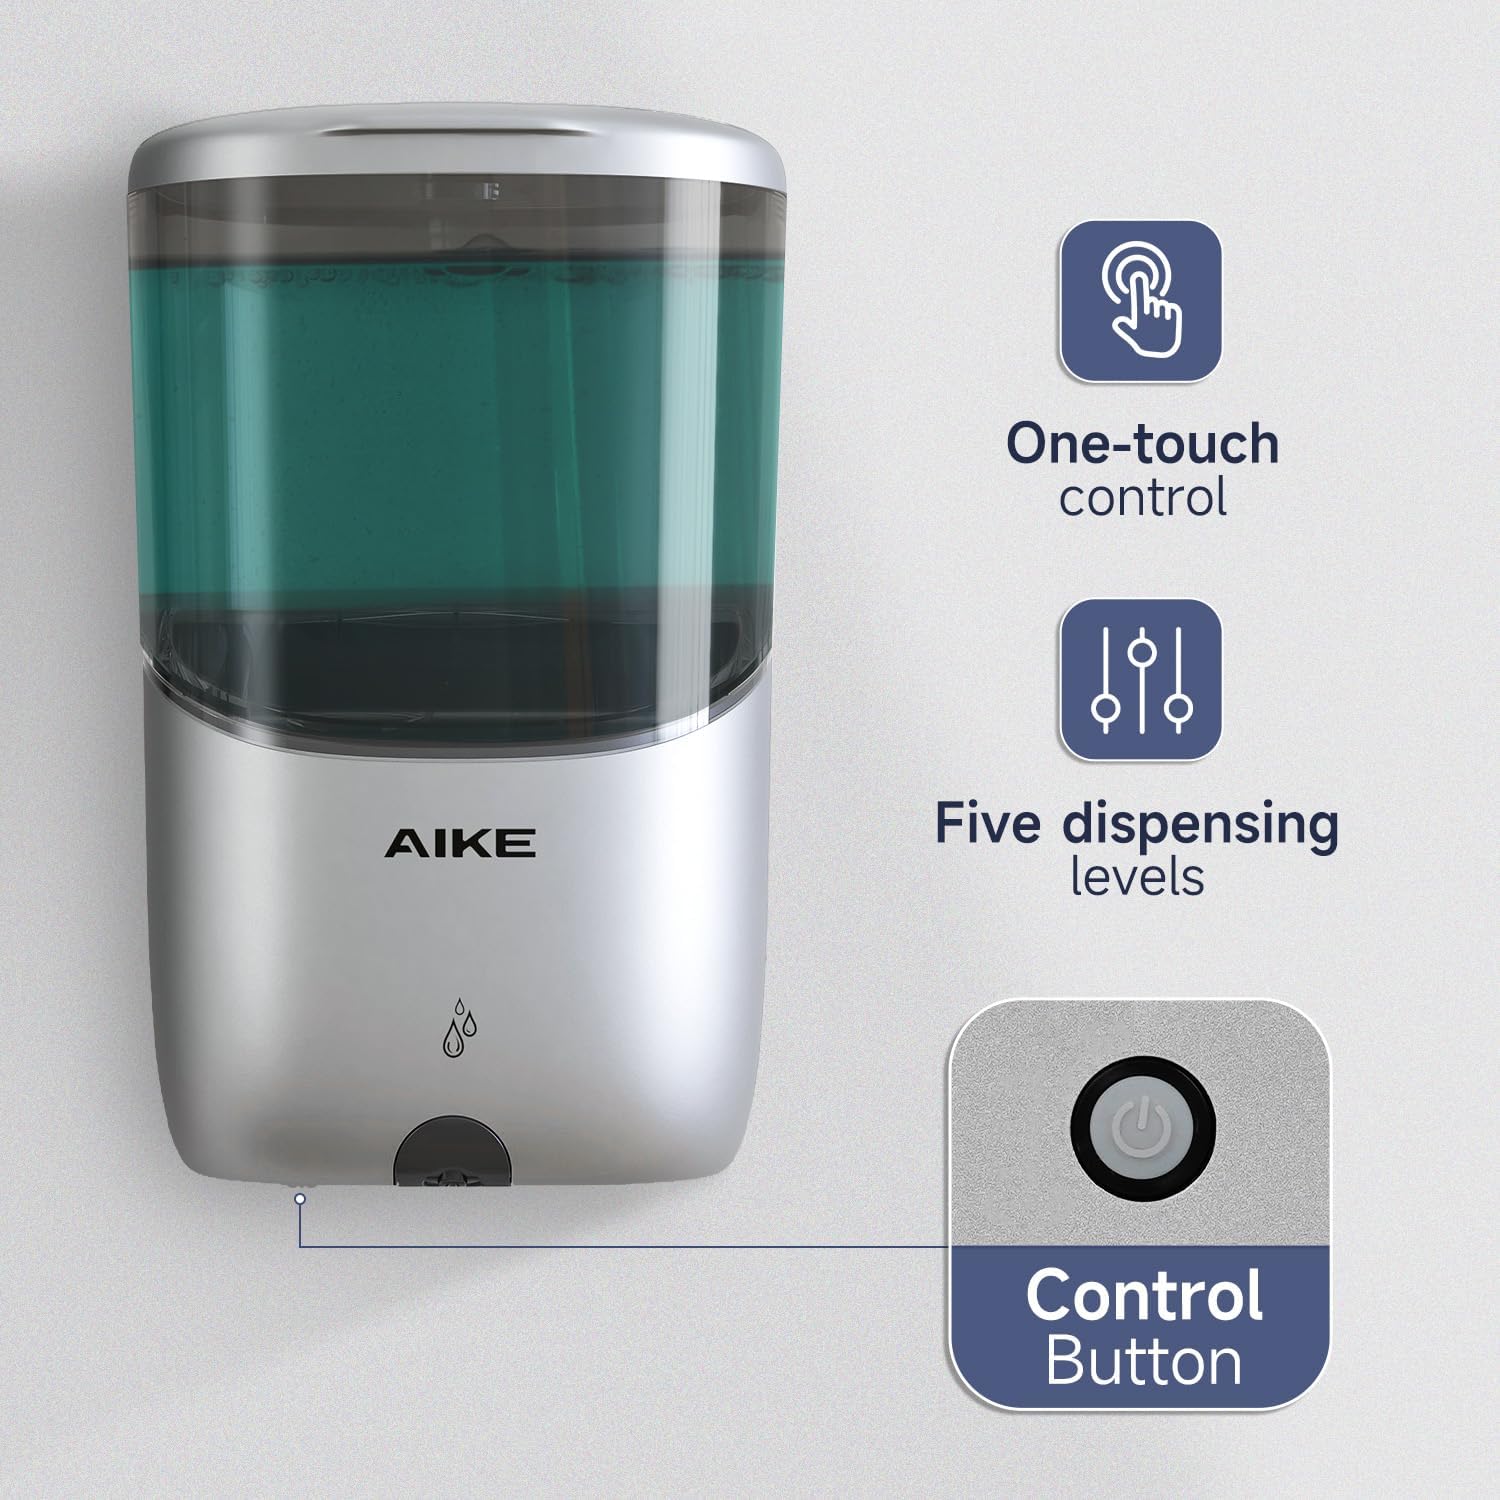
Image: A visual representation highlighting the control button on the dispenser and its functions, including one-touch control and the ability to select from five dispensing levels.
Maintenance
Refilling the Dispenser:
When the soap level is low, use the provided key to unlock the lid. The wide opening allows for easy and mess-free refilling. Securely lock the lid after refilling.
Image: A close-up view of the dispenser being refilled, highlighting its wide opening for easy pouring of liquid soap.
Cleaning:
Wipe the exterior of the dispenser with a soft, damp cloth. Avoid using abrasive cleaners or solvents that could damage the finish. Do not submerge the dispenser in water.
Battery Replacement:
When the dispensing performance decreases or the indicator light signals low battery, replace all 4 AA batteries. Follow the battery installation steps outlined in the Setup section.
Troubleshooting
| Problem | Possible Cause | Solution |
|---|---|---|
| Dispenser not working / No soap dispensed. | Low or dead batteries; Sensor obstructed; Soap reservoir empty; Soap too thick. | Replace batteries; Clean sensor area; Refill soap reservoir; Dilute soap with a small amount of water if too thick. |
| Adhesive mount failing / Dispenser falling. | Improper surface preparation; Surface not suitable for adhesive; Insufficient curing time. | Ensure wall is clean and dry before application; Use drilled installation for rough or peeling surfaces; Allow adhesive to cure for at least 3 hours before hanging. |
| Inconsistent dispensing volume. | Incorrect dispensing setting; Low battery. | Adjust dispensing level using the control button; Replace batteries. |
Specifications
| Attribute | Detail |
|---|---|
| Model Number | AK1216 |
| Color | Silver |
| Material | Acrylonitrile Butadiene Styrene (ABS) |
| Product Dimensions (L x W x H) | 4" x 4.45" x 5.7" (102mm x 113mm x 145mm) |
| Shape | Rectangular |
| Liquid Volume Capacity | Recommended 650 ml (22 fl. oz), Max 700 ml (24 fl. oz) |
| Power Source | 4 AA Batteries (not included) |
| Item Weight | 15.8 ounces |
| Manufacturer | Zhejiang AIKE Appliances Co., Ltd. |
| Date First Available | March 22, 2024 |
Warranty and Support
The AIKE Wall Mount Automatic Soap Dispenser (Model AK1216) comes with a one-year manufacturer warranty from the date of purchase.
For any questions, technical assistance, or warranty claims, please contact AIKE support via Amazon message or our official support email. We value your experience and are committed to providing prompt assistance.


