
1. Introduction
The UUQ Mini Reflex Green Dot Sight HD1088G is designed for precision aiming on rifles, pistols, and shotguns. It features a 2MOA green dot, 12 brightness adjustments, and shake awake technology for extended battery life. The sight is constructed from durable aircraft-grade aluminum and utilizes multi-coated lenses for a clear, bright, and unobstructed view.

Image 1.1: UUQ Mini Reflex Green Dot Sight HD1088G.
Key Features:
- Shake Awake Function: Automatically turns off after 2 minutes of inactivity and reactivates upon motion.
- RMR Footprint: Compatible with RMR/SRO and 407C/507C/508T red dot mounting plates. Includes a 20mm Picatinny rail mount.
- Multi-Coated Lenses: Enhances light transmission for a clear sight picture, 2MOA green dot for precision.
- 12-Level Brightness Adjustment: Allows selection of optimal brightness for various lighting conditions.
- Durable Construction: Aircraft-grade aluminum housing for recoil resistance and field use.
2. Setup
2.1 Mounting the Sight
The UUQ Mini Reflex Green Dot Sight is designed for compatibility with RMR footprint mounting plates/slides/cuts and includes a 20mm Picatinny mount base. Ensure your firearm's slide cut or mounting plate is compatible before installation.

Image 2.1: RMR footprint and Picatinny mount compatibility.
Important Installation Tips:
- Confirm your pistol slide cut is compatible with an RMR footprint. Incorrect slide cuts cannot be used.
- If an adapter plate is required, follow the adapter manufacturer's installation instructions.
- Use blue thread locker and apply reasonable inch-pound torque specifications to ensure the red dot maintains zero. Improper torque can lead to loss of zero.

Image 2.2: Visual guide for installation tips.
Pistol Compatibility (RMR Adapter Plate Not Included):
The following pistols are compatible when using an RMR adapter plate (not included) or RMR-ready slides:
| Brand | Compatible Models |
|---|---|
| Glock | Full Size MOS Models (G17, G19, G20, G21, G22, G23, G26, G34, G35, G40, G41, G45). Excludes Slimline models (G43X, G48). |
| Springfield | 1911 DS Prodigy, Echelon, Hellcat Pro, XD-M Elite, XD-S Mod2. |
| Canik | TP9 Elite, Elite SC, SFx, SF METE-S, SFx RIVAL-S, TTI COMBAT. |
| Taurus | G3/G3C T.O.R.O., GX4 T.O.R.O., GX4XL T.O.R.O., TX 22 Competition, TX22 T.O.R.O. |
| Beretta | 92X RDO Optics Ready, APX A1. |
| FN | 502, 509, 510, 545 MRD, 502, 509, 510, 545 Tactical, FNX-45 Tactical. |
| IWI | Masada, Masada Tactical. |
| Shadow Systems | MR920, MR920L, XR920, DR920, DR920P. |
| Palmetto State Armory | PSA Dagger, Palmetto Dagger, Palmetto Sabre Dagger. |
| Tisas | PX-9 GEN3. |
| Staccato | CS, P, C2, XC, C, XL Optic Ready. |
| Walther | WMP, PDP, Q4, Q5. |
| Anderson Manufacturing | Kiger-9c Pro. |
| Bul Armory | EDC, TAC, SPITFIRE, BULLESTEROS, UR, BLAZE, RADICAL, S0F, AXE. |
| AREX | Delta Gen 2, Zero 1 TC, T. |

Image 2.3: Pistol compatibility list (Part 1).

Image 2.4: Pistol compatibility list (Part 2).
Mounting Screws:
The sight comes with various screw sizes to fit most pistols. Select the appropriate screws for your specific mounting application.

Image 2.5: Included mounting screw sizes.
2.2 Battery Installation
The sight requires 1 C battery (included). To install or replace the battery, locate the battery compartment, typically on the side or top of the sight. Use a small tool to open the compartment, insert the battery with the correct polarity, and secure the cover.
3. Operating Instructions
3.1 Power On/Off and Brightness Adjustment
The sight features two buttons, typically marked with "▲" (up) and "▼" (down), for power control and brightness adjustment.
- Power On: Press either the "▲" or "▼" button briefly to turn on the sight.
- Brightness Adjustment: Press the "▲" button to increase brightness or the "▼" button to decrease brightness. There are 12 levels of brightness adjustment.
- Manual Power Off: To manually turn off the sight, press and hold either the "▲" or "▼" button for 3 seconds.
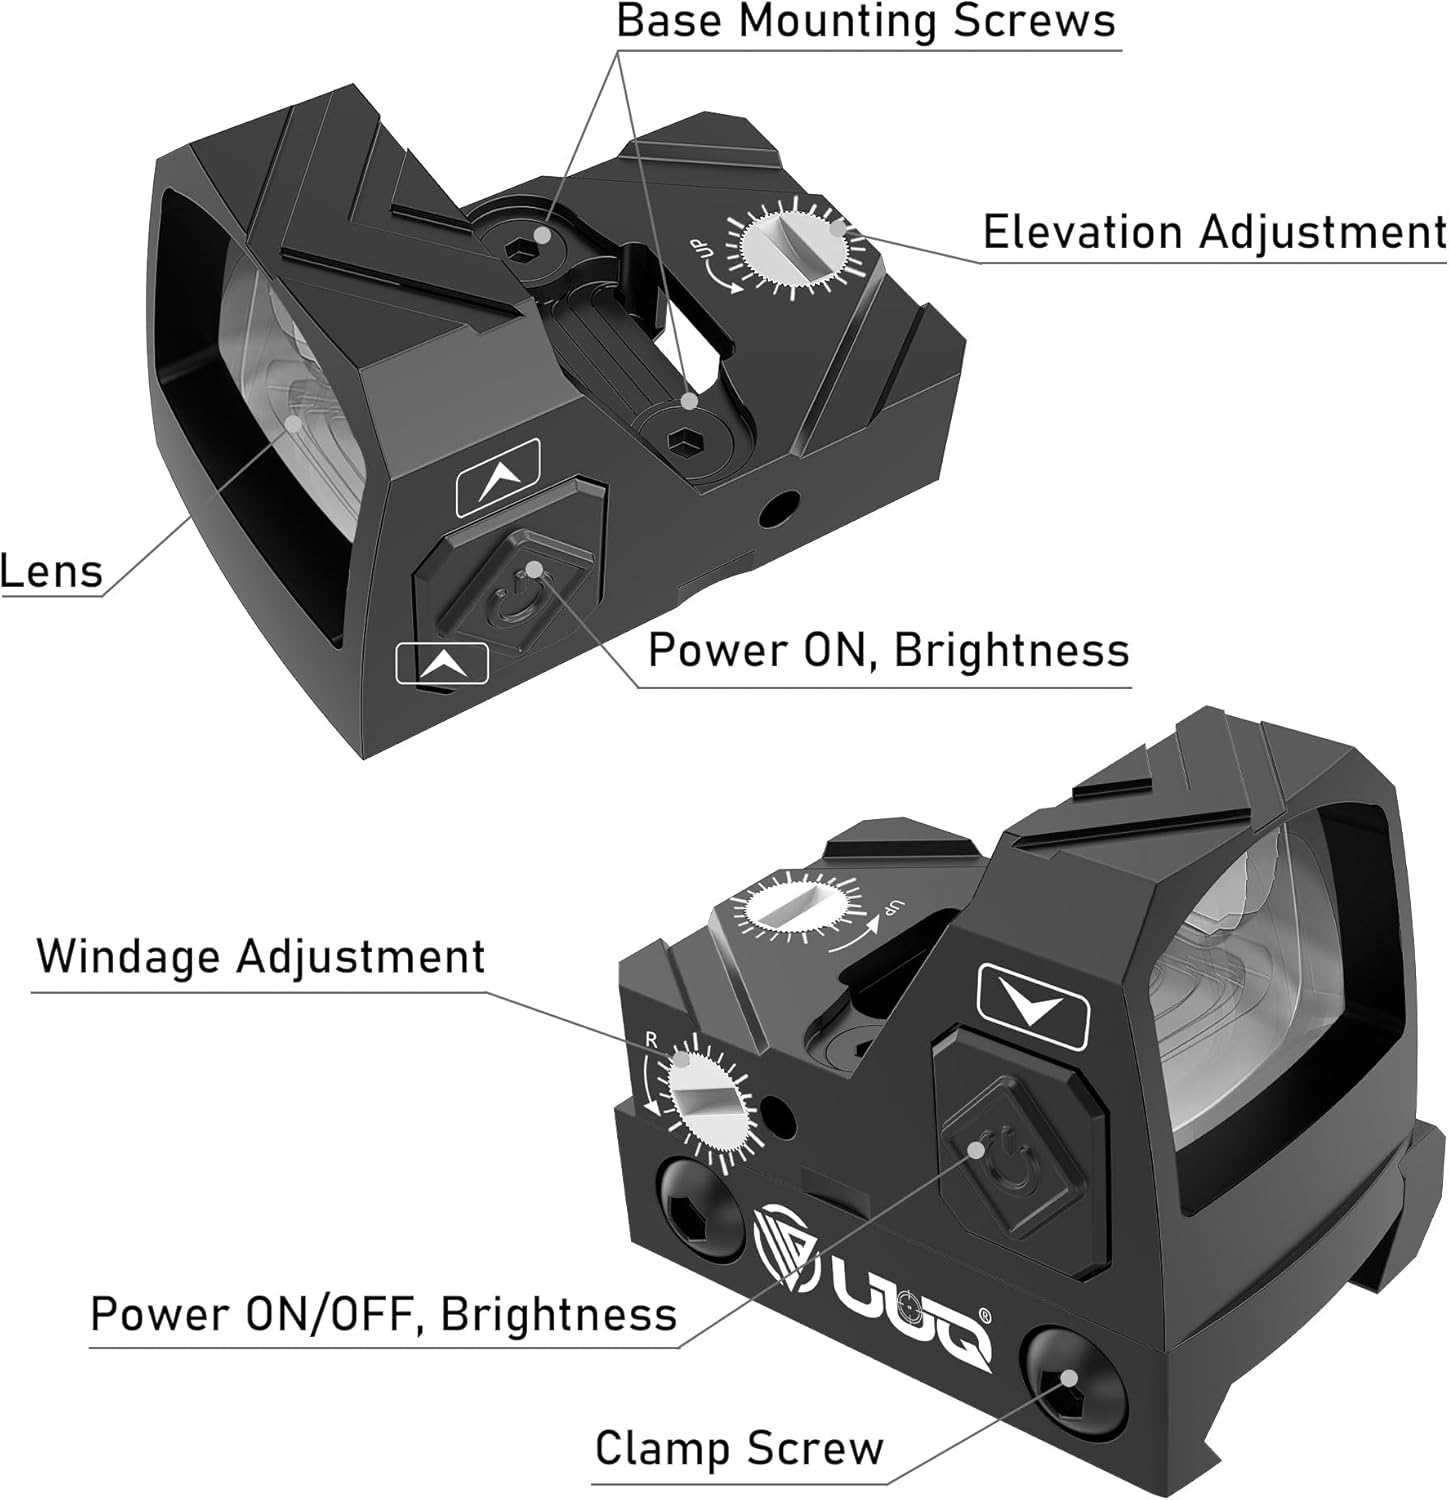
Image 3.1: Sight controls for power, brightness, and adjustments.
3.2 Shake Awake Function
The sight is equipped with a shake awake feature to conserve battery life. If no motion is detected for 2 minutes, the green dot will automatically turn off and enter sleep mode. Any slight shake or touch will automatically reactivate the green dot to its previous brightness setting.

Image 3.2: Shake Awake function demonstration.
3.3 Windage and Elevation Adjustment
The sight features detent windage and elevation adjustments, allowing for precise zeroing. Each click typically represents 1 MOA (Minute of Angle) adjustment.
- Elevation Adjustment: Use a small flat-head screwdriver or the included tool to turn the elevation adjustment screw (usually located on the top of the sight). Turning clockwise or counter-clockwise will move the point of impact up or down.
- Windage Adjustment: Use a small flat-head screwdriver or the included tool to turn the windage adjustment screw (usually located on the side of the sight). Turning clockwise or counter-clockwise will move the point of impact left or right.
Always perform adjustments carefully and test fire to confirm zero.
4. Maintenance
4.1 Cleaning
- Lenses: Use a soft, clean lens cloth and optical cleaning solution to gently wipe the lenses. Avoid abrasive materials that could scratch the multi-coated surfaces.
- Housing: Wipe the aluminum housing with a damp cloth to remove dirt and debris. Avoid harsh chemicals.
4.2 Storage
When not in use, store the sight in a dry, cool place, preferably in its protective case. Remove the battery if storing for extended periods to prevent leakage.
5. Troubleshooting
- Dot Not Appearing:
- Ensure the sight is powered on by pressing a button.
- Check battery orientation and charge level. Replace if necessary.
- If in sleep mode, gently shake the sight to activate the shake awake function.
- Dot Appears Dim:
- Increase brightness using the "▲" button.
- Replace the battery if brightness does not improve.
- Loss of Zero:
- Check mounting screws for tightness. Ensure they are torqued to manufacturer specifications.
- Verify the mounting plate or rail is secure.
- Re-zero the sight.
- Dot Appears Distorted/Star-shaped:
- This can sometimes be an astigmatism issue with the user's eye, not the sight. Try looking through the sight with a different eye or through a camera.
- Ensure lenses are clean.
6. Specifications
| Feature | Detail |
|---|---|
| Reticle Type | Green Dot |
| Dot Size | 2 MOA |
| Brightness Settings | 12 Levels |
| Shake Awake Function | Yes (2 minutes inactivity to sleep) |
| Mounting Type | RMR Footprint, Picatinny Mount (included) |
| Compatible Devices | Rifle, Pistol, Shotgun |
| Material | Aircraft-grade Aluminum |
| Color | Black |
| Item Weight | 45 Grams |
| Product Dimensions (L x W x H) | 43L x 28W x 28H millimeters |
| Battery Type | 1 C battery (included) |
| Shock Resistance | 800G |

Image 6.1: Product dimensions.

Image 6.2: Window size comparison.
7. Warranty and Support
7.1 Warranty Information
The UUQ Mini Reflex Green Dot Sight HD1088G comes with a 1-year warranty from the date of purchase. This warranty covers manufacturing defects under normal use. Please retain your proof of purchase for warranty claims.
7.2 Customer Support
For technical assistance, warranty claims, or any questions regarding your UUQ product, please contact UUQ customer support through the retailer where the product was purchased or refer to the manufacturer's official website for contact information.