
1. Introduction
This manual provides comprehensive instructions for the safe and effective use of the WOYO PDR Kits Slide Hammer Puller Dent Removal Tool. This kit is designed for the removal of dents from various metal surfaces, including auto body panels, using a slide hammer and cold glue technology. Please read this manual thoroughly before operation to ensure proper usage and to prevent damage to the tool or the vehicle.
1.1. Package Contents
The WOYO PDR Kits Slide Hammer Puller Dent Removal Tool package typically includes the following components:
- Slide Hammer
- 3 Pieces Tabs (various sizes/shapes)
- Cold Glue

Figure 1.1: The WOYO PDR Kit, showing the slide hammer, cold glue, and three steel tabs, all contained within the product packaging.
2. Safety Information
Always observe the following safety precautions when using the WOYO PDR Kit:
- Wear appropriate personal protective equipment (PPE), such as safety glasses, to protect against potential debris.
- Ensure the work area is well-lit and free from obstructions.
- Keep children and bystanders away from the work area.
- Do not use the tool for purposes other than dent removal.
- Handle the cold glue with clean hands. Avoid contact with eyes and mouth.
- Do not overheat the tabs or the dented surface. Excessive heat can damage the vehicle's paint or material.
- Store the tool and components in a dry, secure place, out of reach of children.
3. Setup
Before beginning the dent removal process, ensure all components are ready and the work surface is prepared.
3.1. Tool Assembly
- Select the appropriate tab size and shape for the dent you intend to repair. The kit includes three different steel tabs.
- Attach the chosen tab to the end of the slide hammer puller. Ensure it is securely fastened.

Figure 3.1: The WOYO slide hammer puller with various steel tabs and an adapter connector. The handle is designed for increased friction and comfortable grip.

Figure 3.2: Close-up view of the slide hammer's handle design, highlighting the textured grip for improved friction and user comfort during operation.

Figure 3.3: The adapter connector, which allows the slide hammer to fit most styles and sizes of PDR tabs available on the market. Dimensions are provided for reference.
3.2. Surface Preparation
- Clean the dented area thoroughly. Ensure the surface is free from dirt, grease, wax, or any other contaminants. A clean surface is crucial for proper cold glue adhesion.
- Clean your fingers before handling the cold glue to prevent contamination.
- Heat the selected tab and the dented area slightly. This can be done using a heat gun or hairdryer. The temperature of the cold glue should remain below 86°F / 30°C. Do not overheat the glue directly, and avoid overheating the tabs and dent excessively, as this can damage the paint.

Figure 3.4: Illustration of preparing the cold glue and tabs. It shows cleaning and heating the tabs before applying the cold glue, and cleaning and heating the dented surface before using the slide hammer. Emphasizes not to overheat the cold glue directly.

Figure 3.5: Display of the three included steel tabs and a block of cold glue, highlighting their reusable and portable nature.
4. Operating Instructions
Follow these steps carefully to effectively remove dents using the WOYO PDR Kit.
- Apply Cold Glue: After heating the tab and the dent, stick a sufficient amount of cold glue onto the chosen tab.
- Attach to Dent: Firmly press the tab with the cold glue onto the center of the dent. Ensure good contact and allow the glue to adhere for a few moments.
- Pull the Dent: Hold the slide hammer firmly. Slide the weight towards the handle, then quickly slide it back towards the tab, allowing the weight to impact the stop. This action creates the pulling force.
- Repeat as Necessary: Repeat the pulling action multiple times, checking the dent's progress after each series of pulls. For larger or more stubborn dents, you may need to reposition the tab or apply more glue.
- Remove Tab: Once the dent is sufficiently pulled, gently twist or pry the tab off the surface. The cold glue should detach cleanly.
- Clean Residue: Any remaining cold glue residue on the vehicle surface can be easily removed by hand or with a soft cloth. The cold glue is reusable.

Figure 4.1: A visual step-by-step guide on how to use the WOYO PDR100 tool, from choosing and installing tabs, cleaning and heating, to pulling the dent and finishing the repair. It also mentions other repair tools if the dent cannot be fully repaired.
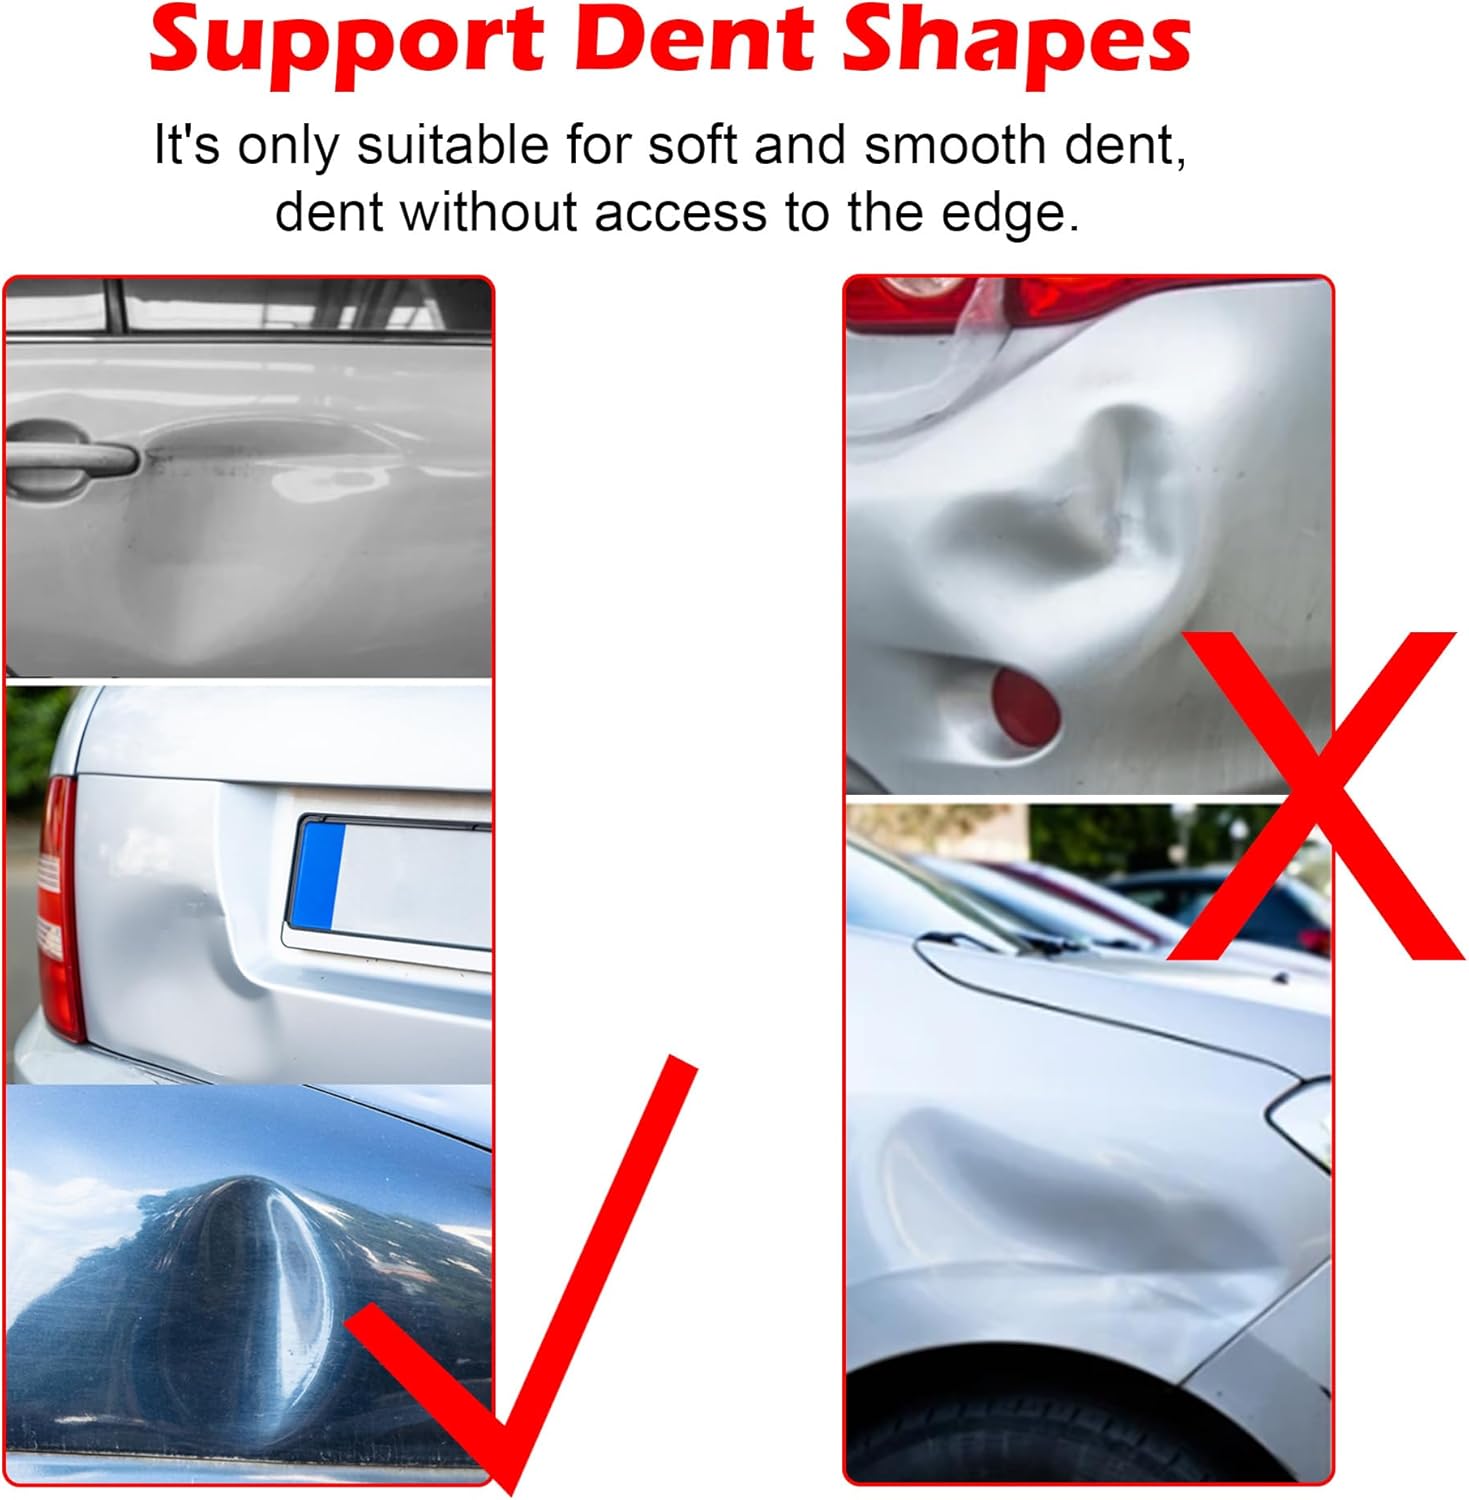
Figure 4.2: Illustrates the types of dents that are suitable for repair with the PDR100 tool. It is primarily effective for soft and smooth dents that do not extend to the edge of the panel. Examples of suitable and unsuitable dents are shown.
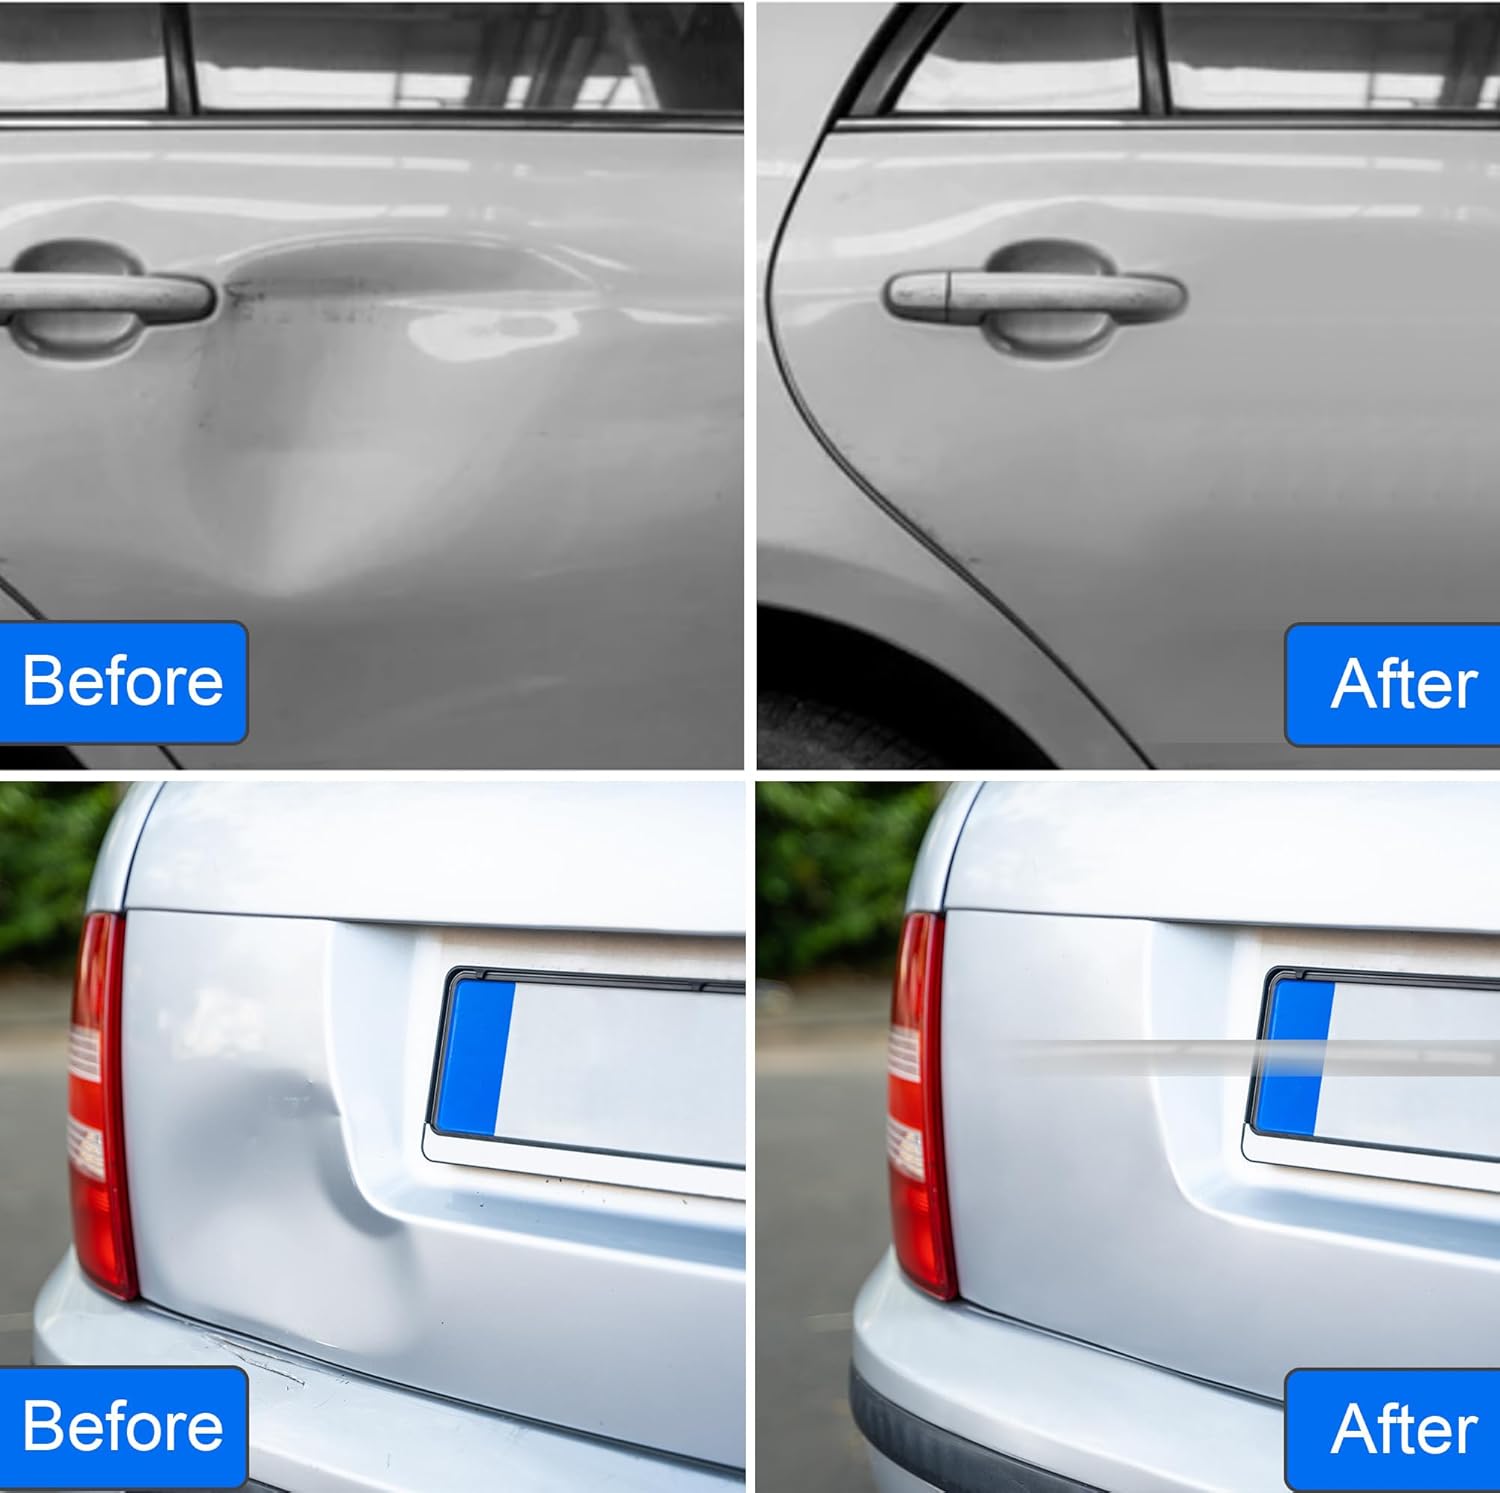
Figure 4.3: Demonstrates the effectiveness of the dent removal process with "Before" and "After" images of vehicle body panels, showing significant improvement in dent appearance.
5. Maintenance
Proper maintenance ensures the longevity and effectiveness of your WOYO PDR Kit.
- Cleaning: After each use, clean any cold glue residue from the tabs and the slide hammer. A soft cloth is usually sufficient.
- Cold Glue Storage: The cold glue can be reused. Store it in a clean, cool, and dry place, away from direct sunlight and extreme temperatures, to maintain its properties.
- Tool Storage: Store the slide hammer and tabs in their original packaging or a suitable tool case to protect them from damage and dust.
- Inspection: Periodically inspect the slide hammer and tabs for any signs of wear or damage. Replace components if they are compromised to ensure safe and effective operation.
6. Troubleshooting
This section addresses common issues you might encounter during operation.
| Problem | Possible Cause | Solution |
|---|---|---|
| Cold glue not sticking to the dent. | Surface is not clean; insufficient heating of tab/dent; glue too cold. | Thoroughly clean the dented area and your fingers. Ensure the tab and dent are slightly warmed (below 86°F / 30°C) before applying glue. |
| Dent not pulling out effectively. | Insufficient pulling force; incorrect tab size/shape; dent type not suitable for cold glue method. | Increase pulling force by sliding the hammer more vigorously. Try a different tab size or shape. Note that this tool is best for soft, smooth dents not on edges. For complex dents, other PDR tools may be required. |
| Tab detaches prematurely. | Poor adhesion; excessive force. | Re-clean and re-heat the surface and tab. Apply fresh cold glue. Ensure firm, even pressure when attaching the tab. Apply consistent, controlled pulling force. |
| Residue left on vehicle after removal. | Normal for cold glue. | The cold glue is designed to be easily removed. Simply rub off any residue with your fingers or a soft cloth. |
7. Specifications
| Feature | Detail |
|---|---|
| Brand | WOYO |
| Model | PDR100 |
| Item Weight | 2.18 pounds |
| Package Dimensions | 12.95 x 4.65 x 2.52 inches |
| Manufacturer Part Number | PDR-100 |
| Application | Sheet metal processing, auto body dent removal, hail damage repair (steel, aluminum, other metal auto body) |
| Glue Type | Cold Glue (reusable, no heating required for glue itself) |
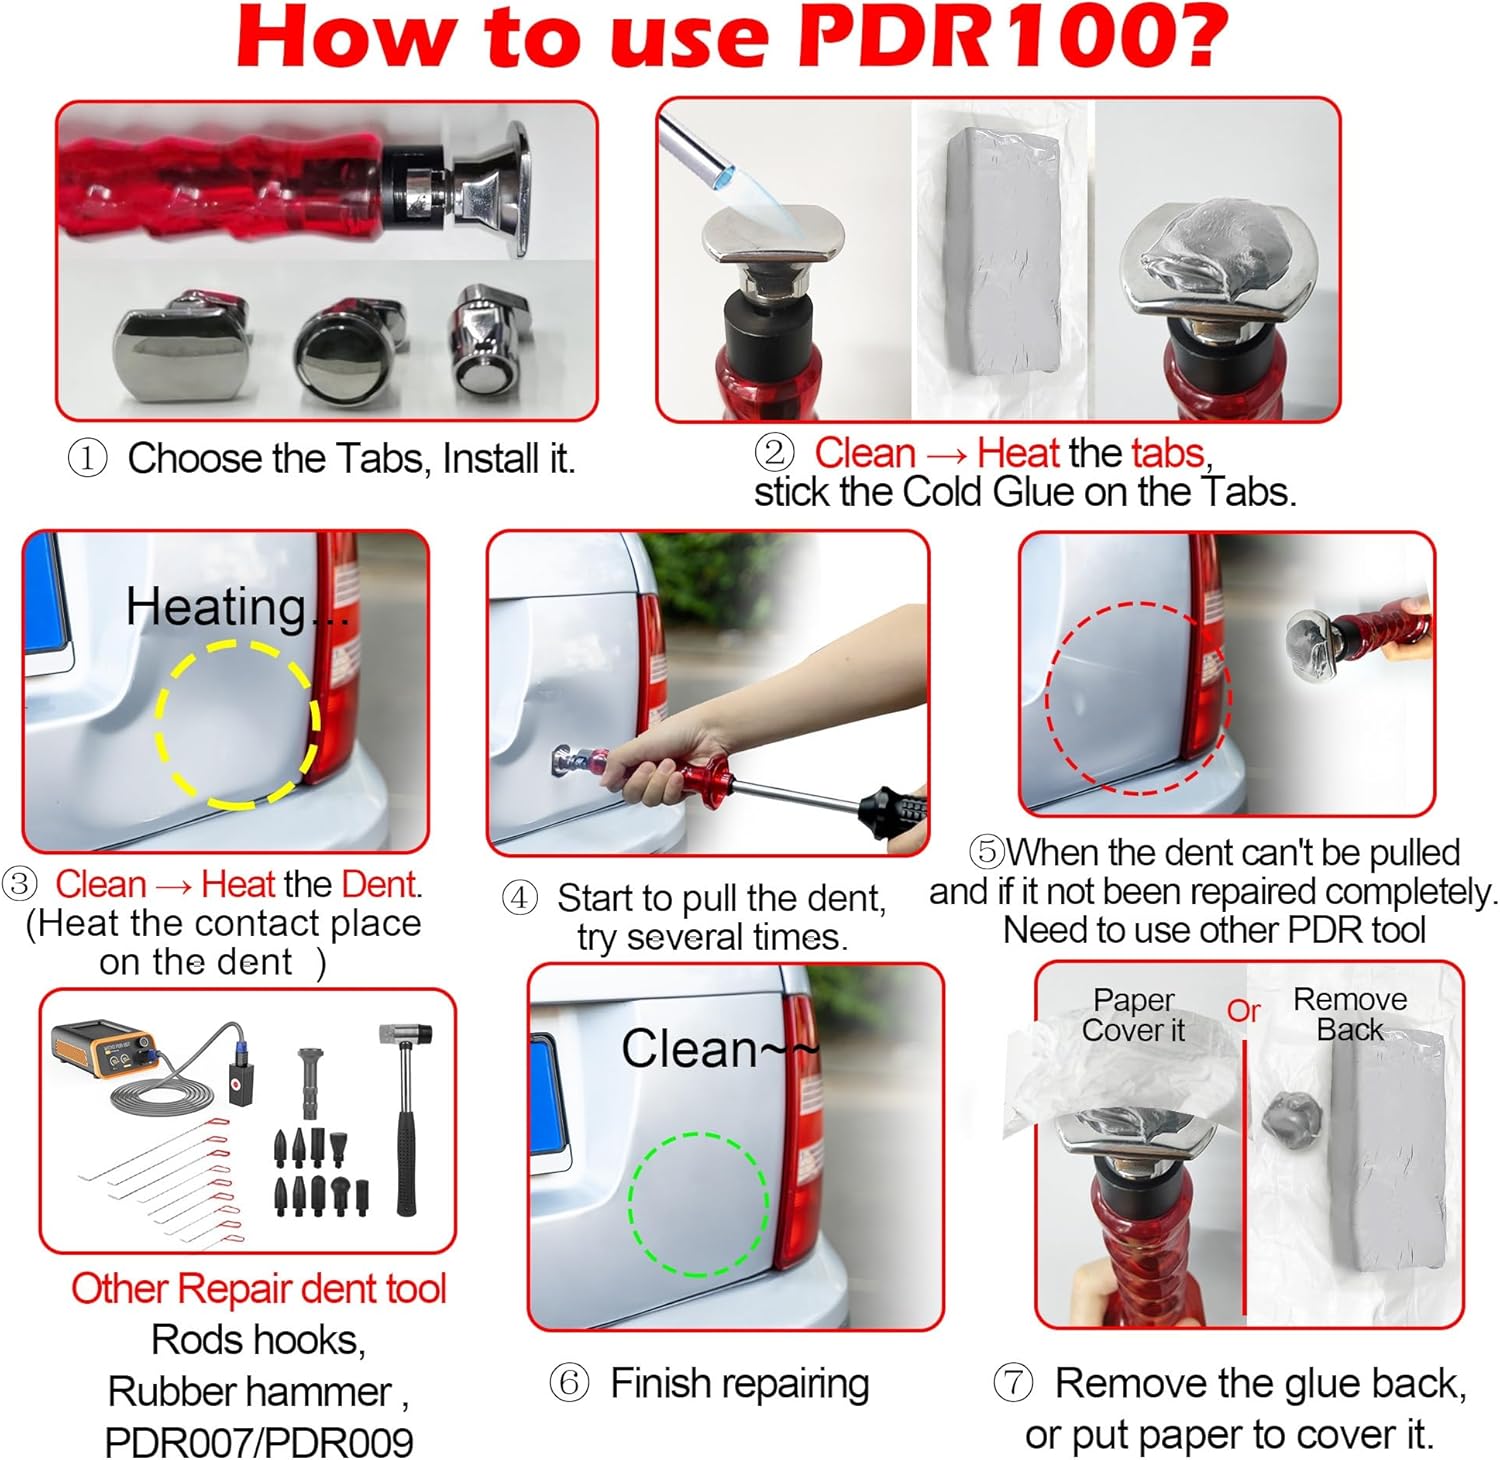
Figure 7.1: Detailed dimensions of the WOYO PDR100 slide hammer and the included tabs, providing measurements in both centimeters and inches for user reference.
8. Warranty and Support
For warranty information, technical support, or any inquiries regarding your WOYO PDR Kit, please contact WOYO customer service through their official channels. You can find more information and contact details on the WOYO Store on Amazon or their official website.
