1. Introduction
This instruction manual provides essential information for the safe installation, operation, and maintenance of your Ledvion GU10 4-Light Adjustable LED Spot Ceiling Light. Please read this manual thoroughly before installation and keep it for future reference. This product is designed for indoor use only and features four adjustable spotlights with GU10 fittings, offering flexible and energy-efficient lighting.
2. Safety Information
- Electrical Safety: Always disconnect the main power supply at the circuit breaker before attempting any installation, maintenance, or bulb replacement.
- Qualified Installation: If you are unsure about electrical installations, consult a qualified electrician.
- Voltage: Ensure the power supply voltage matches the product's specified voltage (230 Volts).
- Indoor Use: This product is intended for indoor use only. Do not expose it to moisture or outdoor elements.
- Bulb Type: Use only GU10 LED bulbs. Do not exceed the maximum wattage specified for GU10 fittings.
- Heat: Allow bulbs to cool completely before handling or replacing.
3. What's in the Box
Verify that all components are present before beginning installation.

Image: Contents of the product packaging.
- 1x Ledvion GU10 4-Light Adjustable LED Spot Ceiling Light
- 2x Screw wall plugs
- 2x Screws
- 1x Instruction Manual
Note: GU10 LED bulbs are not included and must be purchased separately.
4. Specifications
| Feature | Detail |
|---|---|
| Brand | Ledvion |
| Model Number | LV10067 |
| Product Dimensions (L x W x H) | 23L x 23W x 13H centimeters (Fixture: 220 x 220 x 25 mm) |
| Item Weight | 1200 Grams |
| Color | Black |
| Material | Metal |
| Style | Modern |
| Fixture Shape | Ceiling Spotlight |
| Room Type | Living Room (General Indoor Use) |
| Indoor/Outdoor Use | Indoor |
| Power Source | Electric |
| Special Features | Dimmable (with compatible bulbs/switch) |
| Control Method | Touch (Implies external dimmer compatibility) |
| Bulb Type | LED (GU10 base) |
| Number of Bulbs | 4 |
| Voltage | 230 Volts |
| Light Color | White (Dependent on bulb) |
| Bulb Base | GU10 |
| Switch Type | Dimmer switch compatible |
| Water Resistance Level | Not waterproof |
| Mounting Type | Ceiling Mount, Semi-flush mount |
| Assembly Required | Yes |
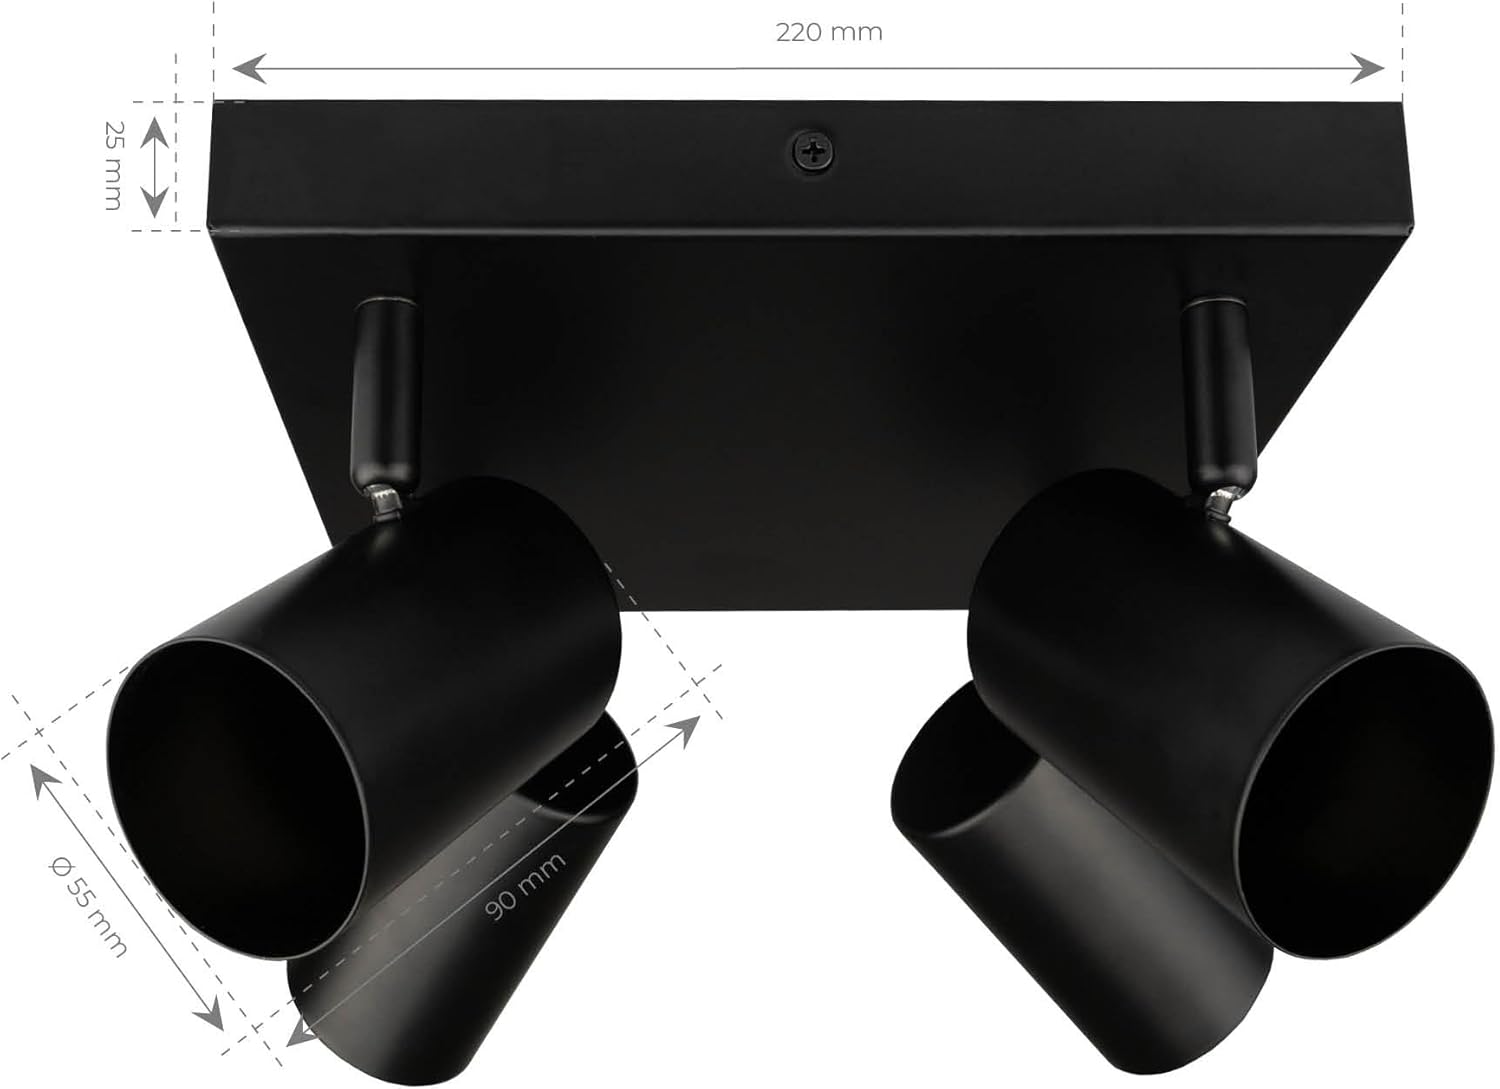
Image: Product dimensions diagram.

Image: EU Energy Label. For more details, visit EPREL Database.
5. Setup and Installation
The Ledvion ceiling light is designed for easy installation. Follow these steps carefully.

Image: Quick installation bracket and wiring.
- Prepare for Installation: Ensure the main power supply to the installation area is switched off at the circuit breaker.
- Mount the Bracket: Position the supplied mounting bracket on the ceiling where you intend to install the light. Mark the drilling points. Drill holes and insert the provided wall plugs. Secure the bracket to the ceiling using the supplied screws.
- Wire Connections: Carefully connect the electrical wires from your ceiling to the terminal block on the light fixture. Ensure correct polarity (Live, Neutral, Ground) and that all connections are secure.
- Attach the Fixture: Align the light fixture with the mounted bracket and secure it in place.
- Install GU10 Bulbs: Insert your GU10 LED bulbs (not included) into each of the four GU10 fittings. Gently push and twist the bulb until it is securely seated.
- Restore Power: Once installation is complete and all connections are secure, restore power at the main circuit breaker.
6. Operating Instructions
This Ledvion ceiling light is designed for straightforward operation and flexible lighting control.

Image: Adjustable and rotatable spotlight head.
- Turning On/Off: Use your standard wall switch to turn the light fixture on or off.
- Adjusting Spotlights: Each of the four spotlights can be individually adjusted. They can be tilted up to 90 degrees and rotated up to 350 degrees. Gently move the spotlight heads to direct the light to your desired area.
- Dimming (Optional): If you have installed dimmable GU10 LED bulbs and connected the fixture to a compatible dimmer switch, you can adjust the light intensity using the dimmer control.

Image: GU10 fitting compatibility.
7. Maintenance
- Cleaning: Always disconnect power before cleaning. Use a soft, dry cloth to wipe the fixture. Do not use abrasive cleaners, solvents, or harsh chemicals, as these can damage the finish.
- Bulb Replacement: Ensure the power is off and the bulbs have cooled down completely. To remove a GU10 bulb, gently push it in and twist counter-clockwise. To install a new GU10 bulb, align the pins with the slots in the fitting, push gently, and twist clockwise until it is secure.
- Inspection: Periodically check the fixture for any signs of damage or loose connections. If any issues are found, disconnect power and address them immediately.
8. Troubleshooting
| Problem | Possible Cause | Solution |
|---|---|---|
| Light does not turn on | No power supply Loose wiring connection Faulty bulb Bulb not properly installed | Check circuit breaker. Verify all wire connections are secure (ensure power is off). Replace bulb with a known working one. Ensure GU10 bulb is fully pushed in and twisted into the fitting. |
| Light flickers | Incompatible dimmer switch/bulb Loose bulb connection Fluctuating power supply | Ensure dimmable bulbs are used with a compatible LED dimmer. Re-seat the bulb firmly. Consult an electrician if power supply issues persist. |
| Difficulty installing bulbs | Bulb pins not aligned Excessive force applied | Ensure the bulb pins are correctly aligned with the GU10 fitting slots before pushing and twisting. Apply gentle, firm pressure. Do not force the bulb. |
9. Warranty and Support
Ledvion products are manufactured to high-quality standards. For information regarding warranty coverage, technical support, or replacement parts, please contact Ledvion customer service through your retailer or the official Ledvion website.
Please retain your proof of purchase for warranty claims.


