
1. Introduction
This manual provides comprehensive instructions for the installation, operation, and maintenance of your VIMAR K42910 Single-Family Video Door Entry Kit. Please read this manual thoroughly before installation and use to ensure proper functionality and safety.
1.1. Product Overview
The VIMAR K42910 is a complete video door entry system designed for single-family homes. It features a modern design, a clear 7-inch color display, and advanced functionalities like RFID access control and intercommunicating units.

Figure 1: The VIMAR K42910 kit, including the indoor monitor, outdoor panel, and product packaging.
1.2. What's in the Box
Your VIMAR K42910 kit includes the following components:
- 1 x Hands-free color LCD 7" monitor with capacitive keypad
- 1 x RFID audio-video outdoor panel with 1 button and rain frame
- 1 x Power supply 24 Vdc 1A with interchangeable standard European, British, American, and Australian plugs
- Wall mounting brackets

Figure 2: Detailed view of the kit's components: indoor monitor, outdoor panel, power supply unit, and various international plug adapters.
2. Key Features
The VIMAR K42910 system offers a range of features designed for convenience and security:
- Expandability: The system can be expanded to include up to 3 indoor monitors and 2 outdoor panels.
- Intercom Functionality: Allows for communication between internal units within the same housing unit.
- 7-inch LCD Monitor: A clear, color display for viewing visitors.
- Capacitive Keypad: Soft-touch keypad for intuitive operation.
- RFID Access Control: The outdoor panel includes RFID functionality for convenient access (keys not included).
- Durable Outdoor Panel: Made from anodized aluminum with an IP54 protection rating (dust and splash resistant) and IK07 impact resistance.
- Auxiliary Services: Supports connection to a door open push button for lock and auxiliary service control.

Figure 3: This diagram highlights the main functionalities and specifications of the system, such as expandability, intercom capabilities, 7-inch LCD monitor, capacitive keypad, 130° wide-angle camera, RFID access control, IP54/IK07 protection rating, and connectivity options.
3. Setup and Installation
Proper installation is crucial for the optimal performance of your video door entry system. It is recommended that installation be performed by a qualified technician.
3.1. Mounting the Outdoor Panel
Select a suitable location for the outdoor panel, typically near your main entrance. Ensure it is at an appropriate height for visitors to use comfortably and for the camera to capture faces clearly. Use the provided mounting brackets for secure installation. The panel is designed for surface mounting and includes an optional rain guard (not included in all kits).

Figure 4: The outdoor panel of the video door entry system shown mounted on an exterior wall, providing a clear view of the entrance area.
3.2. Mounting the Indoor Monitor
Install the indoor monitor in a convenient location within your home, such as a hallway or living area. Ensure it is easily accessible and visible. Use the provided wall mounting brackets for secure attachment.

Figure 5: The 7-inch indoor monitor displayed mounted on an interior wall, ready for use within the home.
3.3. Wiring
The system uses a 2-wire connection for communication between the outdoor panel and the indoor monitor. Connect the power supply to a suitable electrical outlet using the appropriate interchangeable plug. Follow the wiring diagrams provided in the full technical manual for detailed connection instructions. Ensure all connections are secure and correctly polarized.
Important: The maximum distance between the outdoor station and the furthest indoor station is 100 meters. Always use prescribed cables for optimal performance.
4. Operation
4.1. Receiving a Call
When a visitor presses the call button on the outdoor panel, the indoor monitor will ring and display the visitor's image. To answer the call, touch the appropriate icon on the monitor's capacitive keypad.
4.2. Opening the Door
During a call or when monitoring the outdoor panel, touch the door unlock icon on the monitor to open the connected electric lock. The system also supports connection to an auxiliary door open push button.
4.3. RFID Access Control
The outdoor panel features an integrated RFID reader. Present a pre-programmed RFID key fob (not included) to the designated area on the outdoor panel to unlock the door without needing to use the indoor monitor.
4.4. Intercom Function
If multiple indoor monitors are installed within the same housing unit, you can use the intercom function to communicate between them. Refer to the full technical manual for specific instructions on initiating and receiving intercom calls.
4.5. Monitoring
You can manually activate the outdoor camera view from the indoor monitor at any time to see what is happening outside your door, even without a visitor pressing the call button.
5. Maintenance
To ensure the longevity and optimal performance of your VIMAR K42910 system, follow these maintenance guidelines:
- Cleaning: Use a soft, damp cloth to clean the indoor monitor and outdoor panel. Avoid abrasive cleaners, solvents, or harsh chemicals that could damage the surfaces.
- Outdoor Panel: Periodically check the outdoor panel for any obstructions to the camera or microphone. Ensure the rain frame (if installed) is clear of debris.
- Connections: Regularly inspect wiring connections for any signs of wear or corrosion, especially in outdoor environments.
- Software Updates: Check the VIMAR website for any available firmware updates for your system.
6. Troubleshooting
If you encounter issues with your VIMAR K42910 kit, refer to the following common problems and solutions:
| Problem | Possible Cause | Solution |
|---|---|---|
| No image on indoor monitor | Power supply issue, loose wiring, camera malfunction. | Check power connection. Verify all wiring connections are secure. Consult a technician if the issue persists. |
| No audio during call | Microphone/speaker obstruction, wiring issue. | Ensure microphone and speaker on both units are clear. Check wiring connections. |
| Door lock not opening | Incorrect wiring to lock, faulty lock, insufficient power. | Verify lock wiring. Test the lock independently. Ensure power supply is adequate. |
| RFID not working | RFID key not programmed, faulty reader. | Ensure RFID key is correctly programmed. Contact support if the reader is suspected to be faulty. |
For more complex issues or if troubleshooting steps do not resolve the problem, please contact VIMAR customer support or a qualified technician.
7. Specifications
Detailed technical specifications for the VIMAR K42910 Video Door Entry Kit:
| Feature | Specification |
|---|---|
| Brand | VIMAR |
| Model Number | K42910 |
| Manufacturer | Vimar |
| Product Dimensions (L x W x H) | 20.52 x 2.09 x 2.09 cm |
| Weight | 1.19 Kilograms |
| Color | White Monitor and Gray Panel |
| Material | Aluminum |
| Finish | Anodized |
| Style | Single-family multi-socket power supply unit |
| Shape | Rectangular |
| Power Type | Wired electric cable |
| Special Features | RFID audio-video panel |
| Included Components | K42910 single-family video intercom kit with capacitive keypad, multi-socket power supply |
| Batteries Required | No |
| Country of Origin | China |
7.1. Dimensions

Figure 6: Technical drawing providing precise measurements for the outdoor panel.
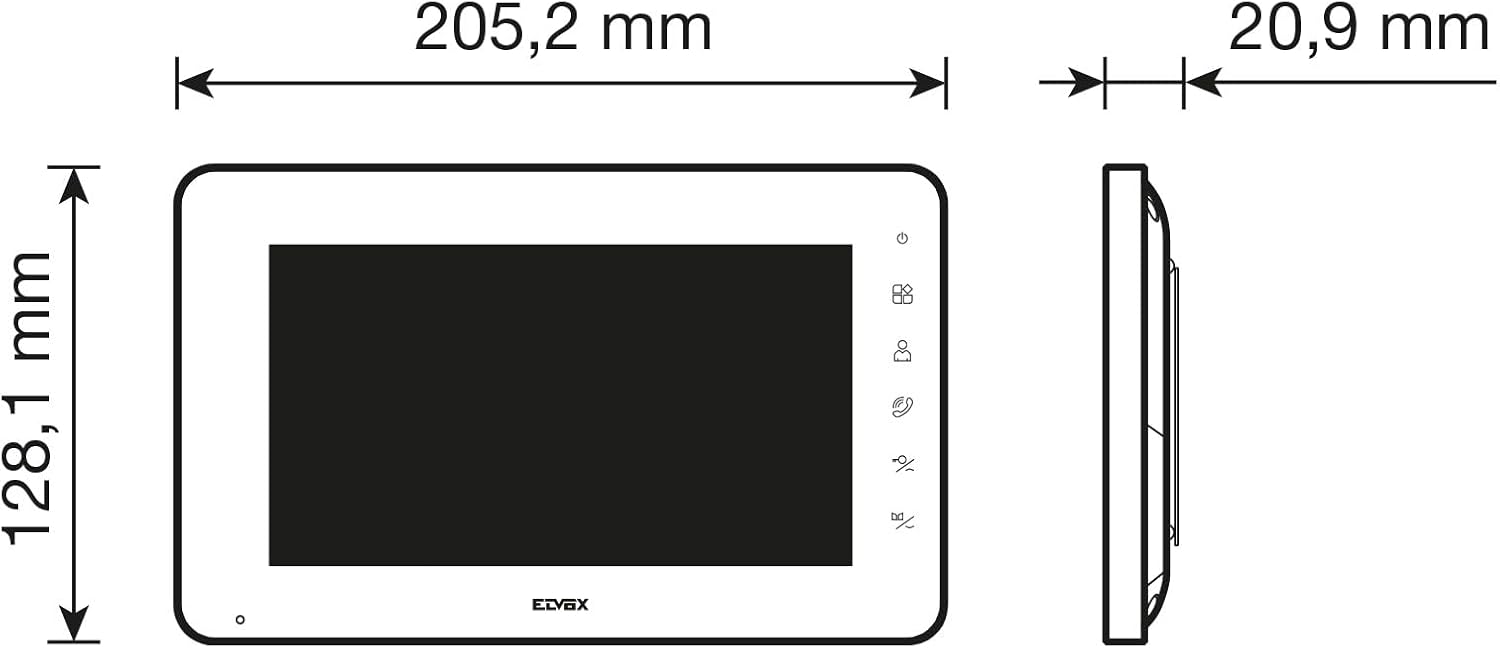
Figure 7: Technical drawing providing precise measurements for the indoor monitor.
8. Warranty and Support
8.1. Warranty Information
The VIMAR K42910 Single-Family Video Door Entry Kit comes with a 24-month warranty from the date of purchase. This warranty covers manufacturing defects under normal use. Please retain your proof of purchase for warranty claims.
8.2. Customer Support
For technical assistance, warranty claims, or further inquiries, please contact VIMAR customer support through their official website or the contact information provided with your product packaging. Always provide your model number (K42910) when seeking support.


