1. Safety Instructions
Please read and understand all safety warnings and instructions before operating this appliance. Failure to follow the warnings and instructions may result in electric shock, fire, and/or serious injury.
- Always disconnect the power plug from the outlet before performing any maintenance or cleaning.
- Do not vacuum flammable or combustible liquids, such as gasoline, or use in areas where they may be present.
- Do not vacuum hot ashes, burning cigarettes, or any hot, burning, or smoking objects.
- Ensure the filter is correctly installed for the type of cleaning (dry or wet).
- Keep hands, feet, loose clothing, and hair away from openings and moving parts.
- Do not operate the vacuum cleaner if it has been dropped, damaged, left outdoors, or dropped into water.
- Use only as described in this manual. Use only manufacturer's recommended attachments.
- This appliance is not intended for use by persons (including children) with reduced physical, sensory or mental capabilities, or lack of experience and knowledge, unless they have been given supervision or instruction concerning use of the appliance by a person responsible for their safety.
2. Product Overview
The TOTAL TVC12202 is a versatile wet and dry industrial vacuum cleaner designed for efficient cleaning in various environments, from home workshops to professional settings.

Figure 2.1: The TOTAL TVC12202 Wet and Dry Vacuum Cleaner shown with its complete set of accessories, including the hose, extension tubes, floor head, foam filter, and crevice nozzle.
2.1 Components and Accessories
- Main Unit with 1000W Motor
- 12-Liter Stainless Steel Tank
- Flexible Suction Hose (1.5 m length, 32 mm diameter)
- Plastic Extension Tubes
- Floor Head
- Foam Filter (for wet vacuuming)
- Dust Bag/Cloth Filter (for dry vacuuming)
- Crevice Nozzle
- Wheels for easy mobility
2.2 Key Features
- Wet and Dry Functionality: Capable of vacuuming both liquids and dry debris.
- Powerful 1000W Motor: Provides strong suction for effective cleaning.
- 12-Liter Capacity: Optimal tank size for various cleaning tasks without frequent emptying.
- Blower Function: Allows for clearing debris from hard-to-reach areas.
- Durable Construction: Built with quality materials for long-lasting performance.
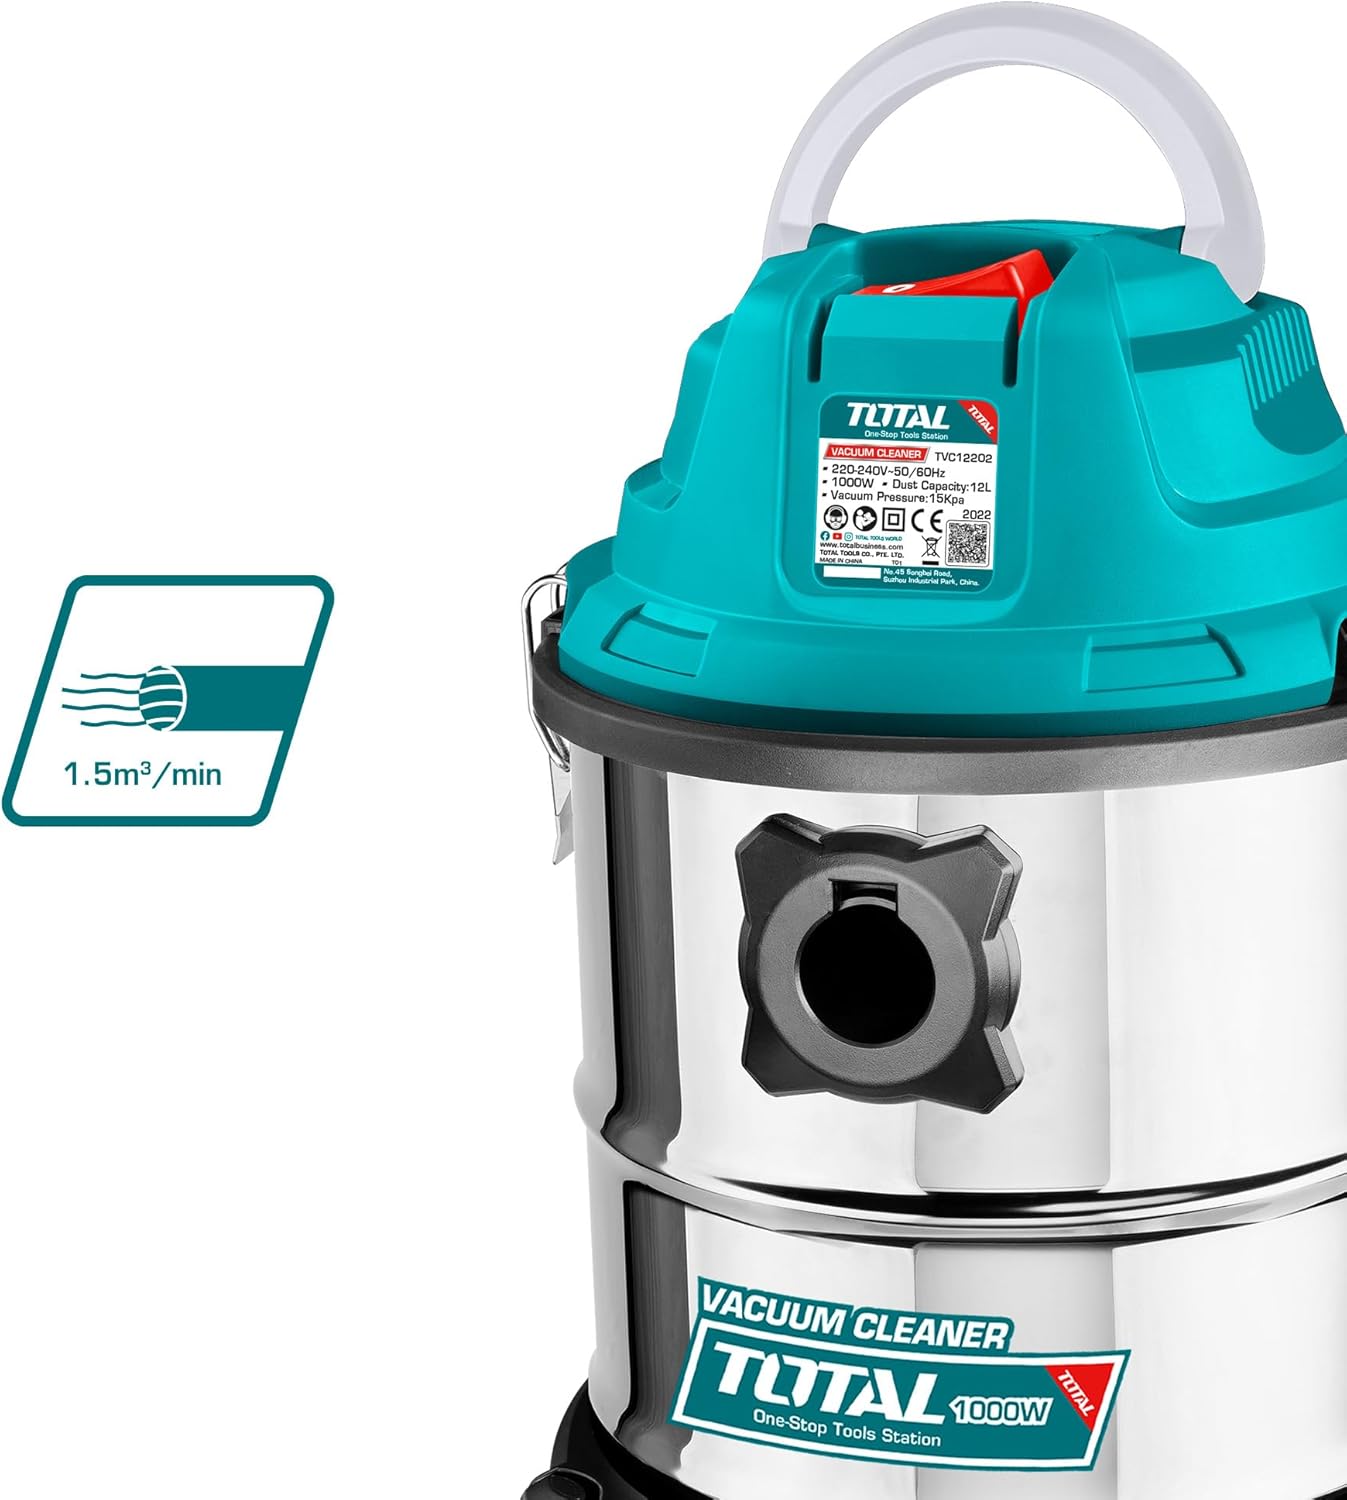
Figure 2.2: Illustration highlighting the airflow rate of 1.5 cubic meters per minute, indicating efficient suction and blowing capabilities.

Figure 2.3: Visual representation of the 12-liter drum capacity, showing the internal volume available for collecting debris and liquids.

Figure 2.4: An icon indicating the vacuum cleaner's dual functionality for both wet and dry cleaning tasks.

Figure 2.5: A close-up view of the vacuum cleaner's top handle and the control panel, showing the power switch and other operational details.
3. Setup
Follow these steps to prepare your vacuum cleaner for use:
- Unpack: Carefully remove all components from the packaging. Check for any damage.
- Attach Wheels: Insert the four caster wheels into the designated slots on the base of the vacuum cleaner until they click into place.
- Install Filter:
- For Dry Vacuuming: Ensure the cloth filter/dust bag is securely fitted over the motor inlet.
- For Wet Vacuuming: Remove the cloth filter/dust bag and install the foam filter over the motor inlet.
- Connect Hose: Insert the flexible suction hose into the intake port on the front of the vacuum cleaner until it is firmly seated.
- Attach Accessories: Connect the desired extension tubes and nozzle (floor head or crevice nozzle) to the end of the flexible hose.
4. Operating Instructions
4.1 Dry Vacuuming
- Ensure the cloth filter/dust bag is correctly installed.
- Plug the power cord into a suitable electrical outlet (220-240V).
- Turn the power switch to the 'ON' position.
- Begin vacuuming dry debris.
- When finished, turn the power switch to 'OFF' and unplug the unit.
4.2 Wet Vacuuming
- Ensure the foam filter is correctly installed and the cloth filter/dust bag is removed.
- Plug the power cord into a suitable electrical outlet.
- Turn the power switch to the 'ON' position.
- Begin vacuuming liquids. Do not overfill the tank; the vacuum has a float mechanism that will stop suction when the tank is full.
- When finished, turn the power switch to 'OFF' and unplug the unit. Empty the tank immediately after wet vacuuming.
4.3 Blower Function
- Locate the blower port on the vacuum cleaner (usually opposite the intake port).
- Insert the flexible suction hose into the blower port.
- Plug the power cord into a suitable electrical outlet.
- Turn the power switch to the 'ON' position.
- Use the hose to direct the airflow for blowing debris.
- When finished, turn the power switch to 'OFF' and unplug the unit.
5. Maintenance
Regular maintenance ensures optimal performance and extends the life of your vacuum cleaner.
5.1 Cleaning the Unit
- After each use, especially after wet vacuuming, empty the tank and rinse it with water. Dry thoroughly before storage.
- Wipe the exterior of the vacuum cleaner with a damp cloth. Do not use harsh chemicals or abrasive cleaners.
- Clean the hose and accessories as needed to prevent blockages.
5.2 Filter Maintenance
- Foam Filter (Wet): Rinse the foam filter with water after each wet use. Allow it to air dry completely before reinstallation or storage.
- Cloth Filter/Dust Bag (Dry): Shake off accumulated dust regularly. For heavy use, the cloth filter can be gently washed with mild soap and water, then air dried completely. Replace if torn or damaged.
5.3 Storage
Store the vacuum cleaner in a dry, clean place, away from direct sunlight and extreme temperatures. Ensure all components are clean and dry before storage.
6. Troubleshooting
Refer to the table below for common issues and their solutions.
| Problem | Possible Cause | Solution |
|---|---|---|
| Vacuum does not turn on | No power supply Power switch is off Damaged power cord | Check power outlet and plug Turn power switch to 'ON' Inspect cord for damage; contact service if damaged |
| Low suction power | Clogged hose or nozzle Full tank Dirty or improperly installed filter Air leak | Clear any blockages Empty the tank Clean or correctly install filter Check all connections for tightness |
| Motor stops during wet vacuuming | Tank is full (float activated) | Empty the tank |
| Unusual noise | Blockage in hose or motor Loose parts | Check for and remove blockages Ensure all parts are securely fastened |
7. Specifications
| Specification | Value |
|---|---|
| Brand | TOTAL |
| Model Number | TVC12202 |
| Color | Blue |
| Capacity | 12 Liters |
| Power | 1000 Watts |
| Voltage | 220 Volts |
| Features | Wet/Dry |
| Item Weight | 4.16 Kilograms |
| Filter Type | Foam |
| Surface Recommendation | All floors |
| Power Source | Corded Electric |
| Included Components | Floor head, plastic tube, foam filter, crevice nozzle |
| Cordless? | No |
| Country of Origin | Spain |
8. Warranty and Support
For warranty information and customer support, please refer to the documentation provided with your purchase or contact the manufacturer directly. Keep your proof of purchase for any warranty claims.
Manufacturer: TOTAL
Contact: Please visit the official TOTAL website or contact your local distributor for support and service inquiries.


