1. Introduction
This manual provides comprehensive instructions for the safe and efficient installation, operation, and maintenance of your 1HVAC Reznor UDXC-200 200,000 BTU Commercial Natural Gas Garage Heater. This unit is designed for heating commercial or industrial spaces such as garages, workshops, warehouses, and factories. It features an 83% thermal efficiency rating, a TCORE2 titanium-stabilized aluminized steel heat exchanger, patented single-burner combustion, an integrated circuit board with display, a built-in disconnect, and a status-indicating LED. Please read this manual thoroughly before installation or operation.
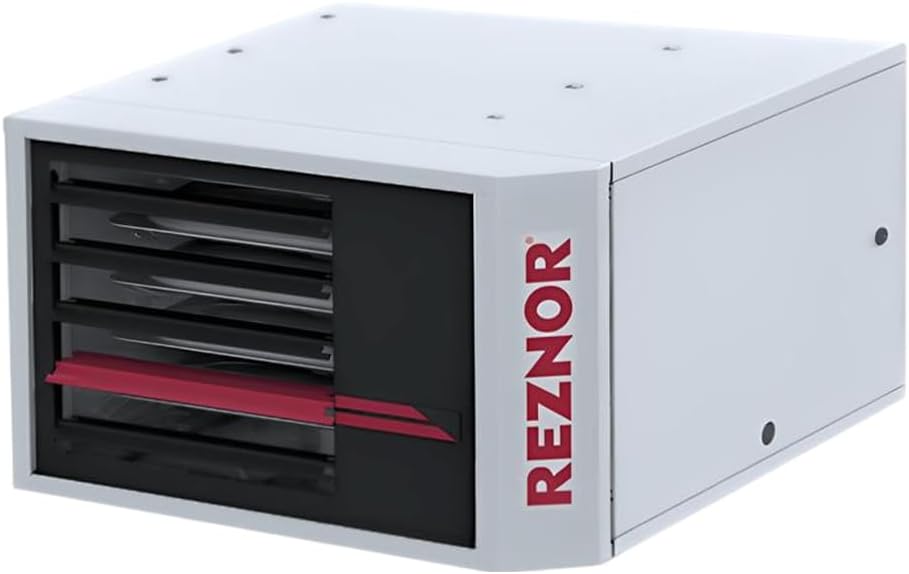
Figure 1: Front view of the Reznor UDXC-200 Natural Gas Garage Heater.
2. Important Safety Information
WARNING: Improper installation, adjustment, alteration, service, or maintenance can cause property damage, injury, or death. Read the installation, operating, and maintenance instructions thoroughly before installing or servicing this equipment.
- Professional Installation Required: Installation and service must be performed by a qualified installer, service agency, or gas supplier.
- Ventilation: Ensure adequate ventilation as required by local codes and the manufacturer's instructions. This unit is compatible with Category 1 double-wall B-vent pipe when vented vertically out of a roof or horizontally through a sidewall.
- Carbon Monoxide Hazard: This appliance produces carbon monoxide, which is an odorless, colorless gas that can cause death. Install a carbon monoxide detector in the vicinity of the heater.
- Gas Supply: Verify that the gas supply type (Natural Gas) matches the heater's requirements.
- Clearances: Maintain proper clearances from combustible materials as specified in the installation instructions.
- Electrical Connection: All electrical wiring must comply with local codes and be performed by a qualified electrician.
3. Package Contents
The product package includes the Reznor UDXC-200 gas unit heater only. Please inspect the unit upon arrival for any shipping damage.
- Reznor UDXC-200 Natural Gas Unit Heater
Note: Mounting hardware and vent installation kits are sold separately and are not included with the unit heater.
4. Product Specifications
| Feature | Specification |
|---|---|
| Brand | 1HVAC (Reznor) |
| Model Number | UDXC-200 |
| Heat Output | 200,000 BTU |
| Thermal Efficiency | 83% AFUE |
| Fuel Type | Natural Gas |
| Form Factor | Ceiling Mount (mounting sold separately) |
| Indoor/Outdoor Usage | Indoor |
| Recommended Uses | Garage, Workshop, Warehouse, Factory |
| Product Dimensions (D x W x H) | 48.44" x 38.19" x 20.13" |
| Special Feature | Low Static Propeller Fan, Quiet Operation |
| Burner Type | Single-burner combustion |
| Heat Exchanger | TCORE2 Titanium-Stabilized Aluminized Steel |
| Control Board | Integrated circuit board with 7-segment display |
| Safety Features | Built-in disconnect, Status-indicating LED |

Figure 2: Key dimensions of the Reznor UDXC-200 unit heater.
5. Setup and Installation
Installation of the Reznor UDXC-200 heater requires adherence to all local and national codes, as well as the manufacturer's detailed instructions. It is strongly recommended that installation be performed by a licensed HVAC professional or qualified technician.
5.1 Mounting
The UDXC-200 is designed for ceiling or wall mounting. It features threaded-nut retainers at four suspension points for secure installation. Mounting brackets are sold separately.
- Ceiling Mount: Utilize appropriate ceiling joists or structural supports capable of holding the unit's weight.
- Wall Mount: Ensure the wall structure can safely support the heater.
- Clearances: Maintain minimum clearances from combustible surfaces as specified in the full installation guide provided with the unit.
5.2 Gas Connection
Connect the natural gas supply to the unit's external gas connection point. This connection must be performed by a qualified gas technician to ensure safety and compliance with all gas codes.
5.3 Venting
The UDXC-200 is compatible with Category 1 double-wall B-vent pipe. The venting system can be installed either vertically through a roof or horizontally through a sidewall. Proper sizing and installation of the vent pipe are crucial for safe operation and efficient exhaust of combustion byproducts.
5.4 Electrical Connection
The unit requires an electrical connection for its fan and control system. An external terminal strip is provided for 24V wiring. All electrical work must be performed by a qualified electrician in accordance with local and national electrical codes.

Figure 3: Example installations showing various mounting configurations and the unit's features.
6. Operating Instructions
Once properly installed and connected, the Reznor UDXC-200 heater is designed for straightforward operation.
6.1 Initial Startup
- Ensure all gas and electrical connections are secure and verified by a professional.
- Turn on the gas supply to the unit.
- Engage the built-in disconnect switch to provide electrical power to the heater.
- Set your thermostat to the desired temperature. The unit will initiate its ignition sequence.
6.2 Normal Operation
The heater features a single-burner design with two BTU outputs, providing high fire for colder days and low fire for milder temperatures, ensuring efficient heating in any weather. The integrated circuit board with a 7-segment display and status-indicating LED will provide operational feedback.
- Thermostat Control: The heater will cycle on and off based on the thermostat settings to maintain the desired room temperature.
- Status LED: Observe the status-indicating LED for normal operation or fault codes (refer to troubleshooting section).
- Quiet Operation: The low static propeller fan and vibration-isolated fan and venter motors contribute to quiet operation.
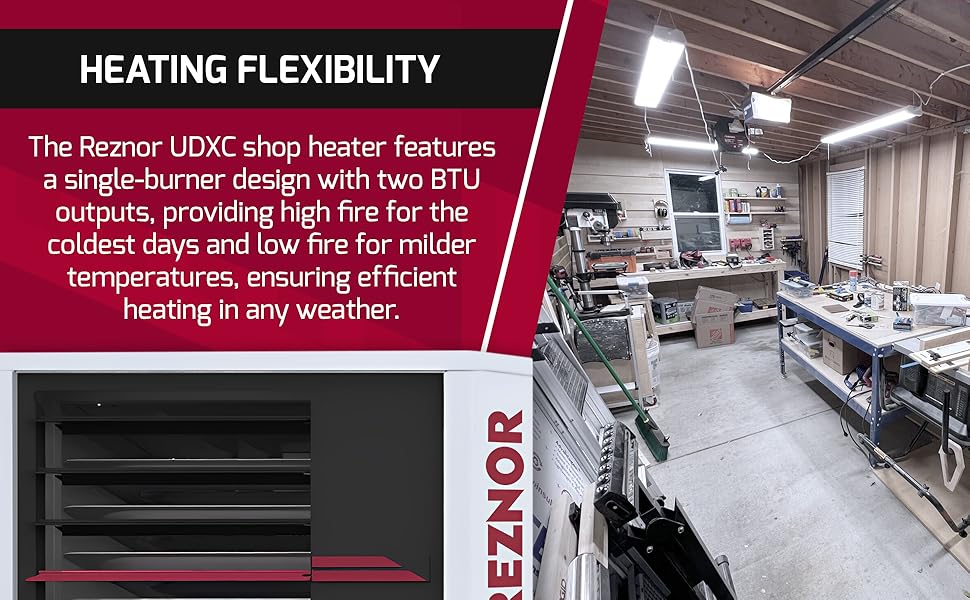
Figure 4: Illustration of the heater's heating flexibility with dual BTU outputs.

Figure 5: Air circulation patterns generated by the low static pressure axial fan.
7. Maintenance
Regular maintenance ensures the longevity and efficient operation of your Reznor UDXC-200 heater. All maintenance should be performed by a qualified service technician.
7.1 Annual Inspection
- Inspect the heat exchanger for any signs of cracks or corrosion.
- Check the burner for proper flame appearance and cleanliness.
- Examine the vent system for obstructions, leaks, or damage.
- Clean the fan blades and motor to ensure proper airflow.
- Verify all electrical connections are tight and free from corrosion.
- Test safety controls, including the built-in disconnect.
7.2 Cleaning
The unit features an updated cabinet structure with a removable front face and a hinged access door panel with a quarter-turn latch for ease of maintenance.
- Keep the area around the heater clear of dust, debris, and combustible materials.
- Periodically clean the exterior of the unit with a soft, damp cloth.
8. Troubleshooting
The Reznor UDXC-200 is equipped with a 7-segment display board and a status-indicating LED for simple troubleshooting. Refer to the full product manual for a complete list of fault codes and diagnostic procedures.
8.1 Common Issues and Indicators
- No Heat: Check thermostat setting, gas supply, and power connection. The status LED may indicate an ignition lockout or pressure switch fault.
- Unit Not Starting: Ensure the built-in disconnect is engaged. Check for power at the unit. The 7-segment display may show a specific error code.
- Unusual Noises: Could indicate a fan motor issue or debris in the fan. Disconnect power and inspect.
- Pilot Light Out (if applicable): Follow relighting instructions in the full manual or contact a technician.
For any persistent issues or complex repairs, contact a qualified service technician. Do not attempt to repair gas appliances yourself.
9. Warranty and Support
For specific warranty details, please refer to the warranty documentation included with your product at the time of purchase or contact 1HVAC directly. Keep your purchase receipt and model number (UDXC-200) readily available when contacting support.
For technical assistance or service inquiries, please contact 1HVAC customer support through their official channels. You can often find contact information on the product packaging, the manufacturer's website, or your purchase invoice.


