
Introduction
This manual provides instructions for the safe and efficient operation, maintenance, and troubleshooting of your Hamilton Beach 20-Cup Programmable Multi-Cooker and your Hamilton Beach 2-Way 12-Cup Programmable Drip Coffee Maker & Single Serve Machine. Please read all instructions carefully before use and retain for future reference.
Important Safety Information
When using electrical appliances, basic safety precautions should always be followed to reduce the risk of fire, electric shock, and/or injury to persons, including the following:
- Read all instructions.
- Do not touch hot surfaces. Use handles or knobs.
- To protect against electrical shock, do not immerse cord, plugs, or appliance in water or other liquid.
- Close supervision is necessary when any appliance is used by or near children.
- Unplug from outlet when not in use and before cleaning. Allow to cool before putting on or taking off parts.
- Do not operate any appliance with a damaged cord or plug, or after the appliance malfunctions or has been damaged in any manner.
- The use of accessory attachments not recommended by the appliance manufacturer may cause injuries.
- Do not use outdoors.
- Do not let cord hang over edge of table or counter, or touch hot surfaces.
- Do not place on or near a hot gas or electric burner, or in a heated oven.
- Extreme caution must be used when moving an appliance containing hot oil or other hot liquids.
- Always attach plug to appliance first, then plug cord into the wall outlet. To disconnect, turn any control to "off," then remove plug from wall outlet.
- Do not use appliance for other than intended use.
Product Overview
Hamilton Beach 20-Cup Programmable Multi-Cooker
This versatile appliance combines the functions of a rice cooker, slow cooker, and food steamer, offering 14 pre-programmed settings for various cooking needs.

Image: Front view of the Hamilton Beach 20-Cup Programmable Multi-Cooker, showing the digital display and control panel with various cooking functions.
- Control Panel: Digital display with buttons for various cooking functions (White Rice, Brown Rice, Super Grains, Whole Grain, Quick Rice, Hot Cereals, Quinoa, Sauté, Steam Cook, Slow Cooker, Sear/Brown, Warm, Delay Timer).
- Inner Pot: Non-stick cooking pot.
- Lid: Hinged lid with steam vent.
- Steaming Basket: Dual-purpose basket for rinsing rice and steaming food.
- Accessories: Includes instruction manual, power cord, and spatula.

Image: The Hamilton Beach Multi-Cooker containing slow-cooked pulled pork, illustrating its slow cooking capability. Tacos are shown in the foreground.

Image: The Hamilton Beach Multi-Cooker with the steaming basket placed above the inner pot, showing vegetables steaming while rice cooks below.
Hamilton Beach 2-Way 12-Cup Programmable Drip Coffee Maker & Single Serve Machine
This coffee maker offers the flexibility to brew a single cup or a full 12-cup pot using your favorite ground coffee.
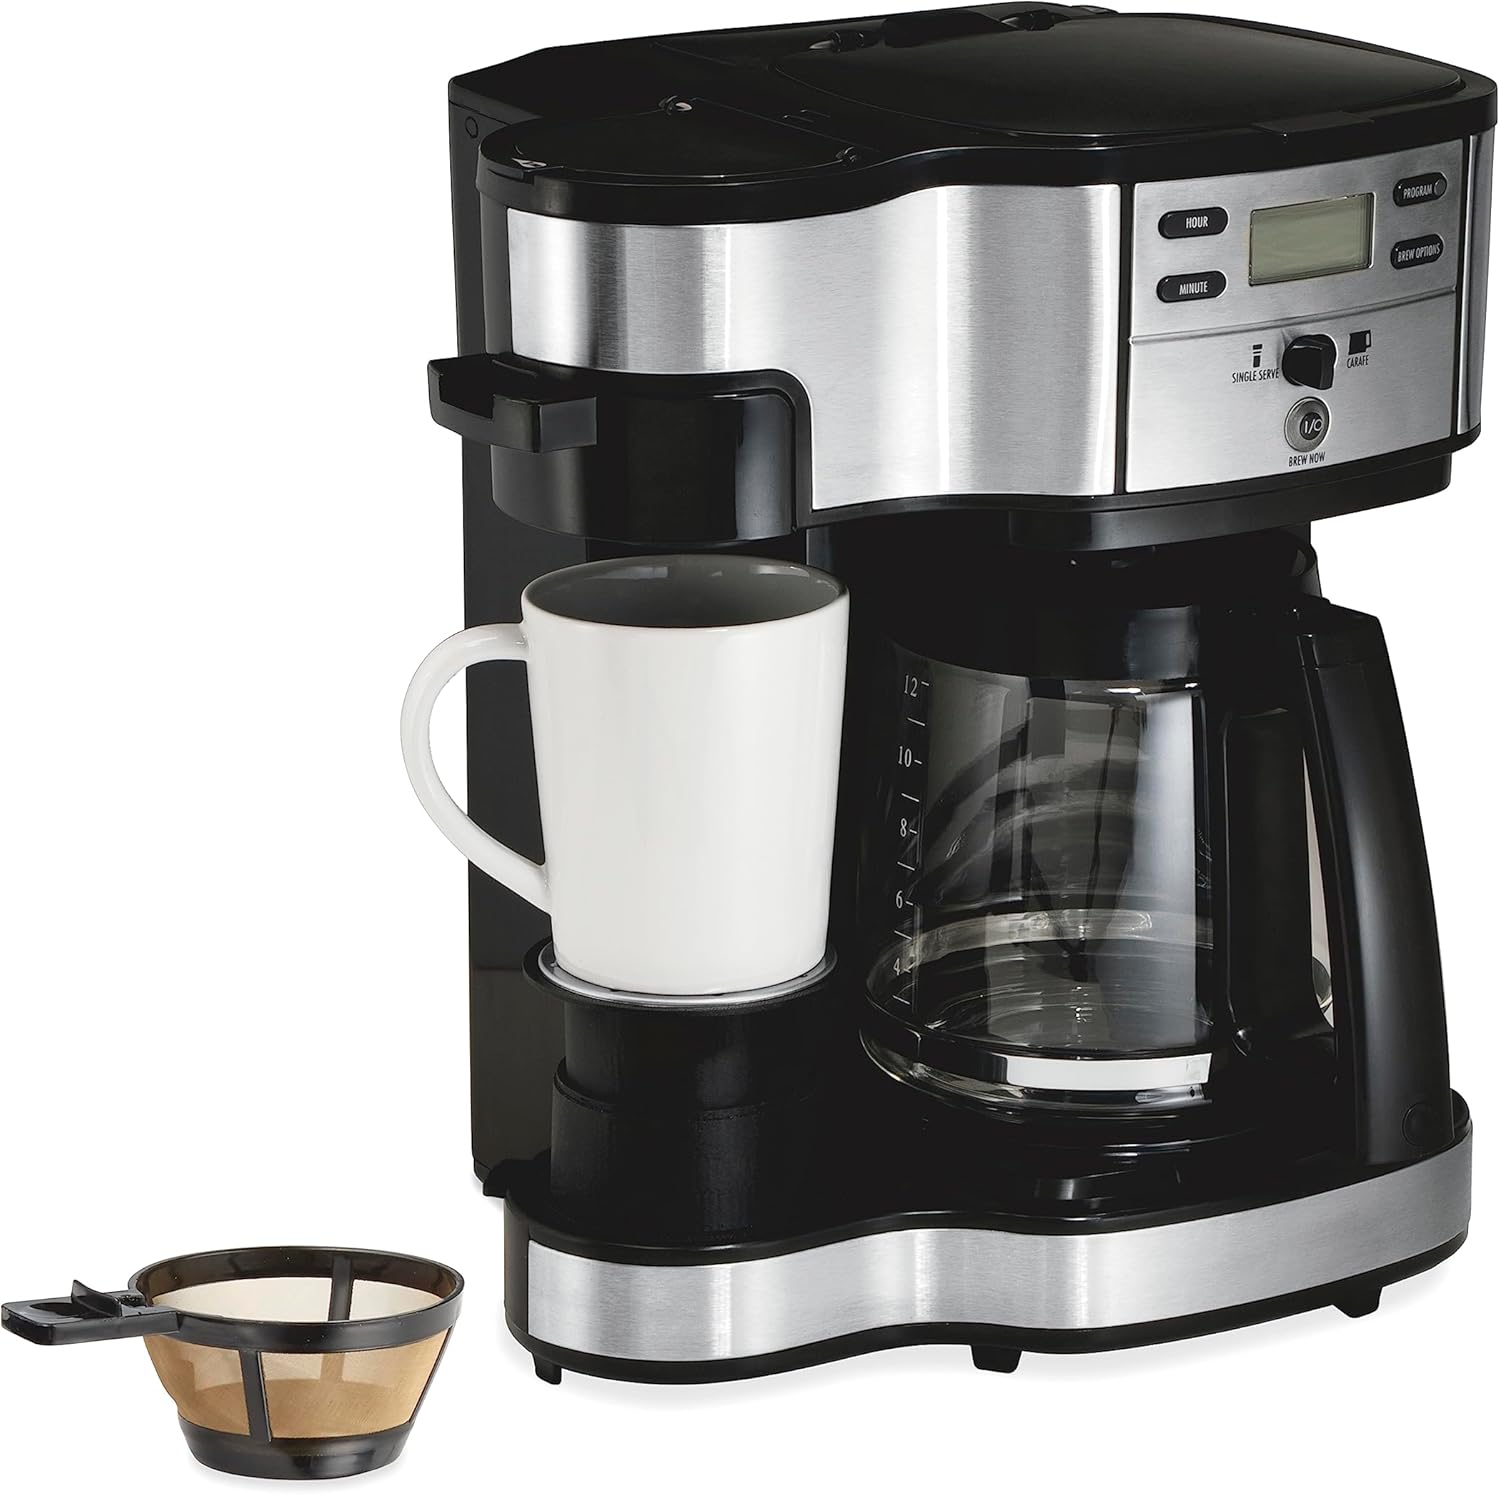
Image: Front view of the Hamilton Beach 2-Way Coffee Maker, showing a single-serve mug placed on the drip tray and the control panel.
- Control Panel: Digital display with Hour, Minute, and Brew Option buttons.
- Carafe: 12-cup glass carafe.
- Single-Serve Side: Brew basket for single-serve brewing.
- Full Pot Side: Brew basket for 12-cup brewing.
- Mesh Scoop/Filter: Reusable mesh filter for ground coffee.

Image: The Hamilton Beach 2-Way Coffee Maker on a counter, showing both a full carafe of coffee and two single cups, illustrating its dual brewing capability.
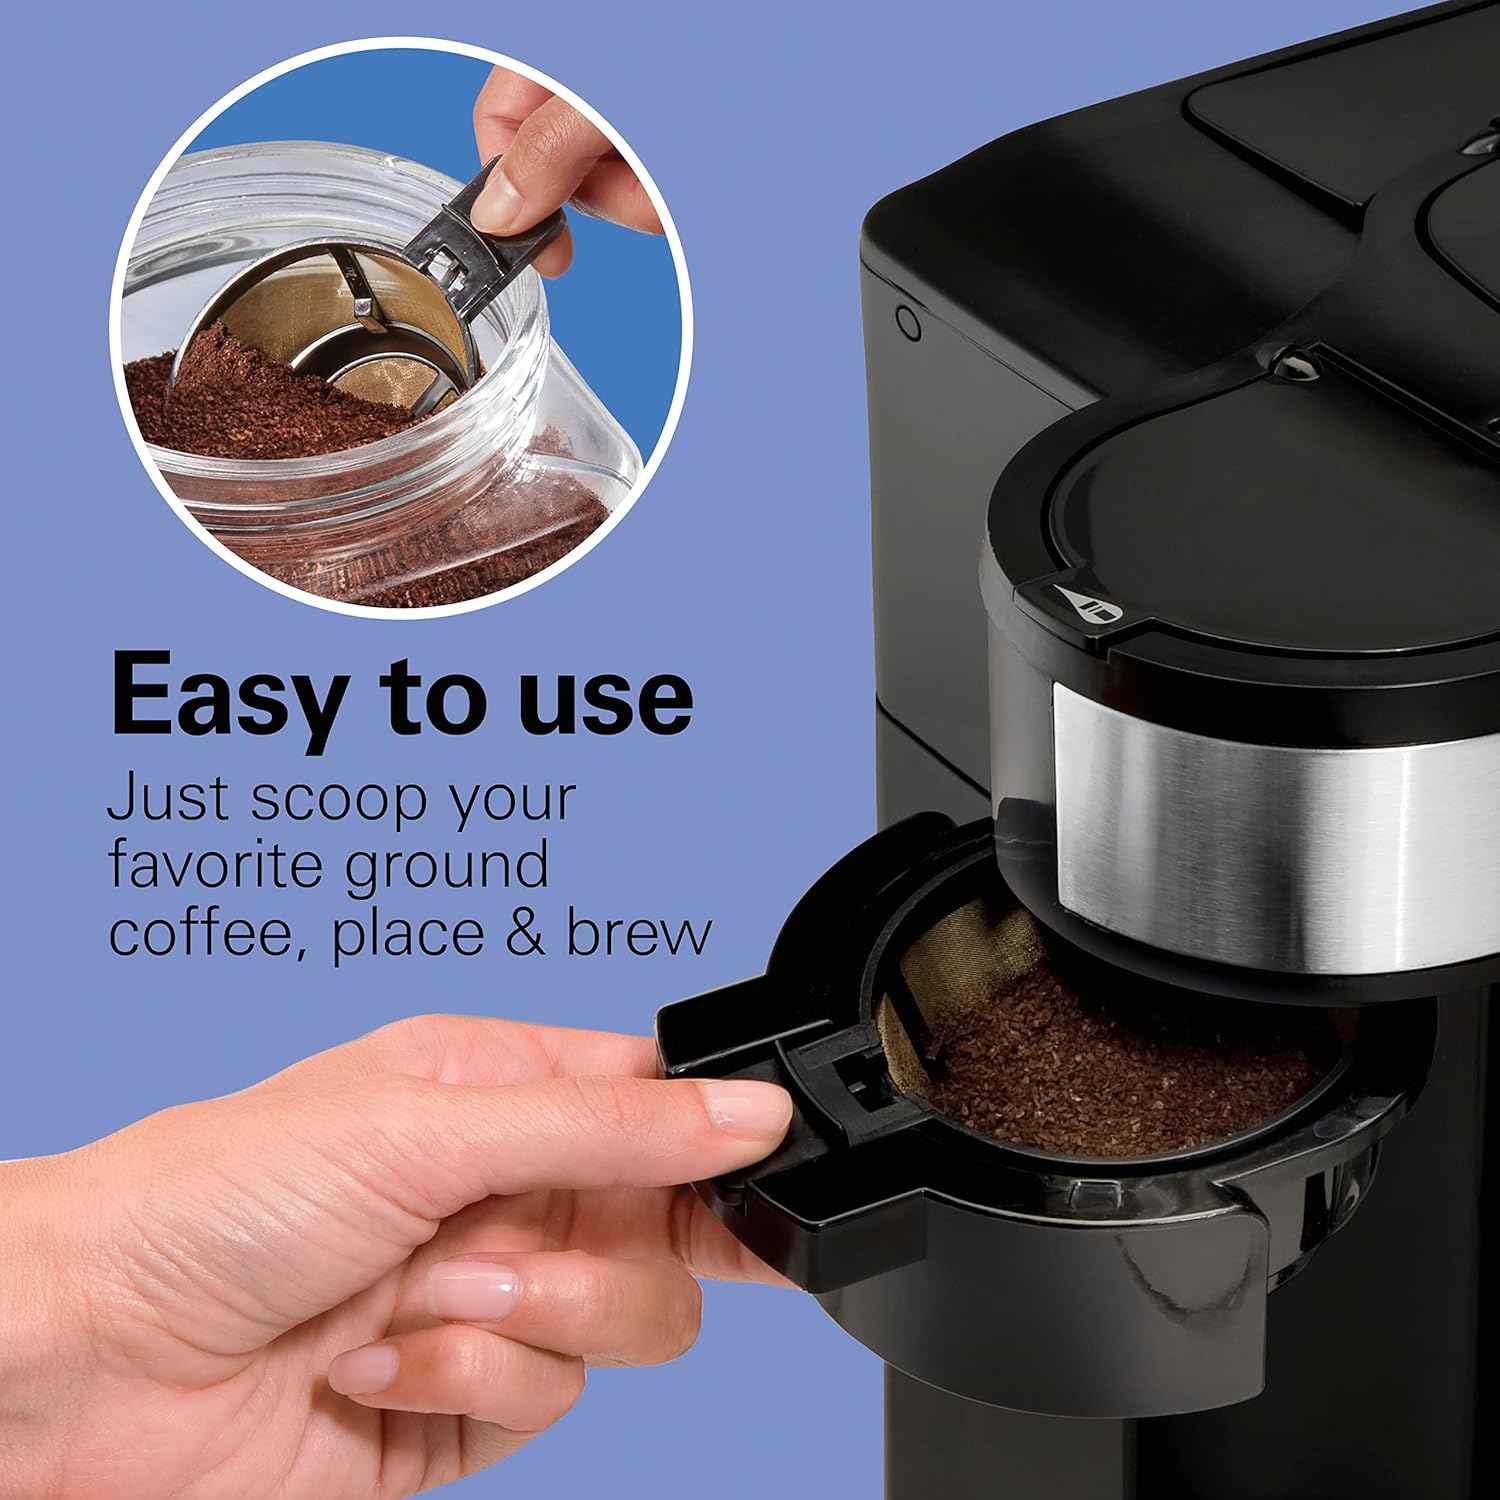
Image: A hand scooping ground coffee into the reusable mesh filter of the Hamilton Beach 2-Way Coffee Maker, demonstrating the ease of adding coffee.
Setup
Multi-Cooker Initial Setup
- Unpack: Remove all packaging materials and accessories.
- Wash Parts: Wash the inner pot, lid, and steaming basket in warm, soapy water. Rinse thoroughly and dry. The inner pot and steaming basket are dishwasher safe.
- Wipe Exterior: Wipe the exterior of the multi-cooker with a damp cloth. Do not immerse the main unit in water.
- Placement: Place the multi-cooker on a stable, level, heat-resistant surface away from walls and cabinets to allow for proper ventilation.
Coffee Maker Initial Setup
- Unpack: Remove all packaging materials.
- Wash Parts: Wash the carafe, carafe lid, single-serve brew basket, and mesh filter in warm, soapy water. Rinse thoroughly and dry.
- Clean Cycle: Before first use, run two or three full brewing cycles with only water to clean the internal components. Do not add coffee during this initial cleaning.
- Placement: Place the coffee maker on a stable, level surface.
Operating Instructions
Multi-Cooker Operation
The multi-cooker features 14 pre-programmed settings for various cooking tasks.
- Add Ingredients: Place desired ingredients into the inner pot. For rice, use the included measuring cup and refer to the rice-to-water ratio guidelines in the recipe section. For steaming, place food in the steaming basket above water in the inner pot.
- Close Lid: Ensure the lid is securely closed.
- Select Function: Press the button corresponding to your desired cooking function (e.g., White Rice, Slow Cook, Steam Cook). The display will show the default cooking time.
- Adjust Time (if applicable): For some functions like Slow Cook or Steam Cook, you can adjust the cooking time using the Hour and Minute buttons.
- Start Cooking: The appliance will typically start automatically after a few seconds or after pressing a dedicated start button (if present).
- Keep Warm: After cooking is complete, the multi-cooker will automatically switch to the "Keep Warm" setting for a set period.
- Delay Timer: To use the delay timer, set your desired cooking function and time, then press the "Delay Timer" button and set the delay duration before cooking begins.
Note: Always refer to specific recipes for precise ingredient quantities and cooking times.
Coffee Maker Operation (Full Pot)
- Fill Water Reservoir: Open the lid and fill the water reservoir with cold, fresh water to the desired level indicated on the side.
- Add Coffee Grounds: Place the reusable mesh filter into the full pot brew basket. Add your desired amount of ground coffee using the included scoop. Close the brew basket lid.
- Place Carafe: Ensure the glass carafe with its lid is properly placed on the warming plate.
- Select Brew Option: Press the "Brew Option" button until the full pot icon is selected.
- Start Brewing: Press the "Brew" button. The coffee maker will begin brewing.
- Auto Pause & Pour: The auto pause and pour feature allows you to temporarily remove the carafe during brewing to pour a cup. Replace the carafe within 20 seconds to prevent overflow.
- Automatic Shutoff: The coffee maker will automatically shut off after 2 hours.
Coffee Maker Operation (Single Serve)
- Fill Water Reservoir: Fill the single-serve water reservoir with cold, fresh water up to the desired cup marking.
- Add Coffee Grounds: Place the reusable mesh filter into the single-serve brew basket. Add your desired amount of ground coffee using the included scoop. Close the brew basket lid.
- Place Mug: Place your mug or travel mug on the single-serve drip tray.
- Select Brew Option: Press the "Brew Option" button until the single-serve icon is selected.
- Start Brewing: Press the "Brew" button. The coffee maker will begin brewing.
Programming the Coffee Maker
- Set Current Time: Press the "Hour" and "Minute" buttons to set the current time.
- Set Program Time: Press the "Program" button. The display will flash. Use the "Hour" and "Minute" buttons to set the desired brew time. Press "Program" again to confirm.
- Activate Program: Ensure the "Program" indicator light is on. The coffee maker will automatically start brewing at the set time.
Maintenance and Cleaning
Multi-Cooker Cleaning
- Unplug and Cool: Always unplug the appliance and allow it to cool completely before cleaning.
- Inner Pot & Steaming Basket: Wash the inner pot and steaming basket in warm, soapy water or in the dishwasher. Use a non-abrasive sponge to prevent scratching the non-stick coating.
- Lid: The lid can be wiped clean with a damp cloth. For thorough cleaning, some lids may be removable; refer to the specific product diagram for your model.
- Exterior: Wipe the exterior of the multi-cooker with a damp cloth. Never immerse the main unit in water or other liquids.
Coffee Maker Cleaning
- Unplug and Cool: Always unplug the appliance and allow it to cool completely before cleaning.
- Carafe & Filter Basket: Wash the glass carafe, carafe lid, single-serve brew basket, and reusable mesh filter in warm, soapy water. These parts are typically top-rack dishwasher safe.
- Exterior: Wipe the exterior of the coffee maker with a damp cloth. Do not immerse the coffee maker in water.
- Descaling (Mineral Deposit Removal):
- Mix 1 cup of white vinegar with 2 cups of cold water.
- Pour the mixture into the water reservoir.
- Place the empty carafe on the warming plate.
- Run a full brew cycle.
- After the cycle, let the coffee maker cool for 15 minutes.
- Repeat the process with fresh water 2-3 times to rinse thoroughly.
- Perform descaling every 1-3 months depending on water hardness.
Troubleshooting
Multi-Cooker Issues
| Problem | Possible Cause | Solution |
|---|---|---|
| Rice is too hard/undercooked. | Not enough water; lid not sealed; incorrect rice type setting. | Ensure correct water-to-rice ratio. Check lid seal. Select appropriate rice setting. |
| Rice is too soft/mushy. | Too much water; rice not rinsed. | Reduce water slightly. Rinse rice thoroughly before cooking. |
| Food not cooking evenly in slow cooker. | Lid lifted too often; ingredients not cut uniformly. | Avoid lifting the lid during slow cooking. Cut ingredients into similar sizes. |
| Appliance does not turn on. | Not plugged in; power outage. | Check power connection. Verify power outlet is functional. |
Coffee Maker Issues
| Problem | Possible Cause | Solution |
|---|---|---|
| Coffee does not brew. | No water in reservoir; not plugged in; brew cycle not started. | Fill water reservoir. Check power connection. Press "Brew" button. |
| Coffee is weak. | Not enough coffee grounds; coarse grind; clogged filter. | Add more coffee. Use a finer grind. Clean the mesh filter. |
| Coffee overflows. | Too much water/coffee; carafe not placed correctly; filter basket clogged. | Do not exceed MAX fill line. Ensure carafe is centered. Clean filter basket. |
| Brewing takes too long. | Mineral buildup (scaling). | Perform descaling procedure as outlined in the Maintenance section. |
Specifications
- Brand: Hamilton Beach
- Multi-Cooker Capacity: 4.5 Quarts (up to 20 cups cooked rice)
- Coffee Maker Capacity: 12 Cups (carafe)
- Color: Stainless Steel (for Multi-Cooker) / Black with Stainless Steel accents (for Coffee Maker)
- Special Features: Automatic Shut Off, Programmable, Timer
- Lid Material: Glass (for Coffee Maker carafe)
- Included Components: Instruction Manual, Power cord, Spatula (for Multi-Cooker), Reusable Mesh Filter (for Coffee Maker)
Warranty and Support
Hamilton Beach products are manufactured to the highest standards of quality. For detailed warranty information, please refer to the warranty card included with your product or visit the official Hamilton Beach website. For customer support, service, or replacement parts, please contact Hamilton Beach Customer Service directly.
Website: www.hamiltonbeach.com
Please have your product model number and date of purchase available when contacting support.


