
VICOHOME CG122
VICOHOME CG122 Outdoor IP 4MPX WiFi Battery Surveillance Camera User Manual
Model: CG122
1. Introduction
Thank you for choosing the VICOHOME CG122 Outdoor IP 4MPX WiFi Battery Surveillance Camera. This manual provides detailed instructions on how to set up, operate, and maintain your camera to ensure optimal performance and security. Please read this manual thoroughly before using the product and keep it for future reference.
The CG122 is a high-definition 4-megapixel (4MPX) outdoor surveillance camera designed for reliable home or business security. Featuring Wi-Fi connectivity and a built-in battery, it offers flexible placement options without the need for constant power wiring. Its infrared night vision capabilities ensure clear monitoring even in low-light conditions.
2. Package Contents
Please check the package contents upon unboxing. If any items are missing or damaged, contact your retailer or VICOHOME customer support.
- VICOHOME CG122 Surveillance Camera
- Mounting Bracket (Magnetic Base)
- USB Charging Cable
- Mounting Screws and Wall Anchors
- User Manual (this document)
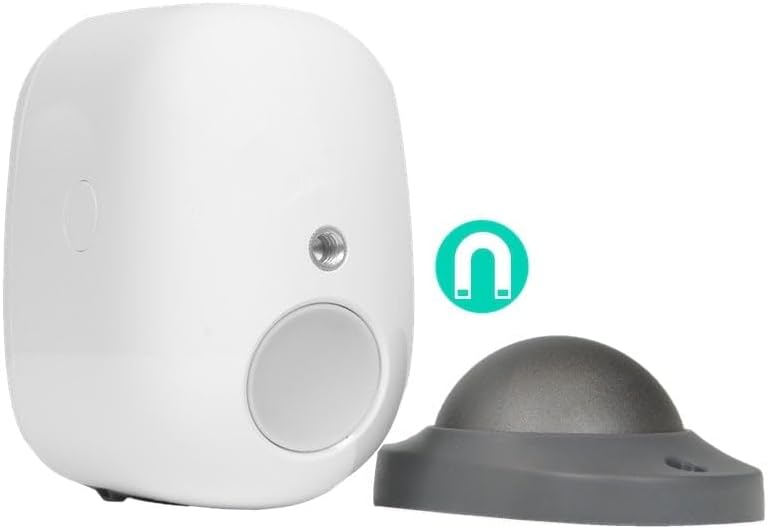
Figure 2.1: Contents of the VICOHOME CG122 package, showing the camera, magnetic mounting base, USB charging cable, and mounting hardware.
3. Product Overview
Familiarize yourself with the various components of your VICOHOME CG122 camera.

Figure 3.1: Front and side view of the VICOHOME CG122 camera, highlighting the lens, infrared sensor, and the integrated mounting base.
- Lens: Captures video footage.
- Infrared LED: Provides illumination for night vision.
- Light Sensor: Detects ambient light levels to switch between day and night modes.
- Microphone: Captures audio for two-way communication and sound detection.
- Speaker: Outputs audio for two-way communication.
- PIR Motion Sensor: Detects passive infrared changes for motion detection.
- Reset Button: Used to reset the camera to factory settings.
- USB Charging Port: For charging the internal battery.
- Mounting Thread/Magnetic Base: For attaching the camera to the mounting bracket.
4. Setup Guide
4.1 Initial Charging
Before first use, fully charge the camera's battery. Connect the provided USB charging cable to the camera's USB port and a standard 5V/1A USB power adapter (not included). The indicator light will show charging status (e.g., red for charging, blue for fully charged).
4.2 App Download and Account Registration
Search for the "VICOHOME" app on the App Store (iOS) or Google Play Store (Android), or scan the QR code provided in the quick start guide (if applicable). Install the app and follow the on-screen instructions to register a new account or log in if you already have one.
4.3 Adding the Camera to the App
- Open the VICOHOME app and tap the "+" icon to add a new device.
- Select "Battery Camera" or the appropriate camera type.
- Power on the camera. Ensure the indicator light is blinking blue, indicating it's ready for pairing. If not, press and hold the reset button for 5 seconds until it blinks.
- Follow the app's instructions to connect the camera to your 2.4GHz Wi-Fi network. (5GHz Wi-Fi is not supported).
- Scan the QR code displayed on your phone screen with the camera lens. Hold the phone approximately 15-20 cm (6-8 inches) from the camera.
- Once connected, the camera will confirm successful pairing, and its indicator light will turn solid blue.
- Name your camera and complete the setup process.
4.4 Installation and Mounting
Choose a suitable location for your camera. For optimal motion detection, position the camera where subjects will cross its field of view rather than moving directly towards or away from it. Ensure the Wi-Fi signal is strong at the chosen location.

Figure 4.1: Rear view of the VICOHOME CG122 camera, showing the magnetic mounting point and the detachable magnetic base for installation.
Magnetic Mounting:
- Attach the magnetic base to the desired surface using the provided screws and wall anchors.
- Once the base is securely mounted, simply attach the camera to the magnetic base. The strong magnet will hold the camera firmly in place, allowing for easy angle adjustment.
Screw Mounting (Alternative):
The camera may also have a standard screw thread for direct mounting to compatible brackets (if included or purchased separately).
5. Operating Instructions
5.1 Live View
Open the VICOHOME app and tap on your camera's name to access the live video feed. From here, you can:
- View real-time video.
- Take screenshots.
- Record video manually.
- Initiate two-way audio communication.
5.2 Recording and Playback
The camera supports motion-triggered recording. Recordings are stored on a microSD card (not included, up to 128GB) or in cloud storage (subscription may be required).
- Motion Detection: Enable motion detection in the app settings. Adjust sensitivity and detection zones as needed.
- Playback: Access recorded events through the "Playback" or "Event" section in the app. Select the date and time to review footage.
5.3 Two-Way Audio
Tap the microphone icon in the live view interface to speak through the camera's speaker. Tap it again to end communication. This feature allows you to communicate with visitors or deter intruders.
5.4 Night Vision
The camera automatically switches to infrared night vision mode in low-light conditions, providing clear black-and-white video up to a certain range. Ensure no obstructions block the infrared LEDs.
6. Maintenance
- Battery Charging: Recharge the camera's battery when the app indicates low power. Battery life varies based on usage and environmental factors.
- Cleaning: Gently wipe the camera lens and body with a soft, dry cloth. Do not use harsh chemicals or abrasive materials.
- Firmware Updates: Regularly check for and install firmware updates via the VICOHOME app. Updates often include performance improvements, new features, and security enhancements.
- MicroSD Card Management: If using a microSD card, periodically check its status and format it through the app to maintain optimal recording performance.
7. Troubleshooting
| Problem | Possible Cause | Solution |
|---|---|---|
| Camera won't power on. | Battery is depleted. | Charge the camera for several hours using the provided USB cable. |
| Cannot connect to Wi-Fi. | Incorrect Wi-Fi password; camera too far from router; 5GHz Wi-Fi network. | Ensure correct 2.4GHz Wi-Fi password. Move camera closer to router. Ensure you are connecting to a 2.4GHz network. Reset camera and try pairing again. |
| Poor video quality. | Dirty lens; weak Wi-Fi signal; low light conditions. | Clean the camera lens. Improve Wi-Fi signal strength. Ensure sufficient lighting or proper night vision activation. |
| Motion detection not working. | Motion detection disabled; incorrect sensitivity settings; obstructions. | Enable motion detection in app settings. Adjust sensitivity. Ensure no objects block the PIR sensor. |
| App crashes or freezes. | Outdated app version; phone storage issues. | Update the VICOHOME app to the latest version. Clear app cache or reinstall. |
8. Specifications
| Feature | Detail |
|---|---|
| Model Number | CG122 |
| Brand | VICOHOME |
| Resolution | 4 Megapixel (4MPX) |
| Connectivity | Wi-Fi (2.4GHz only) |
| Power Source | Battery Powered |
| Night Vision | Infrared |
| Material | Plastic |
| Dimensions (L x W x H) | 8.2 x 5.9 x 1.9 cm (3.23 x 2.32 x 0.75 inches) |
| Storage | MicroSD card (up to 128GB, not included), Cloud Storage (optional) |
9. Warranty and Support
VICOHOME products come with a standard manufacturer's warranty. Please refer to the warranty card included in your package or visit the official VICOHOME website for detailed warranty terms and conditions.
For technical support, troubleshooting assistance, or any product-related inquiries, please contact VICOHOME customer service through the contact information provided on their official website or within the VICOHOME app.
Always ensure you are using the latest version of the VICOHOME app and camera firmware for optimal performance and security.
Related documentsCG122


Ask a question about this manual
Ask about setup, troubleshooting, compatibility, parts, safety, or missing instructions. Manuals+ will review the question and use this page’s manual context to help answer it.