
DOKIO DSP400M*2
DOKIO 2PCS 400 Watt Solar Panels Instruction Manual
Model: DSP400M*2 | Brand: DOKIO
1. Introduction
Thank you for choosing DOKIO 2PCS 400 Watt Solar Panels. This manual provides essential information for the safe and efficient installation, operation, and maintenance of your solar panel system. These high-efficiency panels are designed for various off-grid applications, including caravans, RVs, golf cars, electric cars, yachts, boats, tents, and portable power stations. Please read this manual thoroughly before installation and keep it for future reference.

Image 1.1: Two DOKIO 400 Watt Solar Panels, providing a total of 800W power output.
2. Safety Information
Always observe the following safety precautions to prevent personal injury or damage to the solar panels:
- Do not attempt to disassemble, repair, or modify the solar panels.
- Handle the panels with care to avoid dropping or impacting them.
- Ensure proper grounding and wiring according to local electrical codes.
- Avoid touching the electrical terminals when the panels are exposed to sunlight.
- Wear appropriate personal protective equipment (PPE) during installation, including gloves and eye protection.
- Keep children and unauthorized personnel away from the installation area.
- Do not install panels in areas prone to excessive shading, as this can reduce efficiency and potentially damage cells.
3. Components
Each DOKIO 400 Watt Solar Panel is constructed with high-quality materials to ensure durability and performance.

Image 3.1: Exploded view showing the internal structure and components of the solar panel.

Image 3.2: Key components include low-iron tempered glass for optimal light transmission, an IP65 rated junction box for protection against dust and water, IP67 rated solar connectors for secure and waterproof connections, and a rugged aluminum frame for structural integrity.
Included Components:
- 2 x DOKIO 400 Watt Solar Panels
- Bag (for transport/storage)
- Extra long 3m (9.84ft) cable with MC4 connectors
4. Setup and Installation
Proper installation is crucial for optimal performance and longevity of your solar panels. Each panel features pre-drilled holes for easy mounting.
4.1 Site Selection
Choose a location that receives maximum direct sunlight throughout the day, free from shadows cast by trees, buildings, or other obstructions. Consider the angle and orientation for your specific geographic location to maximize energy harvest.

Image 4.1: Example of a rooftop solar panel installation, illustrating the connection points to an inverter and car charging station (components not included with panels).
4.2 Mounting Options
The DOKIO solar panels are versatile and can be installed using various mounting methods:
- Railed/Flat Roof Mounting: Securely attach panels to existing roof rails or flat roof structures.
- Pole Mounts: Ideal for ground installations where panels can be elevated and angled.
- Foundation Mounts: Ground-based installations with a sturdy base.

Image 4.2: Visual representation of common mounting options for solar panels.
4.3 Electrical Connection (Parallel)
For connecting multiple panels, parallel wiring is a common method. Ensure your MPPT charge controller can handle the combined voltage and current.

Image 4.3: Parallel connection diagram. Connect the positive terminals of both solar panels together and the negative terminals together. These are then connected to the MPPT charge controller. The controller connects to a 24V battery, which then powers a power inverter. Important: The MPPT controller should be able to accept an input voltage of at least 24V and handle an input current of at least 30A.
The panels come with extra-long 3m (9.84ft) cables for flexible placement.
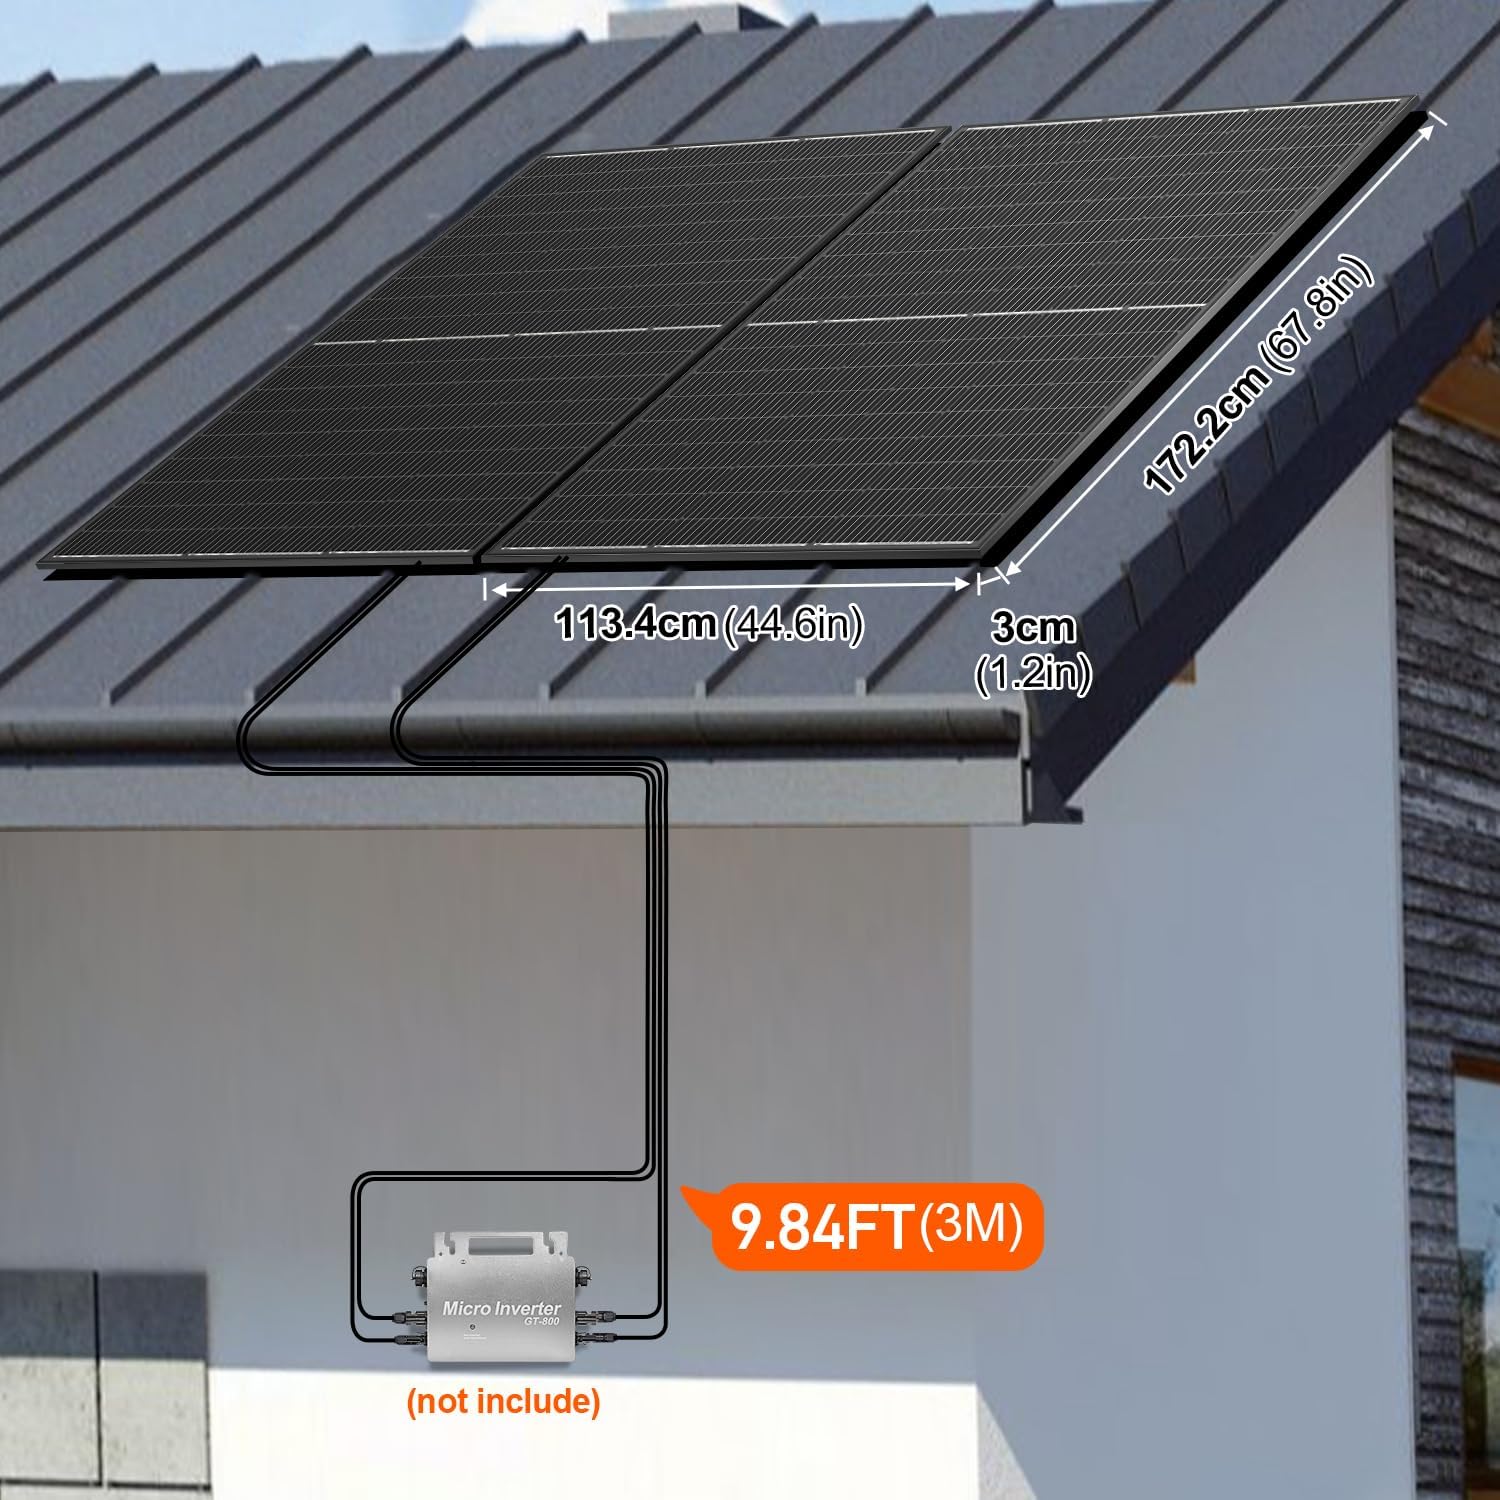
Image 4.4: Solar panel dimensions (67.8"L x 44.65"W x 2.36"H) and cable length for installation planning.
5. Operating the Solar Panels
Once installed and connected to a compatible charge controller and battery system, your DOKIO solar panels will automatically begin generating electricity when exposed to sunlight. The efficiency of power generation depends on several factors:
- Sunlight Intensity: Direct, unobstructed sunlight yields the highest power output.
- Panel Temperature: Cooler panel temperatures generally result in higher efficiency.
- Angle and Orientation: Panels should be angled towards the sun for maximum exposure.
- Cleanliness: Dust, dirt, or debris on the panel surface can reduce efficiency.
The panels feature N-type cells and Class A+ cells, designed to extend solar power generation time, even in less than ideal conditions.

Image 5.1: Grade A+ mono cells contribute to a high conversion efficiency of 22%.
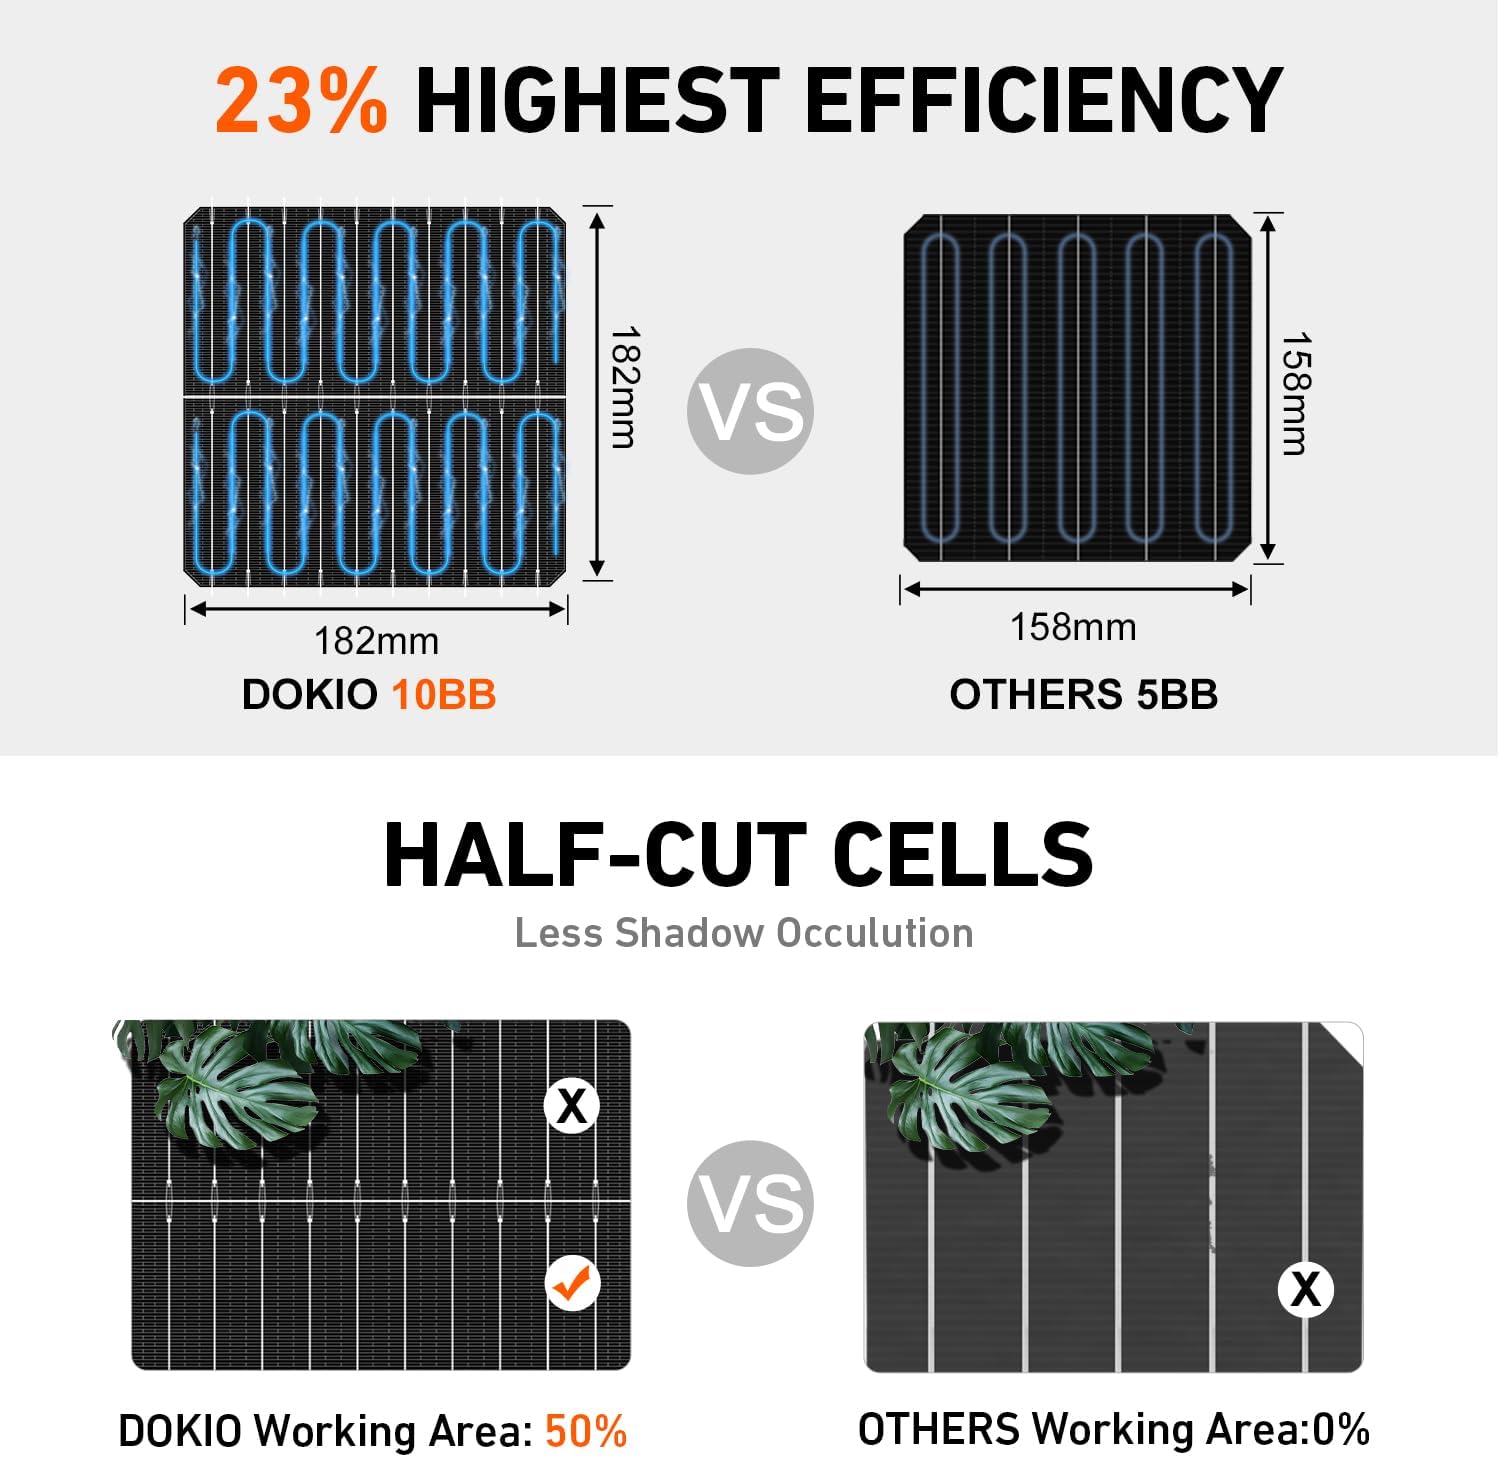
Image 5.2: The 10BB (Busbar) design and half-cut cells reduce energy loss and improve performance, especially under partial shading.
Official Product Video: High-Quality Materials
Video 5.1: This video from DOKIO Solar Panel highlights the high-quality materials and advanced features of the 400 Watt solar panels, including the 9 busbars technology and half-cell design for increased power output and reliability.
6. Maintenance
Regular maintenance ensures the longevity and optimal performance of your solar panels.
- Cleaning: Periodically clean the surface of the panels with a soft cloth and water to remove dust, dirt, bird droppings, or other debris that can reduce efficiency. Avoid abrasive cleaners or harsh chemicals.
- Inspection: Regularly inspect the panels for any physical damage, such as cracks in the glass, loose frames, or damaged cables. Check electrical connections for corrosion or looseness.
- Shading: Ensure no new obstructions (e.g., growing trees) are casting shadows on the panels.
The panels are designed to withstand harsh weather conditions, including strong winds (2400Pa wind load) and snow loads (5400Pa snow load), and are IP65 rated for waterproof protection.

Image 6.1: DOKIO solar panels are certified to withstand extreme weather conditions, including significant wind and snow loads.
7. Troubleshooting
If your solar panels are not performing as expected, consider the following common issues and solutions:
| Problem | Possible Cause | Solution |
|---|---|---|
| Low Power Output | Shading on panels, dirty panel surface, incorrect angle/orientation, cloudy weather, faulty connections. | Remove obstructions, clean panel surface, adjust angle for optimal sun exposure, check all wiring connections, wait for clear weather. |
| No Power Output | Disconnected cables, faulty charge controller/inverter, severe shading, damaged panel. | Verify all cable connections are secure, check charge controller/inverter status, ensure no shading, inspect panel for visible damage. |
| Overheating | Insufficient ventilation behind panels. | Ensure adequate airflow around and behind the panels. |
If problems persist after troubleshooting, contact DOKIO customer support for assistance.
8. Specifications
Detailed technical specifications for the DOKIO 400 Watt Solar Panel:

Image 8.1: Key electrical and physical specifications for the DOKIO 400W Solar Panel.
| Specification | Value |
|---|---|
| Brand | DOKIO |
| Model Number | DSP400M*2 |
| Maximum Power (Pmax) | 400 Watts (per panel) |
| Maximum Power Voltage (Vmp) | 31.00V |
| Maximum Power Current (Imp) | 13.09A |
| Open Circuit Voltage (Voc) | 37.08V |
| Short Circuit Current (Isc) | 13.24A |
| Conversion Efficiency | 22.00% |
| Product Dimensions (L x W x H) | 67.8" x 44.65" x 2.36" (172.2cm x 113.4cm x 3cm) |
| Item Weight | 96.8 pounds (for 2 panels) |
| Material | Aluminum, Glass |
| Connector Type | MC3 or MC4 or Tyco |
| Waterproof Rating | IP65 (Junction Box), IP67 (Connectors) |
| Wind Load Resistance | 2400Pa |
| Snow Load Resistance | 5400Pa |
| Country of Origin | China |
9. Warranty and Support
DOKIO provides a 15-Year Tech Support for its solar panels. As a professional solar system manufacturer, DOKIO is committed to providing professional solutions for any issues you may encounter.
For technical assistance, warranty claims, or any other inquiries, please refer to the contact information provided with your purchase or visit the official DOKIO website.
Note: The power output warranty is transferable.
Related documentsDSP400M*2

Ask a question about this manual
Ask about setup, troubleshooting, compatibility, parts, safety, or missing instructions. Manuals+ will review the question and use this page’s manual context to help answer it.