
Introduction
Thank you for choosing the Hikity 1-DIN Car Stereo. This manual provides essential information for the proper installation, operation, and maintenance of your new car stereo system. Please read this manual thoroughly before using the product to ensure optimal performance and safety. Keep this manual for future reference.
Package Contents
Verify that all items listed below are included in your package:
- 1 x Hikity 1-DIN Car Stereo Unit
- 1 x Power Cable Harness
- 1 x Antenna
- 1 x Steering Wheel Control Remote
- 1 x User Manual
- 1 x 3.5mm Microphone
- 1 x 12LED Rear View Camera

Figure 1: Included accessories and product dimensions.
Product Features
- 6.86-inch High-Definition Touchscreen Display (1280x480 resolution)
- Wireless Apple CarPlay and Android Auto Support
- Mirror Link Functionality for iOS/Android Devices
- Bluetooth 5.0 for Hands-Free Calling and Audio Streaming
- FM/RDS Radio Tuner (87.5-108 MHz)
- Built-in Equalizer (EQ) for Audio Customization
- Front USB and Type-C Ports for Charging and Media Playback
- Support for Steering Wheel Controls
- Rear View Camera Input with Automatic Trigger
- Multi-language Interface
Setup and Installation
Proper installation is crucial for the performance and safety of your car stereo. If you are unsure about any steps, it is recommended to seek professional assistance.
1. Pre-Installation Check
- Ensure your vehicle's power is disconnected before starting installation.
- Confirm the stereo's dimensions (1-DIN standard) are compatible with your car's dashboard opening.
2. Wiring Connections
Connect the power cable harness to your vehicle's wiring according to the provided wiring diagram in the separate installation guide. Key connections include:
- Yellow Wire: Constant 12V (Battery)
- Red Wire: Switched 12V (Accessory/Ignition)
- Black Wire: Ground
- Orange Wire: Illumination (Optional)
- Reverse Gear Wire: Connect to vehicle's reverse light signal for automatic camera display.
- Speaker Wires: Connect to corresponding vehicle speakers (e.g., Front Left +, Front Left -).
3. Antenna and Camera Connection
- Connect the FM antenna to the designated port on the stereo.
- Connect the rearview camera's video output (CVBS) to the stereo's camera input.
4. Mounting the Unit
Secure the 1-DIN unit into your vehicle's dashboard using the provided mounting hardware. Ensure it is firmly in place to prevent vibrations.
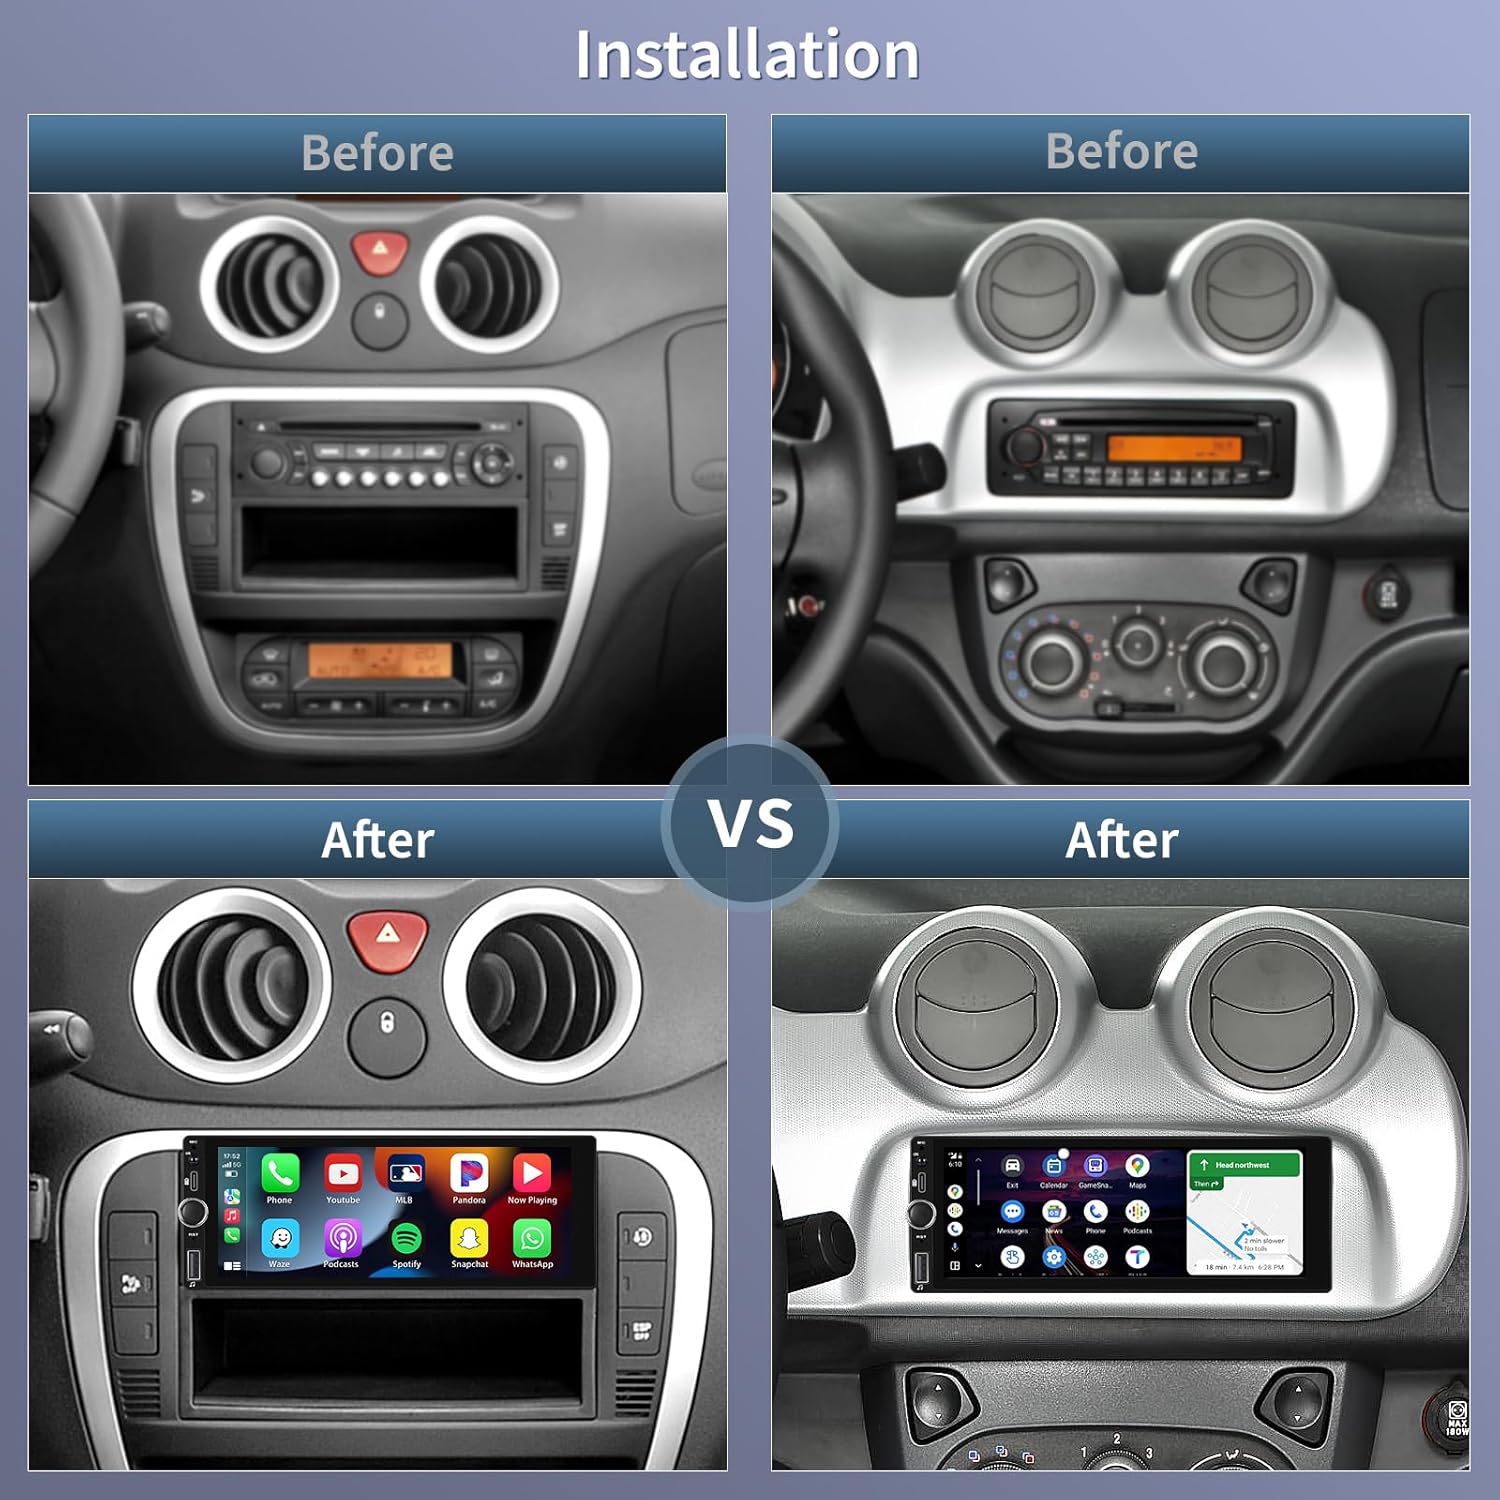
Figure 2: Example of car stereo installation in a vehicle dashboard.
Operating Instructions
1. Power On/Off and Volume
- Press the power button (usually a physical knob or button on the front panel) to turn the unit on or off.
- Rotate the volume knob or use the on-screen controls to adjust the audio level.
2. Wireless CarPlay / Android Auto
This unit supports wireless CarPlay for Apple devices and wireless Android Auto for Android devices. To connect:
- Ensure Bluetooth and Wi-Fi are enabled on your smartphone.
- On the car stereo, select the CarPlay or Android Auto icon.
- Follow the on-screen prompts to pair your phone via Bluetooth. Once paired, the system will automatically establish a Wi-Fi connection for CarPlay/Android Auto.
- Your phone's compatible apps will appear on the stereo display, allowing for navigation, calls, messages, and music playback.

Figure 3: Wireless CarPlay, Android Auto, and Mirror Link functionality.
3. Bluetooth Connectivity
For hands-free calls and Bluetooth audio streaming without CarPlay/Android Auto:
- Go to the Bluetooth menu on the car stereo.
- Enable Bluetooth on your smartphone and search for available devices.
- Select "SWL-BT" from your phone's Bluetooth device list and confirm pairing.
- Once connected, you can make/receive calls and play music through the stereo.

Figure 4: Bluetooth, FM Radio, and EQ settings interfaces.
4. FM/RDS Radio
- Select the "Radio" icon from the main menu.
- Use the on-screen controls to scan for stations manually or automatically.
- The RDS (Radio Data System) function will display station information where available.
- Save your favorite stations to preset buttons for quick access.
5. Mirror Link
The Mirror Link function allows you to display your smartphone's screen directly on the car stereo. This feature supports both iOS and Android devices.
- Select the "Mirror Link" icon on the stereo.
- Follow the specific instructions displayed on the stereo for connecting your iOS or Android device (usually involves USB connection and/or Wi-Fi pairing).
- Once connected, your phone's screen will be mirrored on the stereo display.
6. USB/Type-C Media Playback and Charging
The front USB and Type-C ports can be used for:
- Media Playback: Insert a USB drive (U-disk) containing audio (MP3/WMA/WAV/APE/FLAC) or video (RM/RMVB/AVI/MP4/MKV/3GP) files. The stereo will automatically detect and allow you to browse and play content.
- Charging: Connect your smartphone or other USB-powered devices to charge them.

Figure 5: Type-C/USB interface and HD Video Player.
7. Equalizer (EQ) Settings
Customize your audio experience:
- Access the "EQ" settings from the main menu or audio settings.
- Choose from various preset sound effects (e.g., Pop, Rock, Jazz) or manually adjust bass, treble, and other frequency bands to your preference.
8. Steering Wheel Controls
If your vehicle supports steering wheel controls, you can configure them to operate the stereo:
- Go to the "Steering Wheel Control" settings in the system menu.
- Follow the on-screen instructions to program each button on your steering wheel to a specific function (e.g., volume up/down, track skip, mode).

Figure 6: Steering Wheel Controls setup and Rear View Camera display.
9. Rear View Camera
When the vehicle is shifted into reverse gear, the stereo will automatically display the feed from the connected rearview camera, providing a clear view of the area behind your vehicle. Parking guidelines may also be displayed.
Maintenance
To ensure the longevity and optimal performance of your Hikity car stereo, follow these maintenance guidelines:
- Cleaning the Screen: Use a soft, lint-free cloth to gently wipe the touchscreen. For stubborn smudges, slightly dampen the cloth with water or a screen-safe cleaner. Avoid harsh chemicals or abrasive materials.
- General Cleaning: Keep the unit free from dust and debris. Use a soft brush or compressed air to clean around buttons and ports.
- Temperature: Avoid exposing the unit to extreme temperatures, direct sunlight for prolonged periods, or high humidity.
- Software Updates: Check the Hikity official website periodically for any available firmware updates to improve performance and add new features.
Troubleshooting
If you encounter issues with your car stereo, refer to the following common problems and solutions:
| Problem | Possible Cause | Solution |
|---|---|---|
| No power/Unit does not turn on | Incorrect wiring; Blown fuse; Vehicle battery issue | Check power (yellow, red, black) wire connections. Inspect vehicle's fuse box and stereo's inline fuse. Ensure vehicle battery is charged. |
| No sound | Volume too low; Mute activated; Incorrect speaker wiring; Amplifier issue | Increase volume. Check if mute is active. Verify speaker wire connections. If using an external amplifier, check its power and connections. |
| CarPlay/Android Auto not connecting wirelessly | Bluetooth/Wi-Fi off on phone; Incorrect pairing; Phone compatibility issue | Ensure phone's Bluetooth and Wi-Fi are on. Delete previous pairings and re-pair. Update phone OS. Try a different compatible phone. |
| Poor radio reception | Antenna not connected; Damaged antenna; Weak signal area | Ensure antenna is securely connected. Check antenna for damage. Try scanning for stations in a different location. |
| Rear view camera not displaying | Camera not connected; Reverse trigger wire not connected; Faulty camera | Verify camera video input (CVBS) and reverse trigger wire connections. Test camera functionality. |
| Unit freezes or becomes unresponsive | Software glitch; Overheating | Press the RST (Reset) button (usually a small pinhole). Ensure adequate ventilation around the unit. |
Specifications
| Feature | Specification |
|---|---|
| Model Number | D6021 (H-C79A3547A3) |
| System | Melis |
| CPU Chip | 8227 |
| Operating Voltage | 12V ~ 14.4V |
| Screen Size | 6.86 inches |
| Screen Resolution | 1280 x 480 pixels |
| Radio Frequency | FM 87.5 - 108 MHz |
| Radio Chip | 6625 |
| Output Power | 60W x 4 channels |
| Power Amplifier Chip | YD7388 |
| Bluetooth Version | 5.0 |
| Working Temperature | -10°C ~ 60°C |
| Audio Formats | MP3, WMA, WAV, APE, FLAC |
| Video Formats | RM, RMVB, AVI, MP4, MKV, 3GP |
| Image Formats | JPG, BMP, PNG |
| Connectivity | Bluetooth, USB, Type-C, RCA |
| Product Dimensions (L x W x H) | 18.8 x 6.7 x 13 cm (7.4 x 2.6 x 5.1 inches) |
| Front Panel Dimensions (L x H) | 188mm x 67mm (7.4 x 2.6 inches) |
| Chassis Dimensions (W x H) | 177mm x 52mm (6.9 x 2.0 inches) |
Warranty and Support
Warranty Information
This Hikity car stereo comes with a 2-year warranty from the date of purchase. This warranty covers manufacturing defects and malfunctions under normal use. It does not cover damage caused by improper installation, accident, misuse, abuse, unauthorized modifications, or natural disasters.
Please retain your proof of purchase for warranty claims.
Customer Support
For technical assistance, troubleshooting not covered in this manual, or warranty inquiries, please contact Hikity customer support through the retailer where you purchased the product or visit the official Hikity website for contact information.
When contacting support, please have your product model number (D6021) and purchase details ready.


