Introduction
This user manual provides comprehensive instructions for the installation, operation, and maintenance of the DieseRC 1-Channel Smart WiFi Switch. This versatile relay module allows you to remotely control various devices via the eWelink application, Amazon Alexa, and Google Home. It supports multiple DC voltage inputs (5V, 12V, 24V, 36V) and offers both inching and self-locking operating modes, making it suitable for a wide range of applications from smart home automation to industrial control.
Safety Information
Please read all safety warnings and instructions carefully before installing and operating this device. Failure to follow these instructions may result in electric shock, fire, or serious injury.
- Ensure power is disconnected before performing any wiring or maintenance.
- This device operates with DC voltages (5V, 7V-48V). Verify your power source matches the device's requirements.
- Installation should be performed by a qualified electrician if you are unsure about electrical wiring.
- Do not expose the device to moisture or extreme temperatures.
- Keep out of reach of children.
Product Overview
The DieseRC 1-Channel Smart WiFi Switch is a compact and powerful module designed for remote control applications.
Key Features:
- Wireless WIFI Smart Switch Relay Module (2.4 GHz WIFI).
- Compatible with eWelink APP for Android and iOS.
- Voice control support for Amazon Alexa (Echo / Dot / Spot) and Google Home.
- Two operating modes: Inching (Momentary) and Self-locking (Toggle).
- High-quality 10A relay with over 400,000 operations lifespan.
- Passive output (dry contacts): Normally Open (NO), Common (COM), Normally Closed (NC) pins.
- Wide DC voltage input range: 5V or 7V-48V.
- Compact size (55x29x17 mm / 2.2x1.1x0.7 inches) for easy installation in electrical boxes.
- APP functions include scheduling, timing, and countdown.
- Supports sharing control with family members.
- Compatible with RM2.4G Bluetooth remote control (sold separately).
Component Identification:

Figure 1: Detailed view of the DieseRC Smart WiFi Switch module with labeled components. Key elements include the relay indicator light, the pairing button, the WiFi network indicator light, the USB 5V/0.5A input, and the output terminals: Normally Open (NO), Common (COM), and Normally Closed (NC). The module dimensions are 55x29x17 mm.
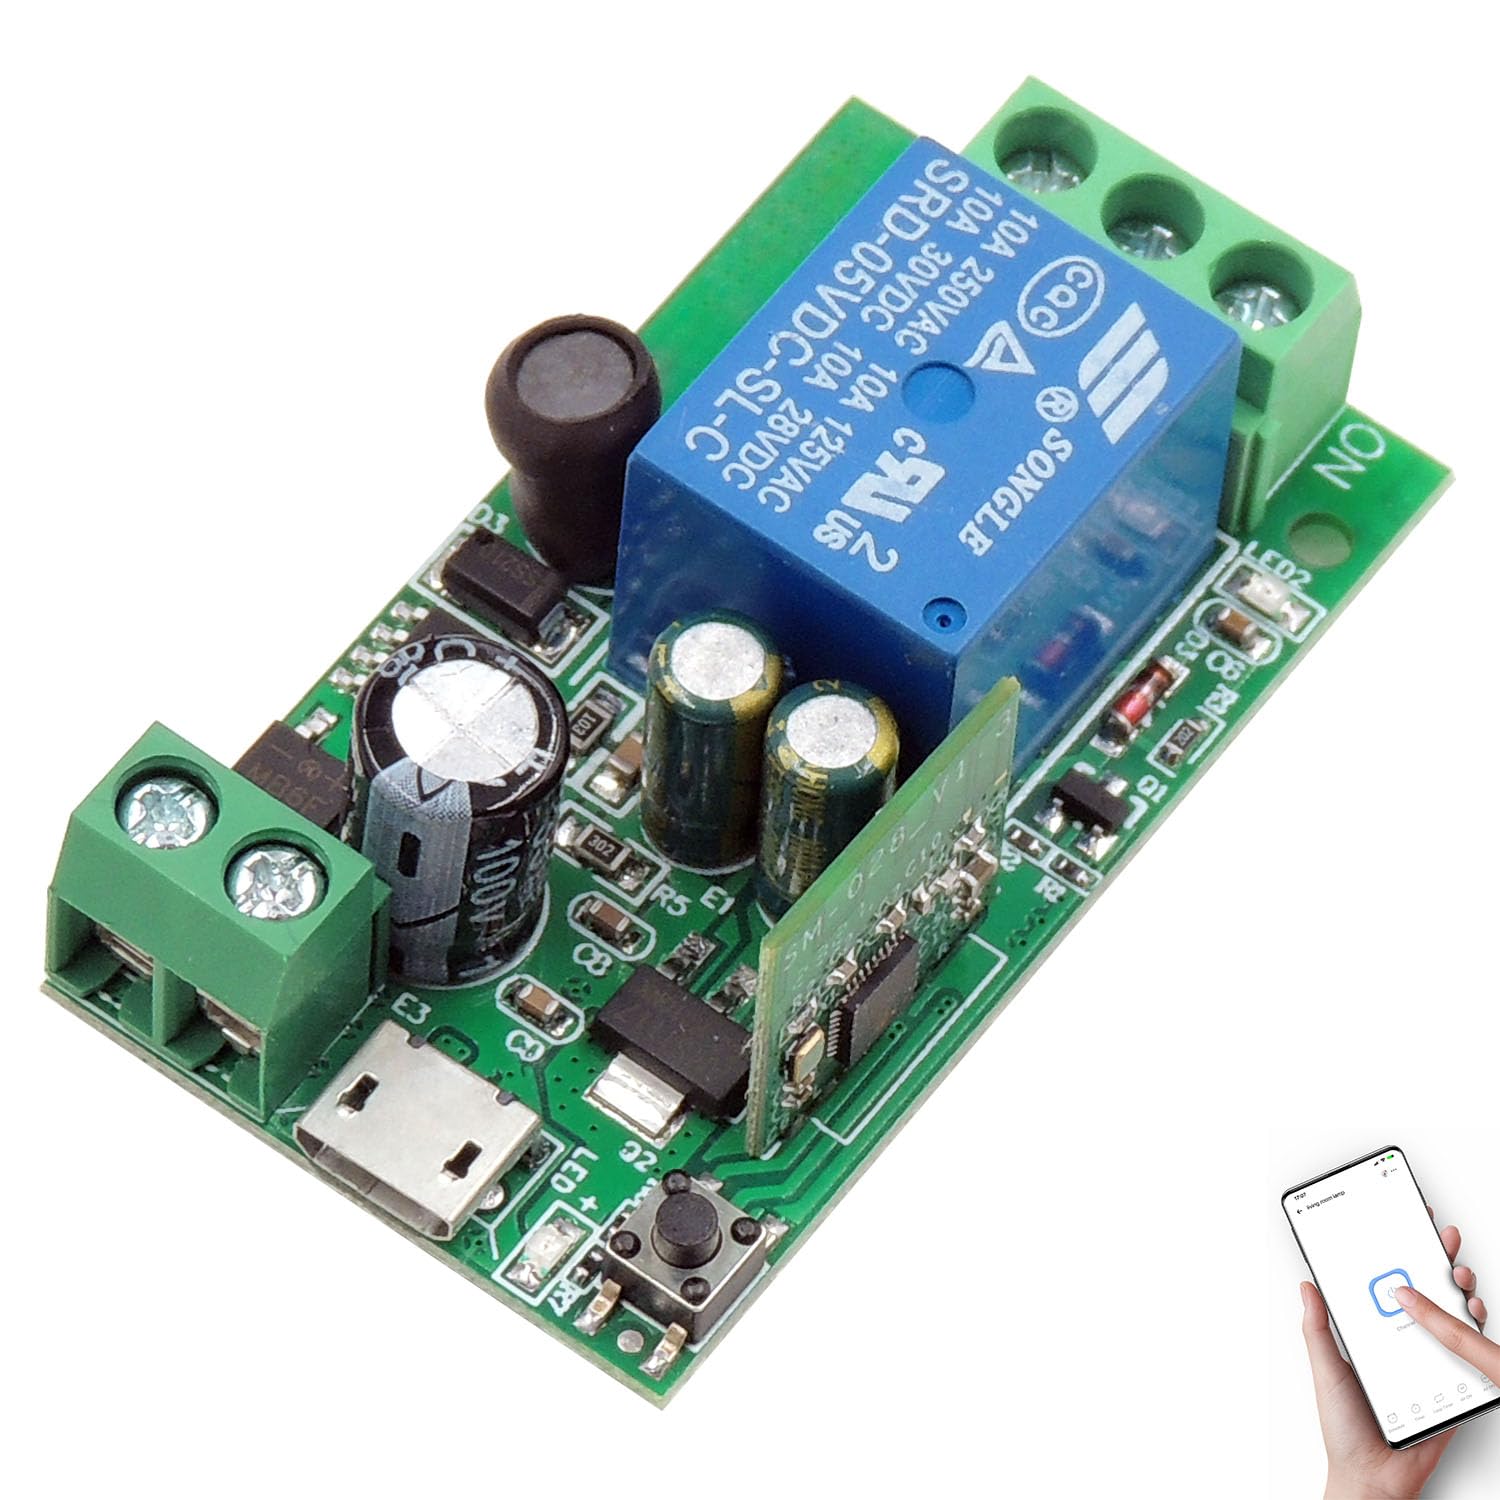
Figure 2: Overall perspective view of the DieseRC 1-Channel Smart WiFi Switch module, highlighting its compact design and main components.
Specifications
| Parameter | Value |
|---|---|
| Product Dimensions (L x W x H) | 12.4 x 8.6 x 1.9 cm; 25 grams |
| Model Number | EW748 (EW-1CH) |
| Manufacturer | DieseRC |
| Connector Type | 1 |
| Contact Material | Metal |
| Contact Type | Normally Open |
| Current Rating | 10A |
| Mounting Type | Surface Mount |
| Operating Mode | Automatic |
| Power | 360 Watts |
| Coil Voltage | 5 Volts (DC) |
| Input Voltage Range | DC 5V or DC 7V ~ 48V |
Setup
1. Wiring the Module:
The DieseRC Smart WiFi Switch features passive output (dry contacts) with Normally Open (NO), Common (COM), and Normally Closed (NC) terminals. It can be powered via a 5V USB input or a DC 7V-48V input.
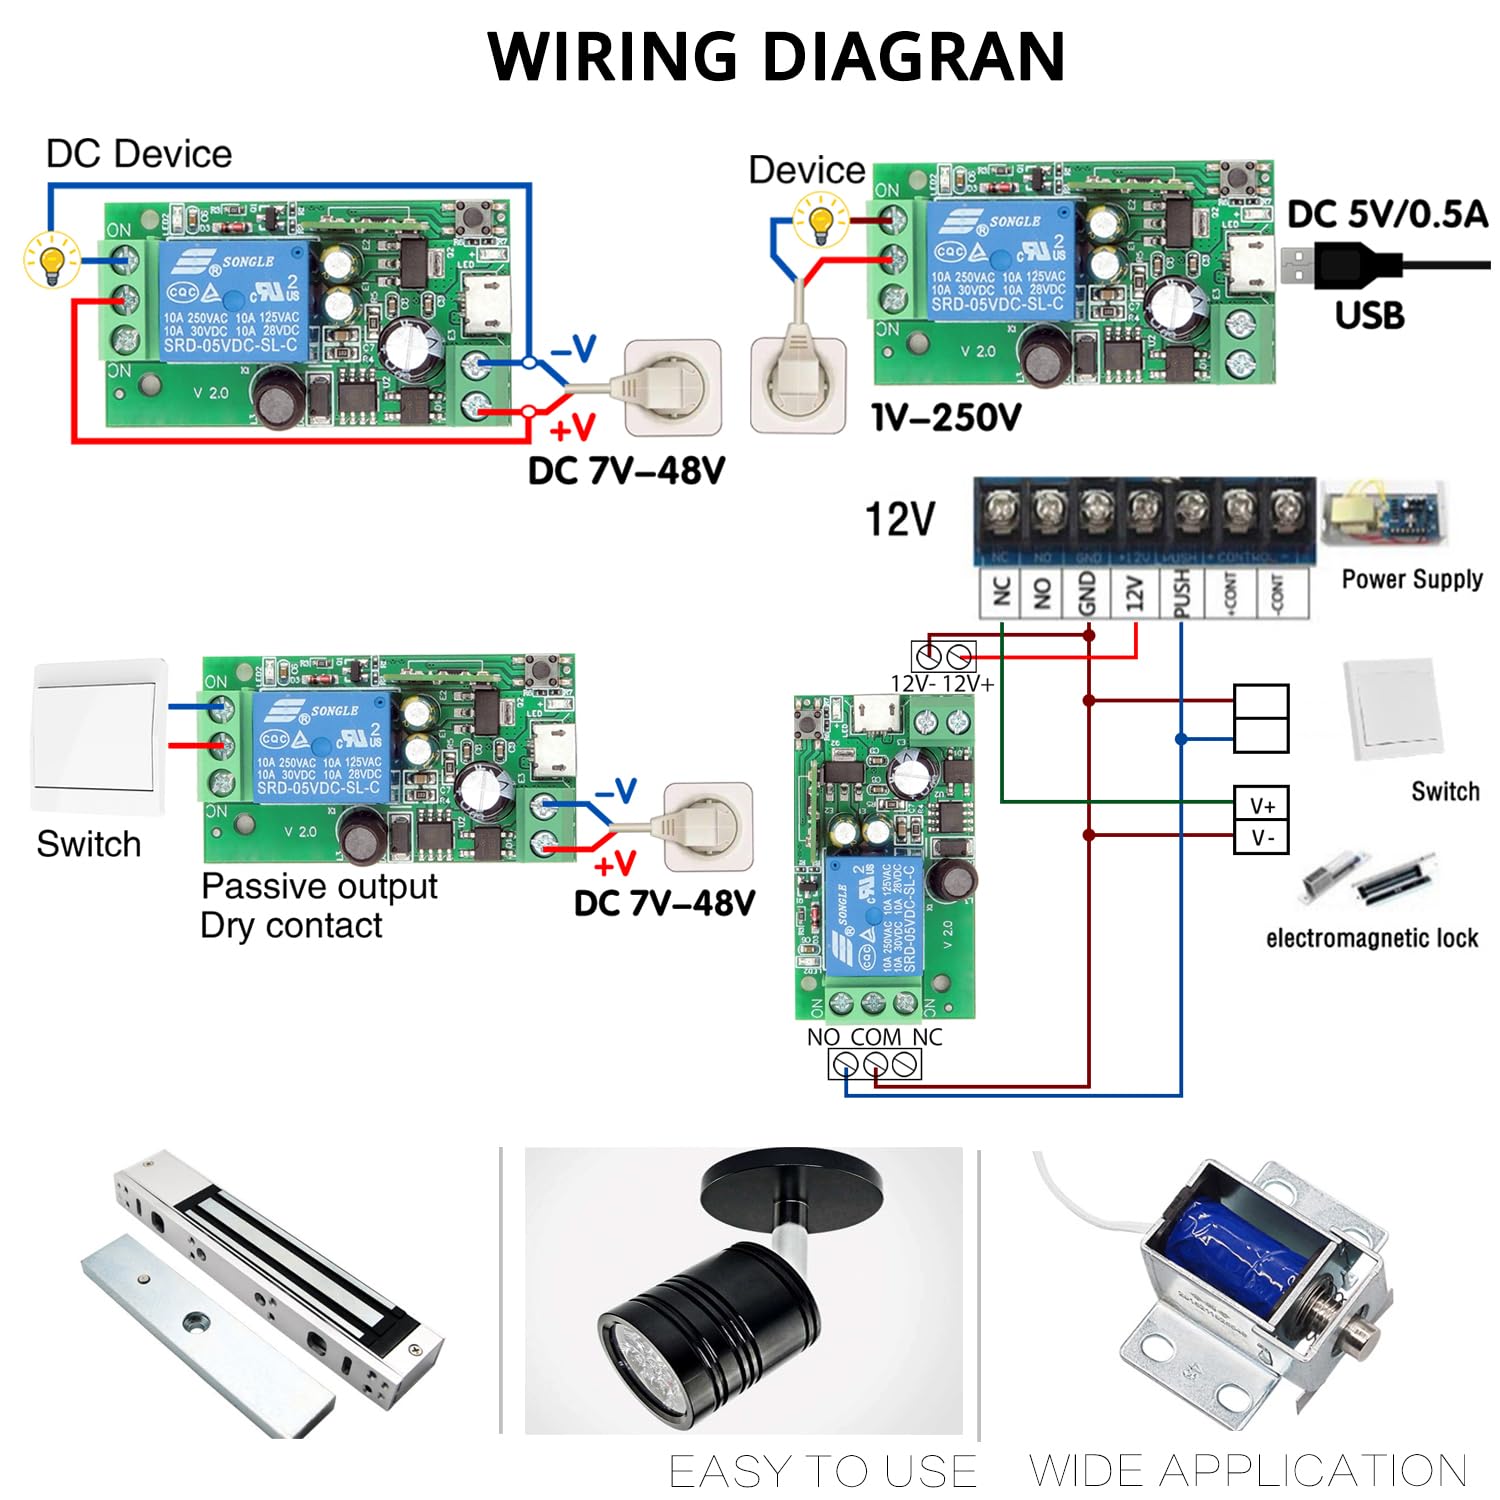
Figure 3: Various wiring configurations for the smart switch. This includes connecting to a DC device, integrating with a standard switch, and controlling an electromagnetic lock. Power can be supplied via DC 5V/0.5A USB or DC 7V-48V.
Important: Ensure correct polarity when connecting DC power. The module's output terminals (NO, COM, NC) act as a switch for your connected device, providing a dry contact closure.
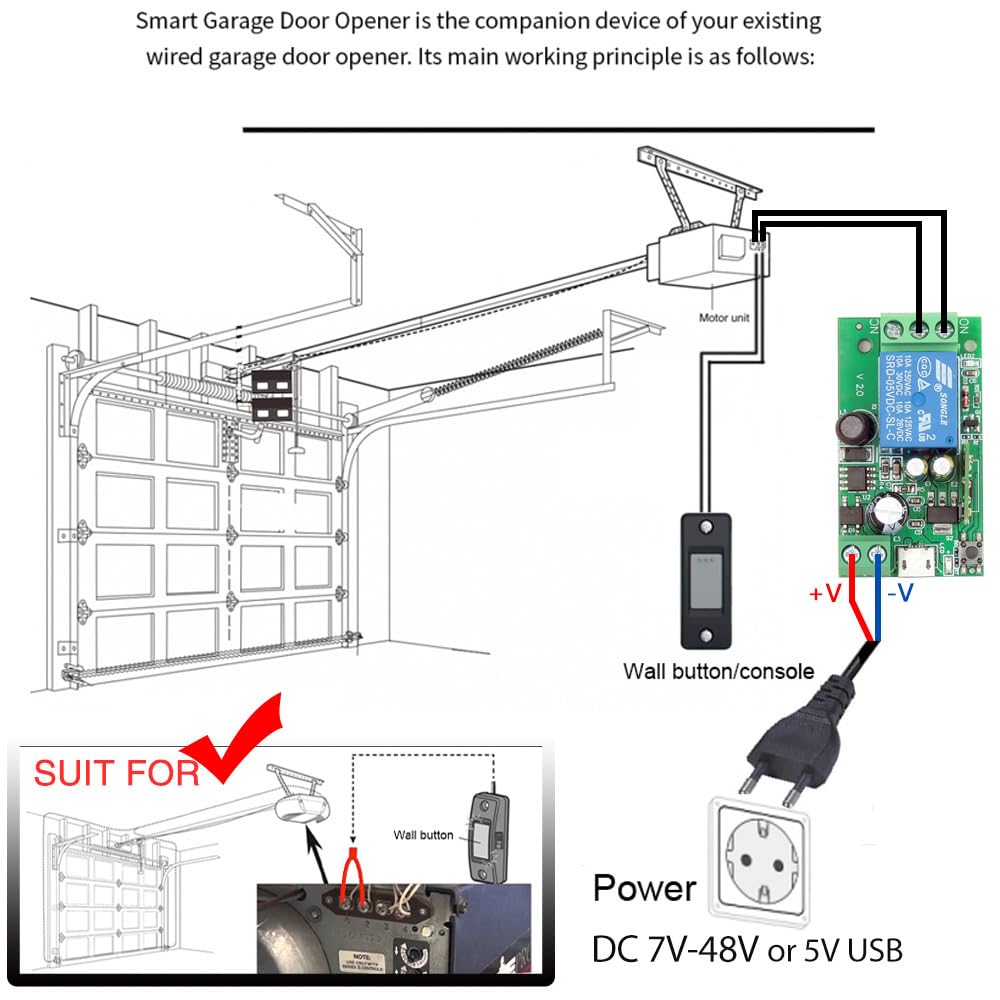
Figure 4: Application example: Connecting the smart switch to a garage door opener. The module acts as a companion device, connecting to the existing wired wall button terminals of the garage door motor unit.
2. App Installation:
To control the device, download the "eWelink" application on your smartphone.
- Scan the QR code below or visit http://app.coolkit.cc/dl.html to download the eWelink app for Android or iOS.
- Install the application and register an account if you don't have one.

Figure 5: QR code for quick download of the eWelink application.
3. Device Pairing:
Follow these steps to pair your smart switch with the eWelink app:
- Power on the DieseRC Smart WiFi Switch.
- Open the eWelink app on your smartphone.
- Tap the "+" icon to add a new device.
- Press and hold the "Open the key / Pairing button" on the module (refer to Figure 1) for approximately 5-7 seconds until the WiFi network indicator light starts blinking rapidly. This indicates pairing mode.
- Follow the on-screen instructions in the eWelink app to connect the device to your 2.4GHz Wi-Fi network.
- Once successfully paired, the WiFi indicator light will become solid, and the device will appear in your eWelink app.
Operating
1. Control Modes:
The smart switch supports two main operating modes:
- Inching Mode (Momentary): The relay turns on for a set duration (e.g., 0.5 seconds) and then automatically turns off. Ideal for momentary actions like garage door openers or electric strikes.
- Self-locking Mode (Toggle): The relay toggles its state with each command (on/off). Ideal for controlling lights or other devices that require a continuous on/off state.
You can configure the operating mode within the eWelink application settings for the device.
2. eWelink APP Control:
Once paired, you can control your device from anywhere using the eWelink app.

Figure 6: Remote control via the eWelink app, demonstrating the ability to operate devices like garage doors from any location with internet access.
The app allows you to:
- Turn the connected device on/off.
- Set Timing schedules for automatic operation (e.g., turn on at 8:00 AM).
- Create Countdown timers for temporary operation.
- Share control of the device with other eWelink users (family members).

Figure 7: Illustration of the scheduling and timing features available in the eWelink app, allowing users to automate device operation.
3. Voice Control (Alexa/Google Home):
Integrate your smart switch with Amazon Alexa or Google Home for convenient voice control.
- Ensure your smart switch is successfully paired with the eWelink app.
- Open the Alexa or Google Home app.
- Enable the "eWelink Smart Home" skill/service.
- Link your eWelink account.
- Discover devices. Your smart switch should now be controllable by voice commands.
Example voice command: "Alexa, turn on the light."

Figure 8: Voice control integration with Amazon Alexa and Google Home, allowing hands-free operation of connected devices.
Maintenance
The DieseRC Smart WiFi Switch is designed for long-term reliability.
- Keep the module clean and free from dust.
- Avoid exposing it to water or excessive humidity.
- The relay has a lifespan of over 400,000 operations, ensuring durable performance.
- No user-serviceable parts inside. Do not attempt to disassemble the module.
Troubleshooting
| Problem | Possible Cause | Solution |
|---|---|---|
| Device not connecting to Wi-Fi / App. | Incorrect Wi-Fi password; Device too far from router; Router is 5GHz only; Device not in pairing mode. |
|
| Device unresponsive after pairing. | No internet connection; Power supply issue; Relay malfunction. |
|
| Voice control not working. | eWelink skill not enabled/linked; Incorrect device name; Voice assistant not connected to internet. |
|
Warranty and Support
For warranty information and technical support, please refer to the product's purchase page or contact DieseRC customer service directly. Details regarding specific warranty periods and support channels may vary.
Manufacturer: DieseRC


