
1. Introduction
This manual provides detailed instructions for the operation and maintenance of your POLONO P31S Portable Thermal Label Maker. Please read this manual thoroughly before using the device to ensure proper function and longevity.

Image 1.1: POLONO P31S Label Maker with included label roll and example labels.
2. Package Contents
Verify that all items are present in the package:
- 1 x POLONO P31S Label Maker
- 1 x Roll of White Label Paper
- 1 x User Manual (this document)
- 1 x Type-C Charging Cord
- 1 x Guide Card
3. Product Overview
The POLONO P31S is a compact, portable thermal label printer designed for various labeling needs. It connects via Bluetooth to your smartphone (iOS or Android) and operates ink-free.
Key Features:
- Portable Design: Compact and lightweight for easy carrying.
- Thermal Printing: No ink or toner required.
- High Resolution: 203 dpi for clear printing.
- Bluetooth Connectivity: Seamless connection to smartphones.
- App Control: Utilizes the "Labelnize" app for label creation and printing.
- Built-in Cutter: For neat label separation.
- Rechargeable Battery: Integrated Lithium Polymer battery.

Image 3.1: The compact size of the P31S label maker, highlighting its portability and dimensions (approximately 2.83 x 2.91 x 5 inches).
4. Setup
4.1 Charging the Device
Before initial use, fully charge the label maker using the provided Type-C charging cord. The charging port is typically located on the side or back of the device. An indicator light will show charging status.
4.2 Installing Label Tape
- Click the unlock button to open the paper cover.
- Install the label tape into the paper bin, ensuring the label side faces upwards.
- Leave approximately 0.2 inches (5mm) of paper extending outside the machine and close the cover.
- Press and hold the power button to turn on the device. Then, press the power button again briefly to initiate calibration.
Important Note:
- Do not tear or damage the green non-adhesive sticker on the back of the label tape, as this will affect printing performance.
- It is recommended to use genuine POLONO thermal label paper for optimal printing quality.

Image 4.1: Step-by-step guide for loading label tape into the P31S device.
4.3 App Installation and Bluetooth Connection
The POLONO P31S operates exclusively with the "Labelnize" mobile application.
- Download the App: Scan the QR code below or search for "Labelnize" in your device's app store.
Apple App Store | Google Play Store - Enable Bluetooth: Ensure Bluetooth is enabled on your smartphone.
- Connect to Printer: Open the Labelnize app. In the app, navigate to the connection section (often indicated by a Bluetooth icon or "Unconnected" status). Select "P31S" from the list of available devices and tap "Click to connect".
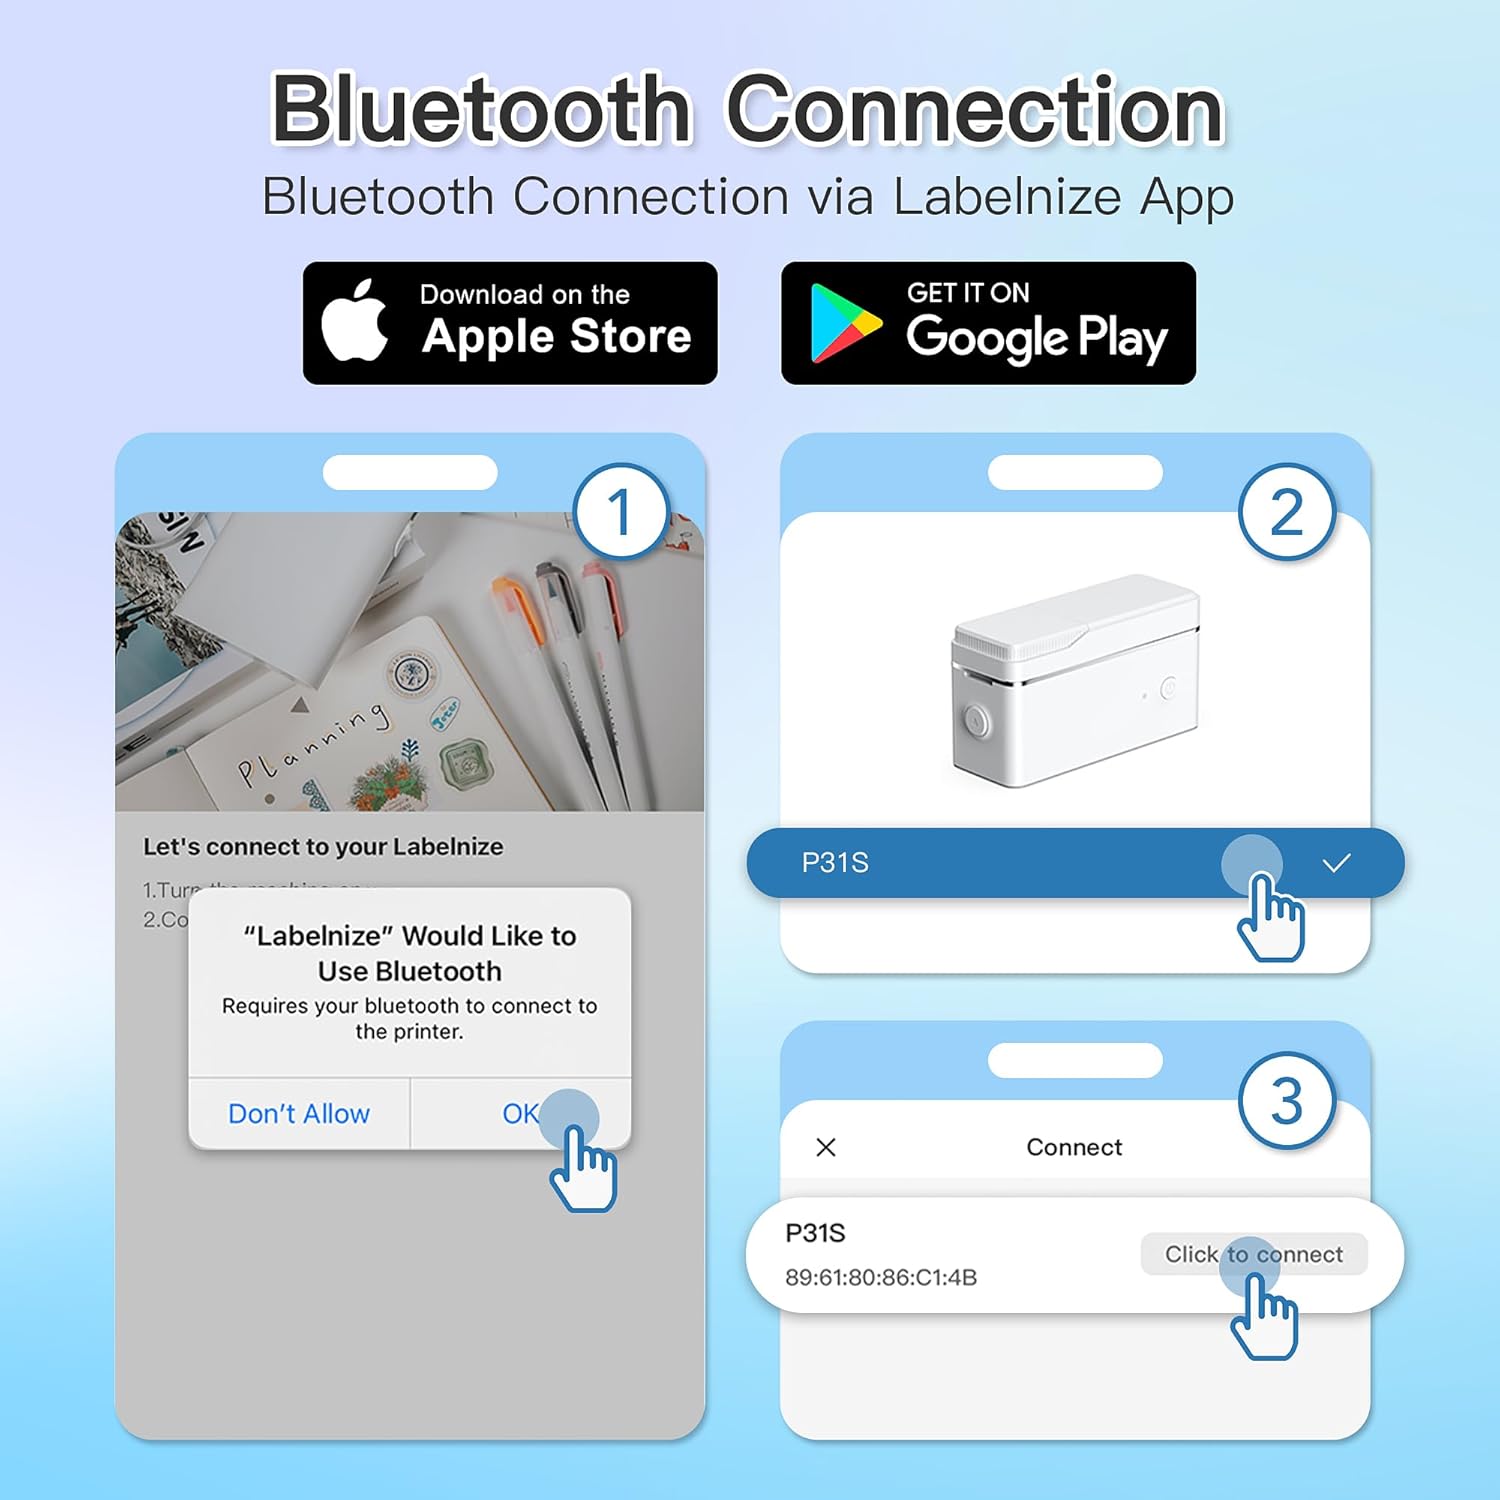
Image 4.2: Visual guide for connecting the P31S to the Labelnize app via Bluetooth.

Image 4.3: Comprehensive steps for app installation, Bluetooth pairing, and initial label creation.
5. Operation
5.1 Creating Labels with the Labelnize App
The Labelnize app offers extensive customization options for your labels.
- Templates: Choose from a variety of pre-designed templates.
- Text: Add custom text with multiple fonts and styles.
- Graphics: Insert icons, symbols, and images.
- Barcodes/QR Codes: Generate and print barcodes or QR codes.
- Borders: Apply decorative borders to your labels.
- Supported Languages: The app supports 15 languages, including English, French, Italian, German, Spanish, Polish, and Russian.

Image 5.1: Customizing labels within the Labelnize app.

Image 5.2: App features for developing various label styles.
5.2 Printing Labels
Once your label design is complete in the Labelnize app:
- Ensure the P31S is connected via Bluetooth and powered on.
- In the app, select the desired label size and paper type if prompted.
- Tap the "Print" button.
- Adjust the number of copies if needed, then confirm to start printing.
The P31S supports various label sizes, including 12x40mm, 15x40mm, 14x40mm, 14x50mm, and 14x75mm.

Image 5.3: Examples of supported label sizes and their applications.
5.3 Cutting Labels
The P31S features a built-in cutting knife for neat label separation.
- After printing, do not pull the label out directly.
- Press the cutting button (usually located near the label exit slot) to cleanly cut the label.

Image 5.4: Using the built-in cutting knife for precise label cuts.
6. Maintenance
6.1 Cleaning the Print Head
To maintain print quality, periodically clean the thermal print head:
- Ensure the device is powered off and disconnected from the charging cable.
- Open the paper cover.
- Gently wipe the print head with a cotton swab lightly dampened with isopropyl alcohol.
- Allow the print head to dry completely before closing the cover and resuming use.
6.2 Label Tape Handling
- Store label rolls in a cool, dry place away from direct sunlight and heat.
- Avoid touching the printing surface of the labels to prevent smudges or damage.
- Always use the built-in cutter to separate labels; do not pull them manually.

Image 6.1: Importance of using genuine POLONO label tape for optimal results.
7. Troubleshooting
| Problem | Possible Cause | Solution |
|---|---|---|
| Device does not power on. | Low battery. | Charge the device using the provided Type-C cable. |
| Cannot connect via Bluetooth. | Bluetooth is off on phone; device is not in pairing mode; app issue. | Ensure phone Bluetooth is on. Restart the label maker and the app. Try re-pairing through the Labelnize app. |
| Poor print quality / Faint print. | Print head dirty; incorrect label tape; low battery. | Clean the print head (see Section 6.1). Ensure you are using genuine POLONO thermal labels. Charge the device. |
| Labels are not feeding correctly. | Label tape installed incorrectly; green sticker damaged. | Re-install label tape according to Section 4.2. Ensure the green non-adhesive sticker is intact. |
| Cannot print continuous labels. | Device design limitation. | The P31S is designed for individual labels and does not support continuous label tapes. |
8. Specifications
| Feature | Detail |
|---|---|
| Brand | POLONO |
| Model | P31S |
| Printing Technology | Thermal |
| Print Resolution | 203 dpi |
| Connectivity | Bluetooth |
| Compatible Devices | Smartphones (iOS & Android) |
| Control Method | Mobile App ("Labelnize") |
| Max Print Speed (Monochrome) | 30 mm/s |
| Supported Label Sizes | 12x40mm, 15x40mm, 14x40mm, 14x50mm, 14x75mm |
| Battery | 1 x Lithium Polymer (included) |
| Charging Port | Type-C |
| Product Dimensions | 2.83 x 2.91 x 5 inches |
| Item Weight | 8.7 ounces |
9. Safety Information
- Do not disassemble or modify the device.
- Keep the device away from water, moisture, and extreme temperatures.
- Use only the specified charging cable and genuine POLONO label tapes.
- Keep out of reach of children.
- Avoid direct contact with the print head immediately after printing, as it may be hot.
10. Warranty and Support
For warranty information or technical support, please refer to the guide card included in your package or visit the official POLONO website. Please retain your proof of purchase for warranty claims.

Image 10.1: Diverse applications of the P31S label maker.


