1. Introduction
Thank you for choosing the Generic 70.87-inch High Glossy Front TV Stand. This manual provides essential information for the safe assembly, proper use, and maintenance of your new furniture. Please read all instructions carefully before beginning assembly and retain this manual for future reference.
2. Safety Information
- Always assemble the unit on a soft, clean surface to prevent scratches.
- Ensure all parts are present and undamaged before assembly. Do not use damaged parts.
- Assembly should be performed by two adults to ensure safety and ease of handling.
- Do not overtighten screws, as this may damage the material.
- Place the TV stand on a level surface to prevent tipping.
- Do not exceed the maximum weight capacity of the stand. Refer to the 'Specifications' section for details.
- Keep small parts and packaging materials away from children and pets.
3. Package Contents
Before assembly, verify that all components and hardware are present. If any parts are missing or damaged, please contact customer support.
3.1. Components Overview
The TV stand consists of various engineered wood panels and hardware. An example of the assembled unit is shown below:

Figure 1: Assembled Generic 70.87-inch High Glossy Front TV Stand. This image displays the overall appearance of the TV stand with a television placed on top, showcasing its beige and brown finish and storage compartments.
3.2. Hardware Package
The hardware package typically includes:
- Screws, dowels, and cam locks for panel connections.
- Hinges for cabinet doors.
- Handles for cabinet doors.
- Anti-tip hardware (recommended for safety).
- Assembly tools (e.g., Allen wrench), if provided.
4. Setup and Assembly Instructions
Follow these steps carefully for proper assembly. It is recommended to have a second person assist with assembly.
- Identify All Parts: Lay out all panels and hardware. Compare them with the parts list in your package to ensure everything is accounted for. Refer to the dimensions image for panel identification.
- Assemble the Base Frame: Attach the side panels to the bottom panel using the provided screws and dowels. Ensure connections are secure.
- Install Internal Dividers and Shelves: Insert the vertical and horizontal divider panels into their designated slots. Secure them with cam locks or screws as indicated in your specific hardware instructions.
- Attach the Top Panel: Carefully place the top panel onto the assembled frame, aligning all pre-drilled holes. Secure it using the appropriate fasteners.
- Install Back Panels: Attach the back panels to the rear of the unit. Ensure the cable management cutouts are correctly oriented.
- Attach Cabinet Doors: Install the hinges onto the cabinet doors and then attach the doors to the main unit. Adjust hinges as needed for proper alignment.
- Install Handles: Secure the handles to the cabinet doors.
- Cable Management: Utilize the integrated cable management holes to route and organize your electronic device cables.
- Install Anti-Tip Hardware: For safety, especially in homes with children or pets, securely attach the provided anti-tip hardware to the TV stand and to a wall stud.

Figure 2: Detailed dimensions of the TV stand. This image provides measurements for the overall width (70.9 inches), height (22.8 inches), depth (15.16 inches), and internal compartment sizes, which is crucial for planning placement and identifying panels during assembly.

Figure 3: Front view of the TV stand with cabinet doors open. This image illustrates the internal layout of the storage compartments and shelves, useful for understanding the structure during assembly.

Figure 4: View of the back panel of the TV stand. This image shows the design and attachment points of the back panel, which is important for correct installation.
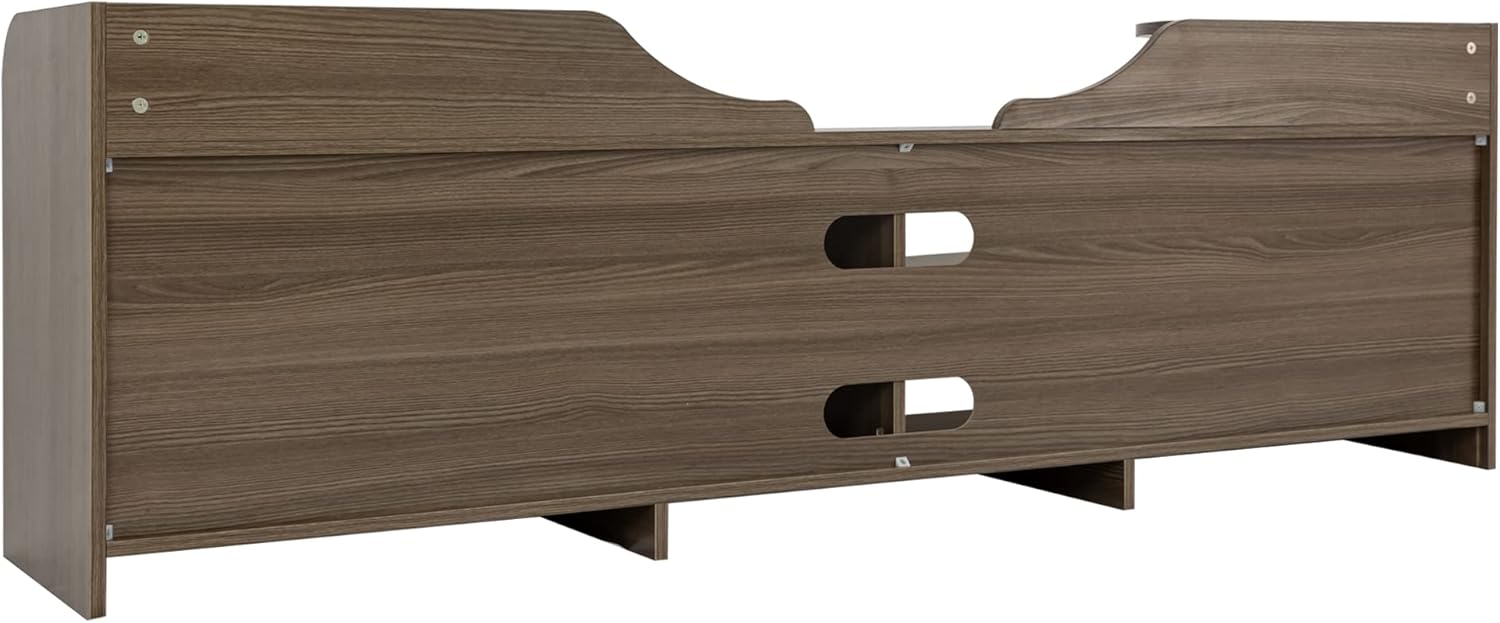
Figure 5: Rear view of the TV stand. This image highlights the cable management openings and the structural supports at the back of the unit, demonstrating how cables can be routed.

Figure 6: Close-up view of the cable management holes. This image details the design and placement of the openings for routing electronic cables, ensuring a tidy setup.
5. Operating Instructions
Your TV stand is designed to hold a television and various media components. Observe the following guidelines for optimal use:
- Placement: Position the TV stand on a flat, stable surface. Avoid placing it near heat sources or in direct sunlight to prevent material damage.
- Weight Distribution: Distribute weight evenly across the top surface and shelves. Do not place excessively heavy items on any single shelf or compartment. Refer to specifications for weight limits.
- Cable Organization: Use the cable management cutouts to route power cords and signal cables. This helps prevent tangles and reduces strain on connections.
- Ventilation: Ensure adequate airflow around electronic devices placed within the compartments to prevent overheating.
6. Maintenance and Care
To maintain the appearance and longevity of your TV stand, follow these care instructions:
- Cleaning: Wipe surfaces with a soft, damp cloth. Avoid using harsh chemicals, abrasive cleaners, or polishes that may damage the high-gloss finish or engineered wood.
- Spills: Immediately wipe up any spills to prevent moisture damage or staining.
- Heat and Moisture: Protect the surface from extreme heat and moisture. Use coasters under beverages and avoid placing hot items directly on the stand.
- Hardware Check: Periodically check all screws and fasteners to ensure they remain tight. Retighten if necessary.
7. Troubleshooting
- Wobbly Stand: Ensure the stand is on a level surface. Check all assembly screws and cam locks to confirm they are fully tightened.
- Doors Not Aligning: Adjust the hinges on the cabinet doors. Most hinges allow for minor adjustments in height, depth, and side-to-side positioning.
- Missing Parts: If you discover missing parts during assembly, do not proceed. Contact the retailer or manufacturer's customer support for assistance.
- Scratches/Damage: For minor scratches, furniture repair kits or markers may be used. For significant damage, contact customer support.
8. Specifications
| Feature | Detail |
|---|---|
| Brand | Generic |
| Model Number | W679S00019-MingX-168 |
| Material | Engineered Wood |
| Product Dimensions | 70.87 x 15.16 x 22.83 inches (L x W x H) |
| Item Weight | 86.2 pounds |
| Color | Beige+Brown |
| Style | French |
| Assembly Required | Yes |
| Manufacturer | SeeTruth |
9. Warranty and Support
For warranty information, please refer to the documentation provided at the time of purchase or contact the retailer directly. For any questions, missing parts, or assistance with assembly, please reach out to the manufacturer or retailer's customer support.


