
Insta360 CINSAAVG
Insta360 GPS Preview Remote User Manual
Model: CINSAAVG
1. Overview
The Insta360 GPS Preview Remote is designed to enhance your camera control and video recording experience. It features a new touchscreen for remote adjustment of shooting settings and real-time image transmission for shot preview. This remote is compatible with Insta360 Ace and Ace Pro cameras, with future compatibility for other camera models expected via updates. It utilizes various GNSS systems (GPS, BeiDou, Galileo, GLONASS) to improve data quality and accuracy, allowing you to add precise dashboard data to your videos using the Insta360 app or Studio software.
The remote offers a maximum control range of 20 meters and a preview range of up to 8 meters. It comes with two adjustable straps for versatile mounting options.

Image: The Insta360 GPS Preview Remote displaying a live camera feed from a cyclist's perspective, showing recording status and GPS signal.
2. Package Contents
Ensure all the following items are included in your package:
- GPS Preview Remote x1
- Wrist Strap x1
- Universal Strap x1
- Charging Cable x1
- Disposable Double-sided Stickers x4

Image: The rear view of the Insta360 GPS Preview Remote, displaying regulatory marks and the model number CINSAAVG.
3. Setup
3.1 Charging the Remote
Before first use, fully charge the GPS Preview Remote using the provided charging cable. Connect the charging cable to the remote's charging port and a compatible USB power source. The charging environment should be between 0°C and 40°C.
3.2 Attaching the Straps
The remote comes with two types of straps for different uses:
- Wrist Strap: For wearing the remote on your wrist like a watch. The diameter range is 14cm to 21cm.
- Universal Strap: For mounting the remote on handlebars, selfie sticks, or other objects. The diameter range is 2cm to 3.5cm.
To attach a strap, slide it into the designated slots on the remote until it clicks securely into place. Ensure the strap is firmly attached before use.

Image: The Insta360 GPS Preview Remote shown with the universal strap attached, ready for mounting on a handlebar or similar object.

Image: The Insta360 GPS Preview Remote shown with the wrist strap attached, suitable for wearing on the wrist.
4. Operating the Remote
4.1 Powering On/Off and Pairing
Press and hold the power button to turn the remote on or off. Once powered on, the remote will automatically attempt to pair with a compatible Insta360 camera via Bluetooth 5.0. Ensure your camera's Bluetooth is enabled.
4.2 Real-time Preview and Control
The remote's vibrant LCD touchscreen allows you to easily control camera settings and preview your shots in real-time. Simply swipe on the screen to navigate through 360-degree views (for 360 cameras). A single tap can activate the camera and start recording.

Image: The Insta360 GPS Preview Remote displaying a live preview from a camera mounted on a motorcycle, with speed and other data overlays.
4.3 GPS Data Integration
The built-in GPS, BeiDou, Galileo, and GLONASS systems work together to accurately record your location, route, and speed. This data can be added as dashboard overlays to your videos using the Insta360 app or Studio software for enhanced visual storytelling.
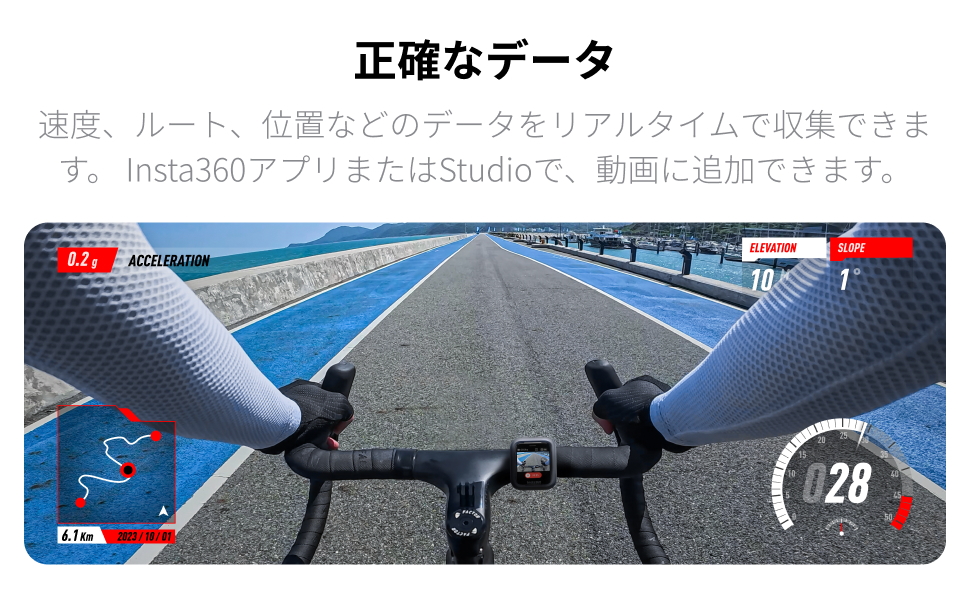
Image: A video frame with real-time GPS data overlays, including speed, elevation, and a map of the route, as captured with the Insta360 GPS Preview Remote.
5. Compatibility
The Insta360 GPS Preview Remote is currently compatible with the following camera models:
- Insta360 Ace Pro
- Insta360 Ace
Future firmware updates may extend compatibility to other Insta360 camera models. Please check the official Insta360 website for the latest compatibility information.
6. Maintenance
- After contact with water, wipe the product dry as soon as possible.
- Do not wear the remote during swimming or diving.
- Do not use liquid detergents to clean the main body.
- Do not wipe the remote's charging terminals with liquid detergents, as this may cause corrosion or rust.
- Wipe the product with a dry, soft cloth.
7. Troubleshooting
7.1 Connection Issues
If the remote frequently loses connection with the camera, ensure both devices are within the 20m operating range and there are no significant obstructions. Make sure the camera's firmware is updated to the latest version for optimal performance.
7.2 Battery Drain
If the product is not used for a long period (e.g., two months or more), the battery may drain. Fully charge the remote before powering it on after extended storage.
7.3 Preview Not Displaying
Ensure the remote is properly paired with the camera. Live preview is possible up to 8 meters. If the camera is a 360-degree model, ensure the correct settings are applied for preview.
8. Specifications
| Feature | Specification |
|---|---|
| Model Number | CINSAAVG |
| Wrist Strap Diameter | 14cm – 21cm |
| Universal Strap Diameter | 2cm – 3.5cm |
| Operating Environment Temperature | -20°C – 40°C |
| Charging Environment Temperature | 0°C – 40°C |
| Water Resistance | IP68 (up to 4.9ft / 1.5m for 1.5 hours) |
| Battery Capacity | 950mAh |
| Connectivity | Bluetooth 5.0 |
| Operating Frequency | 2402-2480MHz |
| Output Power (E.I.R.P.) | < 10dBm |
| Product Dimensions | 15.24 x 15.24 x 7.62 cm |
| Product Weight | 272.16 g |
9. Important Notes and Warnings
- This product contains magnets. To avoid interference, keep it away from medical devices such as pacemakers.
- Use this product only in environments with temperatures between -20°C and 40°C.
- Do not drop, disassemble, crush, insert foreign objects into, or place heavy objects on the remote.
- Do not leave the product near heat sources such as fireplaces, heaters, inside cars, or in direct sunlight.
- Before using this product underwater, attach the dry disposable double-sided stickers to the back of the remote and secure it to a strap for enhanced safety.
10. Warranty and Support
For warranty information, technical support, or service inquiries, please visit the official Insta360 website or contact their customer service. Keep your purchase receipt as proof of purchase for warranty claims.
Related documentsCINSAAVG


Ask a question about this manual
Ask about setup, troubleshooting, compatibility, parts, safety, or missing instructions. Manuals+ will review the question and use this page’s manual context to help answer it.