
1. Important Safety Instructions
Please read all instructions carefully before using this appliance. Retain this manual for future reference.
- Always ensure the power cord is fully inserted into the electrical outlet.
- Do not use the vacuum cleaner on wet surfaces or to pick up liquids.
- Unplug the appliance from the power outlet before cleaning or performing maintenance.
- Keep hair, loose clothing, fingers, and all parts of body away from openings and moving parts.
- Do not pick up anything that is burning or smoking, such as cigarettes, matches, or hot ashes.
- Use only as described in this manual. Use only manufacturer's recommended attachments.
2. Product Overview
Familiarize yourself with the components of your PacuM Canister Vacuum Cleaner.
2.1 Components
- Main Canister Unit
- Flexible Hose
- Extension Wands (2 pieces)
- Floor Brush
- 2-in-1 Crevice Tool/Brush
- Dust Bag/Dust Bucket
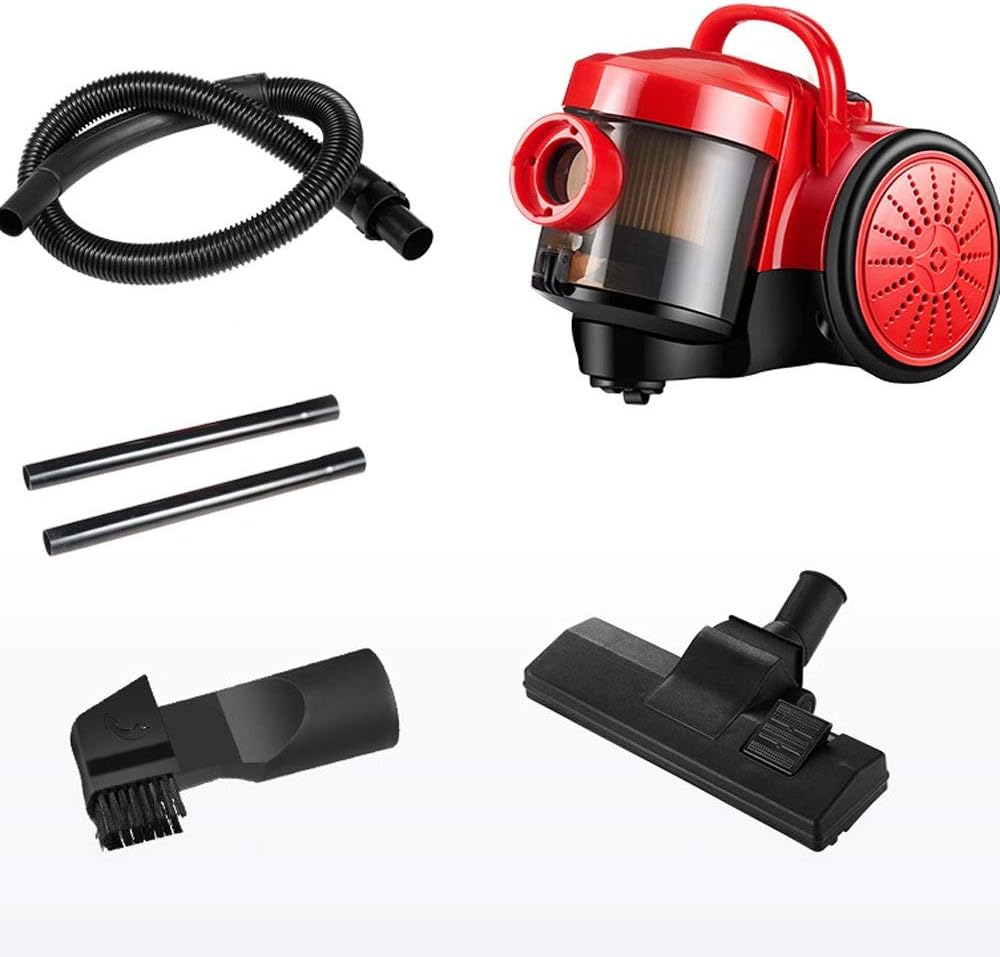
Figure 2.1: Overview of the PacuM Canister Vacuum Cleaner and its included accessories. This image displays the main red and black canister unit, the flexible hose, two black extension wands, a wide floor brush, and a smaller 2-in-1 crevice tool with an integrated brush.
3. Setup
3.1 Assembly
- Attach the Flexible Hose: Insert the end of the flexible hose into the suction inlet on the main canister unit until it clicks securely into place.
- Connect Extension Wands: Connect the two extension wands together by twisting them until they lock.
- Attach Floor Brush: Securely attach the floor brush to the end of the assembled extension wands. For different cleaning tasks, you can attach the 2-in-1 crevice tool directly to the hose or extension wand.
- Power Cord: Extend the power cord from the back of the unit and plug it into a suitable 220V electrical outlet.

Figure 3.1: The PacuM Canister Vacuum Cleaner fully assembled and ready for use. The image shows the red and black canister unit connected to the flexible hose, which then extends to the long black extension wands and the wide floor brush, indicating the typical setup for floor cleaning.
4. Operating Instructions
4.1 Powering On/Off
Once assembled and plugged in, locate the power button on the main canister unit. Press it to turn the vacuum cleaner on. Press it again to turn the unit off.
4.2 Usage Tips
- For hard floors, use the floor brush with the bristles extended (if applicable).
- For carpets, retract the bristles on the floor brush (if applicable) to allow for deeper cleaning.
- Use the 2-in-1 crevice tool for tight spaces, corners, and upholstery.
- The vacuum is designed for dry cleaning only.

Figure 4.1: The floor brush attachment in action, illustrating its effective suction capability on a flat surface. Arrows indicate the powerful airflow and debris collection, highlighting the vacuum's efficiency on hard floors.

Figure 4.2: The PacuM Canister Vacuum Cleaner being used in a typical home environment, demonstrating its reach and maneuverability. The image shows the vacuum cleaning a hard floor in a living room, with indicators for the 2-meter hose and 4-meter power cord length, emphasizing its extended cleaning range.
5. Maintenance
Regular maintenance ensures optimal performance and extends the life of your vacuum cleaner.
5.1 Dust Bin Emptying
Empty the dust bin (or replace the dust bag) when it reaches the 'MAX' fill line or after each use, whichever comes first. To empty, detach the hose, unlatch the dust bin from the main unit, and dispose of collected debris.
5.2 Filter Cleaning
The vacuum cleaner is equipped with a filter system to capture fine dust particles. Regularly check and clean the filter to maintain suction power. Tap the filter gently to remove loose dust, or rinse with water if washable (refer to specific filter instructions). Ensure the filter is completely dry before reinserting.

Figure 5.1: An exploded view illustrating the internal components of the vacuum's dust collection system, specifically highlighting the dust bin and the multi-layered filter. Blue arrows indicate the airflow path, showing how air passes through the filter to separate dust particles, ensuring clean exhaust air.
5.3 Hose and Attachment Cleaning
Periodically check the hose and attachments for blockages. Remove any debris or tangled hair to ensure unobstructed airflow.
6. Troubleshooting
Refer to the table below for common issues and their solutions.
| Problem | Possible Cause | Solution |
|---|---|---|
| Vacuum does not turn on | Not plugged in; Power outlet fault; Power button not pressed | Check power cord connection; Test outlet with another appliance; Press power button firmly |
| Loss of suction | Dust bin full; Clogged filter; Blockage in hose/attachments | Empty dust bin; Clean/replace filter; Remove blockage |
| Unusual noise | Blockage; Damaged motor (rare) | Check for and remove blockages; Contact customer support if noise persists |
| Dust escaping from unit | Dust bin not properly closed; Filter not installed correctly or damaged | Ensure dust bin is securely latched; Reinstall or replace filter |
7. Specifications
Key technical specifications for the PacuM Canister Vacuum Cleaner.
- Vacuum Cleaner Style: Horizontal Canister
- Vacuum Cleaner Function: Dry
- Dust Storage Type: Dust Box/Dust Bucket (Bagless)
- Rated Voltage: 220 V
- Rated Power: 1000 W
- Power Cord Length: Approximately 4 meters
- Special Suction Nozzle: Brush in two-in-one
- Form Factor: Canister
- ASIN: B0CMGQP85T
- Country of Origin: China

Figure 7.1: Dimensional drawing of the PacuM Canister Vacuum Cleaner. The image shows the main unit from two perspectives, indicating a length of 330mm, a width of 230mm, and a height of 310mm, providing a clear understanding of its physical size.
8. Warranty and Support
For warranty information, please refer to the warranty card included with your purchase or contact the retailer. For technical support or service inquiries, please contact PacuM customer service through the contact information provided on the product packaging or the official brand website.