
SecuFirst CWL401W/2
SecuFirst Wireless Outdoor WiFi Surveillance Camera Kit
Model: CWL401W/2
Introduction
This manual provides detailed instructions for the installation, operation, and maintenance of your SecuFirst Wireless Outdoor WiFi Surveillance Camera Kit. This system is designed for reliable security monitoring, offering a 7-inch touchscreen monitor for live viewing and playback, along with two 2K outdoor cameras. It operates independently of an internet connection for local monitoring and recording, with optional remote access via a smartphone application.

Figure 1: SecuFirst Wireless Surveillance Camera Kit, showing the 7-inch monitor and two outdoor cameras.
Safety Information
- Ensure all power adapters are connected to appropriate power sources.
- Do not place cameras near metal objects, as this may reduce wireless range.
- Avoid exposing the monitor to extreme temperatures or direct sunlight.
- Keep the system away from water or excessive moisture, except for the IP66-rated outdoor cameras.
- Only use the provided power adapters and accessories.
- Do not attempt to disassemble or repair the unit yourself. Contact customer support for assistance.
Package Contents
Verify that all items are present in your package:
- 1x 7-inch Touchscreen Monitor
- 2x Outdoor Cameras with Multi-position Mounts
- 3x AC Power Adapters (1.8m cable)
- 2x Power Extension Cables (1.8m)
- 1x 64GB MicroSD Card (pre-installed in monitor)
Product Components
7-inch Touchscreen Monitor

Figure 2: Detailed view of the 7-inch touchscreen monitor, highlighting its various ports and controls.
- Touchscreen Display: Main interface for live view, playback, and settings.
- Recording Indicator: Lights up when recording is active.
- Power Indicator: Shows power status.
- Monitor Microphone: For two-way audio communication.
- Power Button: Press and hold for 3 seconds to power on/off.
- Antenna Port: For connecting the monitor's wireless antenna.
- USB Port: For connecting external storage or accessories.
- Speaker: For audio output.
- Monitor Stand: Provides stable support for the monitor.
- Ethernet Port (Network Port): For wired internet connection (optional).
- Power Input: For connecting the AC power adapter.
- SD Card Slot: For inserting the MicroSD card (64GB included).
- Reset Button: Press for 10 seconds to reset the monitor.
Wireless Outdoor Camera

Figure 3: Detailed view of the outdoor camera, showing its features and connection points.
- Antenna: For wireless signal transmission.
- Adjustable Camera Mount: Allows for flexible positioning and angle adjustment.
- AC Power Cable: For connecting the camera to power.
- Power Status Indicator: Shows the camera's power status.
- Light Sensor: Detects ambient light for automatic day/night mode switching.
- IR LEDs: Infrared LEDs for night vision.
- Passive Infrared (PIR) Motion Sensor: Detects thermal motion for accurate alerts.
- Audio Speaker: For two-way audio output.
- Microphone: Located behind the camera's swivel mount for audio input.
- Antenna Connector: For attaching the camera's antenna.
- Mounting Screws: For securing the camera to a surface.
Setup Guide
Initial Setup (Plug-and-Play)
The cameras are pre-paired with the monitor for immediate use. No internet or complex wiring is required for basic operation.
- Power the Monitor: Connect the monitor's AC power adapter to the power input port and plug it into a wall outlet. The monitor will power on automatically.
- Power the Cameras: Connect each camera's AC power adapter to the camera's power cable and plug them into wall outlets. Use the provided extension cables if needed.
- Automatic Connection: The cameras will automatically connect to the monitor within a few seconds. Live video feeds will appear on the monitor.
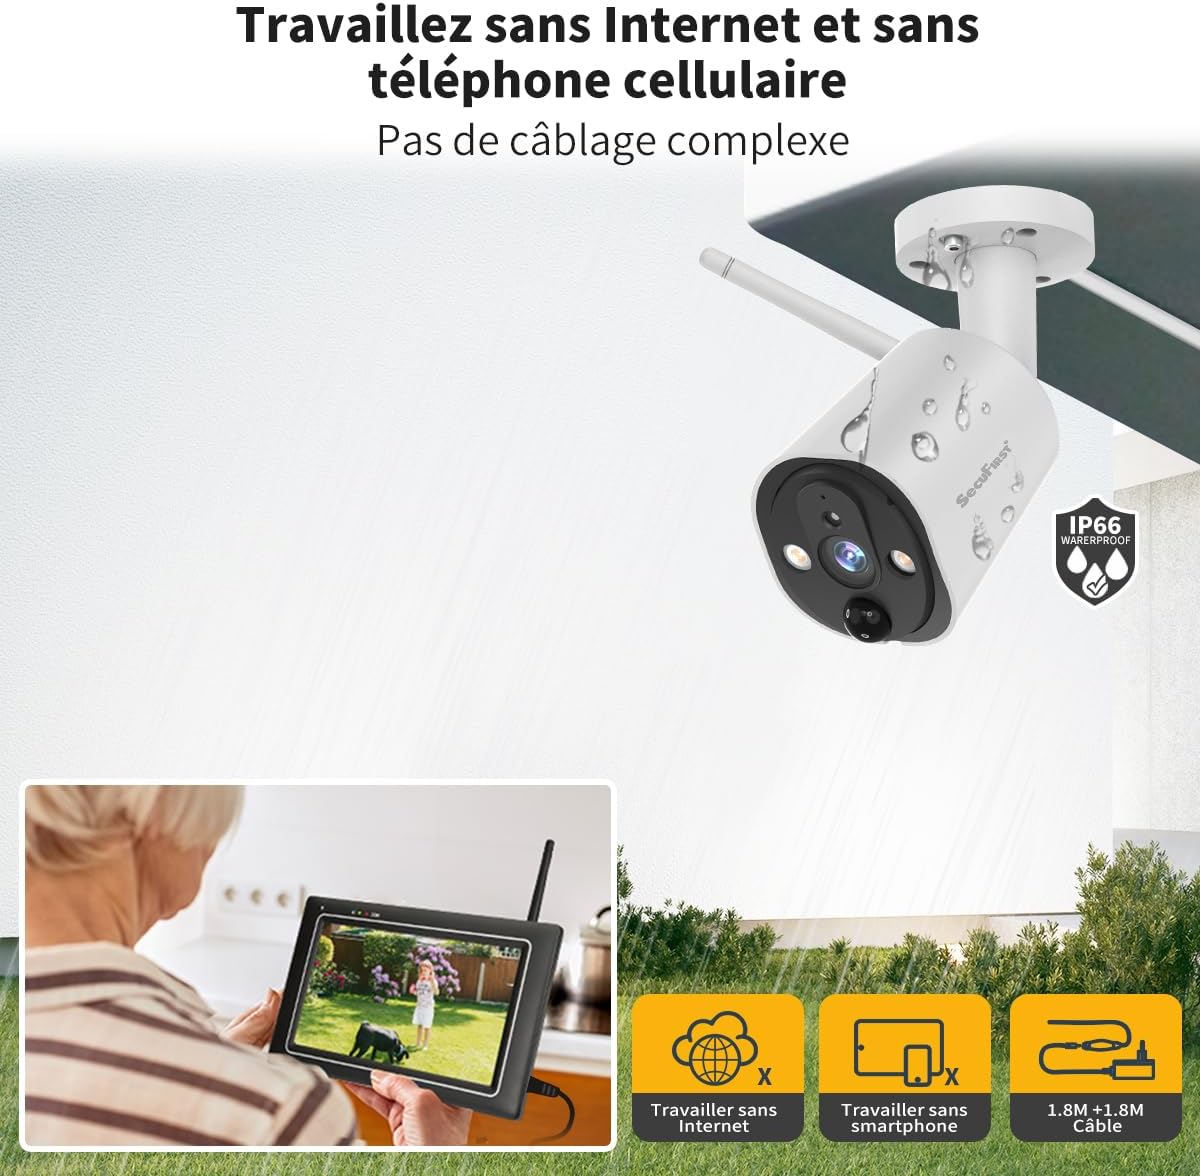
Figure 4: The SecuFirst system operates without requiring an internet connection or complex wiring, offering a simple plug-and-play setup.
Camera Placement
Consider the following for optimal camera performance:
- Range: In open spaces, the wireless range is up to 200 meters. Walls or windows between the camera and monitor will reduce this range.
- Obstructions: Avoid placing cameras near large metal objects, which can interfere with the wireless signal.
- Mounting: Use the adjustable mounts to secure cameras to walls or other suitable surfaces, ensuring a clear view of the desired area.
- Weather Protection: The cameras are IP66 waterproof, suitable for outdoor use in various weather conditions.

Figure 5: The outdoor camera features an IP66 waterproof metal casing, ensuring durability and reliable performance in various weather conditions.
Optional Internet Connection (for Remote Access)
To enable remote viewing and control via a smartphone or tablet, connect the monitor to your internet network:
- Wired Connection: Connect an Ethernet cable from your router to the Ethernet port on the monitor.
- WiFi Connection: Navigate to the network settings on the monitor's touchscreen and connect to your WiFi network.
- Download App: Download the "Observer HD+" application on your smartphone or tablet.
- Pair Device: Follow the in-app instructions to add your SecuFirst system for remote access.

Figure 6: The system supports optional smartphone connectivity, allowing users to view live feeds, listen, talk, and play recordings remotely via the "Observer HD+" app.
Operating Instructions
Using the 7-inch Touchscreen Monitor
The monitor's touchscreen interface allows for easy navigation and control.
- Live View: The main screen displays live video feeds from connected cameras. You can switch between single-camera view and multi-camera view (up to 4 cameras).
- Recording Playback: Access recorded footage directly from the monitor. Recordings are saved to the included 64GB MicroSD card.

Figure 7: The monitor's interface for reviewing recorded footage, allowing users to easily navigate through saved events.
Two-Way Audio
Use the built-in microphones and speakers on both the monitor and cameras for two-way communication.
- Tap the microphone icon on the monitor's screen to speak through the camera's speaker.
- Audio from the camera's microphone will be heard through the monitor's speaker.
Motion Detection and Recording
The cameras feature AI + PIR thermal motion detection for accurate recording.
- Setting Detection Zones: Configure specific areas on the screen where motion detection should be active. This helps reduce false alarms.

Figure 8: The monitor allows users to define specific motion detection zones, ensuring that recordings are triggered only in relevant areas.
- Alarm Notifications: Enable push notifications to your smartphone via the app when motion is detected.
- Siren: The system includes a siren feature that can be activated upon motion detection.
- Local Storage: Recordings are automatically saved to the 64GB MicroSD card. This can be expanded up to 128GB MicroSD, or an external HDD/USB drive up to 2TB.
Privacy Masking
Mask specific areas within the camera's view to protect privacy.
- Access privacy settings through the monitor's menu to black out sensitive areas that should not be recorded.

Figure 9: The privacy masking feature allows users to block out specific areas from being recorded, enhancing privacy.
Night Vision
The cameras provide clear night vision for 24/7 surveillance.
- The cameras automatically switch to night vision mode in low-light conditions using infrared LEDs.

Figure 10: A visual comparison demonstrating the clear image quality during both day and night using the camera's automatic night vision.
Sleep Mode / Digital Clock
The monitor can enter a power-saving sleep mode and display a digital clock.
- Activate "sleep mode" in the settings to conserve energy. The screen will display a digital clock.

Figure 11: The monitor can function as a digital desk clock when in energy-saving sleep mode.
Maintenance
- Cleaning: Use a soft, dry cloth to clean the monitor and camera lenses. Do not use liquid cleaners or aerosols.
- Storage: If storing the system for an extended period, disconnect power and store in a cool, dry place.
- Firmware Updates: Check the SecuFirst website or app for any available firmware updates to ensure optimal performance and security.
Troubleshooting
| Problem | Possible Cause | Solution |
|---|---|---|
| No image on monitor | Monitor not powered on; Camera not powered on; Camera out of range; Camera not paired. | Ensure all power adapters are connected and outlets are active. Move camera closer to monitor. If issues persist, re-pair the camera (refer to manual for pairing process if needed, though typically pre-paired). |
| Poor image quality / Signal interference | Obstructions (walls, metal); Distance too great; Interference from other wireless devices. | Relocate camera or monitor to reduce obstructions. Ensure cameras are not near large metal objects. Try changing the wireless channel on the monitor if available in settings. |
| Motion detection not working or too many false alarms | Sensitivity settings; Detection zone not configured; Environmental factors (e.g., moving branches). | Adjust motion detection sensitivity in monitor settings. Configure specific detection zones to exclude irrelevant areas. Ensure camera lens is clean. |
| Cannot access remotely via app | Monitor not connected to internet; Incorrect app settings; Firewall issues. | Ensure monitor is connected to your home network (wired or WiFi). Verify app settings and device pairing. Check your router's firewall settings if necessary. |
| Recordings not saving | SD card full or faulty; Recording settings incorrect. | Check SD card status on the monitor. Format the SD card (this will erase data). Replace the SD card if it's faulty. Verify recording schedule and motion detection settings. |
Specifications
| Feature | Specification |
|---|---|
| Model Number | CWL401W/2 |
| Brand | SecuFirst |
| Color | 1 monitor + 2 white cameras |
| Monitor Display | 7-inch Touchscreen |
| Camera Resolution | 2K (3MP) |
| Connectivity Protocol | Wi-Fi (Wireless) |
| Indoor/Outdoor Use | Outdoor (Cameras), Indoor (Monitor) |
| Camera Material | Metal Casing |
| Monitor Material | Matte Black Plastic Casing |
| Waterproof Rating | IP66 (Cameras) |
| Local Storage | 64GB MicroSD card included (expandable up to 128GB MicroSD, or 2TB external HDD/USB) |
| Power Source | Cable Electric (AC Power Adapters) |
| Voltage | 12 Volts |
| Power Consumption | 12 Watts |
| Dimensions (L x W x H) | 20 x 14.2 x 7.8 cm (7.87 x 5.59 x 3.07 inches) |
| Weight | 2.26 kilograms (4.98 lbs) |
| Frame Rate | 24/30/60 FPS |
| Number of Channels | 2 (expandable up to 4 cameras) |
Warranty and Support
For warranty information and technical support, please refer to the documentation included with your product or visit the official SecuFirst website. SecuFirst is committed to providing prompt and professional customer service.
Common issues and solutions are detailed in the Troubleshooting section of this manual. If you encounter problems not covered, please contact SecuFirst customer support for further assistance.
Related documentsCWL401W/2


Ask a question about this manual
Ask about setup, troubleshooting, compatibility, parts, safety, or missing instructions. Manuals+ will review the question and use this page’s manual context to help answer it.