
1. Introduction
This manual provides detailed instructions for the safe and effective operation of your DEPSTECH 50FT Sewer Inspection Camera. This device is designed for visual inspection in hard-to-reach areas such as pipes, drains, engine compartments, and wall cavities. It features a 1080P dual-lens camera, a 5-inch IPS display, and a 50-foot semi-rigid cable with IP67 waterproofing.
2. Safety Information
- Do not expose the device to extreme temperatures or direct sunlight.
- Keep the device away from strong magnetic fields.
- Ensure the camera probe is securely connected before use.
- Do not attempt to disassemble or modify the device. Repairs should only be performed by authorized personnel.
- Clean the camera lens and probe after each use to maintain optimal performance.
- The camera probe is IP67 waterproof, but the main unit is not. Avoid exposing the main unit to water.
- Charge the device using the provided Type-C cable and a compatible power adapter (not included).
3. Package Contents
Verify that all items are present in your package:
- Handheld Endoscope Inspection Camera (with built-in 32GB TF Card)
- 50FT Semi-Rigid Camera Cable with Dual Lens Probe
- Type-C Charging Cable
- Accessories: Hook, Magnet, Protective Cap
- User Manual
- Carrying Case

4. Product Overview
4.1 Main Unit and Display
The main unit features a 5-inch IPS screen for clear, real-time observation. The ergonomic design ensures comfortable handling during extended use.


4.2 Camera Probe and Cable
The device includes a 50-foot semi-rigid cable with a 7.9mm dual-lens camera probe. The probe is IP67 waterproof and equipped with adjustable LED lights for illumination in dark environments.


4.3 Control Panel
The control panel provides intuitive buttons for power, menu navigation, camera mode selection, light adjustment, and media capture.
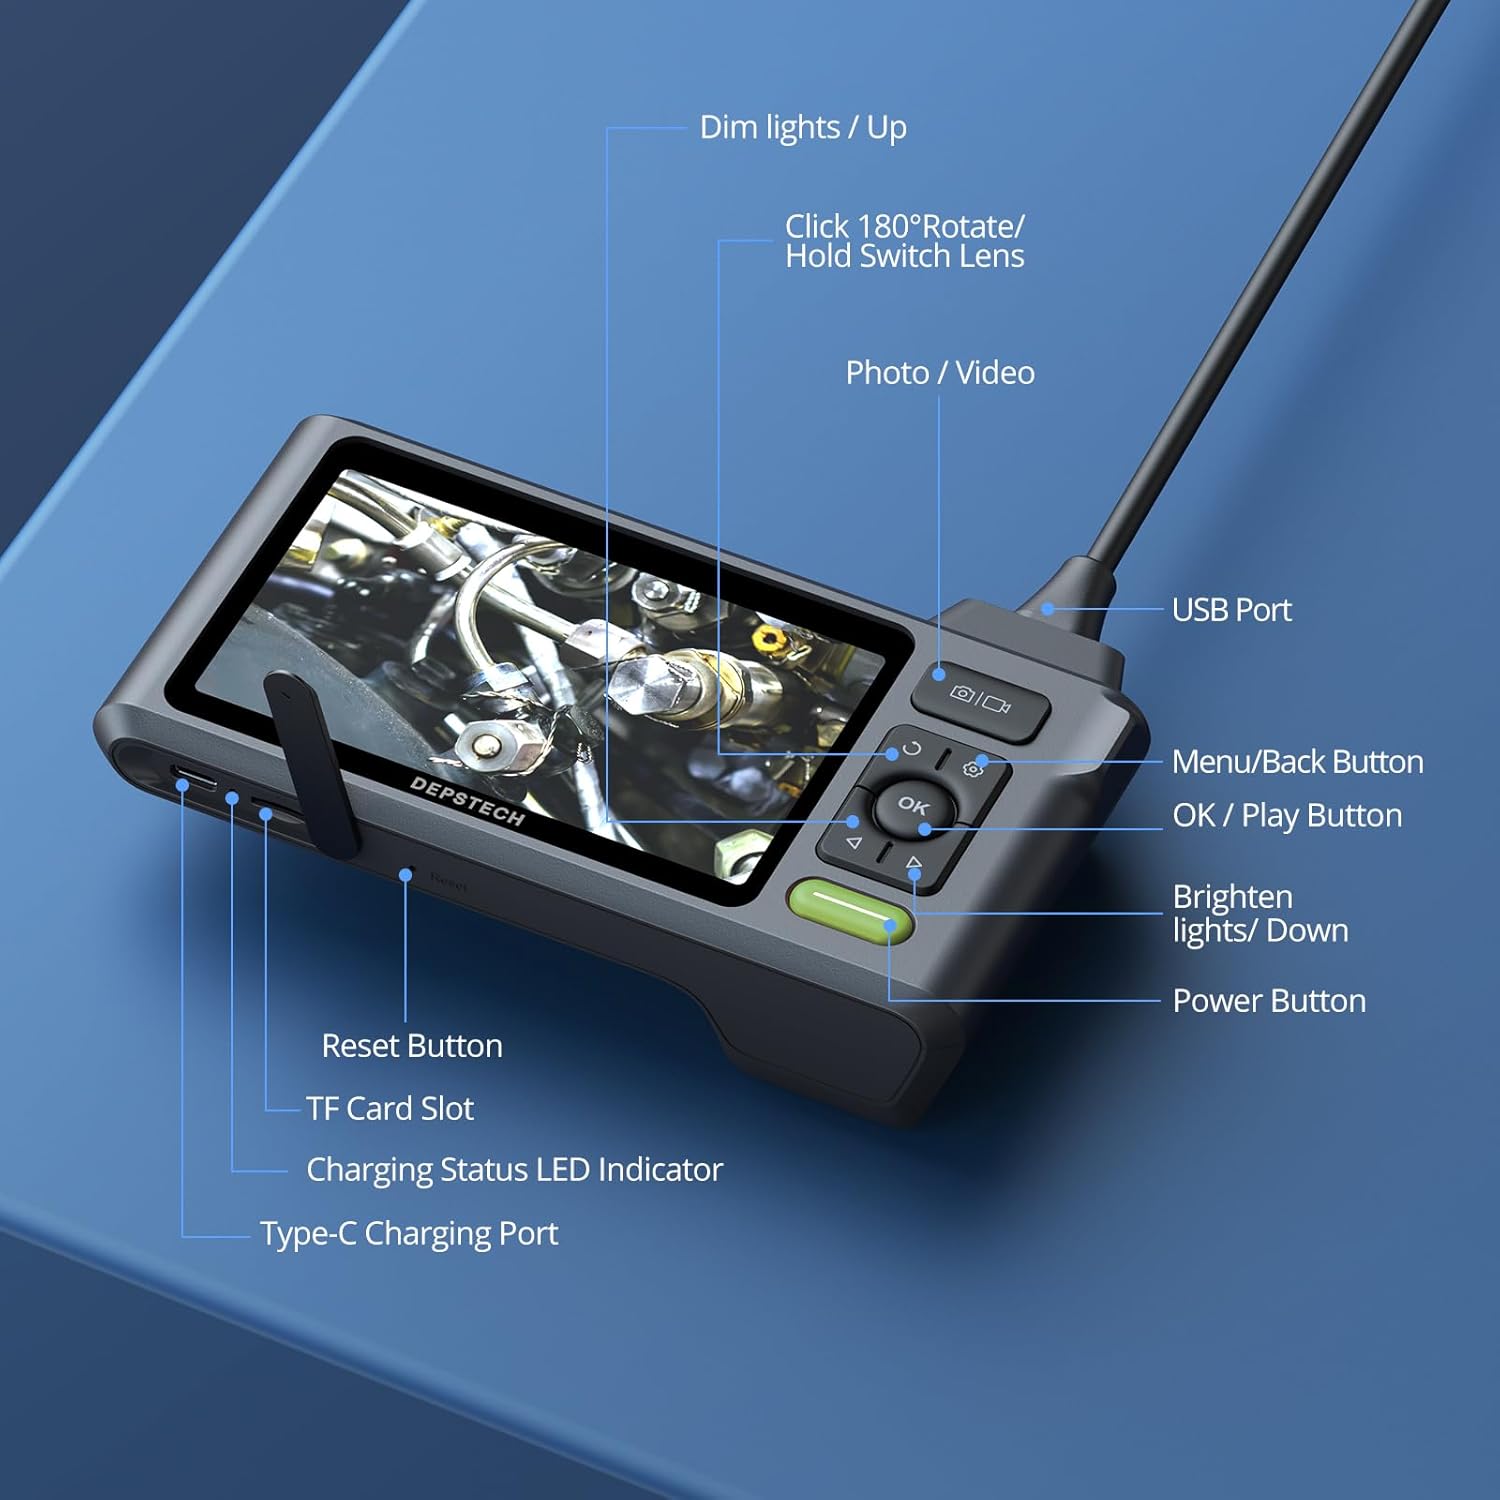
- Power Button: Press and hold to turn the device on/off.
- Menu/Back Button: Access menu options or go back.
- OK/Play Button: Confirm selections or play recorded media.
- Photo/Video Button: Short press to take a photo, long press to start/stop video recording.
- Dim Lights/Up Button: Decrease LED brightness or navigate up in menus.
- Brighten Lights/Down Button: Increase LED brightness or navigate down in menus.
- Rotate 180°/Hold Switch Lens: Short press to rotate the image 180 degrees. Long press to switch between front, side, and split-screen camera views.
5. Setup
5.1 Charging the Device
Before first use, fully charge the device. Connect the Type-C charging cable to the charging port on the main unit and plug the other end into a USB power adapter (5V/1A recommended). The charging status LED indicator will show charging progress.
5.2 Connecting the Camera Probe
Insert the USB connector of the camera cable firmly into the USB port on the top of the main unit. Ensure it clicks into place for a secure connection. The device is designed to prevent accidental disconnection.
5.3 Inserting the TF Card
The device comes with a built-in 32GB TF card. If you need to replace it, gently insert a new Micro SD card (up to 32GB, Class 10 recommended) into the TF card slot until it clicks.
6. Operating Instructions
6.1 Power On/Off
Press and hold the Power Button for a few seconds to turn the device on. Repeat the action to turn it off.
6.2 Adjusting LED Lights
Use the Dim Lights/Up and Brighten Lights/Down buttons to adjust the brightness of the LED lights on the camera probe. This helps optimize visibility in various lighting conditions.
6.3 Switching Camera Views
The dual-lens camera offers multiple viewing options:
- Front Camera: Provides a direct forward view.
- Side Camera: Provides a lateral view.
- Split Screen: Displays both front and side views simultaneously for comprehensive inspection.
Long press the Rotate 180°/Hold Switch Lens button to cycle through these camera modes.

6.4 Capturing Photos and Videos
- To take a photo: Short press the Photo/Video Button.
- To record video: Long press the Photo/Video Button to start recording. Long press again to stop recording.
All captured media is saved to the inserted TF card.
6.5 Data Transfer
To transfer photos and videos to a computer:
- Connect the main unit to your computer using the Type-C charging cable.
- The device will appear as a removable storage device.
- Alternatively, remove the TF card and insert it into a card reader connected to your computer.

6.6 Bluart 3.0 Technology
The device incorporates Bluart 3.0 technology, which enhances image clarity, processing speed, and low-light performance, providing a clearer and smoother inspection experience.

7. Maintenance
7.1 Cleaning
- After each use, wipe the camera lens and probe with a soft, damp cloth. For stubborn dirt, a small amount of mild soap can be used.
- Ensure the lens is dry before storage.
- Clean the main unit with a dry, soft cloth. Do not use abrasive cleaners or immerse the main unit in water.
7.2 Storage
- Store the device and its accessories in the provided carrying case to protect them from dust and damage.
- Store in a cool, dry place, away from direct sunlight and extreme temperatures.
- If storing for an extended period, ensure the battery is partially charged (around 50%) to prolong its lifespan.
8. Troubleshooting
- No image on screen: Ensure the camera probe is securely connected to the main unit. Check if the device is powered on and fully charged.
- Image is blurry: Clean the camera lens. Adjust the LED brightness. Ensure the object is within the camera's focal range (Front Camera: 3-10 cm; Side Camera: 2-5 cm).
- Device not turning on: Charge the device for at least 30 minutes. If the issue persists, try pressing the reset button (if available, refer to Figure 4.5).
- Cannot record photos/videos: Check if the TF card is inserted correctly and has sufficient storage space. Ensure the card is not write-protected.
- Difficulty maneuvering the cable: For longer runs or navigating tight bends, consider attaching the probe to a stiffer guide wire or pipe snake (not included) for better control.
9. Specifications
| Feature | Specification |
|---|---|
| Model Number | USDS520DLG-15M |
| Product Dimensions | 5.91 x 1.97 x 3.94 inches |
| Item Weight | 4.08 Pounds |
| Cable Length | 50 feet |
| Camera Diameter | 7.9mm |
| Camera Resolution | 1080P (1920 x 1080) |
| Lens Type | Dual Lens (Front & Side) |
| Screen Size | 5-inch IPS |
| Waterproof Rating | IP67 (Camera Probe) |
| LED Lights | 6+1 Adjustable LEDs |
| Battery | 1 Lithium Ion battery (up to 4 hours use) |
| Storage | Built-in 32GB Micro SD Card (supports up to 32GB) |
| Connectivity | USB Type-C |
| Manufacturer | DEPSTECH |
10. Warranty and Support
DEPSTECH products are designed for reliability and performance. For warranty information, technical support, or service inquiries, please refer to the contact information provided with your purchase documentation or visit the official DEPSTECH website. Please retain your proof of purchase for warranty claims.


