1. Introduction
The DieseRC Smart WIFI 2-Channel Relay Module is a versatile and reliable wireless smart switch designed for remote control of various electrical devices. It offers stable performance with high reception sensitivity via 2.4 GHz WIFI, allowing you to operate connected machines from anywhere using the eWelink APP. This module supports both inching and self-locking modes, providing flexibility for different applications. It is also compatible with popular voice assistants like Amazon Alexa and Google Home, enabling convenient voice control.

Image: The DieseRC 2-Channel Smart WIFI Relay Module, showcasing its compact design and dual relay configuration.
2. Product Features
- Wireless WIFI Connectivity: Operates on 2.4 GHz WIFI for stable and reliable remote control.
- eWelink APP Control: Full control via the popular eWelink application (Android & iOS), offering unlimited wireless control from anywhere.
- Voice Control Compatibility: Seamless integration with Amazon Alexa and Google Home for hands-free operation.
- Flexible Operating Modes: Supports 2 working modes: Inching (momentary switch) and Self-locking (toggle switch), easily configurable to suit your needs.
- Dual Independent Relays: Features two independent relays, allowing separate control of two devices.
- High-Quality 10A Relays: Equipped with robust 10A relays for reliable switching.
- Passive Output (Dry Contacts): Provides normally open (NO), common (COM), and normally closed (NC) terminals for versatile wiring.
- Wide Voltage Compatibility: Supports DC 5V or DC 7V~48V input, making it suitable for various power sources (DC 5V/12V/24V/36V/48V).
- Compact Design: Measures 60x32x17 mm (2.4x1.3x0.7 inches), allowing easy concealment in electrical boxes or junction boxes.
- Advanced APP Functions: Includes scheduling, timing, and countdown features, with the ability to share control with family members.
- Bluetooth Remote Compatibility: Can be paired with an RM2.4G Bluetooth remote control (not included).

Image: Overview of the module's multiple control modes (APP, voice, remote) and its compact dimensions.

Image: Examples of devices that can be made smart using the DieseRC module, such as various types of switches, fans, and coffee makers.
3. Specifications
| Attribute | Value |
|---|---|
| Manufacturer | DieseRC |
| Product Dimensions (L x W x H) | 12.7 x 8.3 x 2.2 cm; 41 grams |
| Model Number | EW748 |
| Color | 2CH-EW |
| Power | 10 Watts |
| Switch Style | Toggle Switch |
| Certification | CE |
| Components Included | 1 (Module) |
| Batteries Required | No |
| Contact Material | Metal |
| Contact Type | Normally Open |
| Current Rating | 10 A |
| Operating Mode | On/Off |
| Coil Voltage | 5 Volts (DC) |
| Minimum Switching Voltage | 5 Volts (DC) |

Image: A detailed view of the module's circuit board, highlighting the relay indicator light, pairing button, WIFI network indicator, and input USB port. Dimensions are also provided.
4. Safety Information
Please read and understand all safety instructions before installing or operating the DieseRC Smart WIFI 2-Channel Relay Module. Failure to follow these instructions may result in electric shock, fire, or property damage.
- Electrical Safety: Always disconnect power to the circuit at the circuit breaker or fuse box before performing any wiring.
- Qualified Installation: Installation should be performed by a qualified electrician or a person with a thorough understanding of electrical wiring.
- Voltage Compatibility: Ensure the input voltage (DC 5V or DC 7V~48V) matches the requirements of your power supply. Do not exceed the maximum current rating of 10A per relay.
- Indoor Use Only: This device is designed for indoor use in dry environments. Avoid exposure to moisture, extreme temperatures, or corrosive substances.
- Proper Wiring: Ensure all wire connections are secure and properly insulated to prevent short circuits.
- Load Compatibility: Do not connect loads that exceed the maximum power rating of the module.
5. Setup
5.1. Download the eWelink APP
The DieseRC Smart WIFI Relay Module is controlled via the eWelink application. Download the app from your smartphone's app store (Google Play for Android or Apple App Store for iOS) or by scanning the QR code below:

Scan this QR code to download the eWelink App, or visit http://app.coolkit.cc/dl.html
5.2. Powering the Module
The module can be powered by either a DC 5V USB power supply or a DC 7V-48V adapter.

Image: Illustration of the two power input options: DC 5V via USB or DC 7V-48V via screw terminals.
5.3. Pairing with eWelink APP
- Ensure the module is powered on. The WIFI network indicator light will start blinking.
- Open the eWelink APP on your smartphone.
- Tap the '+' icon to add a new device.
- Select 'Quick Pairing Mode' or 'Compatible Pairing Mode' as instructed by the app.
- Follow the on-screen prompts to connect the module to your 2.4 GHz WIFI network.
- Once successfully paired, the WIFI network indicator light will become solid, and the device will appear in your eWelink app.
6. Wiring Diagrams
The DieseRC Smart WIFI Relay Module provides passive output (dry contacts) with Normally Open (NO), Common (COM), and Normally Closed (NC) terminals for each relay. This allows for flexible integration with various circuits.

Image: Diagram illustrating the Normally Open (NO), Common (COM), and Normally Closed (NC) pins for each relay.
6.1. Understanding Relay Contacts
- NO (Normally Open): The circuit between COM and NO is open when the relay is off and closes when the relay is activated.
- COM (Common): The common terminal for the relay.
- NC (Normally Closed): The circuit between COM and NC is closed when the relay is off and opens when the relay is activated.
6.2. Common Wiring Modes
Below are examples of common wiring configurations for different types of devices. Always ensure power is disconnected before wiring.
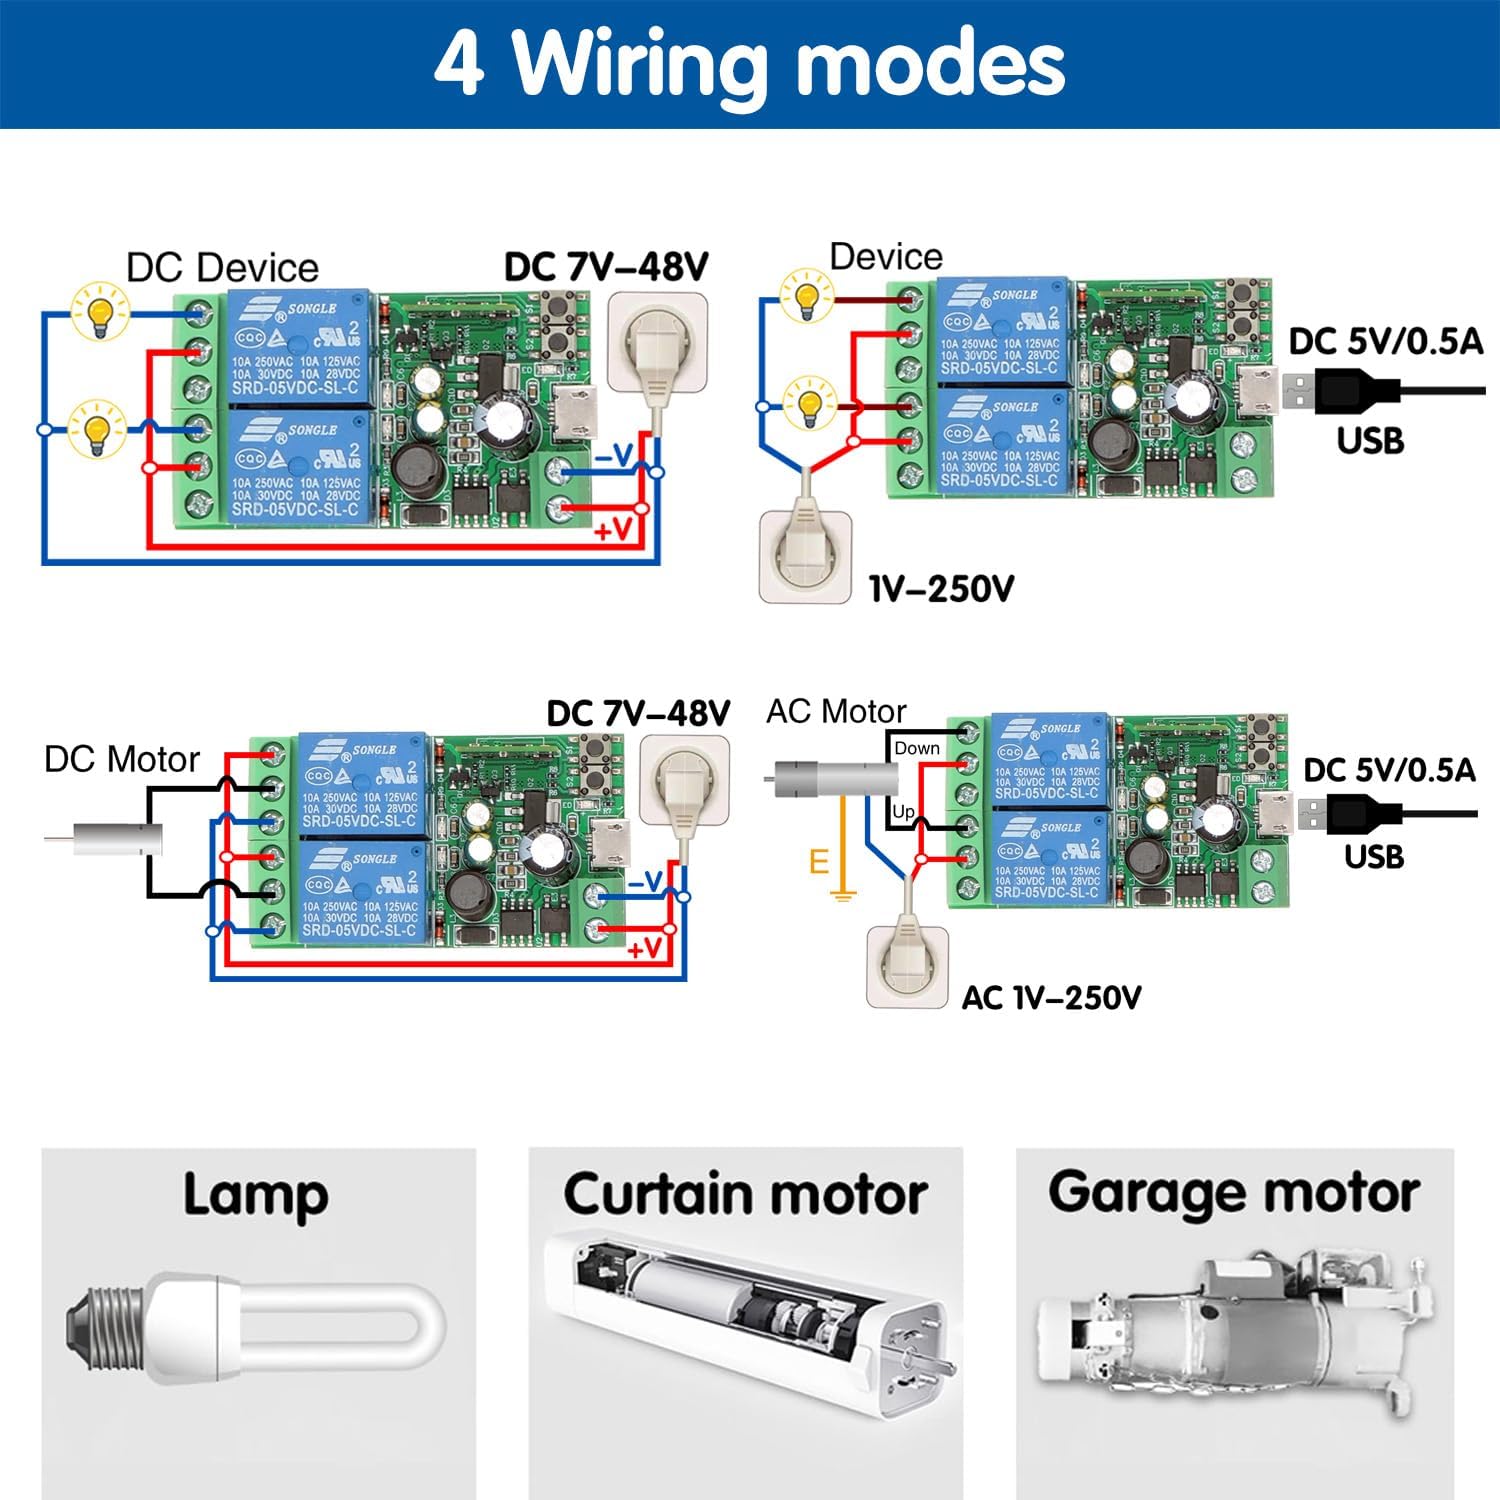
Image: Illustrations of four different wiring modes: DC device with DC 7V-48V, DC device with DC 5V/0.5A USB, DC motor with DC 7V-48V, and AC motor with AC 1V-250V.
- DC Device Wiring (e.g., LED strip, DC fan): Connect the DC power source to the module's input terminals. Connect the device to the NO and COM terminals of the desired relay.
- AC Device Wiring (e.g., lamp, AC fan): Connect the AC power source to the module's input terminals. Connect the device to the NO and COM terminals of the desired relay. Ensure proper isolation for AC circuits.
- DC Motor Control: Use both relays for directional control. Connect the motor to the NO/COM/NC terminals of both relays as per the diagram for forward/reverse operation.
- Garage Door Opener/Gate Control: Typically uses the inching mode. Connect the module's NO and COM terminals to the garage door opener's push-button input terminals.
7. Operating Modes
7.1. Inching Mode (Momentary)
In inching mode, the relay will activate for a brief, configurable duration (e.g., 0.5 seconds to 3600 seconds) and then automatically turn off. This mode is ideal for applications like garage door openers, gate controls, or momentary button presses.
7.2. Self-locking Mode (Toggle)
In self-locking mode, the relay acts as a traditional on/off switch. One press will turn the device on, and another press will turn it off. This mode is suitable for controlling lights, fans, or other devices that require continuous power until manually switched off.
You can configure these modes within the eWelink APP for each independent relay.

Image: A visual comparison showing how the smart relay module can replace or enhance traditional switches for various applications.
7.3. APP Control (eWelink)
Once paired, you can control your devices from anywhere using the eWelink APP. The app provides:
- Remote On/Off: Instantly turn devices on or off.
- Timing & Scheduling: Set one-time, repeating, or countdown timers to automate device operation.
- Scene Creation: Group multiple devices and control them with a single tap or based on specific conditions.
- Device Sharing: Share control of your smart switch with family members.

Image: Demonstrates remote control via the eWelink app, showing a user controlling a garage door from a beach, highlighting the 'no distance limit' feature.

Image: Illustrates the timing, scheduling, and countdown functions available in the eWelink app, allowing users to automate device operation.
7.4. Voice Control (Alexa & Google Home)
Integrate your DieseRC Smart Switch with Amazon Alexa or Google Home for convenient voice control. After linking your eWelink account in the Alexa or Google Home app, you can use commands like:
-
Related Documents - 2CH-EW

DieseRC 1204 Relay Remote Control Switch Manual
User manual for the DieseRC 1204 Relay Remote Control Switch, detailing product information, wiring diagrams, operating modes (momentary, toggle, latched), programming instructions, and troubleshooting.
DieseRC Relay Remote Control Switch Type 2201 - User Manual
Comprehensive user manual for the DieseRC Type 2201 Relay Remote Control Switch, detailing technical specifications, wiring diagrams, operating modes (Momentary, Toggle, Latched), programming instructions, troubleshooting, and contact information.
DieseRC 1201 Relay Remote Control Switch User Manual
User manual for the DieseRC 1201 Relay Remote Control Switch, detailing product information, wiring diagrams, operating modes (Momentary, Toggle, Latched, Delay), programming instructions, and troubleshooting.
DieseRC 2202 Relay Remote Control Switch - Product Manual
This product manual provides detailed information for the DieseRC 2202 Relay Remote Control Switch. It covers technical specifications, operating modes (Momentary, Toggle, Latched), programming instructions, troubleshooting tips, and customer support contact details from Huizhou Wenqiao Electronic Technology Co., Ltd.
DieseRC 5302G Relay Remote Control Switch Product Manual
Product manual for the DieseRC 5302G Relay Remote Control Switch. Includes technical data, wiring diagrams, operating modes (Momentary, Toggle, Latched), programming instructions, and troubleshooting for this 433MHz RF receiver.
DieseRC 5301 Wireless Remote Control Switch Manual
User manual for the DieseRC 5301 Wireless Remote Control Switch, detailing technical specifications, wiring diagrams, operating modes (Momentary, Toggle, Latched, Delay), programming instructions, and troubleshooting.