Introduction
This manual provides detailed instructions for the setup, operation, and maintenance of your HAOYAO Wireless Weather Station. Please read this manual thoroughly before using the product to ensure proper functionality and longevity.

Image: The HAOYAO Wireless Weather Station main unit with its color display and a separate wireless outdoor sensor.
Key Features
- Wireless Connectivity: Supports up to 3 wireless outdoor sensors with a transmission range of up to 60 meters.
- Multi-Data Display: Clear 7.5" LCD HD color screen showing weather forecast, temperature (indoor/outdoor), humidity (indoor/outdoor), time, date, atmospheric pressure, moon phases, and comfort levels.
- Accurate Weather Forecast: Predicts weather for the next 12 hours based on atmospheric pressure trends (sunny, partly cloudy, cloudy, rainy, snowy).
- High Precision Sensors: Monitors indoor temperature from -9.9°C to 50°C and outdoor temperature from -40°C to 70°C, with humidity from 20% to 95%.
- Alarm and Snooze: Features two daily alarms and an automatic snooze function (5 to 60 minutes).
- Additional Functions: DCF radio timer, perpetual calendar up to 2099, sunrise/sunset times, mold risk indicator, outdoor temperature alerts, and frost warnings.
- Multiple Power Options: Can be powered by an included adapter, USB cable (not included), or 2 AA batteries (not included). Outdoor sensors use 2 AA batteries.

Image: Visual representation of the weather station's key features, including calendar, temperature, humidity, weather forecast, sunrise/sunset, moon phases, mold risk, temperature alerts, and alarms.
Package Contents
Please check the package for the following items:
- 1 x HAOYAO Wireless Weather Station (Main Unit)
- 1 x Wireless Outdoor Sensor
- 1 x Power Adapter
- 1 x User Manual
Setup Guide
1. Powering the Weather Station
- Using Power Adapter: Connect the included power adapter to the DC 5V 1.2A input port on the weather station and plug it into a wall outlet.
- Using Batteries (Backup): Open the battery compartment on the back of the weather station and insert 2 x LR6 AA batteries (not included), observing polarity.
- Using USB Cable (Optional): The weather station can also be powered via a USB cable (not included) connected to a compatible USB power source.

Image: Illustration of the three power supply methods: USB output socket, DC power supply socket, and AA batteries.
2. Powering the Wireless Outdoor Sensor
- Open the battery compartment on the back of the wireless outdoor sensor.
- Insert 2 x LR6 AA batteries (not included), ensuring correct polarity.
- Close the battery compartment securely.
3. Pairing the Sensor with the Main Unit
- Place the outdoor sensor within 3 meters of the main weather station unit during the initial pairing process.
- The main unit will automatically search for the outdoor sensor. The outdoor temperature and humidity readings should appear on the display.
- If the connection is not established, press and hold the "CHANNEL" or "SEARCH" button on the main unit (refer to the specific button layout on your device) to initiate a manual search.
- Up to 3 wireless outdoor sensors can be connected. Use the channel switch inside the sensor's battery compartment to select a different channel (1, 2, or 3) for each additional sensor.

Image: The weather station can connect to up to three remote sensors, allowing for monitoring in various locations up to 60 meters away.
4. Placement
- Main Unit: Place the weather station on a flat surface using its integrated table stand or mount it on a wall using the hanging hole on the back. Ensure it is in a central location for optimal indoor readings.
- Outdoor Sensor: Place the outdoor sensor in a shaded, dry location away from direct sunlight and precipitation to ensure accurate readings. The sensor can be wall-mounted or placed on a flat surface.
- Avoid placing the main unit or sensor near sources of heat, cold, or strong electromagnetic interference.

Image: The weather station offers flexible placement options, including wall mounting and use with its integrated table stand.
Operating Instructions
1. Display Overview
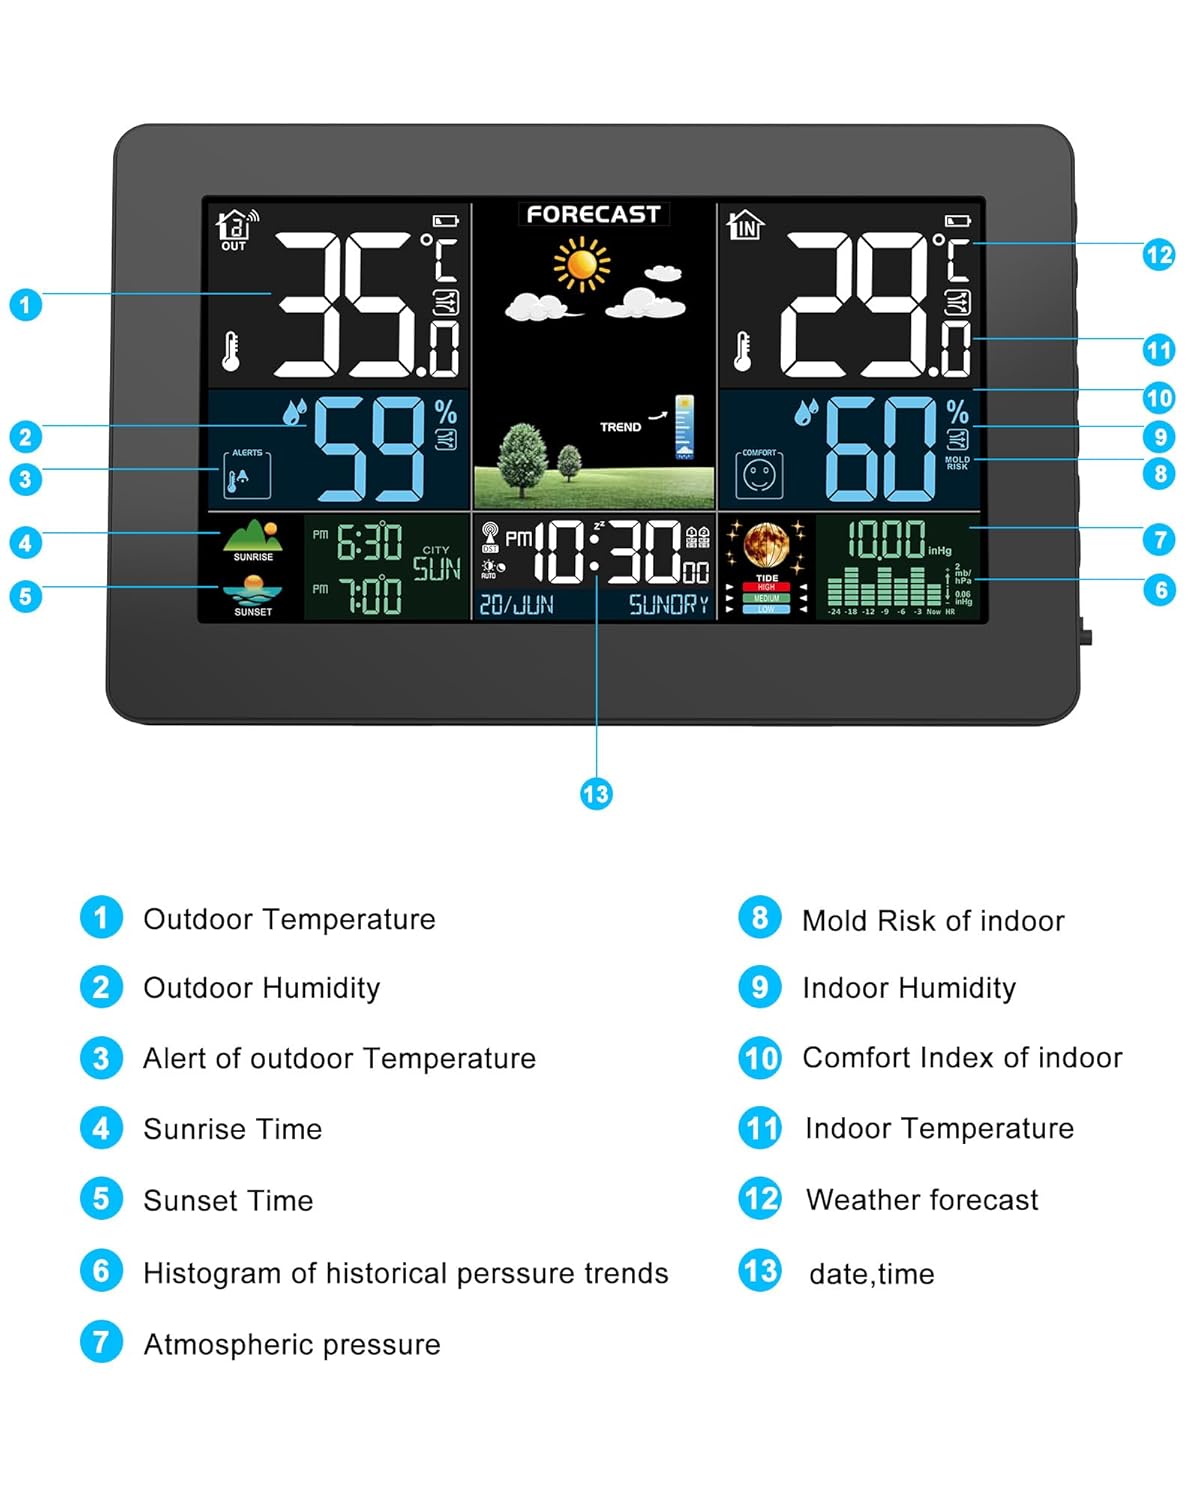
Image: Detailed diagram of the weather station's display, indicating various data points and their locations.
| No. | Description |
|---|---|
| 1 | Outdoor Temperature |
| 2 | Outdoor Humidity |
| 3 | Alert of Outdoor Temperature |
| 4 | Sunrise Time |
| 5 | Sunset Time |
| 6 | Histogram of Historical Pressure Trends |
| 7 | Atmospheric Pressure |
| 8 | Mold Risk of Indoor |
| 9 | Indoor Humidity |
| 10 | Comfort Index of Indoor |
| 11 | Indoor Temperature |
| 12 | Weather Forecast |
| 13 | Date, Time |
2. Setting Time and Date
The weather station features a DCF radio timer function for automatic time synchronization. If manual setting is required:
- Press the "SET" button (or similar) to enter time setting mode.
- Use the "UP" and "DOWN" buttons to adjust values.
- Press "SET" again to confirm and move to the next setting (e.g., 12/24 hour format, year, month, day, language for day of week).
- The day of the week can be set in 7 languages: English, German, Italian, French, Spanish, Dutch, and Danish.
3. Setting Alarms
- Press the "ALARM" button to view alarm times.
- Press and hold "ALARM" to enter alarm setting mode.
- Adjust alarm time using "UP" and "DOWN" buttons.
- Press "ALARM" to confirm. Repeat for the second alarm.
- To activate/deactivate an alarm, press "ALARM" repeatedly until the alarm icon appears/disappears.
- Snooze Function: When an alarm sounds, press the "SNOOZE" button to activate snooze (5 to 60 minutes, adjustable). Press any other button to stop the alarm.
4. Weather Forecast
The weather station analyzes atmospheric pressure trends to provide a 12-hour weather forecast. The forecast accuracy is approximately 90%.
- Symbols displayed include: Sunny, Partly Cloudy, Cloudy, Rainy, Snowy.
- If the station is moved, it will take 12-24 hours to recalibrate and provide accurate forecasts for the new location.

Image: Visual guide to the weather forecast symbols displayed on the screen, representing different weather conditions.
5. Temperature and Humidity Display
- The display shows current indoor and outdoor temperature and humidity.
- Press the "℃/℉" button to switch between Celsius and Fahrenheit.
- The station also displays minimum/maximum recorded values for temperature and humidity.
- Outdoor Temperature Alarm: Set upper and lower temperature limits for outdoor readings. An alarm will sound if the temperature goes outside this range, along with a frost warning.
- Comfort and Mold Risk: The display includes indicators for indoor living comfort and potential mold risk based on temperature and humidity levels.
Maintenance
- Cleaning: Wipe the weather station and sensor with a soft, dry cloth. Do not use abrasive cleaners or solvents.
- Battery Replacement: Replace batteries in both the main unit and outdoor sensor when the low battery indicator appears on the display. Ensure correct polarity.
- Storage: If storing the device for an extended period, remove all batteries to prevent leakage.
- Environmental Conditions: While the outdoor sensor is designed for outdoor use, prolonged exposure to extreme weather conditions (heavy rain, snow, direct intense sunlight) may affect its lifespan. Consider placing it under a protective cover or in a sheltered area.
Troubleshooting
| Problem | Possible Cause | Solution |
|---|---|---|
| No display on main unit | No power; batteries inserted incorrectly or depleted. | Ensure power adapter is connected or replace batteries, checking polarity. |
| Outdoor readings not displayed or "---" shown | Sensor out of range; sensor batteries depleted; interference; incorrect channel. | Move sensor closer to main unit (within 60m); replace sensor batteries; avoid strong electronic devices; ensure sensor channel matches main unit. Press search button on main unit. |
| Inaccurate temperature/humidity readings | Sensor exposed to direct sunlight/rain; near heat/cold source. | Relocate sensor to a shaded, dry area. Ensure proper ventilation around both units. |
| Weather forecast inaccurate | Station recently moved; local atmospheric pressure changes. | Allow 12-24 hours for recalibration after moving. Forecasts are predictions and may not always be 100% accurate. |
| "LL.L" or "HH.H" on display | Temperature/humidity is outside the measurable range. | This indicates readings are below the minimum or above the maximum measurable range. No action required unless the device is malfunctioning. |
Specifications
| Feature | Detail |
|---|---|
| Model Number | Weather station |
| Indoor Temperature Range | -9.9°C to 50°C (14.2°F to 122°F) |
| Outdoor Temperature Range | -40°C to 70°C (-40°F to 158°F) |
| Humidity Range (Indoor & Outdoor) | 20% to 95% RH |
| Atmospheric Pressure Range | 600 hPa/mb to 1100 hPa/mb (17.72 inHg to 32.50 inHg) |
| Wireless Transmission Frequency | 433.92 MHz |
| Wireless Transmission Range | Up to 60 meters (open field) |
| Max. Outdoor Sensors | 3 |
| Main Unit Power Supply | DC 5V 1.2A Adapter (included), 2 x LR6 AA batteries (not included), USB cable (not included) |
| Outdoor Sensor Power Supply | 2 x LR6 AA batteries (not included) |
| Product Dimensions (Main Unit) | Approx. 20.5 cm (L) x 3 cm (W) x 13 cm (H) |
| Weight | 600 grams |
| Special Features | Adjustable alarm, adjustable brightness, large display, wireless clock, perpetual calendar, moon phases, tides, sunrise/sunset. |
Warranty and Support
For warranty information and customer support, please refer to the contact details provided with your purchase or visit the official HAOYAO website. Keep your purchase receipt as proof of purchase for any warranty claims.
Manufacturer: HAOYAO
ASIN: B0CFQBH98P


