
RCB RK6
RCB RK6 Electric Folding Bicycle User Manual
Model: RK6
1. Important Safety Information
Please read this manual carefully before operating your RCB RK6 Electric Folding Bicycle. Failure to follow safety instructions may result in serious injury or damage to the product.
- Always wear a helmet and appropriate safety gear when riding.
- Ensure all bolts, nuts, and quick releases are securely fastened before each ride.
- Check tire pressure, brakes, and battery charge level before each use.
- Do not ride in adverse weather conditions (heavy rain, snow, ice).
- Adhere to local traffic laws and regulations.
- Do not exceed the maximum load capacity of 120 kg.
- Keep hands and feet away from moving parts.
- Do not modify the bicycle or its electrical system.
- Children should not operate this electric bicycle. It is designed for adults.
2. Product Overview
The RCB RK6 is a versatile 20-inch electric folding bicycle designed for urban commuting and outdoor adventures. It features a robust aluminum frame, a powerful 250W motor, and a removable 36V 12Ah battery, offering an extended range. Its folding design allows for easy storage and transport.

Figure 2.1: Overview of the RCB RK6 Electric Folding Bicycle.
Key Features:
- Long Range: Up to 90 km on a single charge (environmental factors may affect actual range).
- Multiple Riding Modes: Pedal-assist and electric-assist modes for flexible riding.
- Foldable Design: Compact for convenient storage and portability.
- Enhanced Comfort: Front suspension and cushioned seat absorb vibrations for a smooth ride.
- Powerful Motor: 250W motor with a maximum speed of 25 km/h.
- All-Terrain Tires: 20-inch fat tires provide stability on various surfaces.
- 7-Speed Gear System: Shimano 7-speed gears for adaptable riding.
3. Setup and Assembly
Your RCB RK6 Electric Folding Bicycle comes mostly pre-assembled. Follow these steps to complete the setup.
- Unpacking: Carefully remove the bicycle and all components from the packaging. Retain packaging for future transport or storage.
- Handlebar Adjustment:
Unfold the handlebar stem and secure it in the upright position using the quick-release lever. Adjust the handlebar height to a comfortable riding position and tighten the clamp securely.
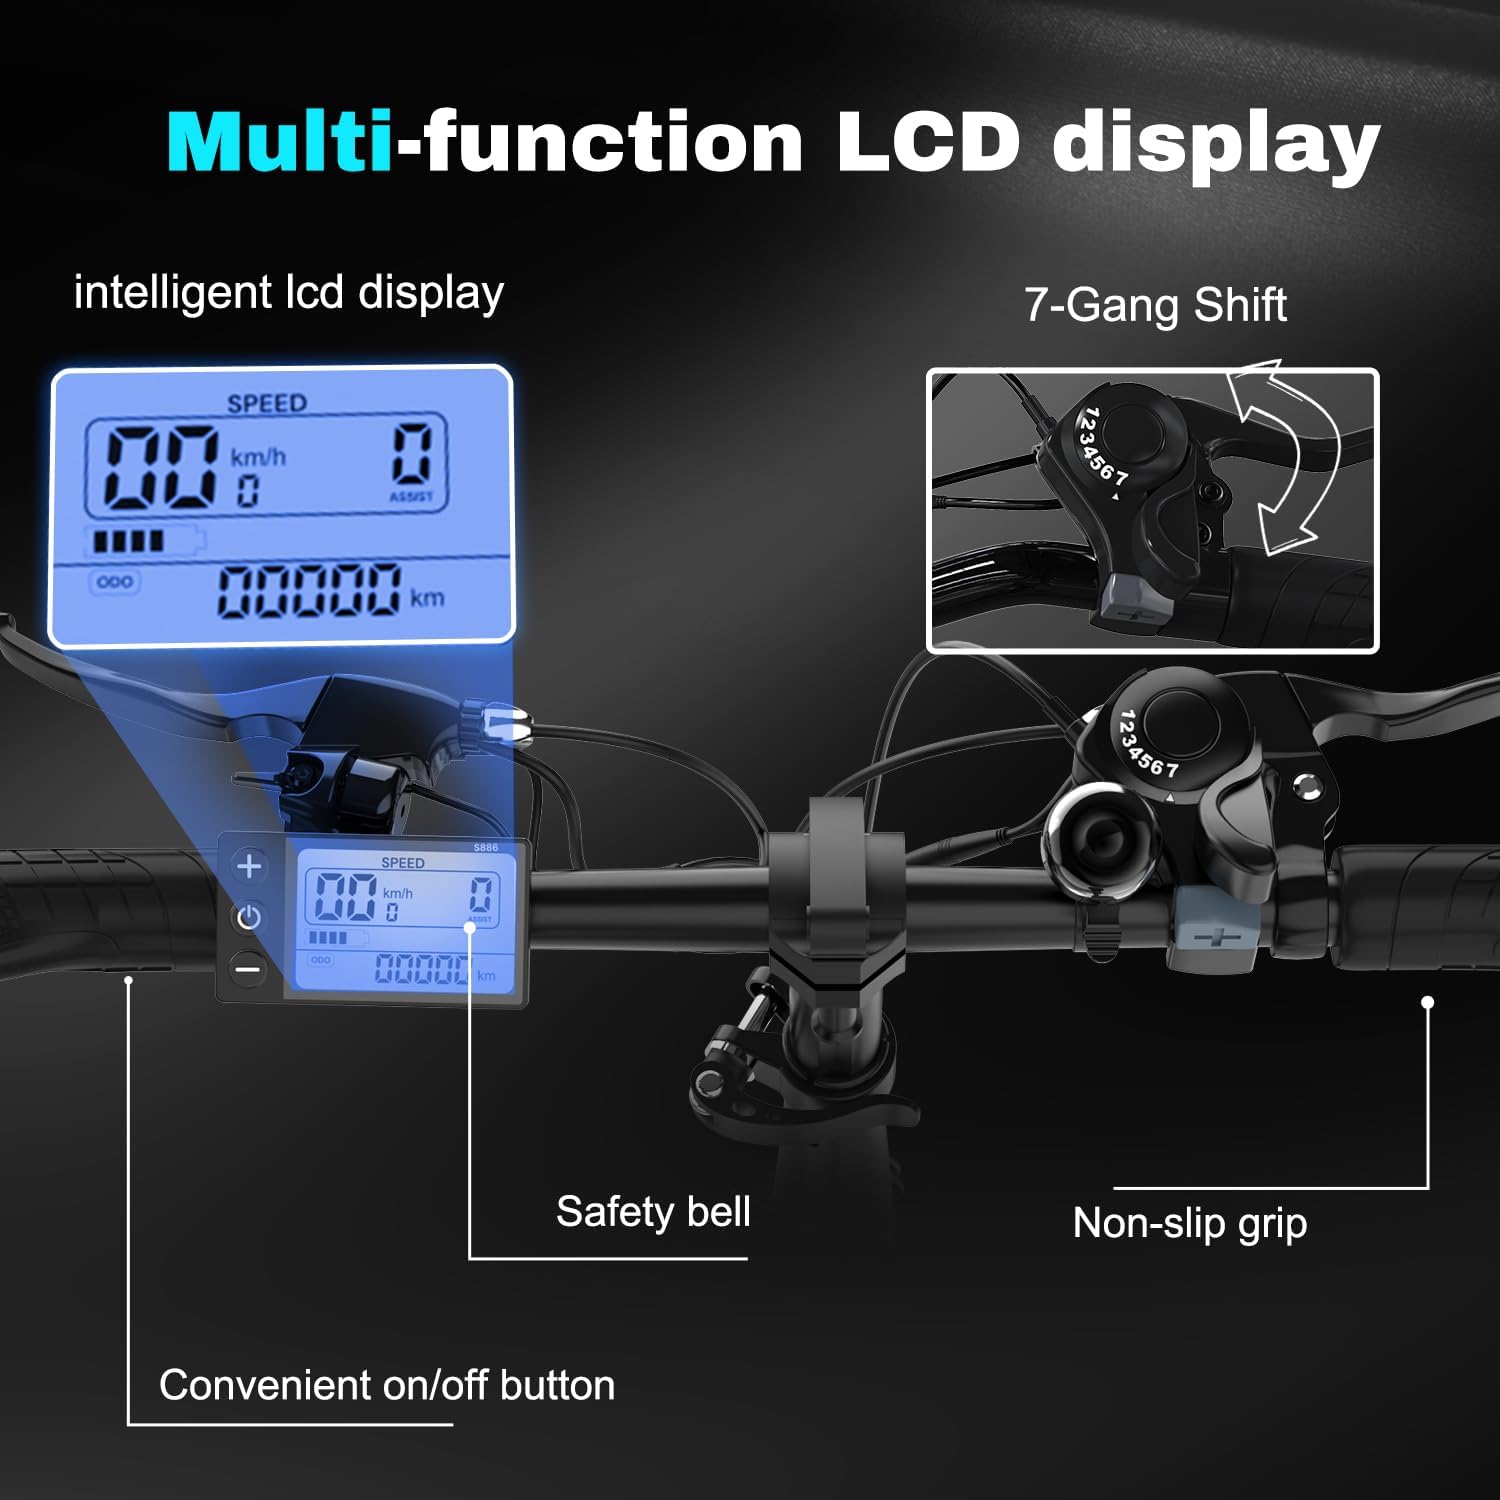
Figure 3.1: Handlebar area showing LCD display, gear shifter, and brake levers.
- Seat Adjustment:
Insert the seat post into the frame. Adjust the seat height so that your feet can comfortably touch the ground when stopped, or for optimal pedaling efficiency. Secure the seat post with the quick-release clamp.

Figure 3.2: Adjustable seat and handlebar components.
- Pedal Installation:
Identify the left (L) and right (R) pedals. The left pedal has a reverse thread. Screw the pedals into the crank arms by hand, then tighten them securely with a wrench. Ensure they are fully tightened to prevent loosening during riding.
- Battery Installation:
Insert the fully charged battery into its compartment on the frame. Ensure it clicks into place securely. Use the provided key to lock the battery if applicable.
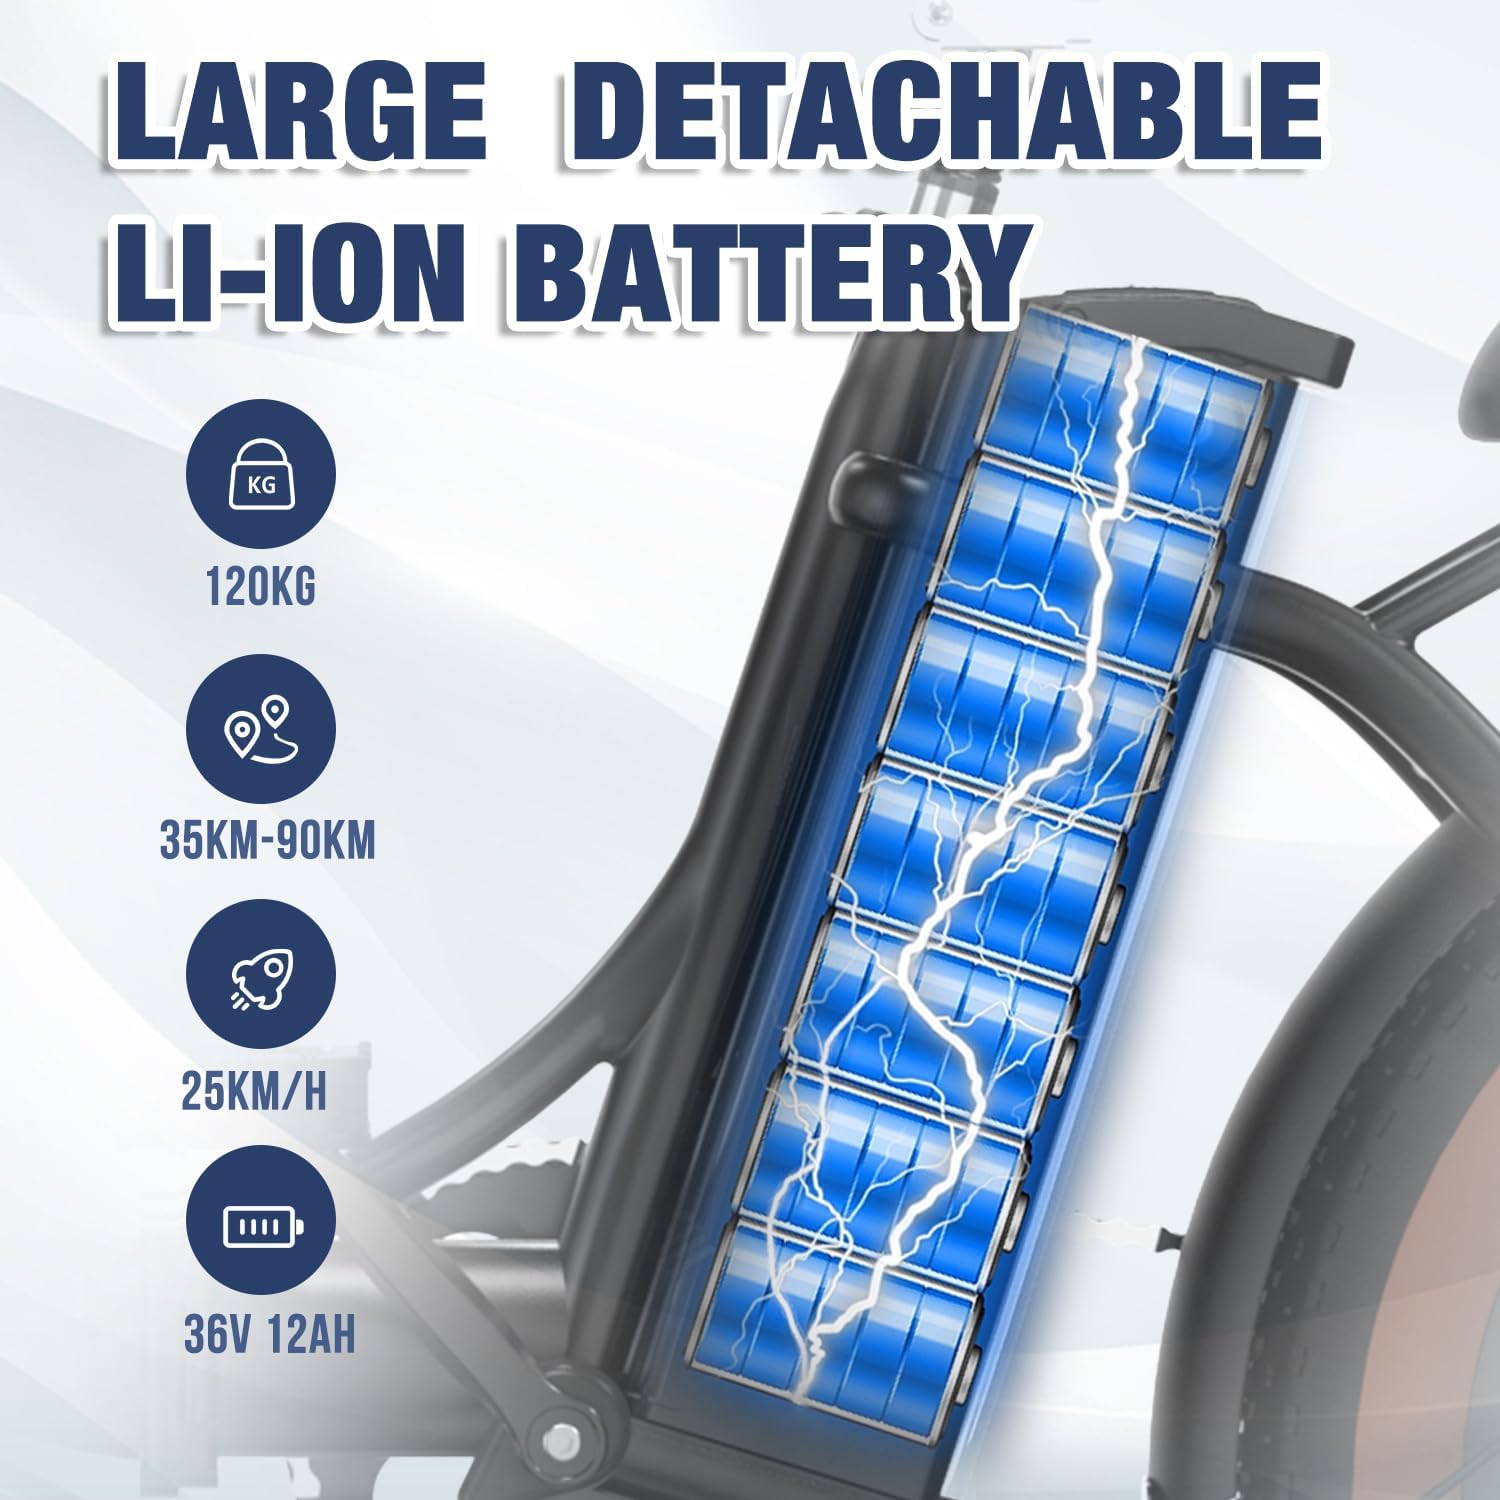
Figure 3.3: Illustration of the large detachable Li-Ion battery.
- Tire Inflation:
Inflate tires to the recommended pressure indicated on the tire sidewall. An inflator is included with your bicycle.
- Pre-Ride Check:
Before your first ride, and before every subsequent ride, perform a thorough safety check as outlined in Section 1.
4. Operating Instructions
4.1 Powering On/Off
To power on the bicycle, press and hold the power button on the LCD display. The display will illuminate. To power off, press and hold the power button again until the display turns off.
Figure 4.1: Multi-function LCD display showing speed, battery level, and mileage. Includes on/off button and non-slip grip.
4.2 Riding Modes
The RCB RK6 offers multiple riding modes:
- Pedal-Assist Mode: The motor provides assistance as you pedal. You can adjust the level of assistance using the '+' and '-' buttons on the display. This mode extends your range and makes pedaling easier, especially uphill.
- Electric-Assist (Throttle) Mode: If equipped, this mode allows you to propel the bicycle using only the throttle, without pedaling. Use with caution and according to local regulations.
- Normal Bicycle Mode: The electric system is off, and you can ride the bicycle like a traditional bike using pedal power only.
4.3 Gear Shifting
The bicycle is equipped with a 7-speed gear system. Use the shifter on the handlebar to change gears according to terrain and desired speed. Shift to lower gears for climbing hills and higher gears for flat terrain or downhill riding.
Figure 4.2: Close-up of the 7-speed gear shifter on the handlebar.
4.4 Braking
The RCB RK6 features disc brakes for reliable stopping power. Use both brake levers simultaneously for effective and safe braking. Apply gentle pressure initially and increase as needed. Avoid sudden, hard braking, especially at high speeds.

Figure 4.3: Rear wheel assembly showing the 250W motor and disc brake system.
5. Battery Information and Charging
The RCB RK6 is equipped with a 36V 12Ah removable lithium-ion battery.
5.1 Charging the Battery
- Ensure the bicycle is turned off before charging.
- The battery can be charged while installed on the bike or removed.
- Connect the charger to the charging port on the battery, then plug the charger into a standard wall outlet.
- The charger indicator light will typically show red during charging and turn green when fully charged.
- Charging time is approximately 5-6 hours for a full charge.
- Do not overcharge the battery. Disconnect the charger once charging is complete.
Figure 5.1: The removable 36V 12Ah Li-Ion battery, highlighting its capacity and range.
5.2 Battery Care and Storage
- Store the battery in a cool, dry place, away from direct sunlight and extreme temperatures.
- If storing for an extended period, charge the battery to 50-70% every 2-3 months to maintain its health.
- Do not expose the battery to water or moisture.
- If the battery is damaged or shows signs of overheating, discontinue use immediately and contact support.
6. Maintenance
Regular maintenance ensures the longevity and safe operation of your electric bicycle.
- Tires: Check tire pressure before each ride. Maintain pressure within the recommended range (usually found on the tire sidewall). Inspect tires for wear, cuts, or punctures.
- Brakes: Regularly check brake lever tension and brake pad wear. Ensure brakes engage smoothly and effectively. Adjust or replace pads as needed.
- Chain: Keep the chain clean and lubricated. Apply bicycle chain lubricant regularly, especially after riding in wet conditions.
- Bolts and Fasteners: Periodically check all bolts, nuts, and quick releases for tightness. Tighten any loose components.
- Cleaning: Clean the bicycle with a damp cloth and mild soap. Avoid using high-pressure washers directly on electrical components. Dry thoroughly after cleaning.
- Suspension: The front suspension and cushioned seat are designed for comfort. Inspect them periodically for any signs of damage or reduced performance.
- Storage: When not in use, store the bicycle in a dry, sheltered area to protect it from the elements. The folding mechanism makes storage convenient.

Figure 6.1: Illustration of the high shock absorption front suspension and cushioned seat.

Figure 6.2: The 20-inch fat tires are suitable for various road surfaces including urban streets, dirt roads, and sandy paths.
7. Troubleshooting
This section addresses common issues you might encounter with your RCB RK6 Electric Folding Bicycle.
| Problem | Possible Cause | Solution |
|---|---|---|
| Bicycle does not power on. | Battery not charged or not properly installed. Loose electrical connection. | Ensure battery is fully charged and securely seated. Check all visible cable connections. |
| Motor not assisting. | Low battery. Pedal-assist level set to zero. Brake levers engaged. | Charge battery. Increase pedal-assist level on display. Ensure brake levers are fully released. |
| Brakes feel weak. | Worn brake pads. Loose brake cable. | Inspect brake pads and replace if worn. Adjust brake cable tension. Consult a bicycle mechanic if unsure. |
| Unusual noises during riding. | Loose components. Dry chain. | Check all bolts and fasteners for tightness. Lubricate the chain. |
| Difficulty shifting gears. | Misaligned derailleur. Stretched gear cable. | Inspect the derailleur for alignment. If issues persist, professional adjustment may be required. |
If you encounter problems not listed here or if solutions do not resolve the issue, please contact customer support.
8. Specifications
| Feature | Specification |
|---|---|
| Model Number | RK6 |
| Age Range | Adults |
| Bike Type | Electric Bicycle |
| Brake Type | Disc Brake |
| Color | Black |
| Frame Material | Aluminum |
| Number of Speeds | 7 |
| Power Source | Electric Battery (36V 12Ah) |
| Suspension Type | Front |
| Wheel Size | 20 Inches |
| Motor Wattage | 250W |
| Max Speed | 25 km/h |
| Max Range | Up to 90 km (environmental factors apply) |
| Product Dimensions | 168 x 56 x 120 cm |
| Bicycle Weight | 27.9 kg |
| Load Capacity | 120 kg |
| Recommended Height | 165-195 cm |
| Included Components | Inflator, Camel Bag, Lock |
Figure 8.1: Detailed dimensions, weight, and load capacity of the RCB RK6 Electric Folding Bicycle.
9. Warranty and Support
For warranty information, technical support, or replacement parts, please contact the manufacturer or your point of purchase. Keep your purchase receipt as proof of purchase.
Manufacturer: ZHEJIANG KUANTU INDUSTRY AND TRADE CO.,LTD
Model: RK6
Related documentsRK6


Ask a question about this manual
Ask about setup, troubleshooting, compatibility, parts, safety, or missing instructions. Manuals+ will review the question and use this page’s manual context to help answer it.