1. Introduction
This manual provides instructions for the Mesqool CR1024 Projection Alarm Clock. This device features a digital time display, time projection, dual alarms, a night light, date, temperature, and humidity display, along with Type-C and USB charging ports. Please read this manual thoroughly before operating the device to ensure proper use and to understand all functions.

Image 1.1: Mesqool CR1024 Projection Alarm Clock. This image shows the alarm clock displaying time, date, temperature, and humidity, with a smartphone connected for charging via its USB port.
2. Product Overview
2.1 Key Features
- Time Projection: Projects time onto a wall or ceiling with 180° swivel and adjustable focus.
- Large LED Display: 5.9-inch screen displaying 12/24 hour format, calendar date, day of the week, and alarm times.
- Multi-function Display: Includes temperature and humidity readings.
- Dual Alarms: Two independent alarms with customizable modes (Mon-Sun, Mon-Fri, Sat-Sun, One-time).
- Snooze Function: Provides an additional 9 minutes of sleep.
- Night Light: Built-in soft LED night light with adjustable brightness.
- Adjustable Dimmer: 5-level brightness adjustment for the main LED display and projection.
- USB Charging Ports: Equipped with Type-C and standard USB ports for charging external devices.
- Memory Function: Requires 2x AAA batteries (not included) for backup to preserve settings during power outages.

Image 2.1: Overview of the Mesqool CR1024 Projection Alarm Clock's features, including dual alarms, calendar, 12/24H time, temperature, humidity, and night light.
2.2 Package Contents
- 1x Mesqool CR1024 Projection Alarm Clock
- 1x Power Adapter
- 1x USB Charging Cable
- 1x User Manual (this document)
3. Setup Instructions
3.1 Power Connection
- Connect the provided power adapter to the DC IN port on the back of the alarm clock.
- Plug the power adapter into a standard electrical outlet. The clock display will illuminate.
3.2 Battery Backup (Optional)
To retain time and alarm settings during a power outage, install 2x AAA batteries (not included) into the battery compartment on the bottom of the clock. The batteries will not power the main display or projection functions, only preserve settings.
4. Operating Instructions
4.1 Setting Time and Date
- Press and hold the TIME SET button to enter time setting mode. The hour digits will flash.
- Use the + or - buttons to adjust the hour.
- Press TIME SET again to confirm the hour and move to minute setting. Use + or - to adjust minutes.
- Continue pressing TIME SET to cycle through year, month, and day settings, adjusting each with + or -.
- After setting the day, press TIME SET one last time to exit.
4.1.1 12/24 Hour Format
While in normal time display mode, press the 12/24H button to switch between 12-hour (with AM/PM indicator) and 24-hour formats.

Image 4.1: The clock displaying time in both 12-hour and 24-hour formats, illustrating the selectable options.
4.2 Setting Alarms
The clock supports two independent alarms (Alarm 1 and Alarm 2).
- Press and hold the AL1 or AL2 button to enter alarm setting mode for the respective alarm. The hour digits will flash.
- Use the + or - buttons to adjust the alarm hour.
- Press AL1 or AL2 again to confirm the hour and move to minute setting. Use + or - to adjust minutes.
- Press AL1 or AL2 again to select the alarm mode: Mon-Sun (7 days), Mon-Fri (weekdays), Sat-Sun (weekends), or One-time.
- Press AL1 or AL2 one last time to exit.
4.2.1 Alarm Volume Adjustment
While the alarm is sounding, press the VOL button to adjust the alarm volume (7 levels).

Image 4.2: Illustration of the 7-level volume adjustment and 4 alarm modes (Mon-Sun, Mon-Fri, Sat-Sun, One-time) for the alarm clock.
4.2.2 Snooze Function
When an alarm sounds, press the SNOOZE/OK button to temporarily silence the alarm for 9 minutes. The alarm will sound again after 9 minutes. To turn off the alarm completely, press any other button.
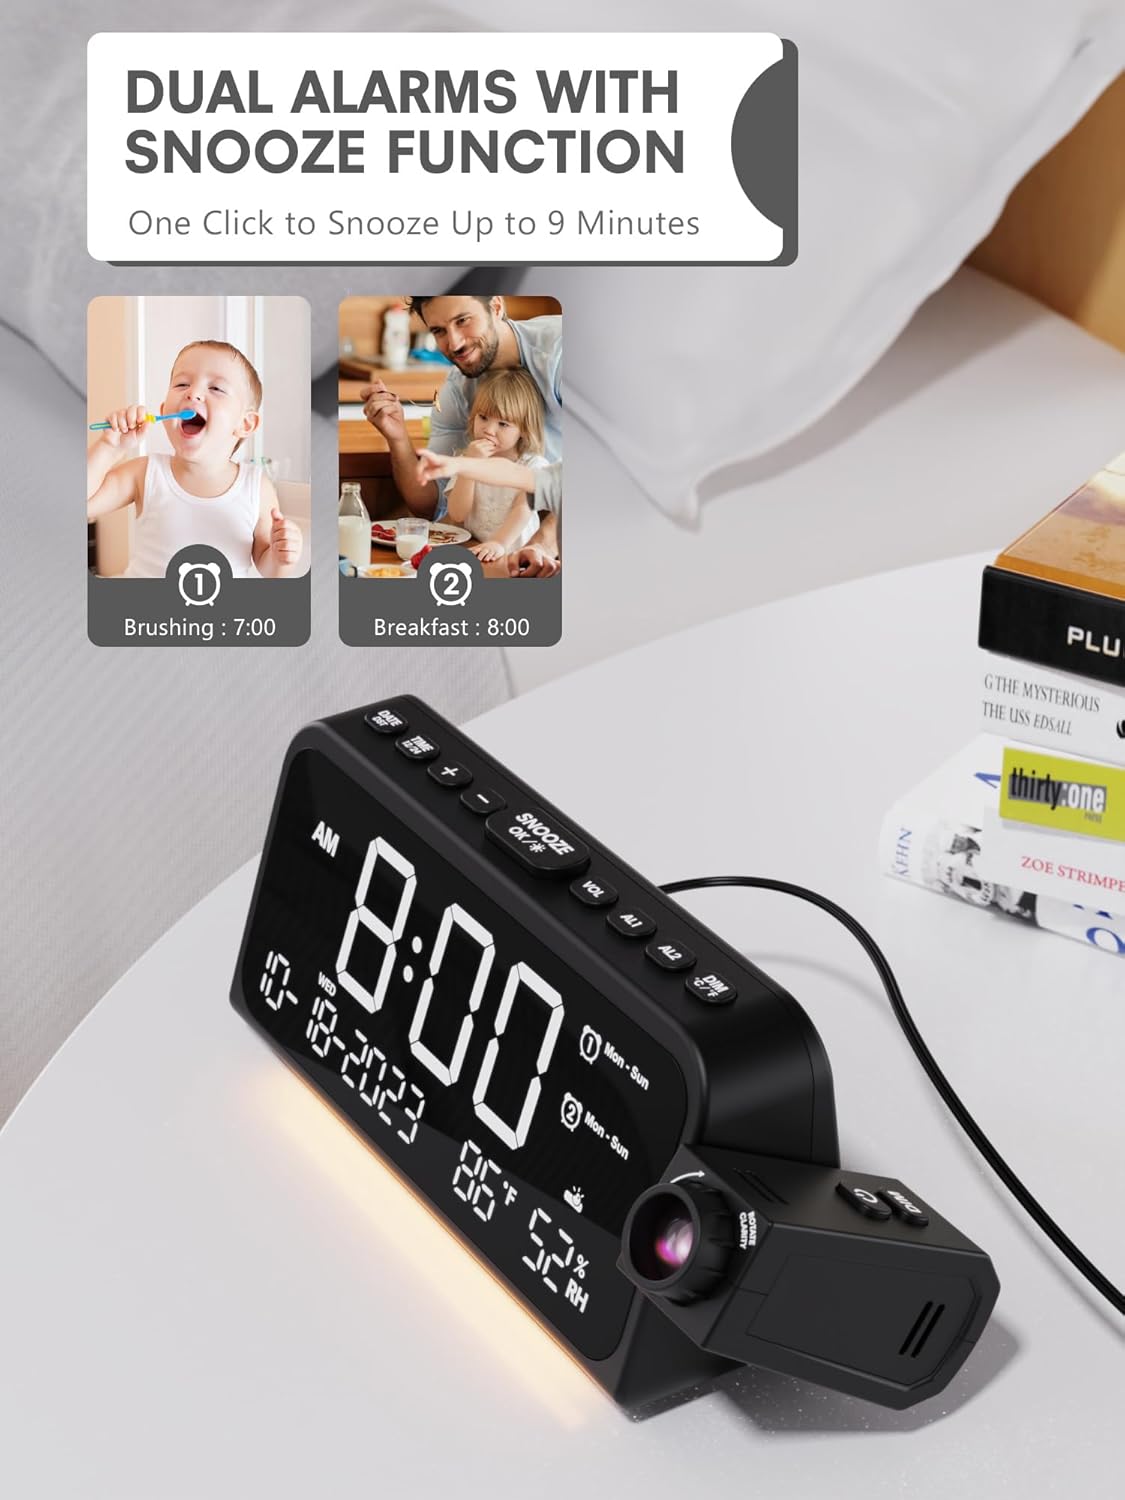
Image 4.3: The clock displaying two set alarms and indicating the snooze function, which provides 9 extra minutes of sleep.
4.3 Time Projection
The clock can project the time onto a wall or ceiling.
- Activate/Deactivate: Press the PROJECTION button to turn the projection on or off.
- 180° Swivel: The projector arm can be manually swiveled 180 degrees to adjust the projection angle.
- Focus Adjustment: Rotate the focus ring on the projector lens to achieve a clear image.
- Projection Brightness: Press the PROJECTION button repeatedly to cycle through 5 brightness levels (Off, Dim, Low, Medium, High, Full).

Image 4.4: The alarm clock projecting the time onto a wall, demonstrating the clear time projection feature.

Image 4.5: Illustration of the 180-degree time flip feature for the projection, allowing for flexible viewing angles.

Image 4.6: Diagram showing the effective projection distance of the clock, typically between 4.92 and 9.84 feet.
4.4 Night Light
The clock includes a soft LED night light located at the bottom.
- Press the NIGHT LIGHT button to cycle through brightness levels: Off, Medium, Full.

Image 4.7: The alarm clock with its integrated night light illuminated, showing the soft glow it provides.
4.5 Display Dimmer
The main LED display brightness can be adjusted.
- Press the DIMMER button to cycle through 5 brightness levels for the main display.

Image 4.8: The clock demonstrating its 5-level adjustable dimmer for the main display, from dim to full brightness.
4.6 USB Charging Ports
The clock features a Type-C and a standard USB port on the back for charging external devices.
- Connect your device's charging cable to the appropriate USB or Type-C port on the alarm clock.
- Ensure the alarm clock is powered via the AC adapter for charging functionality.

Image 4.9: The back of the alarm clock showing the Type-C and standard USB charging ports, with devices connected.
5. Maintenance
To ensure the longevity and proper functioning of your Mesqool CR1024 Projection Alarm Clock, follow these maintenance guidelines:
- Cleaning: Use a soft, dry cloth to clean the surface of the clock. Do not use abrasive cleaners, waxes, or solvents.
- Dust Removal: Gently wipe the projector lens with a soft, lint-free cloth to maintain clear projection.
- Placement: Place the clock on a stable, flat surface away from direct sunlight, heat sources, and excessive moisture.
- Power Disconnection: Disconnect the power adapter from the outlet if the clock will not be used for an extended period.
6. Troubleshooting
| Problem | Possible Cause | Solution |
|---|---|---|
| Clock display is off. | No power connection. | Ensure the power adapter is securely plugged into the clock and a working electrical outlet. |
| Projection is unclear or blurry. | Focus not adjusted; projector lens dirty. | Rotate the focus ring on the projector lens until the image is clear. Clean the lens with a soft, lint-free cloth. |
| Projection is too dim or too bright. | Projection brightness level needs adjustment. | Press the PROJECTION button repeatedly to cycle through brightness levels. |
| Alarm does not sound. | Alarm is not activated or volume is too low. | Ensure the alarm is set and activated (indicated by an alarm icon on the display). Adjust alarm volume using the VOL button. |
| USB charging not working. | Clock not powered by AC adapter; cable issue. | Ensure the clock is connected to AC power. Check if the charging cable is functional and properly connected to both the clock and the device. |
| Settings lost after power outage. | No backup batteries installed or batteries are depleted. | Install 2x new AAA batteries for backup. |
7. Specifications
| Feature | Detail |
|---|---|
| Brand | Mesqool |
| Model Number | CR1024 |
| Color | White Digit+ Red Projection |
| Display Type | Digital LED |
| Product Dimensions | 7.87"W x 3.4"H (7.87x2.36x3.43 inch) |
| Item Weight | 11.7 ounces (0.33 Kilograms) |
| Power Source | Corded Electric |
| Battery Backup | 2x AAA batteries (not included) for memory function |
| Material | Acrylonitrile Butadiene Styrene (ABS) |
| Special Features | Adjustable Brightness, Adjustable Volume, Mood Light, Projection Clock, Snooze, Dual USB Charger |
| Mounting Type | Tabletop |
8. Warranty and Support
This Mesqool CR1024 Projection Alarm Clock comes with an 18-month warranty. Mesqool also provides lifetime support for its products.
For technical assistance, troubleshooting, or warranty claims, please refer to the contact information provided with your purchase or visit the official Mesqool support website.


