1. Important Safety Information
Always read and understand all safety warnings and instructions before operating this power tool. Failure to follow the warnings and instructions may result in electric shock, fire, and/or serious injury.
- Work Area Safety: Keep work area clean and well lit. Cluttered or dark areas invite accidents.
- Electrical Safety: Do not expose power tools to rain or wet conditions. Water entering a power tool will increase the risk of electric shock.
- Personal Safety: Always wear eye protection. Use hearing protection when operating for extended periods. Dress properly. Do not wear loose clothing or jewelry. Keep hair, clothing, and gloves away from moving parts.
- Tool Use and Care: Do not force the power tool. Use the correct power tool for your application. Disconnect the plug from the power source before making any adjustments, changing accessories, or storing power tools.
- Maintenance: Maintain power tools. Check for misalignment or binding of moving parts, breakage of parts, and any other condition that may affect the power tool’s operation.
2. Product Overview and Components
The Allsome Benchtop Drill Press is a versatile tool designed for precise drilling in various materials. Familiarize yourself with its main components before operation.

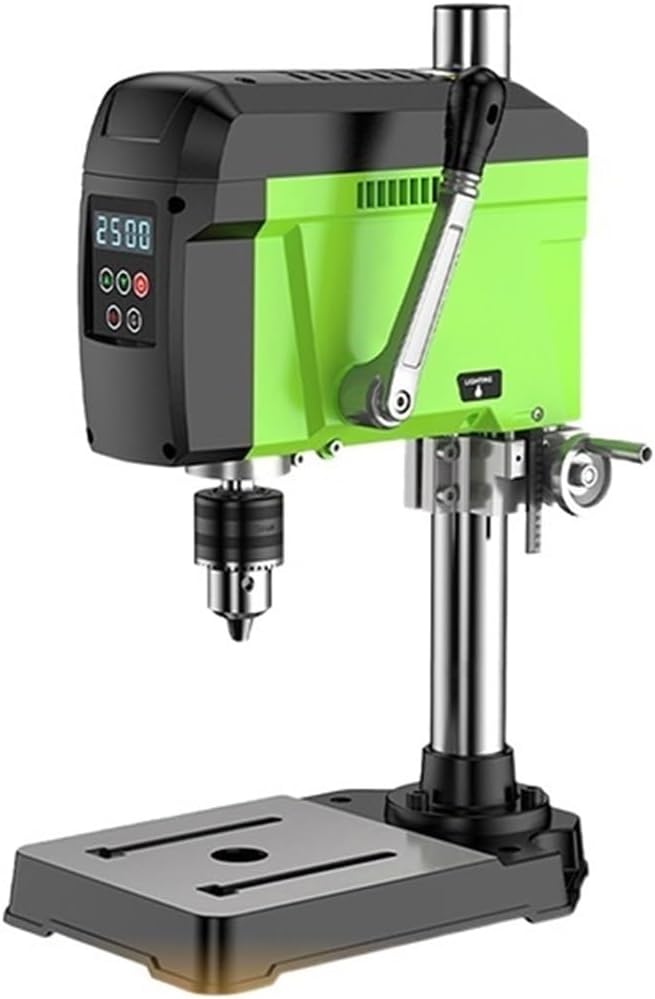
Key components include the motor head, chuck, column, base, and operating handle. The unit features a power switch and speed control for variable operation.

- Fixing Screws (Top & Bottom): Used to adjust the height of the machine head along the column. Loosen to move, tighten to secure.
- Safety Limit Hoop: Ensures the machine head does not lower beyond a safe operating position. The height of the machine head must not be lower than this position.
- Steel Pipe and Base Fixing Screws: Secure the column to the base, ensuring stability during operation. Allows for adjustable head direction.
3. Setup and Assembly
Before first use, ensure the drill press is properly assembled and secured to a stable workbench. The worktable shown in some images is not included and must be acquired separately if needed.

- Unpacking: Carefully remove all components from the packaging. Check for any damage during transit.
- Base and Column Assembly: Securely attach the steel column to the base using the provided fixing screws. Ensure the column is vertical and stable.
- Head Unit Installation: Slide the motor head unit onto the column. Adjust its height using the fixing screws as described in Section 2. Ensure the safety limit hoop is correctly positioned.
- Chuck Installation: Install the chuck onto the spindle. Ensure it is firmly seated.
- Mounting: For optimal stability and safety, bolt the drill press base to a sturdy workbench.
4. Operating Instructions
This drill press is designed for drilling various materials including wood, metal, and plastic. It features variable speed control for optimal performance.


- Power Connection: Connect the drill press to a suitable power outlet (220V).
- Select Drill Bit: Choose the appropriate drill bit for your material and desired hole size. Insert it firmly into the chuck and tighten using the chuck key.
- Adjust Speed: Use the variable speed control to set the rotation rate suitable for your material. Slower speeds are generally for harder materials and larger bits, while faster speeds are for softer materials and smaller bits.
- Secure Workpiece: Always clamp your workpiece securely to the drill press table or base. Never hold it by hand.
- Position Workpiece: Align the drill bit with your marked drilling point. Utilize the laser guide for enhanced accuracy if available.
- Start Drilling: Turn on the drill press. Slowly lower the drill bit into the workpiece using the operating handle, applying steady, even pressure.
- Clear Chips: Periodically raise the bit to clear chips, especially when drilling deep holes in metal.
- Finish Drilling: Once the hole is complete, raise the bit clear of the workpiece and turn off the drill press. Wait for the chuck to stop rotating before removing the workpiece.
5. Maintenance
Regular maintenance ensures the longevity and safe operation of your drill press. Always disconnect the power before performing any maintenance.
- Cleaning: After each use, clean the drill press to remove dust, chips, and debris. Use a brush or compressed air. Do not use solvents that may damage plastic parts.
- Chuck Care: Keep the chuck jaws clean and free of debris. Periodically apply a light coat of machine oil to the chuck jaws and threads.
- Column and Spindle: Keep the column and spindle clean and lightly lubricated to ensure smooth movement.
- Cord Inspection: Regularly inspect the power cord for any signs of damage, cuts, or fraying. Replace if damaged.
- Fastener Check: Periodically check all screws and fasteners for tightness. Tighten as necessary.
6. Troubleshooting
Refer to this section for common issues and their solutions. If the problem persists, contact qualified service personnel.
| Problem | Possible Cause | Solution |
|---|---|---|
| Drill press does not start. | No power supply; Power switch off; Internal wiring issue. | Check power connection and outlet; Ensure power switch is ON; Consult service personnel. |
| Excessive vibration during operation. | Loose drill bit; Unsecured workpiece; Loose mounting bolts. | Ensure drill bit is tightly secured in chuck; Clamp workpiece firmly; Tighten all mounting bolts. |
| Drill bit not cutting efficiently. | Dull drill bit; Incorrect speed for material; Insufficient pressure. | Replace or sharpen drill bit; Adjust speed setting; Apply steady, appropriate pressure. |
7. Specifications
Technical specifications for the Allsome Benchtop Drill Press (Model BG-5168E, 680W version).

| Specification | Value |
|---|---|
| Power | 680W |
| Voltage | 220V |
| Clamping Capacity | 1-13mm |
| Rotation Rate | 1100r/min, 2500r/min, 4500r/min (Variable Speed) |
| Stroke Length | 60mm |
| Working Radius | 143mm |
| Size of Operation Platform | 205mm x 205mm |
| Upright Column | 45mm x 500mm |
| Drilling Capacity (Iron) | 8mm |
| Drilling Capacity (Wood) | 30mm |
| Item Weight | 1 Grams (Note: This value from product data seems unusually low for a drill press and may be a data entry error. Refer to actual product for accurate weight.) |
8. Warranty and Support
Specific warranty information and direct support contact details are not available in the provided product data. Please refer to the product packaging or the retailer's website for warranty terms and customer support options.
For general inquiries or technical assistance, you may attempt to contact the manufacturer, FITGS, through their official channels if available.


