1. Introduction
This manual provides detailed instructions for the installation, operation, and maintenance of your HAvern Aluminum Sliding Glass Door Smart Lock. Please read this manual thoroughly before installation and use to ensure proper function and longevity of the product. Keep this manual for future reference.
2. Product Overview and Components
The HAvern Smart Lock offers multiple unlocking methods including fingerprint, IC card, mechanical key, and Tuya APP control. It is designed for aluminum sliding glass doors.
Package Contents:
- Front Panel x 1
- Back Panel x 1
- Mortise Lock x 1
- Smart Card x 2
- Mechanical Keys x 2
- Screw Kit x 1

Figure 2.1: An overview of the HAvern Smart Lock, showing the exterior and interior handle units along with the central mortise lock mechanism.

Figure 2.2: An annotated diagram showing the overall dimensions of the smart lock (315mm height, 42mm width) and identifying key components like the fingerprint reader, card reader, confirm button, battery box, and hidden physical keyhole.
3. Pre-Installation Considerations
Before proceeding with installation, it is crucial to verify your door's compatibility with the smart lock. Incorrect measurements can lead to installation difficulties or improper function.
Door Measurement Guide:
- Gauge the door thickness: Measure the thickness of your sliding glass door.
- Measure the length of the guide plate: Determine the length of the existing guide plate on your door.
- Measure the width of the guide plate: Determine the width of the existing guide plate on your door.
If you are uncertain about the correct mortise selection, please contact the manufacturer with your door's detailed measurements for assistance.

Figure 3.1: Diagram displaying different mortise lock sizes and configurations, crucial for selecting the correct type based on door specifications.
4. Setup and Installation
This smart lock is suitable for both left and right-hand door configurations. Ensure all components are present and undamaged before beginning installation.
General Installation Steps (Refer to detailed diagrams for specific mortise installation):
- Prepare the door: Ensure the door frame is clean and free of obstructions.
- Install the mortise lock: Insert the selected mortise lock into the door edge. Secure it with screws from the screw kit.
- Attach the exterior panel: Connect the exterior handle unit to the mortise lock, ensuring cables are routed correctly.
- Attach the interior panel: Connect the interior handle unit, aligning it with the exterior panel and mortise. Secure both panels using the provided screws.
- Install batteries: Open the battery box on the interior panel and insert 4 AA batteries.
- Test functionality: After installation, test all unlocking methods and ensure the lock operates smoothly.

Figure 4.1: A side perspective of the smart lock, illustrating how the mortise lock integrates within the handle units during installation.
5. Operating Instructions
Your HAvern Smart Lock offers multiple convenient ways to secure and access your sliding glass door.
Unlocking Methods:
- Fingerprint Unlocking: The lock features a semiconductor auto-sensing fingerprint head. It can store up to 100 unique fingerprints and unlocks in approximately 0.5 seconds. To register fingerprints, follow the instructions in the Tuya APP or the lock's internal menu.
- IC Card Unlocking: Use the provided smart cards to unlock the door. Present the card to the designated card reader area on the lock. Register new cards via the Tuya APP or lock menu.
- Tuya APP Unlocking: Connect your smart lock to the Tuya APP via a Tuya BLE gateway. This allows for remote control and management of the lock, including unlocking, adding/removing users, and viewing access logs.
- Mechanical Key Unlocking: In case of emergency or battery depletion, use the provided mechanical keys to manually unlock the door. The keyhole is typically hidden for security.
Power Supply:
The lock is powered by 4 AA batteries. It also features a USB charging interface for emergency power supply if batteries are depleted.

Figure 5.1: Detailed view of the semiconductor auto-sensing fingerprint head and the numeric keypad, highlighting the 100-group storage capacity and 0.5-second unlock time.
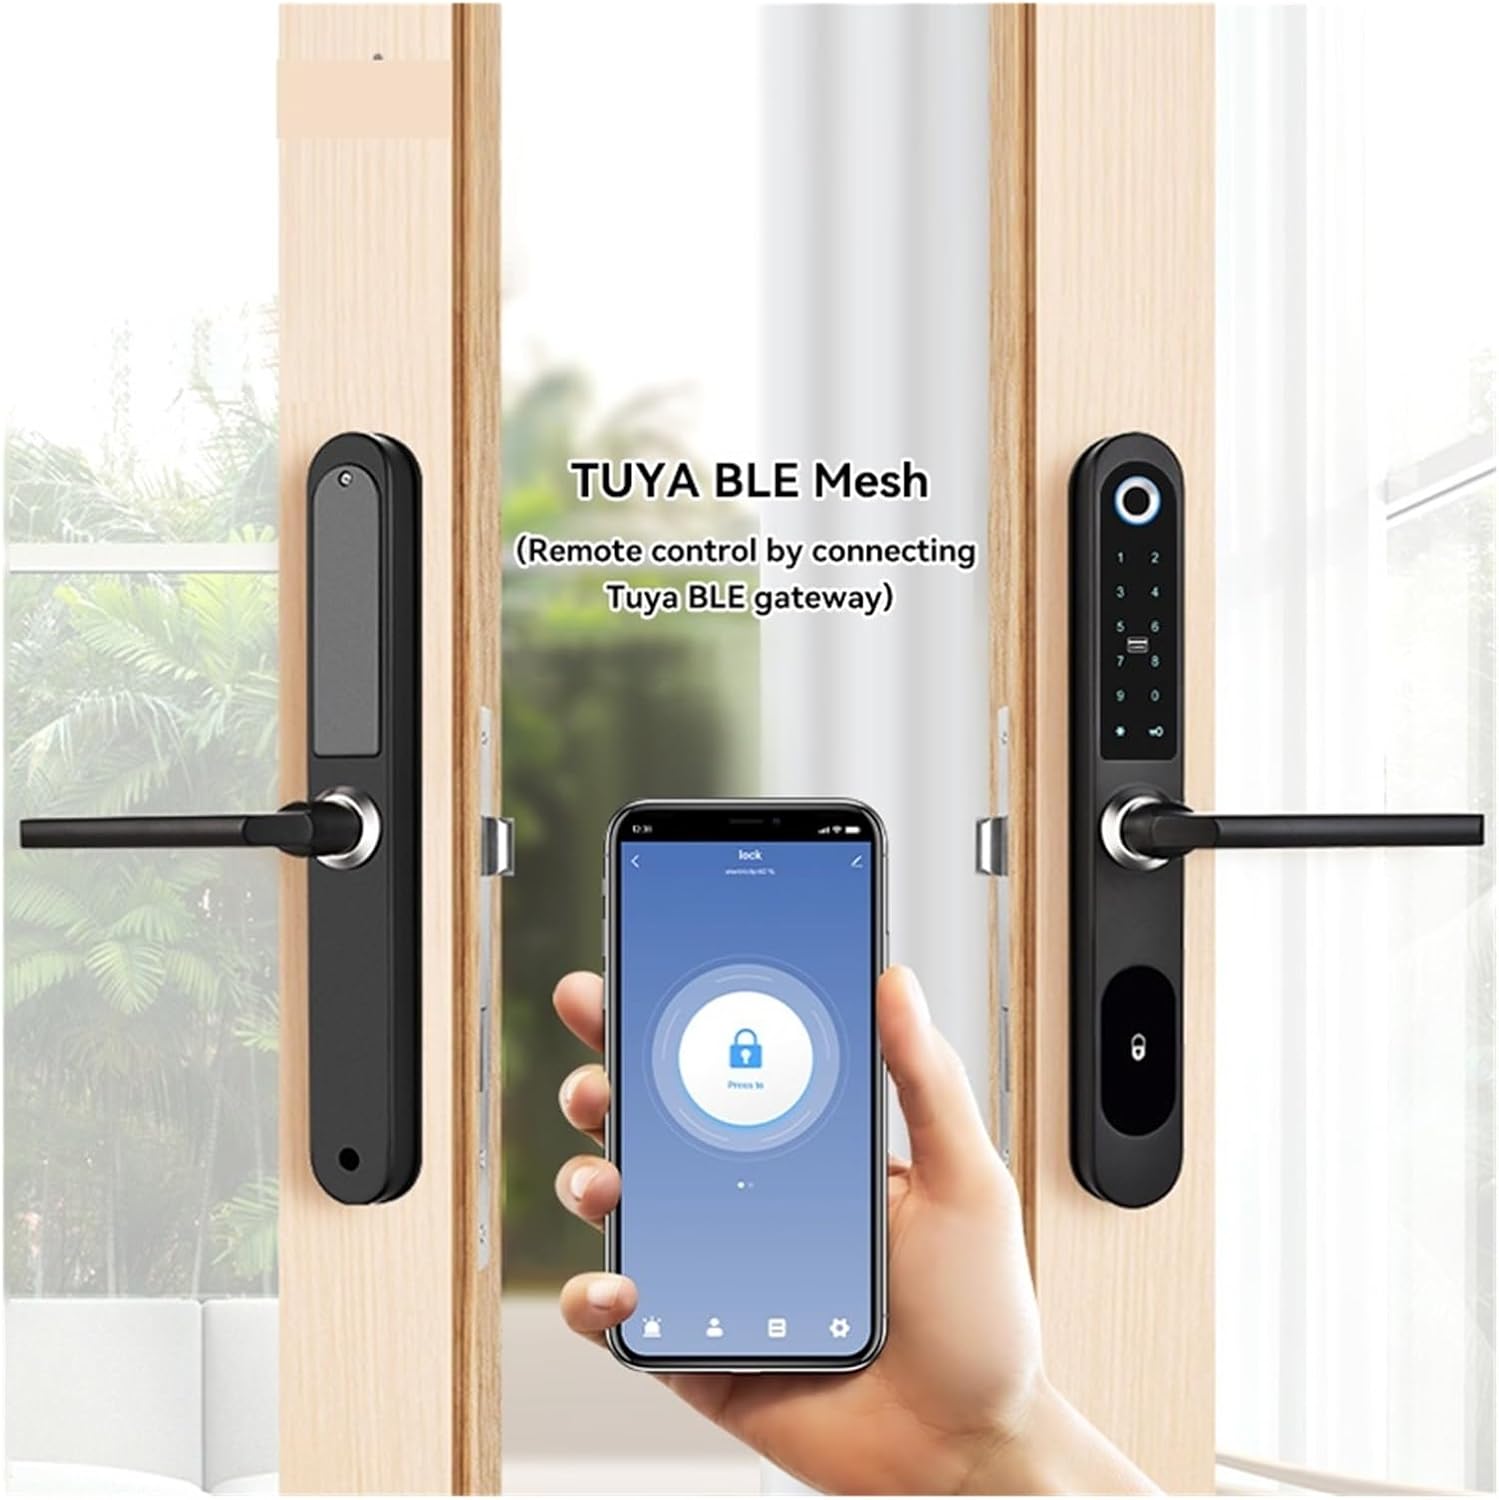
Figure 5.2: An image demonstrating the smart lock's integration with the Tuya BLE Mesh application, allowing remote control via a connected gateway.
6. Maintenance
Regular maintenance ensures the optimal performance and longevity of your smart lock.
- Battery Replacement: Replace all 4 AA batteries when the low battery indicator appears or when the lock's response time slows. Use high-quality alkaline batteries.
- Cleaning: Wipe the lock's surface with a soft, dry cloth. Avoid using abrasive cleaners, solvents, or harsh chemicals, as these can damage the finish and electronic components.
- Fingerprint Sensor: Keep the fingerprint sensor clean and dry for accurate readings.
- Mechanical Parts: Periodically check screws for tightness. Do not lubricate the lock cylinder with oil; use graphite powder if necessary.
7. Troubleshooting
If you encounter issues with your smart lock, refer to the following common problems and solutions:
| Problem | Possible Cause | Solution |
|---|---|---|
| Lock does not respond | Dead batteries | Replace all 4 AA batteries. Use the USB emergency power interface if needed. |
| Fingerprint not recognized | Dirty sensor, unregistered fingerprint, or incorrect placement | Clean the sensor. Ensure your fingerprint is registered. Try different finger angles. |
| IC card not working | Unregistered card, damaged card, or incorrect placement | Ensure the card is registered. Try another registered card. Present the card correctly. |
| Tuya APP connection issues | No Tuya BLE gateway, gateway offline, or Bluetooth issues | Ensure a Tuya BLE gateway is present and online. Check Bluetooth on your phone. Re-pair the lock with the app. |
| Lock is stiff or difficult to operate | Misalignment, debris in mortise, or loose screws | Check door and lock alignment. Clean any debris. Tighten all screws. |
8. Specifications
| Feature | Detail |
|---|---|
| Model | 22 240 3585 |
| Brand | HAvern |
| Unlocking Methods | Fingerprint, IC Card, Tuya APP, Mechanical Key |
| Fingerprint Capacity | 100 groups |
| Unlock Speed | ≤0.5 seconds |
| Power Supply | 4 x AA Batteries |
| Emergency Power | USB Charging Interface |
| Compatibility | Aluminum Sliding Glass Doors (Left/Right opening) |
| Item Weight | 0.035 ounces |
| ASIN | B0CBSCX7ZB |
| Manufacturer | dengzhiyongg |
9. Warranty and Support
For warranty information or technical support, please refer to the documentation provided with your purchase or contact the manufacturer directly. Ensure you have your product model and purchase details available when seeking support.


