
Introduction
Thank you for choosing the LUXBIRD 2-in-1 Mini Hedge Trimmer Cordless. This versatile tool is designed for efficient and comfortable garden maintenance, functioning as both a hedge trimmer and a grass trimmer. Please read this manual thoroughly before operation to ensure safe and effective use of the product.
Safety Instructions
Always prioritize safety when operating power tools. Failure to follow these instructions may result in serious injury.
- Read the Manual: Familiarize yourself with all controls and safety warnings before use.
- Wear Protective Gear: Always wear safety goggles and cut-resistant gloves during operation.
- Keep Work Area Clear: Ensure the area is free from debris, children, and pets.
- Inspect Before Use: Check the blades and tool for any damage or loose parts before each use. Do not operate if damaged.
- Battery Safety: Use only the specified rechargeable batteries. Do not expose batteries to extreme temperatures or water.
- Avoid Accidental Start-up: Ensure the safety trigger lock is engaged when not in use or when changing blades.
- Maintain Firm Grip: Hold the tool firmly with one hand using the anti-slip handle.
- Waterproof Rating: The tool has an IP67 waterproof rating, allowing use in various weather conditions. However, avoid submerging the tool.
Package Contents
Verify that all items are present in the package:
- LUXBIRD 2-in-1 Mini Hedge Trimmer Unit
- Hedge Trimmer Blade (Long blade for shrubs & hedges)
- Grass Trimmer Blade (Short blade for lawn mowing)
- 2 x 21V 1500mAh Rechargeable Batteries
- Battery Charger
- Protective Goggles
- Cut-Resistant Gloves
- User Manual

Figure 1: Included components of the LUXBIRD 2-in-1 Mini Hedge Trimmer package.
Product Overview
The LUXBIRD 2-in-1 Mini Hedge Trimmer is designed for versatility and ease of use.
- Two Usage Modes: Easily switch between hedge trimming and grass mowing with interchangeable blades. The long blade is for shrubs and hedges, while the short blade is for lawn edges and grass.
- Adjustable Cutting Angle: The cutting head can be adjusted up to 90 degrees, providing flexibility for various trimming tasks and ergonomic comfort.
- Lightweight Design: Weighing approximately 2.65 lbs (1.2 kg), the trimmer allows for comfortable one-handed operation.
- Durable Construction: Features a robust ABS housing and an anti-slip hand grip for secure handling.
- IP67 Waterproof Rating: Ensures durability and reliability in different weather conditions.
- Safety Trigger Lock: Prevents accidental activation, enhancing user safety.
- SK5 Blades: Equipped with anti-rust and non-stick coated SK5 blades for improved trimming efficiency and easier cleaning.

Figure 2: The trimmer supports two usage modes with interchangeable blades.

Figure 3: Key design features for durability and safety.

Figure 4: SK5 blades with anti-rust, non-stick coating for efficient trimming.
Setup
1. Charging the Battery
The trimmer comes with two 21V 1500mAh rechargeable batteries. Before first use, fully charge both batteries.
- Connect the charger to a power outlet.
- Insert a battery into the charger.
- Allow 1.5 to 2 hours for a full charge. The indicator light on the charger will change to indicate a full charge.
- Once charged, remove the battery and repeat for the second battery.
2. Installing/Replacing the Cutting Head
Ensure the trimmer is turned off and the battery is removed before changing blades.
- To Remove: Press the blade release buttons located on both sides of the trimmer head. Pull the cutting head upwards to detach it from the main body.
- To Install: Align the desired cutting head (hedge or grass trimmer blade) with the mounting slot on the main body. Insert it firmly until it clicks into place. Ensure it is securely fastened before use.

Figure 5: Step-by-step guide for replacing the cutting head.
3. Installing the Battery
Slide a charged battery into the battery slot on the handle until it locks into place. Ensure it is securely seated.
Operating Instructions
Always wear protective goggles and gloves before operating the trimmer.
1. Starting the Trimmer
- Ensure a charged battery is installed and the desired cutting head is securely attached.
- Disengage the safety trigger lock.
- Press the power trigger to start the blades.
2. Adjusting the Cutting Angle
The cutting head can be adjusted to different angles (e.g., 90°, 60°, 45°) to suit the height and angle of the hedge or grass you are trimming. This helps maintain wrist comfort and prevents injury.
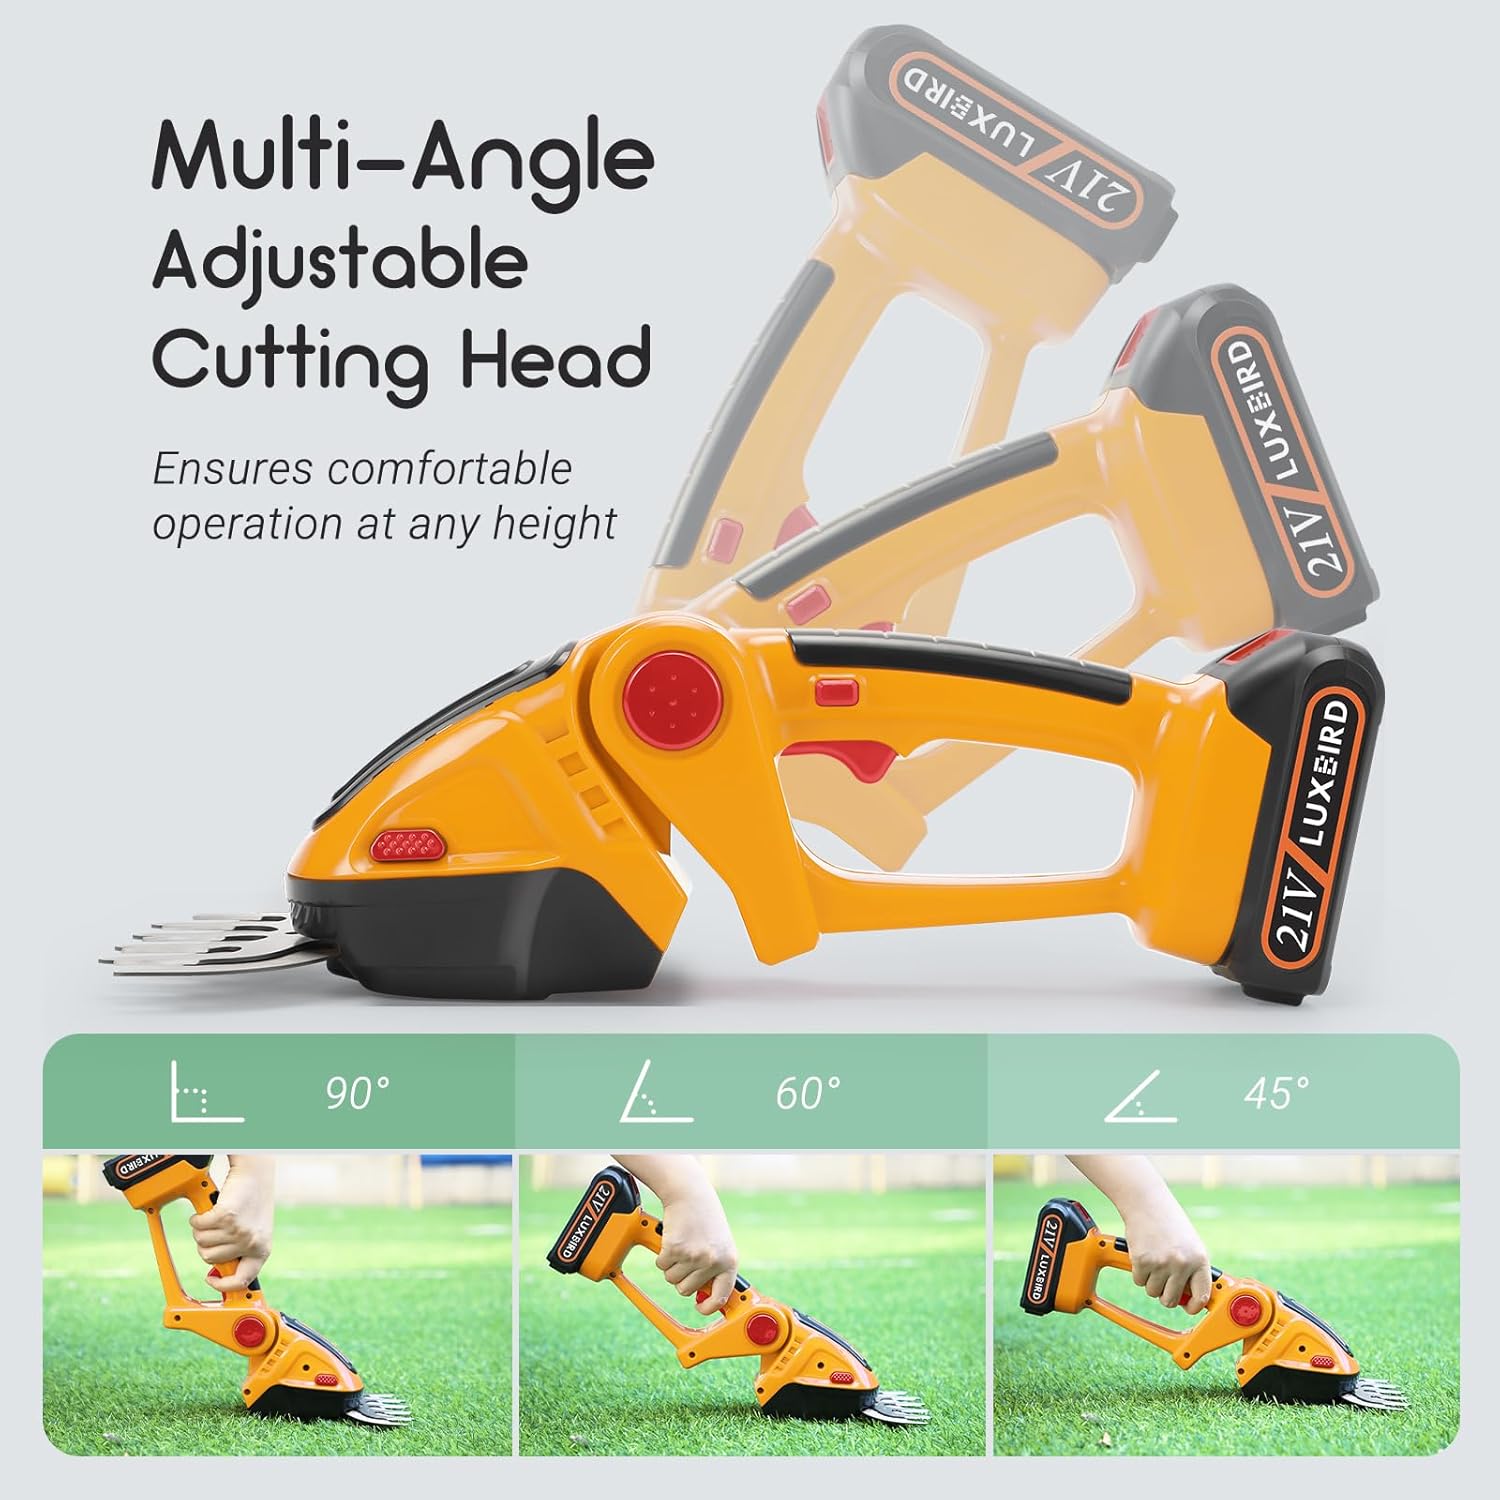
Figure 6: Demonstrating the multi-angle adjustable cutting head.
3. Trimming Techniques
- Hedge Trimming: Use the long blade. Move the trimmer in a smooth, sweeping motion across the hedge. Avoid cutting too deeply at once.
- Grass Trimming: Use the short blade. Guide the trimmer along lawn edges or small grass areas.
- Battery Life: Each 1500mAh battery provides up to 1 hour of continuous operation. Use the second battery for extended tasks.
4. Stopping the Trimmer
Release the power trigger to stop the blades. Engage the safety trigger lock when finished or when moving between tasks.
Maintenance
Regular maintenance ensures optimal performance and extends the life of your trimmer.
- Blade Cleaning: After each use, ensure the trimmer is off and the battery is removed. Carefully clean the blades of any sap, leaves, or debris using a brush or cloth. The non-stick coating on the SK5 blades makes cleaning easier.
- Blade Lubrication: Periodically apply a light machine oil to the blades to reduce friction and prevent rust.
- Storage: Store the trimmer in a dry, secure place, out of reach of children. Ensure the safety trigger lock is engaged and batteries are removed for long-term storage.
- Battery Care: Store batteries in a cool, dry place. Do not store fully discharged batteries for extended periods.
Troubleshooting
If you encounter issues, refer to the following common problems and solutions:
| Problem | Possible Cause | Solution |
|---|---|---|
| Trimmer does not start. | Battery not charged or improperly installed. Safety trigger lock engaged. | Ensure battery is fully charged and correctly inserted. Disengage the safety trigger lock. |
| Blades are not cutting effectively. | Blades are dull or dirty. Debris caught in blades. | Clean blades thoroughly. If dull, consider professional sharpening or blade replacement. |
| Short battery life. | Battery not fully charged. Old battery. | Ensure battery is fully charged before use. If battery is old, it may need replacement. |
| Excessive vibration or noise. | Loose blade or component. Damaged blade. | Check all components for tightness. Inspect blades for damage and replace if necessary. |
Specifications
Detailed technical specifications for the LUXBIRD 2-in-1 Mini Hedge Trimmer.
| Feature | Specification |
|---|---|
| Brand | Luxbird |
| Model Number | LB-HT001-Y-US |
| Power Source | Battery Powered |
| Battery Type | 21V 1500mAh Rechargeable (x2) |
| Continuous Work Time | Up to 1 hour per battery |
| Charging Time | 1.5 - 2 hours |
| Product Dimensions (L x W x H) | 14" x 4.5" x 5" (35.5cm x 11.4cm x 12.7cm) |
| Item Weight | 2.4 Pounds (1.09 kg) |
| Blade Length (Hedge Trimmer) | 11.8 inches (30 cm) |
| Blade Length (Grass Trimmer) | 3.93 inches (10 cm) |
| Cutting Width | 0.2 Inches (0.5 cm) |
| Speed | 2200 RPM |
| Blade Material | Carbon Steel (SK5 with anti-rust, non-stick coating) |
| Housing Material | Durable ABS Plastic |
| Waterproof Rating | IP67 |
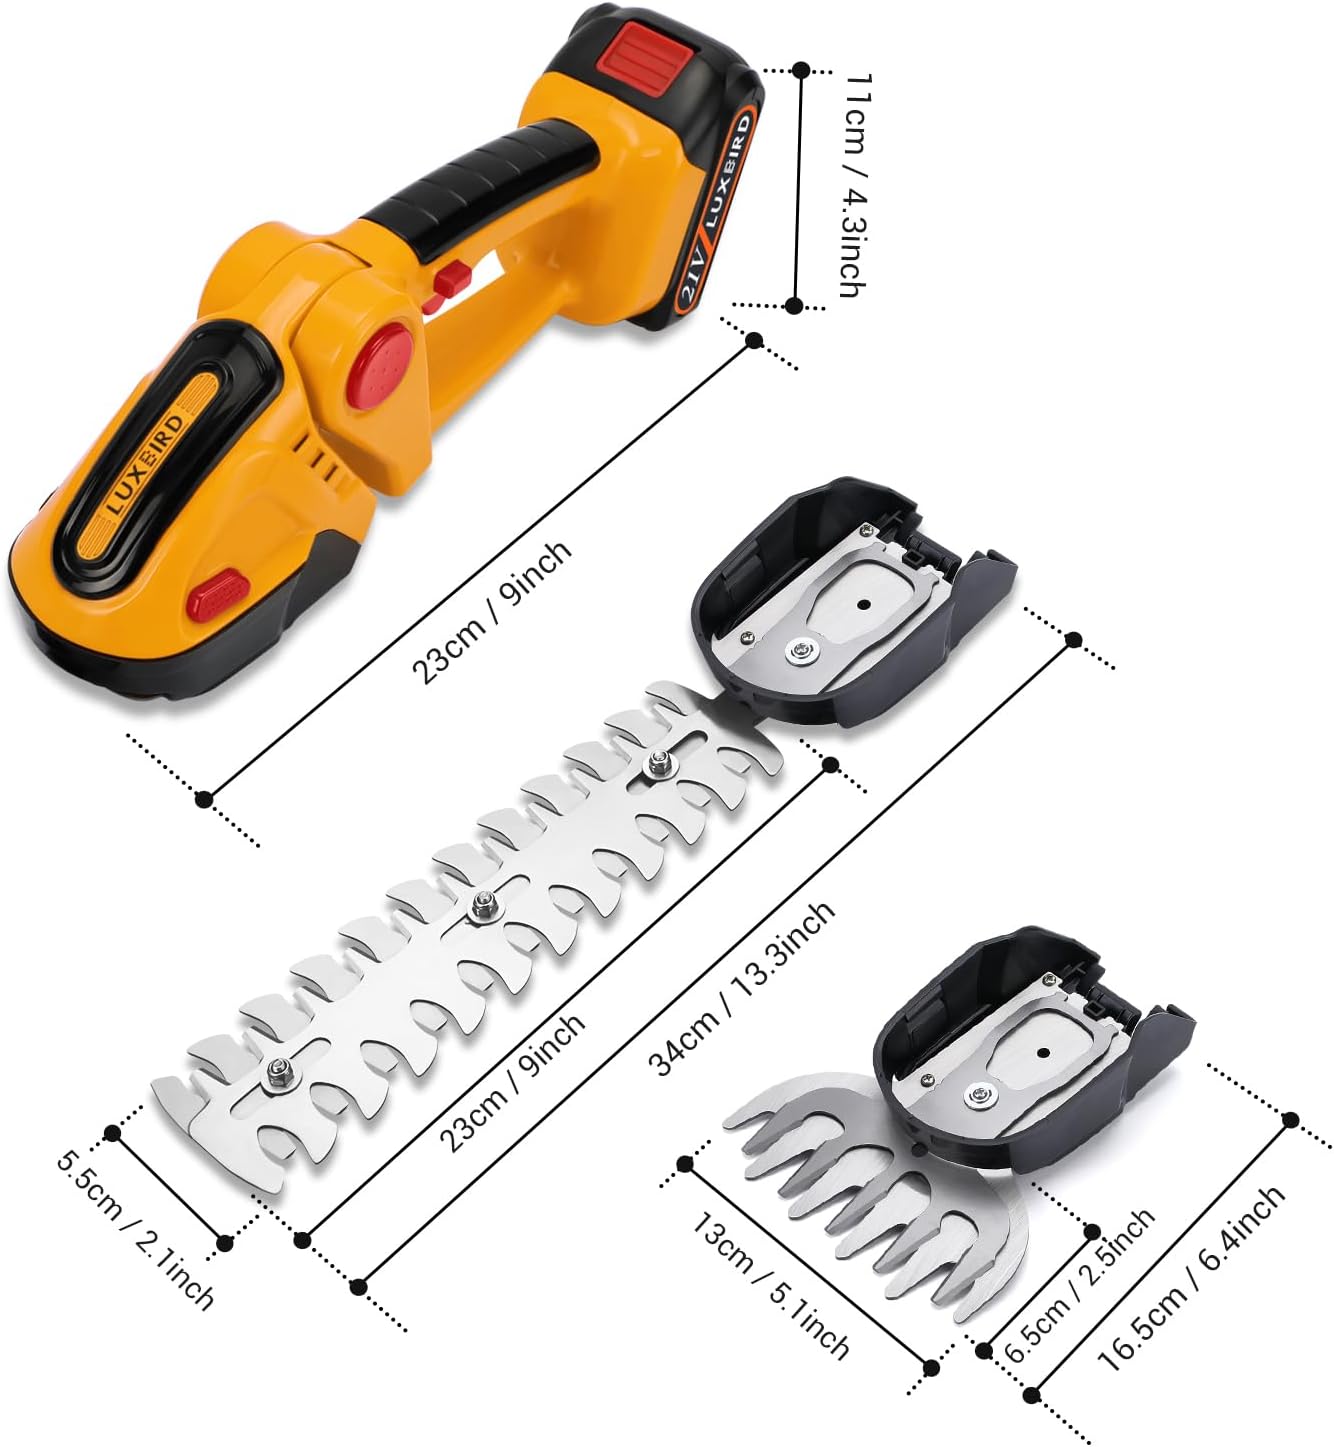
Figure 7: Product dimensions with both blade types.
Warranty Information
LUXBIRD products are manufactured to high-quality standards. This product is covered by a standard manufacturer's warranty against defects in materials and workmanship from the date of purchase. Please retain your proof of purchase for warranty claims. The warranty does not cover damage caused by misuse, neglect, unauthorized repairs, or normal wear and tear. For specific warranty terms and conditions, please refer to the documentation included with your purchase or contact customer support.
Customer Support
If you have any questions, require assistance, or need to make a warranty claim, please contact LUXBIRD customer support through the following channels:
- Website: Visit the official Luxbird website for FAQs and support contact information.
- Email: Refer to your product packaging or purchase documentation for the customer service email address.
- Online Retailer: Contact the seller directly through the platform where you purchased the product.
Please have your model number (LB-HT001-Y-US) and purchase date ready when contacting support.