1. Introduction
The PREXISO 5-in-1 Stud Finder is a versatile tool designed for detecting concealed objects in walls, measuring distances, areas, and volumes using ultrasound, and providing laser marking. It is suitable for use on dry interior walls to locate wood studs, metal objects, and live AC wires.

Figure 1: Overview of the PREXISO 5-in-1 Multi-purpose Detector's capabilities.
2. Safety Information
- Laser Safety: This product contains a Class II laser with an output of less than 1mW. Avoid direct eye exposure to the laser beam. Do not stare into the beam.
- Sharp Needles: The auxiliary laser marking stud button uses needles. Exercise caution to prevent injury. These needles are intended for use on wallpaper and wooden surfaces only. Do not use on stone, metal walls, or low-density plasterboard.
- AC Wire Detection: Always exercise extreme caution when detecting AC wires. Live wires can cause serious injury or death. Confirm power is off before drilling or cutting into walls where live wires are suspected.
- Environmental Conditions: High moisture levels on wall surfaces can affect detection accuracy. Ensure the wall surface is dry for optimal performance.
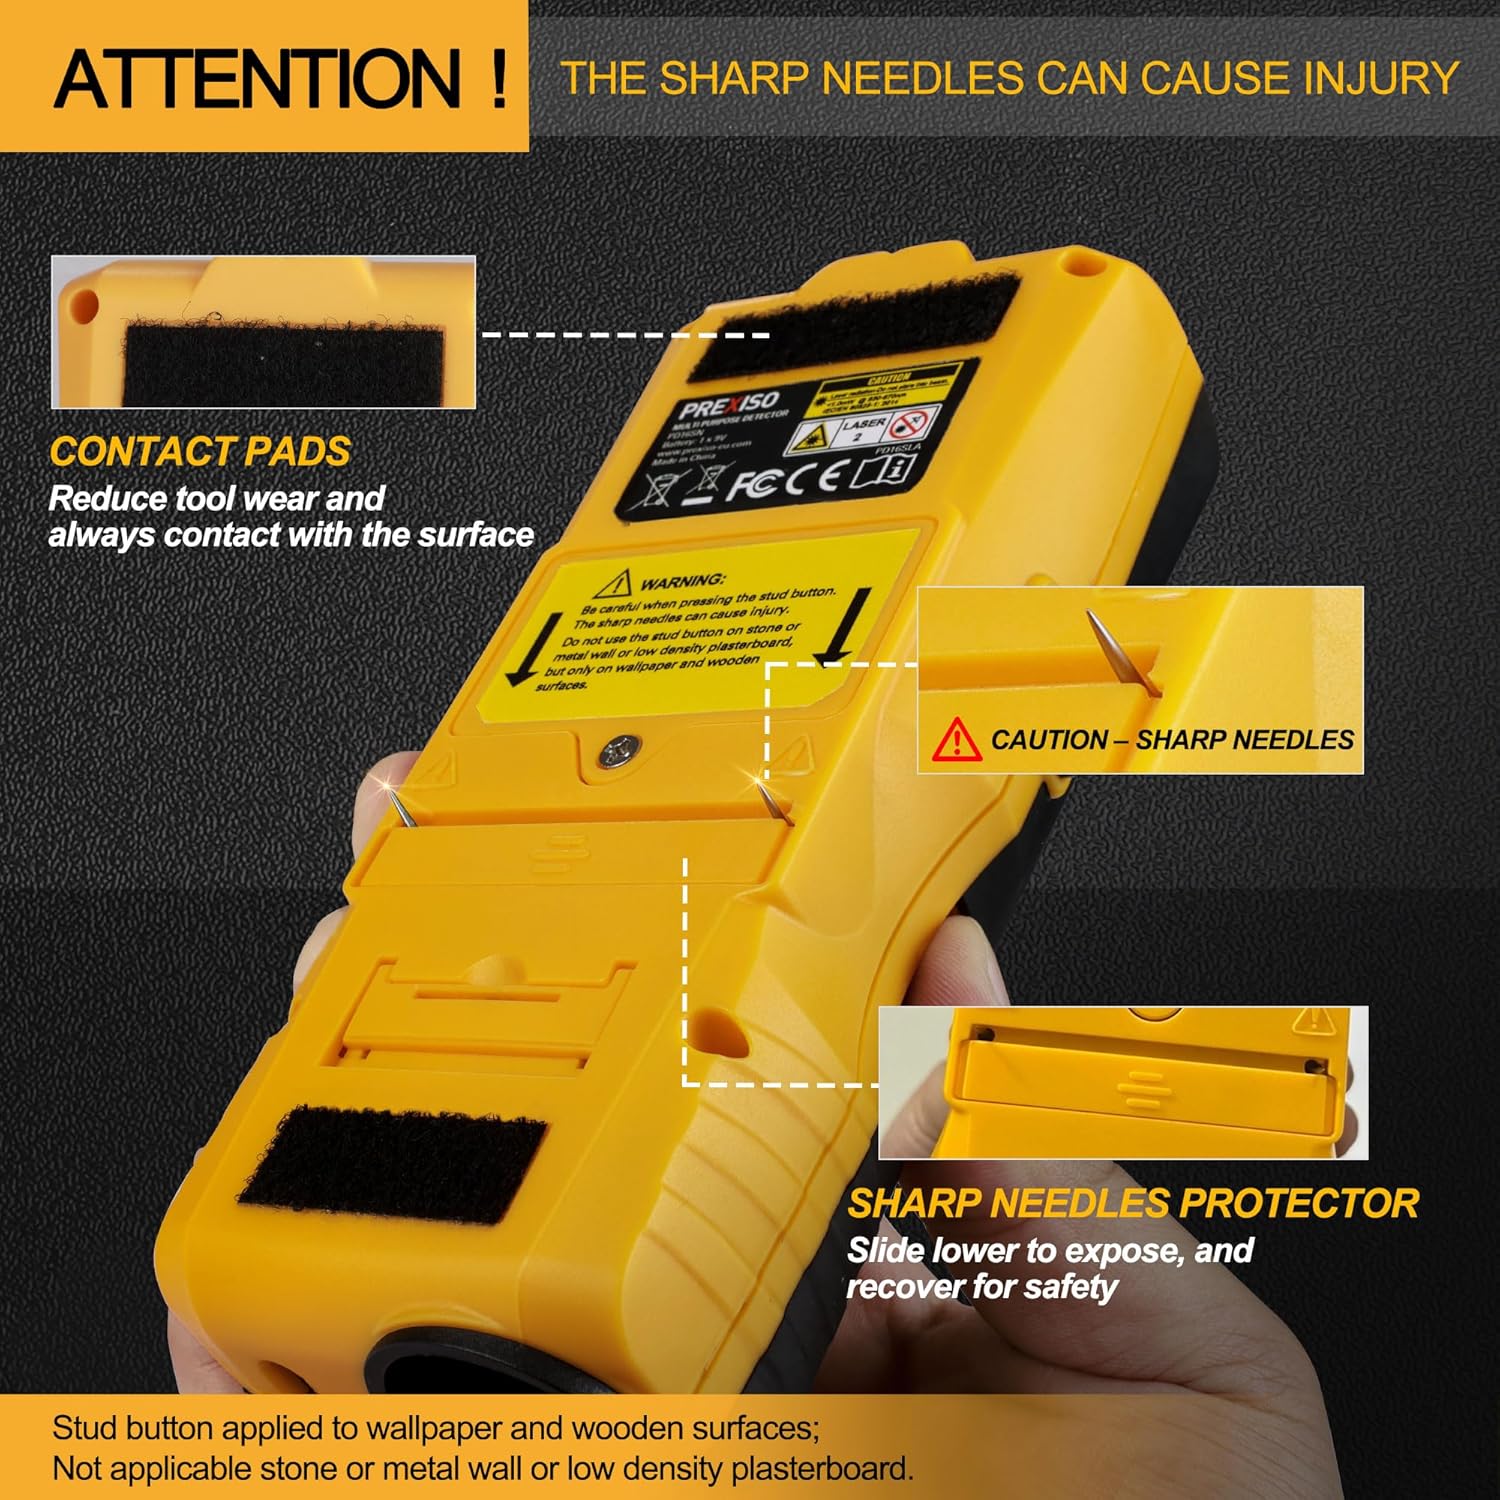
Figure 2: Caution regarding the sharp needles used for laser marking on certain surfaces.
3. Product Overview and Components
Familiarize yourself with the various parts and controls of your PREXISO 5-in-1 Stud Finder.

Figure 3: Key components of the PREXISO 5-in-1 Stud Finder.
- Measurement Point: Reference point for distance measurements.
- LCD Display: Shows detection mode, depth, battery status, and measurement readings.
- Button - Push: General activation/selection button.
- Material Switch (STUD/AC WIRE/METAL): Selects the desired detection mode.
- Ultrasound Measure Buttons: Used for distance, area, volume, memory, and addition functions.
- Spirit Level Bubble Vial: For horizontal leveling.
- Battery Compartment: Houses the 9V battery.
- Stud Pins Protector: Slide to expose or cover the stud pins.
- Plastic Flip for Laser Line Position Adjustment: Adjusts the laser line for uneven surfaces.
- Contact Pads for Detection: Must be in full contact with the wall surface during scanning.
- Laser Beam Exit: Where the laser line projects from.
- Ultrasound Sender/Receiver: Emits and receives ultrasonic waves for distance measurement.
- Function Switch (LASER/DETECTOR/DISTANCE): Selects between laser, detection, and distance measurement functions.
4. Setup
4.1 Battery Installation
The device requires one 9V battery (included). Open the battery compartment on the back of the device and insert the 9V battery, ensuring correct polarity. Close the compartment securely.

Figure 4: The PREXISO Stud Finder, carrying case, and 9V battery.
4.2 Automatic Calibration
Before each use, the device performs an automatic calibration to ensure accuracy. To calibrate:
- Turn on the stud finder.
- Place the device flat against the wall surface where you intend to scan. Ensure the contact pads are fully touching the surface.
- Wait for the calibration process to complete. The device will indicate when it is ready for use.
Note: Proper calibration is crucial for reliable detection. Avoid calibrating over a stud, metal, or live AC wire.
5. Operating Modes
The PREXISO 5-in-1 Stud Finder offers multiple detection and measurement modes. Use the function switch and material switch to select the desired mode.
5.1 Stud Detection (Wood)
This mode is used to locate wood studs behind drywall. It can detect studs up to 1 inch (24mm) deep.
- Set the material switch to "STUD".
- Place the device flat against the wall.
- Press and hold the "Push" button.
- Slowly slide the device horizontally across the wall.
- The LCD display will indicate the presence and center of a stud. An audible warning will also sound.

Figure 5: Scanning for wood studs.
5.2 AC Wire Detection
This mode detects live AC wires up to 1-3/8 inches (35mm) deep.
- Set the material switch to "AC WIRE".
- Place the device flat against the wall.
- Press and hold the "Push" button.
- Slowly slide the device horizontally across the wall.
- The LCD display will show an AC wire symbol and an audible warning will sound when a live wire is detected.

Figure 6: Detecting live AC wires. Always proceed with caution.
5.3 Metal Detection
This mode detects various metal materials up to 1-1/2 inches (38mm) deep.
- Set the material switch to "METAL".
- Place the device flat against the wall.
- Press and hold the "Push" button.
- Slowly slide the device horizontally across the wall.
- The LCD display will indicate the presence of metal, accompanied by an audible alert.

Figure 7: Maximum scanning depths for different materials.
5.4 Laser Marking
The integrated laser provides a level line for marking. It includes a bubble vial for accurate horizontal alignment.
- Set the function switch to "LASER".
- Position the device on the desired surface. Use the bubble vial to ensure it is level.
- The laser line will project onto the surface.
- For uneven surfaces, use the backside plastic flip to adjust the laser line position.
- If marking on wallpaper or wooden surfaces, you can use the auxiliary stud button with needles to temporarily fix the device. Ensure the stud pins protector is slid down to expose the needles.

Figure 8: Using the laser marking function with the bubble vial and stud button.
5.5 Ultrasonic Distance Measurement
This mode allows for ultrasonic measurement of distances, areas, and volumes up to 50 feet (15 meters).
- Set the function switch to "DISTANCE".
- Point the ultrasound sender/receiver towards the target surface.
- Press the appropriate ultrasound measure button for single measurement, area, or volume.
- The measurement will be displayed on the LCD screen.
- The device also supports addition measurement.

Figure 9: Examples of ultrasonic distance, area, volume, and addition measurements.
Note: Ultrasonic distance measurement is for rough reference and may not be as accurate as laser distance measurement. Ensure there are no objects obstructing the path between the device and the target surface, as this can lead to inaccurate readings.
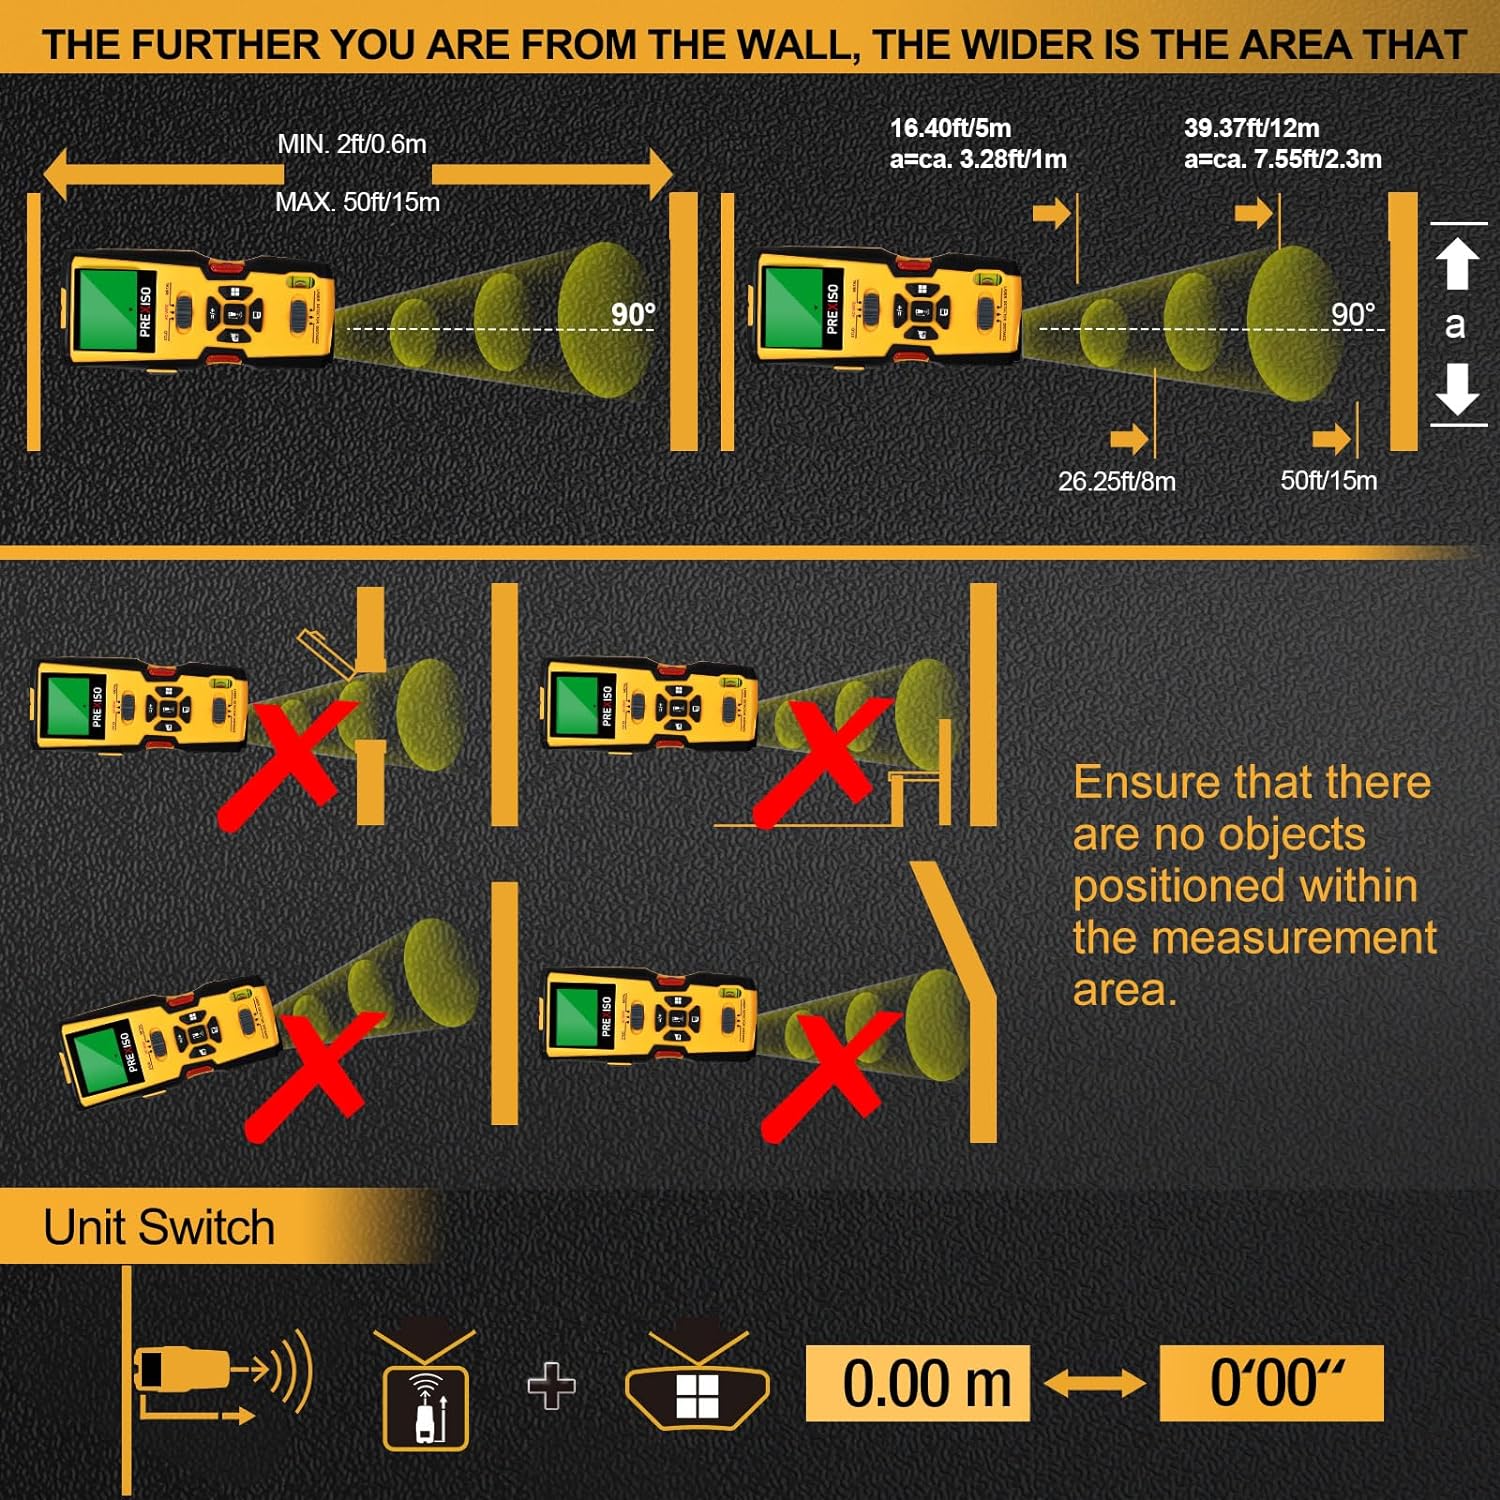
Figure 10: Proper technique for ultrasonic measurement to avoid errors caused by obstructions or angled measurements.
6. Tips for Accurate Measurement
- Surface Condition: High moisture on wall surfaces can interfere with electromagnetic fields, potentially causing false readings or reduced sensitivity. Always ensure the wall is dry.
- Scanning Technique: Maintain firm, flat contact with the wall surface. Slide the device slowly and steadily. Avoid lifting or tilting the device during scanning.
- Recalibration: If you move the device to a different wall or notice inconsistent readings, recalibrate by turning it off and on, then placing it flat on a clear section of the wall.
- Ultrasonic Obstructions: For ultrasonic measurements, ensure a clear line of sight between the device and the target. Objects in the path or angled measurements can lead to inaccuracies.
7. Maintenance
- Cleaning: Wipe the device with a soft, dry cloth. Do not use abrasive cleaners or solvents.
- Storage: Store the device in its carrying case in a dry, cool place when not in use. Remove the battery if storing for extended periods to prevent leakage.
- Battery Replacement: Replace the 9V battery when the low battery indicator appears on the LCD display.
8. Troubleshooting
| Problem | Possible Cause | Solution |
|---|---|---|
| Inaccurate or inconsistent readings |
|
|
| Device does not turn on |
|
|
| Laser marking pins not extending |
|
|
9. Specifications
- Model: B0C2825KWG
- Detection Depth (Wood Studs): Up to 1 inch (24mm)
- Detection Depth (Metal): Up to 1-1/2 inches (38mm)
- Detection Depth (Live AC Wires): Up to 1-3/8 inches (35mm)
- Ultrasonic Distance Measurement Range: 2 ft (0.6m) to 50 ft (15m)
- Laser Class: Class II, output < 1mW
- Power Source: 1 x 9V battery (included), Zinc Carbon type
- Display: LCD
- Material: Plastic
- Item Weight: Approximately 13.4 ounces
- Package Dimensions: Approximately 9.25 x 3.98 x 2.24 inches
- Manufacturer: Hang Zhou Great Star Industrial Co.,LTD
10. Warranty and Support
For warranty information, technical support, or service inquiries, please contact PREXISO customer service directly. Refer to the product packaging or the official PREXISO website for contact details.


