1. Introduction
This manual provides essential instructions for the safe and efficient operation, installation, and maintenance of your Winco EMW-2100BT Commercial-Grade Microwave. Designed for commercial foodservice environments, this microwave offers robust performance and durability. Please read this manual thoroughly before operating the appliance and retain it for future reference.
Key Features:
- Capacity: 1.2 Cubic Feet, accommodating up to a 14-inch platter.
- Power Output: 2,100 Watts for rapid cooking.
- Construction: Easy-clean stainless steel exterior and interior.
- Control: Intuitive touch controls with digital display.
- Power Levels: 5 distinct power levels for versatile cooking.
- Programming: 10 preset cooking programs, with storage for up to 100 customized programs.
- Quantity Function: 2x quantity button for automatic adjustment of cooking times for multiple portions.
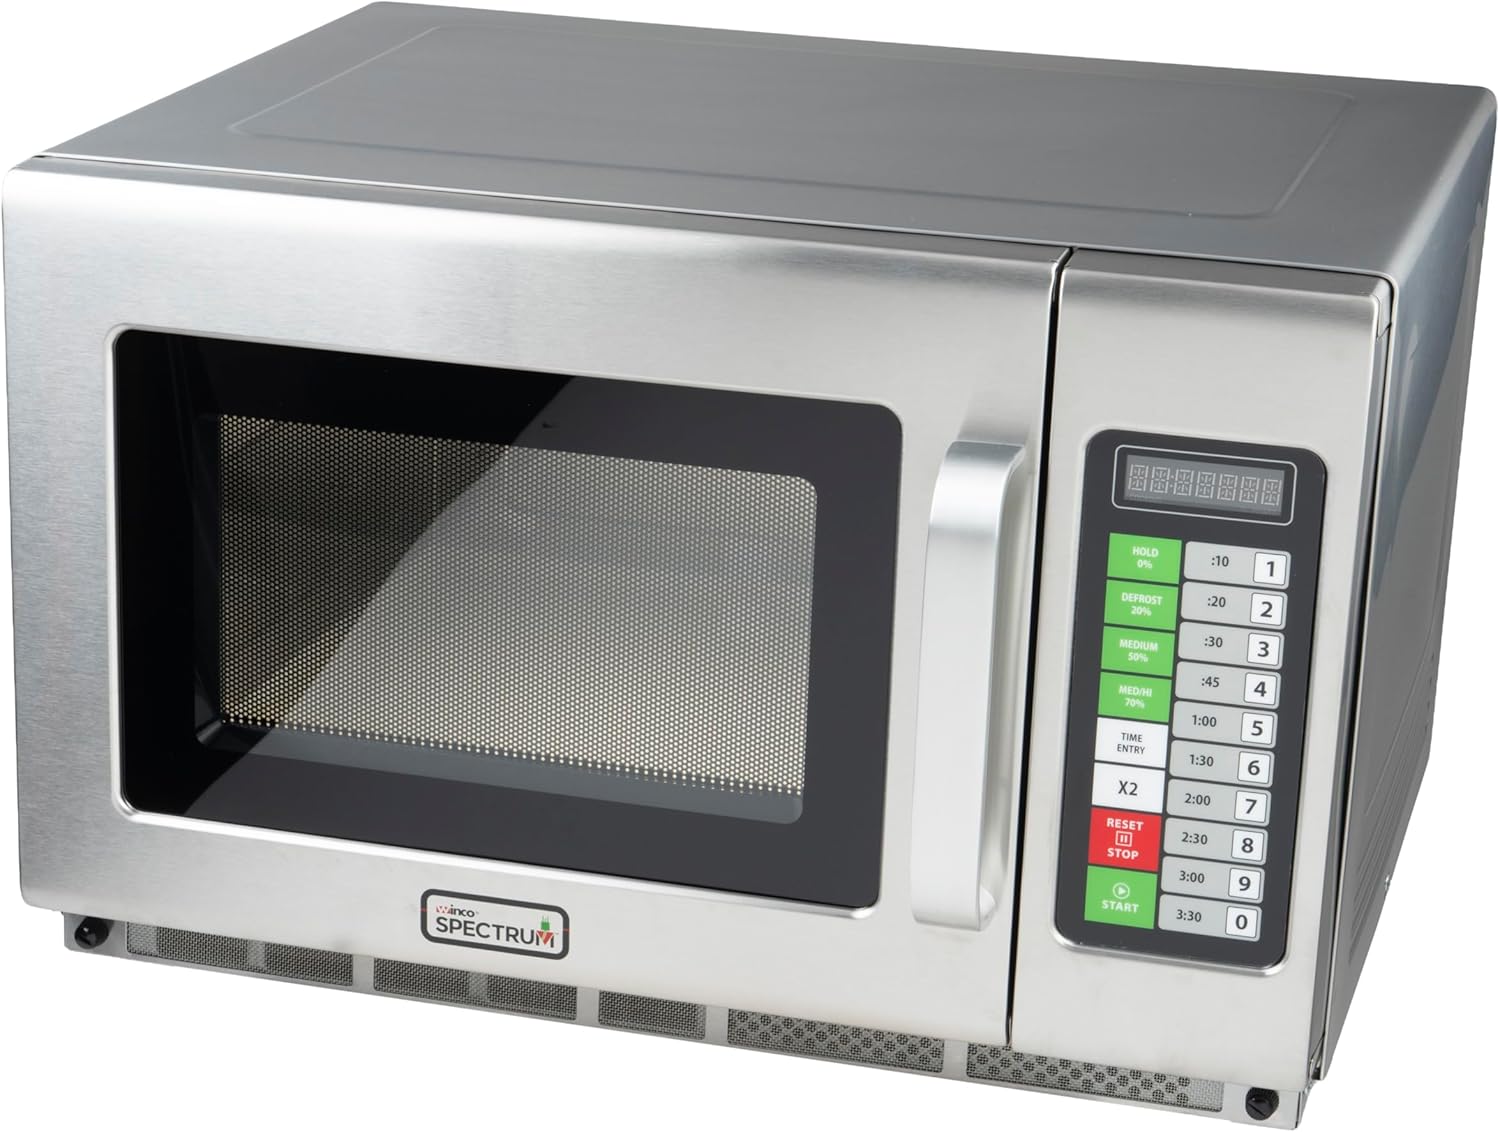
Figure 1: Front view of the Winco EMW-2100BT Commercial-Grade Microwave.
2. Safety Information
To prevent potential hazards and ensure safe operation, always adhere to the following safety guidelines:
- Electrical Safety: Ensure the microwave is connected to a properly grounded 120V electrical outlet with adequate wattage capacity (2100W). Do not use extension cords.
- Placement: Place the microwave on a stable, level surface. Ensure sufficient clearance around the unit for proper ventilation (minimum 4 inches on sides and back, 12 inches above). Do not block ventilation openings.
- Supervision: Never leave the microwave unattended during operation, especially when heating liquids or foods that can boil over.
- Materials: Do not place metal, aluminum foil, or metal-trimmed dishes inside the microwave, as this can cause arcing and damage the unit. Use only microwave-safe cookware.
- Sealed Containers: Do not heat sealed containers, including baby bottles with tight caps, as pressure buildup can cause them to explode.
- Flammable Materials: Keep flammable materials away from the microwave.
- Door Seal: Regularly inspect the door seals and latch for any damage. Do not operate the microwave if the door is damaged or does not close properly.
- Children: This appliance is not intended for use by children without supervision.
3. Setup
Unpacking:
- Carefully remove the microwave from its packaging.
- Remove all packing materials, including any protective film or tape from the exterior and interior.
- Inspect the microwave for any signs of damage. If damaged, do not operate and contact your supplier.
Placement:
- Place the microwave on a sturdy, level countertop or surface capable of supporting its weight (approximately 75.6 pounds).
- Ensure adequate ventilation by maintaining a minimum of 4 inches of clear space on the sides and back, and 12 inches above the unit. Do not place the microwave in an enclosed cabinet.
- Avoid placing the microwave near heat sources, water, or in direct sunlight.
Electrical Connection:
- Plug the microwave into a dedicated 120V, 60Hz, grounded electrical outlet. The microwave requires 2100 watts of power.
- Do not use adapters or extension cords.

Figure 2: Rear view illustrating ventilation requirements and power cord connection.
4. Operating Instructions
The Winco EMW-2100BT features an intuitive touch control panel for easy operation.
Control Panel Overview:

Figure 3: Detailed view of the touch control panel.
- Digital Display: Shows cooking time, power level, and program selections.
- Power Level Buttons:
- HOLD (0%): For holding food at temperature.
- DEFROST (20%): Low power for thawing.
- MEDIUM (50%): Medium power for general cooking.
- MED/HI (70%): Medium-high power.
- HIGH (100%): Full power for rapid heating.
- Time Entry Buttons (0-9): Used to input specific cooking times.
- Preset Time Buttons: Dedicated buttons for common cooking durations (e.g., :10, :20, :30, :45, 1:00, 1:30, 2:00, 2:30, 3:00, 3:30).
- X2 Quantity Button: Doubles the cooking time for programs.
- RESET/STOP Button: Stops cooking, clears settings, or cancels a program.
- START Button: Begins the cooking cycle.
Basic Operation:
- Place food in a microwave-safe container inside the oven. Close the door securely.
- Select Power Level: Press the desired power level button (e.g., HIGH, MEDIUM). If no power level is selected, the microwave defaults to HIGH (100%).
- Enter Cooking Time: Use the number buttons (0-9) to enter the desired cooking time, or press one of the preset time buttons (e.g., 1:00 for one minute).
- Start Cooking: Press the START button. The microwave will begin cooking, and the display will count down the time.
- To stop cooking at any time, press the RESET/STOP button.
Using Preset Programs:
The microwave comes with 10 factory preset programs and allows for storing up to 100 customized programs.
- Place food in the microwave.
- Press the number button corresponding to the desired preset program (e.g., 1 for program 1).
- Press the START button.
Custom Program Storage:
Refer to the full programming guide for detailed steps on storing custom programs. Generally, this involves:
- Entering a program number.
- Setting the power level and cooking time.
- Saving the settings to the chosen program number.
Using the 2x Quantity Button:
This feature automatically adjusts the cooking time for two portions when using a stored program.
- Place two portions of food in the microwave.
- Select the desired preset or custom program number.
- Press the X2 button. The display will show the adjusted time.
- Press the START button.

Figure 4: Interior view of the microwave, showing the cooking cavity.
5. Maintenance
Regular cleaning and maintenance will ensure the longevity and optimal performance of your microwave.
Cleaning the Interior:
- After each use, wipe the interior with a damp cloth to remove food splatters.
- For stubborn stains, use a mild, non-abrasive detergent. Avoid harsh chemicals or abrasive scrubbers that can damage the stainless steel surface.
- Ensure the interior is dry before closing the door.
Cleaning the Exterior:
- Wipe the exterior surfaces with a soft, damp cloth.
- For stainless steel surfaces, use a specialized stainless steel cleaner to maintain its finish.
- Do not spray cleaners directly onto the control panel. Apply cleaner to a cloth first, then wipe.
Door Seal Care:
- Regularly inspect the door seals for food debris or damage. Clean with a damp cloth.
- A clean and intact door seal is crucial for safe and efficient operation.
Ventilation:
- Ensure that the ventilation openings on the microwave are not blocked by dust or debris. Clean as needed.

Figure 5: Bottom view, highlighting the ventilation grilles.
6. Troubleshooting
If you encounter issues with your microwave, refer to the following common problems and solutions:
| Problem | Possible Cause | Solution |
|---|---|---|
| Microwave does not start | Door not closed properly Power cord unplugged Circuit breaker tripped | Ensure door is securely latched Check power cord connection Reset circuit breaker |
| No heat or insufficient heating | Incorrect power level selected Food not microwave-safe Ventilation blocked | Verify power level setting Use appropriate cookware Ensure proper clearance around unit |
| Display not working | Power interruption Internal fault | Unplug and replug the unit after 1 minute Contact customer support if issue persists |
| Unusual noise during operation | Loose internal component Food container vibrating | Ensure food container is stable If noise persists, contact customer support |
| Arcing or sparking inside | Metal objects inside Damaged interior surface | Immediately stop operation and remove any metal Contact customer support for inspection |
If the problem persists after attempting these solutions, please contact Winco customer support.
7. Specifications
| Feature | Specification |
|---|---|
| Model Number | EMW-2100BT |
| Capacity | 1.2 Cubic Feet |
| Power Output | 2100 Watts |
| Voltage | 120 Volts |
| Frequency | 60 Hz |
| Material | Stainless Steel (Interior & Exterior) |
| Product Dimensions (D x W x H) | 20.75" x 22.63" x 14.5" |
| Item Weight | 75.6 Pounds |
| Installation Type | Countertop |
| Special Feature | Programmable Touch Controls |
8. Warranty Information
Winco products are manufactured to high-quality standards. Specific warranty details, including duration and coverage, are typically provided with the product packaging or can be obtained directly from Winco customer service. Please retain your proof of purchase for warranty claims.
9. Support
For technical assistance, parts, or service inquiries, please contact Winco customer support. Contact information can typically be found on the manufacturer's website or on the product packaging.
Winco Official Website: www.wincous.com


