1. Introduction
Thank you for choosing the Nilight 2PCS 12 Inch Roof Top Strobe Lights. This product is designed to provide high visibility and safety warning for various vehicles, including cars, trucks, snow plows, and construction vehicles. Please read this manual thoroughly before installation and operation to ensure proper use and longevity of your product.
2. Safety Information
- Operating Speed: This product is only suitable for use at low speed and static conditions. It is not suitable for use at high speeds exceeding 40 mph (64 km/h). Operating at higher speeds may cause the lights to detach, leading to potential damage or accidents.
- Magnetic Adsorption: The product is fixed by magnet adsorption. It only has adsorption force on iron surfaces and has no adsorption force on other materials such as aluminum alloy and stainless steel. Ensure the mounting surface is ferrous metal and clean before attachment.
- Power Source: Use only with 12V-24V vehicle power systems.
- Installation: Ensure the magnetic base is securely attached to a flat, clean, and dry metal surface on the vehicle's roof.
- Visibility: While designed for high visibility, always exercise caution and adhere to local traffic laws and regulations.
Video: Notice Before Purchasing. This video provides important information regarding the product's suitable operating conditions, specifically highlighting speed limitations and magnetic mounting requirements.
3. Package Contents
The package includes the following items:
- 2 x LED Strobe Lights

Image: Product Overview. This image displays the two Nilight 12-inch roof top strobe lights, their magnetic bases, and the integrated cigarette lighter plug with control switches.
4. Product Features
- High Visibility: Equipped with 48 high-intensity LED chips, providing maximum illumination and visibility from greater distances. Effective in daylight, midnight, rainy, foggy, or snowy conditions.
- Strong Magnetic Mount: Features 2 magnetic cups with a total of 14 powerful magnets for secure attachment to any ferrous metal exterior of vehicles.
- Multiple Flash Patterns: Offers 16 distinct strobe patterns, including rotating, flashing, and alternating modes. Includes a last pattern memory recall function.
- Durable Construction: Made with a sturdy ABS housing and an upgraded scratch-resistant crystal clear PC optic lens for maximum brightness. Features an integrated heat sink and anti-condensation drain port to prevent internal moisture buildup.
- Convenient Power Plug: Equipped with a 12V cigarette plug featuring a dual switch: one for power on/off and another momentary switch to cycle through the 16 flash modes. The plug includes a built-in fuse for electrical safety.

Image: Durable Material and High Brightness. This image highlights the transparent housing and the 48 high-intensity LED chips that ensure excellent visibility in various weather conditions.

Image: Strong Magnetic Base. This image illustrates the robust magnetic base, featuring two large suction cups and a total of 14 individual magnets for secure mounting on ferrous surfaces.

Image: Durability and Water Resistance. This image shows the strobe light with water droplets, demonstrating its robust construction and resistance to environmental elements.
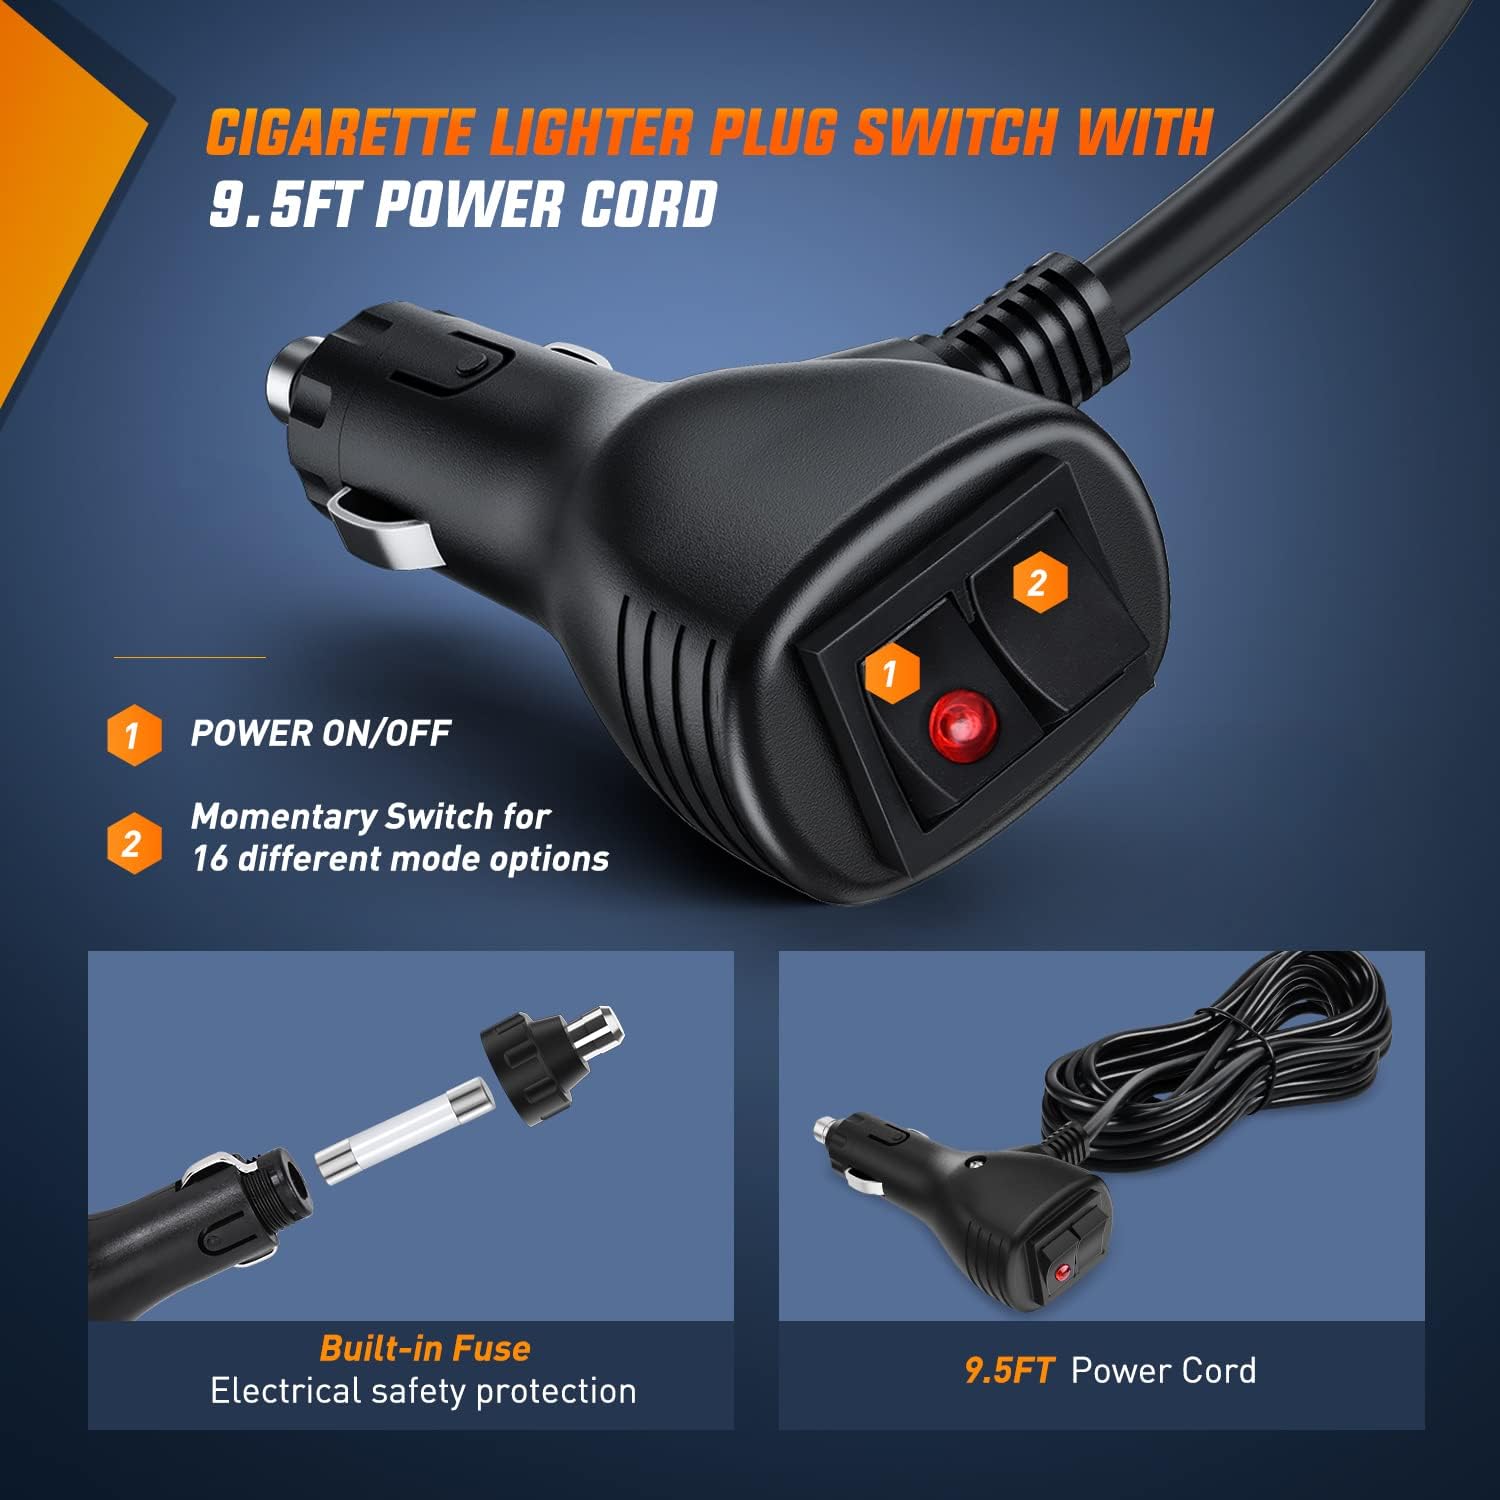
Image: Cigarette Lighter Plug Switch. This image details the 12V cigarette lighter plug, highlighting its dual switches for power control and mode selection, along with the integrated fuse for protection.
5. Setup
- Prepare Mounting Surface: Ensure the vehicle's roof or desired mounting area is clean, dry, and made of ferrous metal (iron). Remove any dirt, dust, or moisture that could affect magnetic adhesion.
- Attach Strobe Light: Carefully place the magnetic base of the strobe light onto the prepared metal surface. The strong magnets will secure the light in place.
- Connect Power: Plug the 12V cigarette lighter plug into your vehicle's cigarette lighter socket.
6. Operating Instructions
- Power On/Off: Use the red power switch on the cigarette lighter plug to turn the strobe lights on or off.
- Change Flash Patterns: Press the momentary switch (usually a black button next to the power switch) on the cigarette lighter plug to cycle through the 16 available flash patterns. The light will remember the last selected pattern when powered off and on again.
7. Maintenance
- Cleaning: Regularly clean the transparent housing and PC optic lens with a soft, damp cloth to maintain optimal brightness and visibility. Avoid abrasive cleaners.
- Magnetic Base Inspection: Periodically check the magnetic bases and protective rubber feet for wear or damage. Ensure the magnets are clean and free of debris to maintain strong adhesion.
- Cable Inspection: Inspect the power cord and cigarette lighter plug for any signs of damage, fraying, or loose connections.
- Storage: When not in use, store the strobe lights in a cool, dry place away from direct sunlight and extreme temperatures.
8. Troubleshooting
- Lights Not Turning On:
- Check if the cigarette lighter plug is fully inserted into the vehicle's socket.
- Verify the power switch on the plug is in the 'On' position.
- Check the vehicle's fuse for the cigarette lighter socket.
- Inspect the built-in fuse within the cigarette lighter plug and replace if necessary.
- Lights Detaching During Use:
- Ensure the vehicle speed is below 40 mph (64 km/h).
- Verify the mounting surface is clean, dry, and made of ferrous metal.
- Check the magnetic bases for any debris or damage that might reduce adhesion.
- Inconsistent Flash Patterns:
- Ensure the momentary switch is functioning correctly.
- Check for stable power supply from the vehicle.
9. Specifications
| Attribute | Value |
|---|---|
| Brand | Nilight |
| Model Number | 48-36AW |
| Color | Amber Mix White 2Pcs |
| Light Source Type | LED |
| Voltage | 12 Volts |
| Number of Light Sources | 2 |
| Item Weight | 4.8 pounds |
| Package Dimensions | 12.68 x 7.13 x 6.81 inches |
| Special Features | Waterproof |
| Usage | Exterior, Strobe Lights |

Image: Product Dimensions. This diagram provides the key measurements of the strobe light, including its length, width, and height, for installation planning.
10. Warranty and Support
This Nilight product comes with a 2-year warranty from the date of purchase. For warranty claims, technical support, or any inquiries regarding your product, please contact Nilight customer service through their official website or the retailer where the product was purchased.
For additional information and support, you may visit the Nilight Store on Amazon.


