1. Introduction
Thank you for choosing the Aveek F-5A 5-Channel Professional Audio Mixer. This compact and versatile mixing console is designed for a variety of audio applications, including recording, live streaming, podcasting, and small band performances. It features multiple input options, 48V phantom power, USB and Bluetooth connectivity, and built-in echo and delay effects. This manual provides detailed instructions for setup, operation, maintenance, and troubleshooting to ensure optimal performance of your device.

Image 1.1: Aveek F-5A 5-Channel Professional Audio Mixer
2. Safety Information
- Power Source: Use only the provided AC power adapter. Ensure the voltage matches your local power supply.
- Water and Moisture: Do not expose the mixer to water, rain, or high humidity. Avoid placing liquid containers near the device.
- Ventilation: Ensure adequate ventilation around the mixer. Do not block ventilation openings.
- Heat: Keep the mixer away from heat sources such as radiators, heat registers, stoves, or other heat-producing appliances.
- Servicing: Do not attempt to service this product yourself. Refer all servicing to qualified service personnel.
- Cables: Protect power cords from being walked on or pinched, particularly at plugs, convenience receptacles, and the point where they exit from the apparatus.
3. Package Contents
Verify that all items are present in the package:
- 1x Aveek F-5A Audio Mixer
- 1x USB-B Cable for PC Connection/Recording
- 1x Type-C Power Cable
- 1x AC Power Adapter
- 1x User Manual (this document)

Image 3.1: Package Contents
4. Product Overview
Familiarize yourself with the various controls and connections on your Aveek F-5A mixer.
4.1 Front Panel Controls and Indicators

Image 4.1: Front Panel Layout
- Mic/Line Inputs (1-3): XLR/TRS combo jacks for microphones or line-level instruments.
- PAD Switch: Attenuates input signal by 22dB for high-level sources.
- HPF Switch: High-Pass Filter (80Hz) to reduce low-frequency rumble.
- Gain Knob: Adjusts input sensitivity for each channel.
- Treble and Bass Knobs: 2-band EQ for high and low frequencies.
- Channel Effect Switch (EFF): Activates the built-in effect for the channel.
- Peak Indicator: Lights up when the input signal is too high.
- Level Knob: Adjusts the output volume for each channel.
- Stereo Input (Line 4/5): RCA and 6.35mm stereo inputs for external devices.
- 4/5 PC/USB/BT Switch: Selects input source for channel 4/5 (PC, USB drive, or Bluetooth).
- USB Socket: For USB drive playback/recording or PC connection.
- MP3 Playback Adjustment: Controls for USB/Bluetooth playback (Mode, Play/Pause, Skip).
- Reverb Echo Delay: Adjusts the delay time for the reverb effect.
- Reverb Time Adjustment: Adjusts the intensity of the reverb effect.
- Master Volume Knob: Controls the overall output volume.
- Monitor Headphone Jack (PHONES): 3.5mm output for headphone monitoring.
- Monitor Volume Knob: Adjusts headphone volume.
- Power Indicator: Lights up when the unit is powered on.
- LED Peak Level Indicator: Visual display of output signal level.
4.2 Rear Panel Connections

Image 4.2: Rear Panel Connections
- Power Switch: Turns the mixer on/off.
- Type-C Power Cord Socket: Connects to the AC power adapter.
- Connection Indicator: Indicates power status.
- USB-B Data Transmission Cable Port (PC/REC): Connects to a computer for recording and playback.
- Main Out (L/R): XLR outputs for connecting to active speakers or power amplifiers.
- Output (L/R): RCA outputs for connecting to other audio devices.
5. Setup
5.1 Power Connection
- Connect the Type-C power cable to the mixer's Type-C power socket.
- Connect the AC power adapter to the Type-C power cable.
- Plug the AC power adapter into a suitable power outlet.
- Flip the Power Switch on the rear panel to the 'ON' position. The connection indicator will light up.

Image 5.1: Power Connection
5.2 Connecting Input Devices
The mixer supports various input devices:

Image 5.2: Multiple Device Connections
- Microphones/Instruments (Channels 1-3): Connect microphones (XLR) or instruments (6.35mm TRS) to the MIC/LINE 1-3 combo jacks.
- 48V Phantom Power: For condenser microphones, press the +48V Phantom Power button. Note that phantom power applies to all 3 XLR inputs simultaneously and cannot be switched on/off for individual channels.

Image 5.3: 48V Phantom Power Activation
- Stereo Line Inputs (Channels 4/5): Connect CD players, keyboards, or computers using the L/R 6.35mm or L/R RCA stereo inputs.
5.3 Connecting Output Devices
- Main Output: Connect active speakers, power amplifiers, or active sound systems to the MAIN OUT XLR jacks.
- RCA Output: Use the L/R RCA output jacks to connect to other recording devices or monitors.
- Headphones: Plug 3.5mm headphones into the PHONES jack for monitoring.
5.4 Computer Connection for Recording
To record directly to your computer:
- Connect the provided USB-B cable from the mixer's PC/REC port to a USB port on your computer.
- The mixer will be recognized as an audio device. No additional drivers are typically required.
- Select the mixer as your input device in your computer's sound settings or recording software.
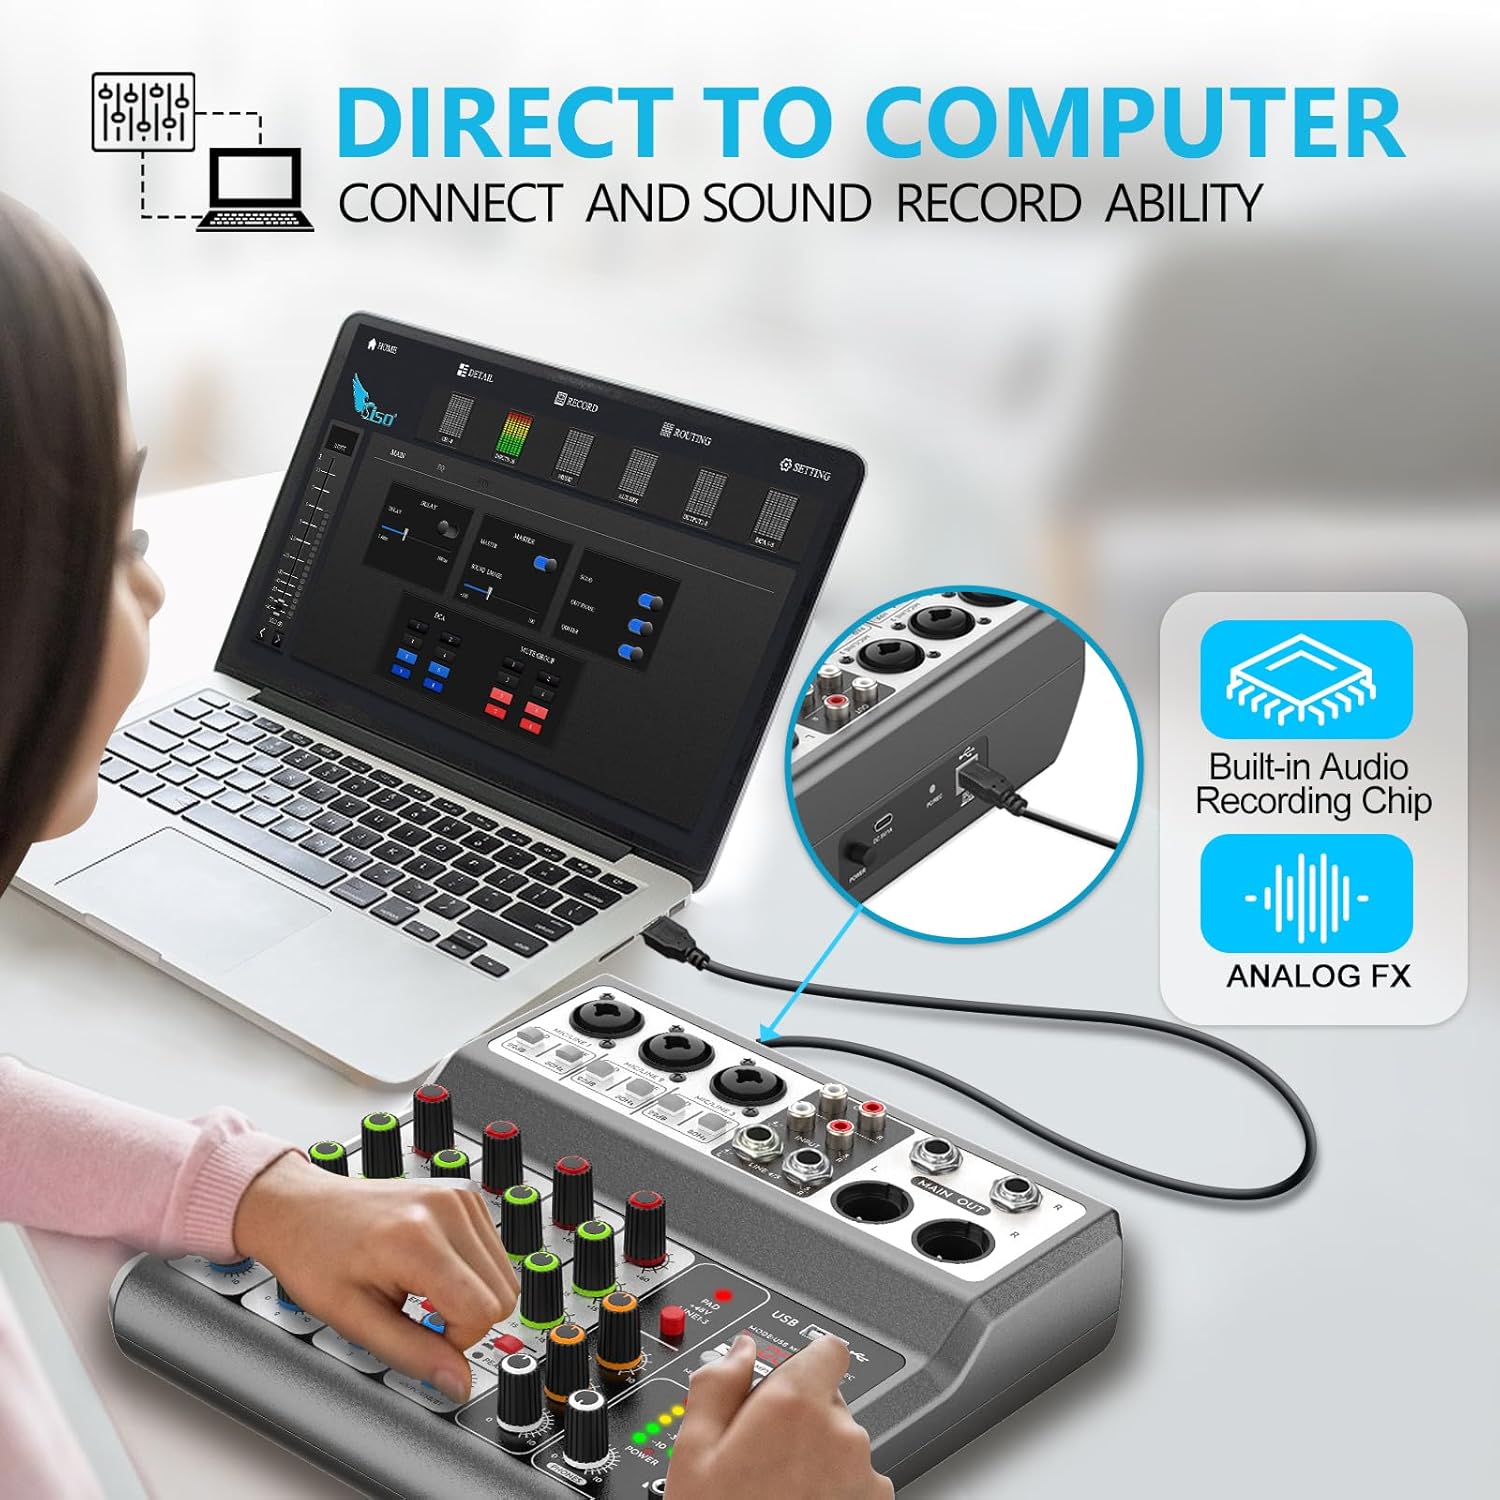
Image 5.4: Direct to Computer Connection
6. Operating Instructions
6.1 Basic Channel Operation
- Gain Adjustment: For each input channel, adjust the Gain knob to achieve an optimal input level. The Peak indicator should flash only occasionally during the loudest parts of the signal.
- Equalization (EQ): Use the Treble and Bass knobs to shape the tone of each channel. Turn clockwise to boost, counter-clockwise to cut.
- Channel Volume: Adjust the Level knob for each channel to set its individual volume in the mix.
- Master Volume: Adjust the Master Volume knob to control the overall output level of the mixer. Monitor the LED Peak Level Indicator to avoid clipping.
6.2 Echo and Delay Effects
The mixer includes built-in echo and delay effects:

Image 6.1: Echo and Delay Functions
- Press the EFF switch on the desired channel to apply the effect.
- Use the Reverb Echo Delay knob to adjust the delay time.
- Use the Reverb Time Adjustment knob to control the intensity or decay of the effect.
6.3 USB Drive Playback and Recording
The mixer supports direct playback from and recording to a USB stick.

Image 6.2: USB Playback and Recording
- Insert a USB stick into the USB Socket.
- Press the MODE button to cycle through USB, Bluetooth, and PC modes. Select USB.
- Use the playback controls (Play/Pause, Skip) to manage audio files on the USB stick.
- To record to the USB stick, ensure USB mode is selected and press the record button (REC).
6.4 Wireless Bluetooth Streaming
Stream audio wirelessly from your Bluetooth-enabled devices.
- Press the MODE button to select Bluetooth mode. The display will show 'BT'.
- On your device (phone, tablet, computer), search for Bluetooth devices and select 'Aveek Mixer'.
- Once paired, audio from your device will stream through the mixer.
- Use the mixer's playback controls or your device to manage the audio.
- Note: If Bluetooth fails to connect, press and hold the Play/Pause button for 3 seconds to restart Bluetooth on the mixer, then reconnect.
6.5 Headphone Monitoring
Monitor your mix using headphones:

Image 6.3: Headphone Monitor Connection
- Connect your 3.5mm headphones to the PHONES jack.
- Adjust the Monitor Volume knob to set the desired headphone listening level.
6.6 Important Operating Note
Bluetooth, USB, and PC (channel 4/5) functions are mutually exclusive. Only one of these three options can be active at any given time. For example, if you are using Bluetooth for audio input, you cannot simultaneously play from a USB drive or use the PC connection for input on channel 4/5.
7. Maintenance
Proper maintenance ensures the longevity and optimal performance of your mixer.
- Cleaning: Use a soft, dry cloth to clean the exterior of the mixer. Do not use liquid cleaners, aerosols, or solvents.
- Dust: Regularly remove dust from the ventilation openings to prevent overheating.
- Storage: When not in use for extended periods, store the mixer in a cool, dry place, away from direct sunlight and extreme temperatures.
- Cable Care: Avoid bending or twisting cables excessively. Disconnect cables by pulling the plug, not the cable itself.
8. Troubleshooting
If you encounter issues, refer to the following troubleshooting guide:
| Problem | Possible Cause | Solution |
|---|---|---|
| No power | Power cable not connected; Power switch off; Faulty adapter/outlet | Check all power connections; Ensure power switch is ON; Try a different outlet or adapter |
| No sound output | Volume knobs too low; Incorrect input/output connections; Muted channels | Increase Master Volume and individual channel Levels; Verify all cables are correctly connected; Ensure no channels are muted or set to minimum gain |
| Distorted sound | Input gain too high; Output level too high; Faulty cable/device | Reduce input Gain until Peak indicator stops flashing; Lower Master Volume; Test with different cables or input devices |
| Bluetooth not connecting | Incorrect mode; Previous connection interference | Ensure mixer is in Bluetooth mode; Press and hold Play/Pause button for 3 seconds to reset Bluetooth, then try pairing again |
| USB playback/recording not working | Incorrect mode; USB drive format issue; Corrupt files | Ensure mixer is in USB mode; Check USB drive format (FAT32 recommended); Try different audio files or USB drive |
| Phantom power not working | 48V button not pressed | Press the +48V Phantom Power button. Note it applies to all XLR inputs. |
9. Specifications
| Feature | Specification |
|---|---|
| Brand | Aveek |
| Model Number | 5 Channel (F-5A) |
| Number of Channels | 5 |
| Connectivity Technology | USB, Bluetooth |
| Phantom Power | 48 Volts (for XLR inputs 1-3) |
| Power Source | Corded Electric |
| Material Type | Plastic |
| Product Dimensions (D x W x H) | 8.27" x 8.27" x 2.56" (21cm x 21cm x 6.5cm) |
| Item Weight | 2.16 pounds (0.98 kg) |
10. Warranty and Support
10.1 Warranty Information
Aveek is committed to customer satisfaction. This product is covered by a 45-day refund or replacement policy for faulty products. Please retain your proof of purchase for warranty claims.
10.2 Customer Support
If you have any questions, concerns, or require technical assistance, please contact Aveek customer support through the retailer's platform or the official Aveek website. Our team is available to provide efficient service and support.


