1. Product Overview
The RAINPOINT Water Timer is designed to automate your garden, lawn, or pool watering, providing convenience and efficient water management. Featuring a durable brass inlet and outlet, this timer offers three independent programming schedules, rain delay functionality, and manual watering options to suit various plant needs and weather conditions.

Image: Front view of the RAINPOINT Water Timer, showing the digital display, control buttons, and rotary dial. The brass inlet is visible at the top, and the brass outlet at the bottom.
2. Key Features
- 100% Brass Water Inlet and Outlet: Ensures durability and resistance to high water pressure, reducing wear compared to plastic alternatives.
- 3 Independent Schedules: Allows for flexible programming with customizable start times, durations, and frequencies (daily, weekly, or specific intervals).
- Flexible Watering Options: Supports morning, afternoon, or evening watering on specific days or intervals.
- Rain Delay Function: Offers 24/48/72-hour rain delay to prevent overwatering and conserve water.
- Manual Watering: Initiate immediate watering for 1 minute to 8 hours without affecting programmed schedules.
- User-friendly Interface: Equipped with navigation buttons, a rotary dial, and a large LED display for easy setup and monitoring.
- Low Power Protection: The valve automatically closes when the battery is low to prevent water waste.
- Durable Casing: IP54 waterproof, UV resistant coating, and anti-rust material for outdoor use.

Image: Close-up view highlighting the 360° leak-proof design of the RAINPOINT Water Timer, showing the solid brass inlet and the internal anti-leak sealing ring for enhanced durability and reliability.

Image: The RAINPOINT Water Timer screen showing options for setting three auto cycle modes, including adjustable start time, watering duration (1 minute to 3 hours 59 minutes), and frequency (weekly, every 6/8/12 hours, or every 1-7 days).
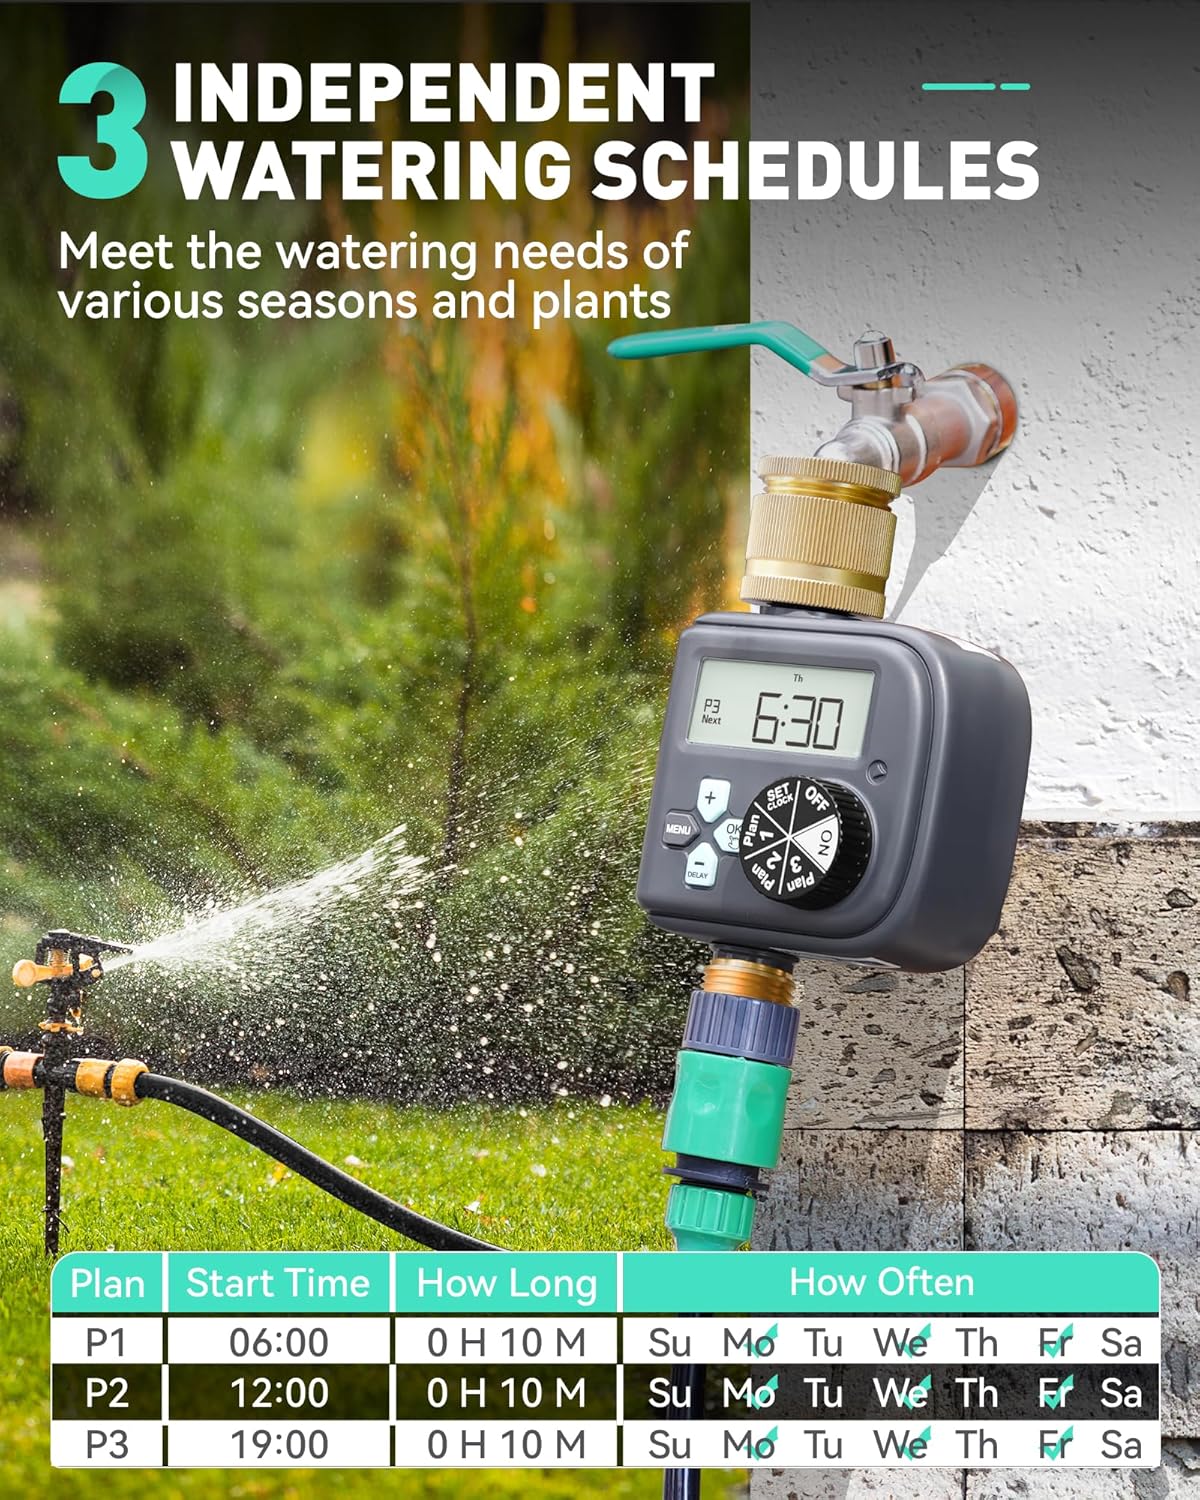
Image: The RAINPOINT Water Timer in a garden setting, illustrating the capability to set three independent watering schedules (P1, P2, P3) with distinct start times, durations, and days of the week for watering.
3. Package Contents
The package includes the following items:
- RAINPOINT Watering Timer x 1
- User Manual x 1
- Note: 2 AAA alkaline batteries are not included and must be purchased separately.

Image: The front packaging of the RAINPOINT Digital Multi-Programming Water Timer, displaying the product and indicating Model No. ITV517P.
4. Specifications
| Feature | Detail |
|---|---|
| Watering Duration | 1 Min - 3 H 59 Min |
| Watering Frequency | Every 6H to 7 Days or any day of the week |
| Working Pressure | 0.5 - 8 Bar (7 - 116 Psi) |
| Max Flow Rate | 22 L/Min (5.8 Gal/Min) |
| Thread | NH(US) for 3/4" taps, BSP(EU) for 3/4" or 1" taps |
| Manual Watering | 1 Min - 8 H |
| Battery Power | 2*AAA 1.5V alkaline batteries (not included) |
| Waterproof and Dustproof | IP54 |
| Product Dimensions | 11 x 8 x 17 cm |
| Item Weight | 540 g |
| Material | Brass |

Image: The back packaging of the RAINPOINT Water Timer, providing a detailed table of specifications and features.
5. Setup
5.1 Battery Installation
- Locate the battery compartment on the back of the timer.
- Open the battery compartment cover.
- Insert 2 new AAA 1.5V alkaline batteries, ensuring correct polarity (+/-).
- Close the battery compartment cover securely.
5.2 Installation to Faucet
- Ensure the faucet is turned off.
- Screw the RAINPOINT Water Timer onto your outdoor faucet by hand. Ensure it is tightened securely to prevent leaks.
- Connect your garden hose or irrigation system to the brass outlet at the bottom of the timer.

Image: An illustrative diagram demonstrating the proper installation of the RAINPOINT Water Timer to an outdoor faucet and its connection to a drip irrigation system for efficient plant watering.
6. Operating Instructions
6.1 Activating the Valve (Important First Use Step)
Warning: Every valve is water tested. The silicone diaphragm may stick together. Follow these steps to activate the valve to avoid water not dosing or flowing out.
- Install batteries and screw the timer on the garden faucet by hand. Keep the faucet turned off.
- Turn the timer dial to "ON".
- Press and hold the "OK" button for 3-5 seconds to enter Manual Watering Mode.
- When the screen flashes, press the "OK" button to run manual watering.
- After hearing the "click" sound or waiting for about 5 seconds, the valve in the timer is opened, and then turn the dial to "OFF" to close the valve.
- Repeat the step 2-5 for 3-5 times.
- Test: Turn on the faucet a little bit, and then repeat the step 2-5 to check if the water flow out or shut off as expected.
If the timer valve is activated successfully, you can proceed with programming. If not, please repeat steps 2-5 several times or contact customer support.
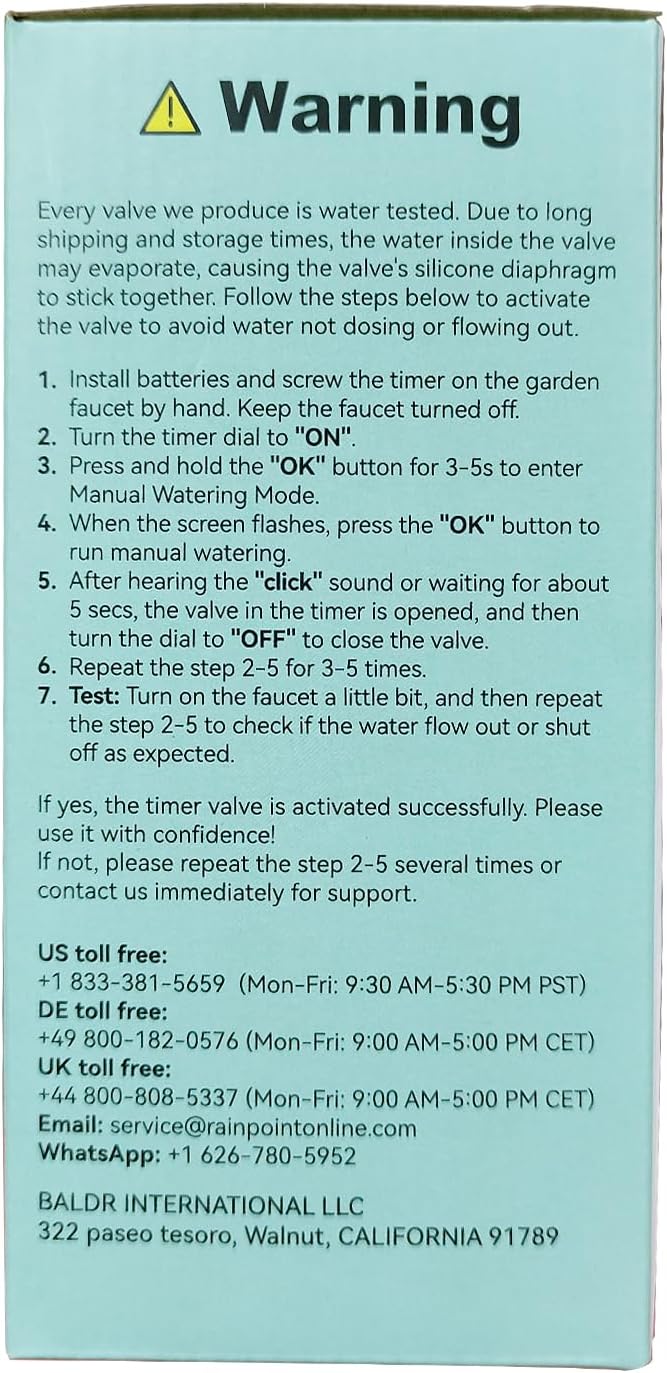
Image: A warning label detailing the crucial first-time activation steps for the water timer's valve to ensure proper functionality after manufacturing water testing.
6.2 Setting the Clock
- Turn the rotary dial to "SET CLOCK".
- Use the "+" and "-" buttons to adjust the current time.
- Press "OK" to confirm and move to the next setting (e.g., day of the week).
- Adjust and confirm the day of the week.
6.3 Programming Watering Schedules (Plan 1, 2, 3)
The timer supports three independent watering plans (P1, P2, P3). Follow these steps for each plan:
- Turn the rotary dial to "Plan 1" (or "Plan 2", "Plan 3").
- Set Start Time: Use "+" and "-" to adjust the desired start time. Press "OK" to confirm.
- Set How Long (Duration): Use "+" and "-" to set the watering duration (from 1 minute to 3 hours 59 minutes). Press "OK" to confirm.
- Set How Often (Frequency):
- Weekly: Select specific days of the week using "+" and "-" and "OK" to toggle.
- Interval: Choose every 6/8/12 hours, or every 1-7 days.
- Repeat for Plan 2 and Plan 3 as needed.

Image: An example of setting a weekly watering cycle, demonstrating how to program start times, durations, and specific days for three different plans (P1, P2, P3).

Image: An example of setting a daily watering cycle, suitable for plants with lower water requirements, showing how to program start times and frequencies like "Every 2 Days".

Image: An example of setting an hourly watering cycle, ideal for plants requiring frequent watering, illustrating programming for intervals like "Every 12 hours".
6.4 Rain Delay Function
The rain delay function allows you to pause your watering schedule for a set period to avoid overwatering during rainy weather.
- Turn the rotary dial to "DELAY".
- Use the "+" and "-" buttons to select the desired delay duration (24, 48, or 72 hours).
- Press "OK" to activate the rain delay. The timer will automatically resume its programmed schedule after the delay period.

Image: The RAINPOINT Water Timer displaying the rain delay function (24/48/72 hours) to skip irrigation programs and a manual watering option (1 minute to 8 hours) for immediate watering.

Image: A visual representation of the rain delay feature, showing the timer in a rainy environment and highlighting the option to skip preset irrigation programs for 24, 48, or 72 hours.
6.5 Manual Watering
To water immediately without affecting your programmed schedules:
- Turn the rotary dial to "ON".
- Press and hold the "OK" button for 3-5 seconds to enter Manual Watering Mode.
- Use the "+" and "-" buttons to set the desired manual watering duration (from 1 minute to 8 hours).
- Press "OK" to start manual watering.
- To stop manual watering, turn the dial to "OFF".

Image: A visual guide to the manual watering function, showing a person watering plants and highlighting the ability to set watering duration from 1 minute to 8 hours without interrupting programmed schedules.
7. Maintenance
- Battery Replacement: Replace batteries when the low battery indicator appears on the display. The valve will automatically close to prevent water waste when the battery is critically low.
- Cleaning: Periodically check the brass inlet filter for debris and clean if necessary to maintain optimal water flow.
- Winter Storage: Before freezing temperatures, disconnect the timer from the faucet, remove batteries, and store the unit indoors in a dry, frost-free location.
- Seal Inspection: Regularly inspect the sealing rings for wear and tear. Replace if damaged to prevent leaks.
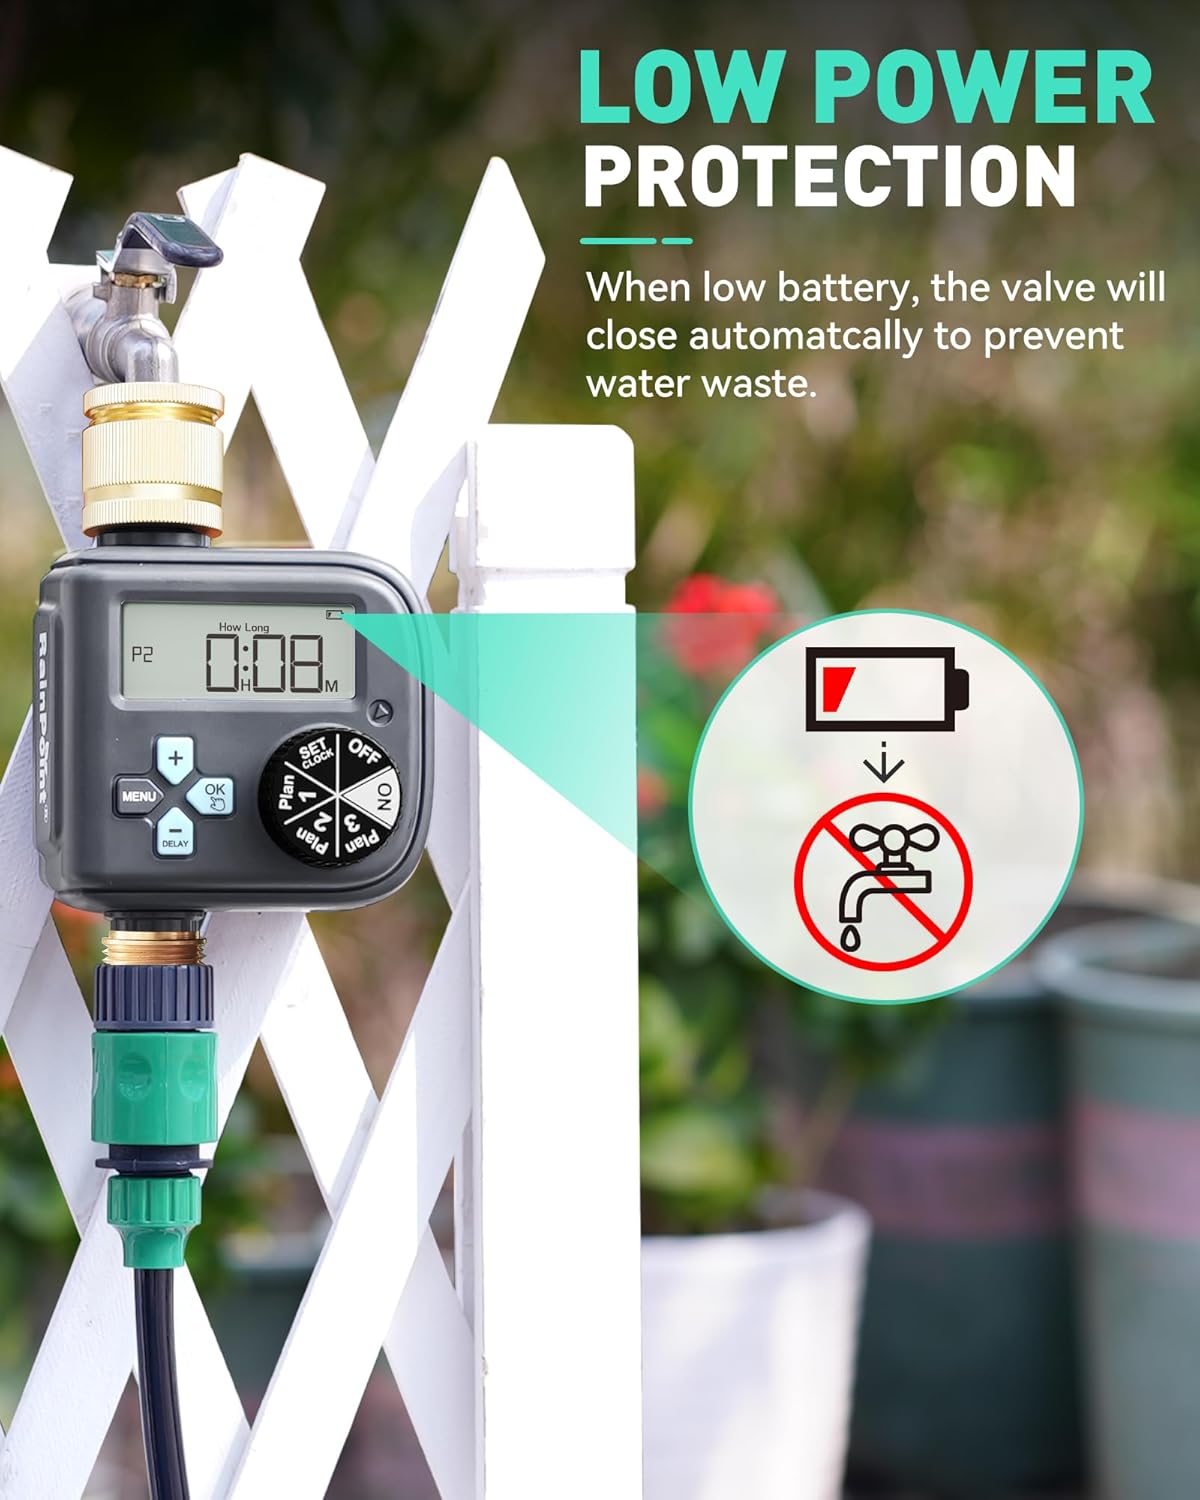
Image: The RAINPOINT Water Timer displaying its low power protection feature, where the valve automatically closes when the battery level is low to prevent water wastage.

Image: The RAINPOINT Water Timer showcasing its durable casing, emphasizing IP54 waterproof rating, UV resistant coating, and anti-rust material for long-lasting outdoor performance.
8. Troubleshooting
| Problem | Possible Cause | Solution |
|---|---|---|
| No water flow / Valve not opening. |
|
|
| Timer not watering at scheduled times. |
|
|
| Water leaking from connections. |
|
|
9. Warranty
RAINPOINT products are designed for durability and reliability. Based on customer reviews, the product may be eligible for an extended warranty upon online registration. Please refer to the official RAINPOINT website or contact customer support for the most up-to-date warranty information and registration process.
10. Customer Support
For any questions, technical assistance, or warranty claims, please contact RAINPOINT customer service:
- Email: service@rainpointonline.com
- US Toll Free: +1 833-381-5659 (Mon-Fri: 9:30 AM-5:30 PM PST)
- DE Toll Free: +49 800-182-0576 (Mon-Fri: 9:00 AM-5:00 PM CET)
- UK Toll Free: +44 800-808-5337 (Mon-Fri: 9:00 AM-5:00 PM CET)
- WhatsApp: +1 626-780-5952
Professional customer service and support are provided in your native language.

Image: A visual representation of the professional customer support team, emphasizing a response within 24 hours via phone, email, or local business contact.


