
1. Introduction
This manual provides comprehensive instructions for the installation, operation, and maintenance of your MSI PRO B760-VC WiFi ProSeries Motherboard. Please read this manual thoroughly before attempting any installation or configuration to ensure proper functionality and to prevent damage to the components.
The MSI PRO B760-VC WiFi motherboard is designed to support 12th, 13th, and 14th Gen Intel Core, Pentium Gold, and Celeron processors with an LGA 1700 socket. It features DDR5 memory support, PCIe 4.0, M.2 slots, 2.5Gbps LAN, USB 3.2 Gen2, Wi-Fi 5.1, and Bluetooth 5.1 connectivity.
2. Safety Information
Always observe the following safety precautions when handling computer components:
- Electrostatic Discharge (ESD) Prevention: Always wear an anti-static wrist strap or frequently touch a grounded metal object (like your computer case) before handling components to discharge static electricity.
- Power Disconnection: Ensure the power supply is unplugged from the wall outlet and all power cables are disconnected from the motherboard before installation or removal of any components.
- Component Handling: Handle components by their edges. Avoid touching pins, contacts, or circuitry directly.
- Ventilation: Ensure adequate airflow within your computer case to prevent overheating.
- Tool Usage: Use appropriate tools for installation. Avoid excessive force.
3. Package Contents
Verify that all items listed below are present in your motherboard package:

Image: The MSI PRO B760-VC WiFi motherboard, its retail box, European Union Regulatory Notice, Quick Installation Guide, two M.2 screw/standoff sets, a SATA cable, a Wi-Fi antenna, and an I/O shield.
- MSI PRO B760-VC WiFi Motherboard
- Quick Installation Guide
- European Union Regulatory Notice
- 2x M.2 Screw / Standoff Sets
- SATA Cable
- Wi-Fi Antenna
- I/O Shield
4. Product Overview
The MSI PRO B760-VC WiFi motherboard is an ATX form factor board designed for robust performance and stability. Below are key features and component layouts.
4.1 Motherboard Layout
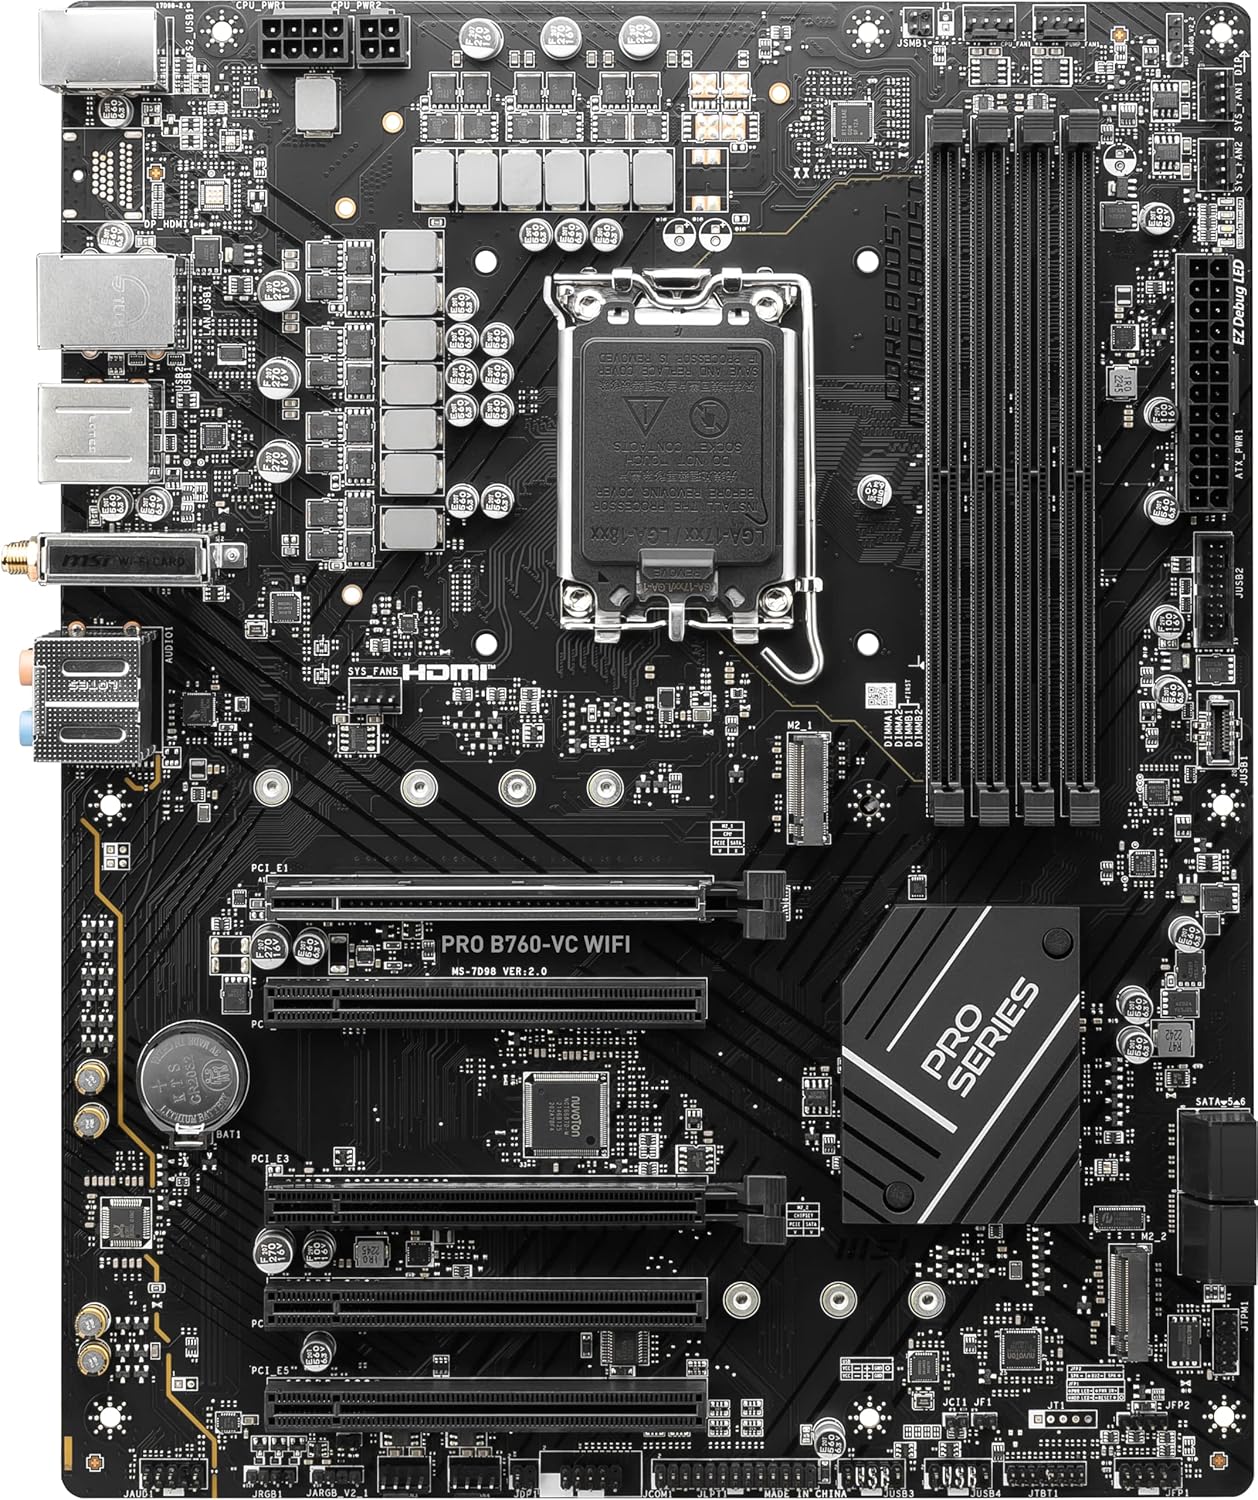
Image: Top-down view of the MSI PRO B760-VC WiFi motherboard, showing the CPU socket, DDR5 DIMM slots, PCIe slots, M.2 slots, and various headers.
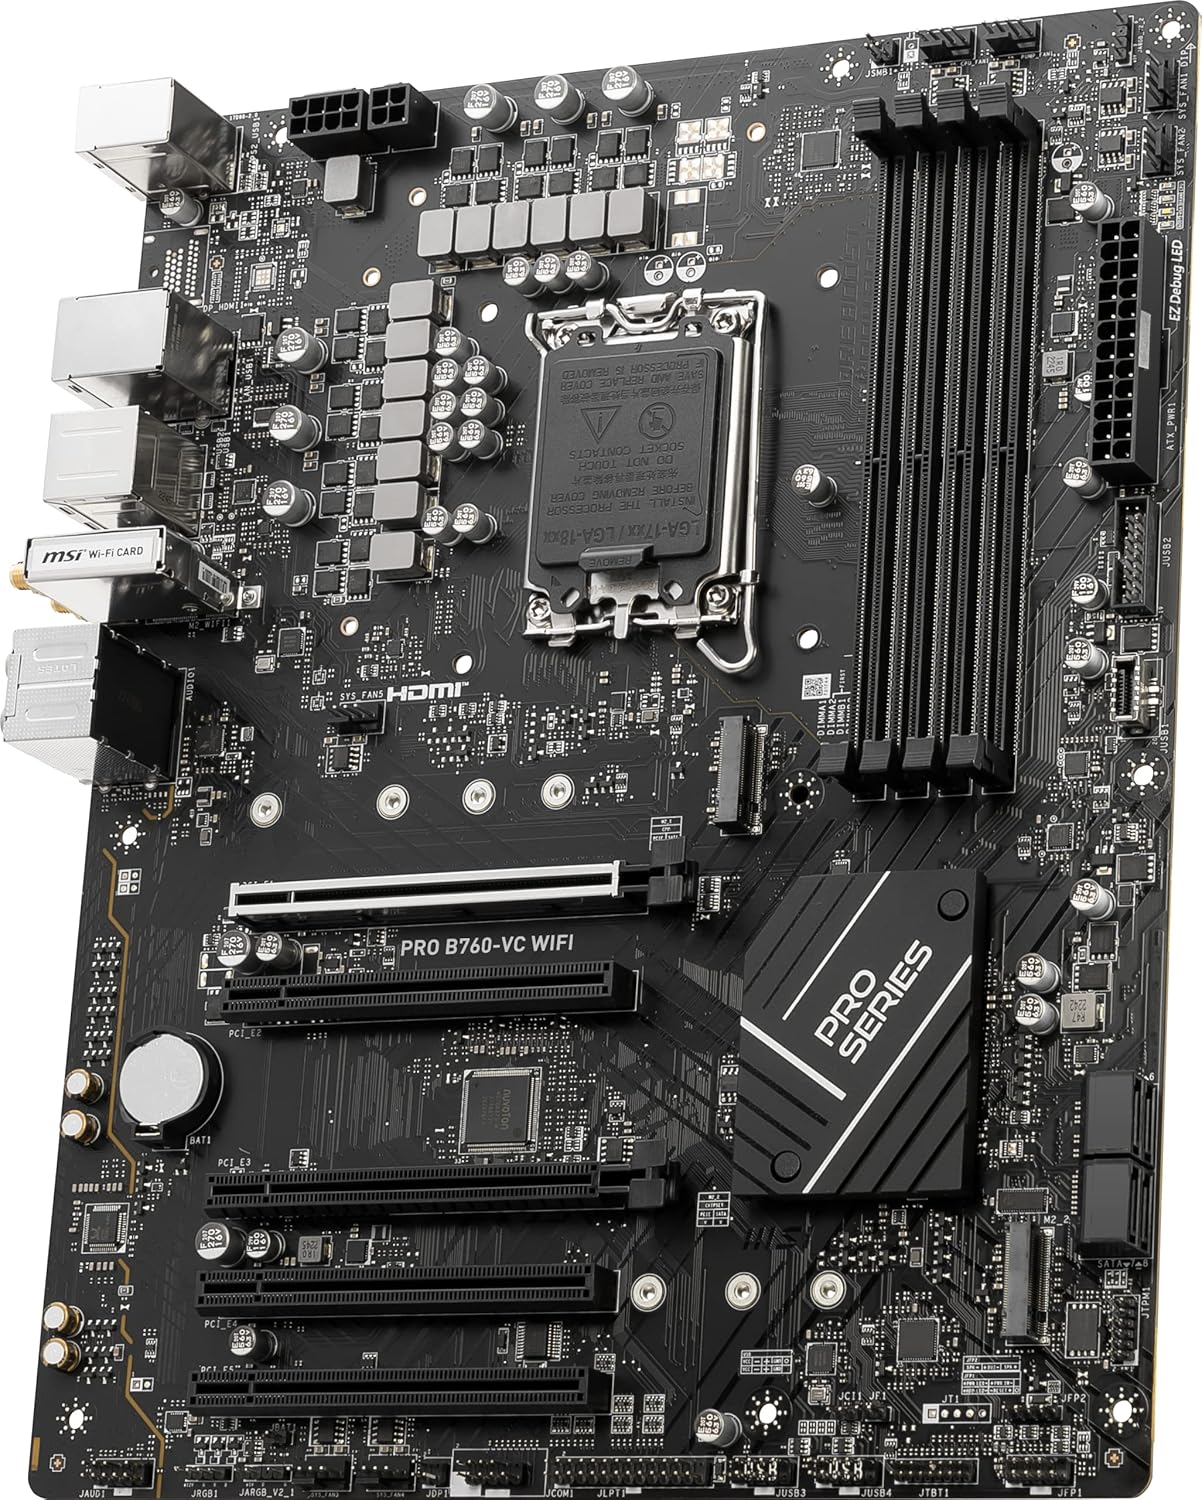
Image: Angled view of the MSI PRO B760-VC WiFi motherboard, highlighting the rear I/O panel and power delivery components.

Image: Close-up view of the rear I/O ports, including USB, LAN, Wi-Fi antenna connectors, and audio jacks.
4.2 Key Features
- Processor Support: Compatible with 12th, 13th, and 14th Gen Intel Core, Pentium Gold, and Celeron processors for the LGA 1700 socket.
- Enhanced Power Design: Features a 12+1 Duet Rail Power System with P-PAK, 8-pin + 4-pin CPU power connectors, Core Boost, and Memory Boost for stable power delivery.
- DDR5 Memory Support: Supports DDR5 memory modules up to 6800+(OC) MHz across four DIMM slots, with a maximum capacity of 256 GB.
- PCIe 4.0: Equipped with Fortified PCIe 4.0 x16 slots for high-speed graphics cards and expansion cards.
- Gen4 M.2 Connectors: Multiple M.2 slots supporting PCIe Gen4 for high-speed NVMe SSDs.
- 2.5G LAN with Wi-Fi 5 Solution: Provides a secure, stable, and fast network connection for professional and multimedia use, along with Bluetooth 5.1.
- High Quality PCB: Constructed with a 6-layer PCB made from 2oz thickened copper and server-grade level material for durability and performance.

Image: Diagram showing the motherboard's compatibility with Intel Core 12th and 13th Gen processors.

Image: Close-up of the motherboard's power delivery system, indicating the 12+1 Duet Rail Power System.

Image: Graphic illustrating the DDR5 memory slots and support for speeds up to 6800MHz.

Image: Diagram showing the fortified PCIe 4.0 x16 slots on the motherboard.

Image: Close-up of the M.2 Gen4 connectors on the motherboard.

Image: Diagram showing the network connectivity features, including 2.5G LAN, Wi-Fi, and Audio Boost.

Image: Graphic illustrating the integrated cooling features and the 6-layer PCB with 2oz copper.
5. Setup and Installation
Follow these general steps for installing your motherboard into a computer case. Refer to your case manual for specific mounting instructions.
- Prepare the Case: Install the I/O shield into the case's rear opening. Install standoffs in the case for the ATX motherboard form factor.
- Install the CPU: Open the CPU socket lever, align the CPU with the socket (triangle/arrow indicator), gently place the CPU into the socket, and close the lever.
- Install the CPU Cooler: Mount your CPU cooler according to its manufacturer's instructions.
- Install RAM: Open the clips on the DDR5 DIMM slots, align the memory modules with the key notch, and press firmly until the clips snap into place.
- Install M.2 SSDs: Insert M.2 SSDs into the M.2 slots, secure them with the provided standoff and screw.
- Mount Motherboard: Carefully place the motherboard into the case, aligning it with the standoffs and I/O shield. Secure it with screws.
- Install Graphics Card (GPU): Insert your graphics card into the primary PCIe 4.0 x16 slot until it clicks. Secure it with a screw or latch on the case.
- Connect Power Supply: Connect the 24-pin ATX main power connector and the 8-pin + 4-pin CPU power connectors from your power supply to the motherboard. Connect power to other components like the GPU and storage drives.
- Connect Front Panel Cables: Connect the front panel headers (power button, reset button, USB, audio) to the corresponding pins on the motherboard. Refer to the motherboard manual for pin layouts.
- Connect Storage Drives: Connect SATA data cables to your SATA drives and the motherboard.
- Install Wi-Fi Antenna: Screw the included Wi-Fi antenna onto the connectors on the rear I/O panel.
6. Operating Instructions
6.1 First Boot
After completing the hardware installation, connect your monitor, keyboard, and mouse. Power on your system. The system should display the MSI logo and enter the BIOS or prompt for an operating system installation.
6.2 BIOS/UEFI Setup
To enter the BIOS/UEFI setup utility, press the Delete key repeatedly during the boot process when the MSI logo appears. The BIOS allows you to configure system settings, boot order, and monitor hardware status.
6.3 Driver Installation
After installing your operating system, it is crucial to install the latest drivers for your motherboard components. These include chipset drivers, LAN drivers, Wi-Fi/Bluetooth drivers, audio drivers, and any other necessary utilities.
- Download the latest drivers from the official MSI website: www.msi.com. Navigate to the support page for your specific motherboard model.
- Install drivers in the recommended order (usually chipset first).
7. Maintenance
Regular maintenance helps ensure the longevity and optimal performance of your motherboard and system.
- Dust Cleaning: Periodically clean dust from inside your computer case, especially from fans, heatsinks, and vents. Use compressed air and ensure the system is powered off and unplugged.
- BIOS Updates: Check the MSI website regularly for BIOS/UEFI updates. BIOS updates can improve stability, compatibility, and performance. Follow MSI's instructions carefully when updating the BIOS to avoid system damage.
- Driver Updates: Keep your drivers updated to ensure compatibility and access to the latest features and bug fixes.
8. Troubleshooting
This section addresses common issues you might encounter.
- No Power/No Boot:
- Ensure all power cables (24-pin ATX, 8-pin CPU, 4-pin CPU) are securely connected.
- Verify the power supply is switched on and plugged into a working outlet.
- Check front panel power button connection to the motherboard.
- No Display:
- Ensure the monitor is connected to the graphics card (or motherboard if using integrated graphics) and powered on.
- Reseat the graphics card and memory modules.
- Test with a single RAM stick in different slots.
- Component Not Detected (e.g., SSD, RAM):
- Check physical connections for the component.
- Verify the component is properly seated in its slot.
- Check BIOS settings to ensure the component is enabled or detected.
- System Instability/Crashes:
- Ensure all drivers are installed and up to date.
- Check CPU and GPU temperatures to rule out overheating.
- Run memory diagnostic tools to check for RAM issues.
- Update BIOS to the latest version.
9. Specifications
| Feature | Specification |
|---|---|
| Brand | MSI |
| CPU Socket | LGA 1700 |
| Compatible Devices | Personal Computer |
| RAM Memory Technology | DDR5 |
| Compatible Processors | Intel® Pentium® Gold and Celeron® Processors (12th/13th/14th Gen Intel Core) |
| Chipset Type | Intel B760 |
| Memory Clock Speed | Up to 6800+(OC) MHz |
| Platform | Windows 10, Windows 11 |
| Model Name | PRO B760 VC |
| Processor Socket | LGA 1700 |
| Ram Memory Maximum Size | 256 GB |
| Main Power Connector Type | 24-Pin |
| Graphics Card Interface | PCI Express |
| Memory Slots Available | 4 |
| Number of Ports | 6 (USB, LAN, Audio, etc.) |
| S/PDIF Connector Type | Optical |
| System Bus Standard Supported | SATA 3 |
| Total SATA Ports | 4 (typically) |
| Total USB Ports | Multiple (including USB 3.2 Gen2) |
| Number of Ethernet Ports | 1 (2.5Gbps) |
| Total PCIe Ports | 5 (including PCIe 4.0 x16) |
| Model Number | PRO B760-VC WIFI |
| Manufacturer | MSI |
| UPC | 824142311882 |
10. Warranty Information
The MSI PRO B760-VC WiFi ProSeries Motherboard comes with a 3-year manufacturer's warranty. For detailed terms and conditions, please refer to the warranty card included in your package or visit the official MSI website.
11. Support
For further assistance, technical support, driver downloads, or additional documentation, please visit the official MSI support website:
You can also find FAQs and community forums on the MSI website for common issues and solutions.


