
Cloud Mountain CM0207
Cloud Mountain 86 LBS Thrust Trolling Motor User Manual
Model: CM0207
Introduction
This manual provides essential information for the safe and efficient operation, maintenance, and troubleshooting of your Cloud Mountain 86 LBS Thrust Trolling Motor. Please read this manual thoroughly before using the product to ensure proper function and longevity.
The Cloud Mountain 86 LBS Thrust Trolling Motor is a 24V transom-mounted electric outboard motor designed for various watercraft, including kayaks, inflatable boats, and fishing boats. It features an 8-speed control (5 forward, 3 reverse), an LED battery indicator, and a telescoping handle for enhanced control.

Figure 1: The Cloud Mountain 86 LBS Thrust Trolling Motor in use on a boat. This image shows the motor's overall appearance and how it is mounted on the transom of a boat.
Product Overview
Key Features
- Powerful 86 LBS Thrust: Provides significant power and efficiency for various boating needs.
- 24V System: Optimized for robust performance.
- Transom Mounted: Designed for easy installation on the transom of your boat.
- 8-Speed Control: Features 5 forward speeds and 3 reverse speeds for precise maneuverability.
- 10-Point LED Battery Indicator: Allows real-time monitoring of battery power to prevent unexpected power loss.
- 6-Inch Telescoping Handle: Offers ergonomic control and comfortable operation.
- 3-Blade Propeller: Enhances propulsion efficiency.
- Adjustable Shaft Angle & Propeller Depth: Allows for optimal placement in different water conditions.
- Durable Construction: Reinforced nylon bracket, all-aluminum motor head, and stainless steel, zinc, and magnesium hardware ensure suitability for both fresh and saltwater environments.
Components
Familiarize yourself with the main components of your trolling motor:

Figure 2: Main Components of the Trolling Motor. This diagram illustrates the Control Box, Telescoping Handle, Regulating Ring, Power Cord, Suspension System, Propeller, and All Copper Core Motor.
- Control Box: Contains the speed control and battery indicator.
- Telescoping Handle: Extends for comfortable steering and houses the speed adjustment.
- Regulating Ring (Depth Collar): Used to adjust the height of the propeller.
- Power Cord: Connects the motor to the battery.
- Suspension System (Mounting Bracket): Secures the motor to the boat's transom.
- Propeller: The three-blade unit that generates thrust.
- All Copper Core Motor: The internal electric motor providing power.

Figure 3: Detailed Component Breakdown. This image provides a numbered breakdown of parts including Control Box Cover, Telescoping Handle, Adjustment Depth Collar, Bracket, Propeller, Power Reader, Handle Speed Control, Pin-hinge, Motor Shaft, and Durable Motor.
Setup and Installation
What's in the Box
- Trolling Motor Assembly
- Propeller
- User Manual (this document)
Mounting the Motor
The Cloud Mountain trolling motor is designed for transom mounting. Ensure your boat's transom is sturdy enough to support the motor's weight and thrust.
- Positioning: Place the motor's mounting bracket onto the transom of your boat. Ensure the motor is centered or positioned to allow for comfortable steering and clearance from other boat components.
- Securing: Tighten the two fixing screws on the adjustable hanging support (suspension system) firmly to secure the motor to the transom. Ensure the motor is stable and does not wobble.
- Adjusting Height: Adjust the motor's shaft height using the regulating ring (depth collar) to ensure the propeller is submerged to the appropriate depth. The 30-inch shaft is suitable for various boat types and allows for comfortable steering while sitting or standing.
- Adjusting Angle: The shaft angle can be adjusted for comfortable steering. Press the board to change the underwater angle of the motor.
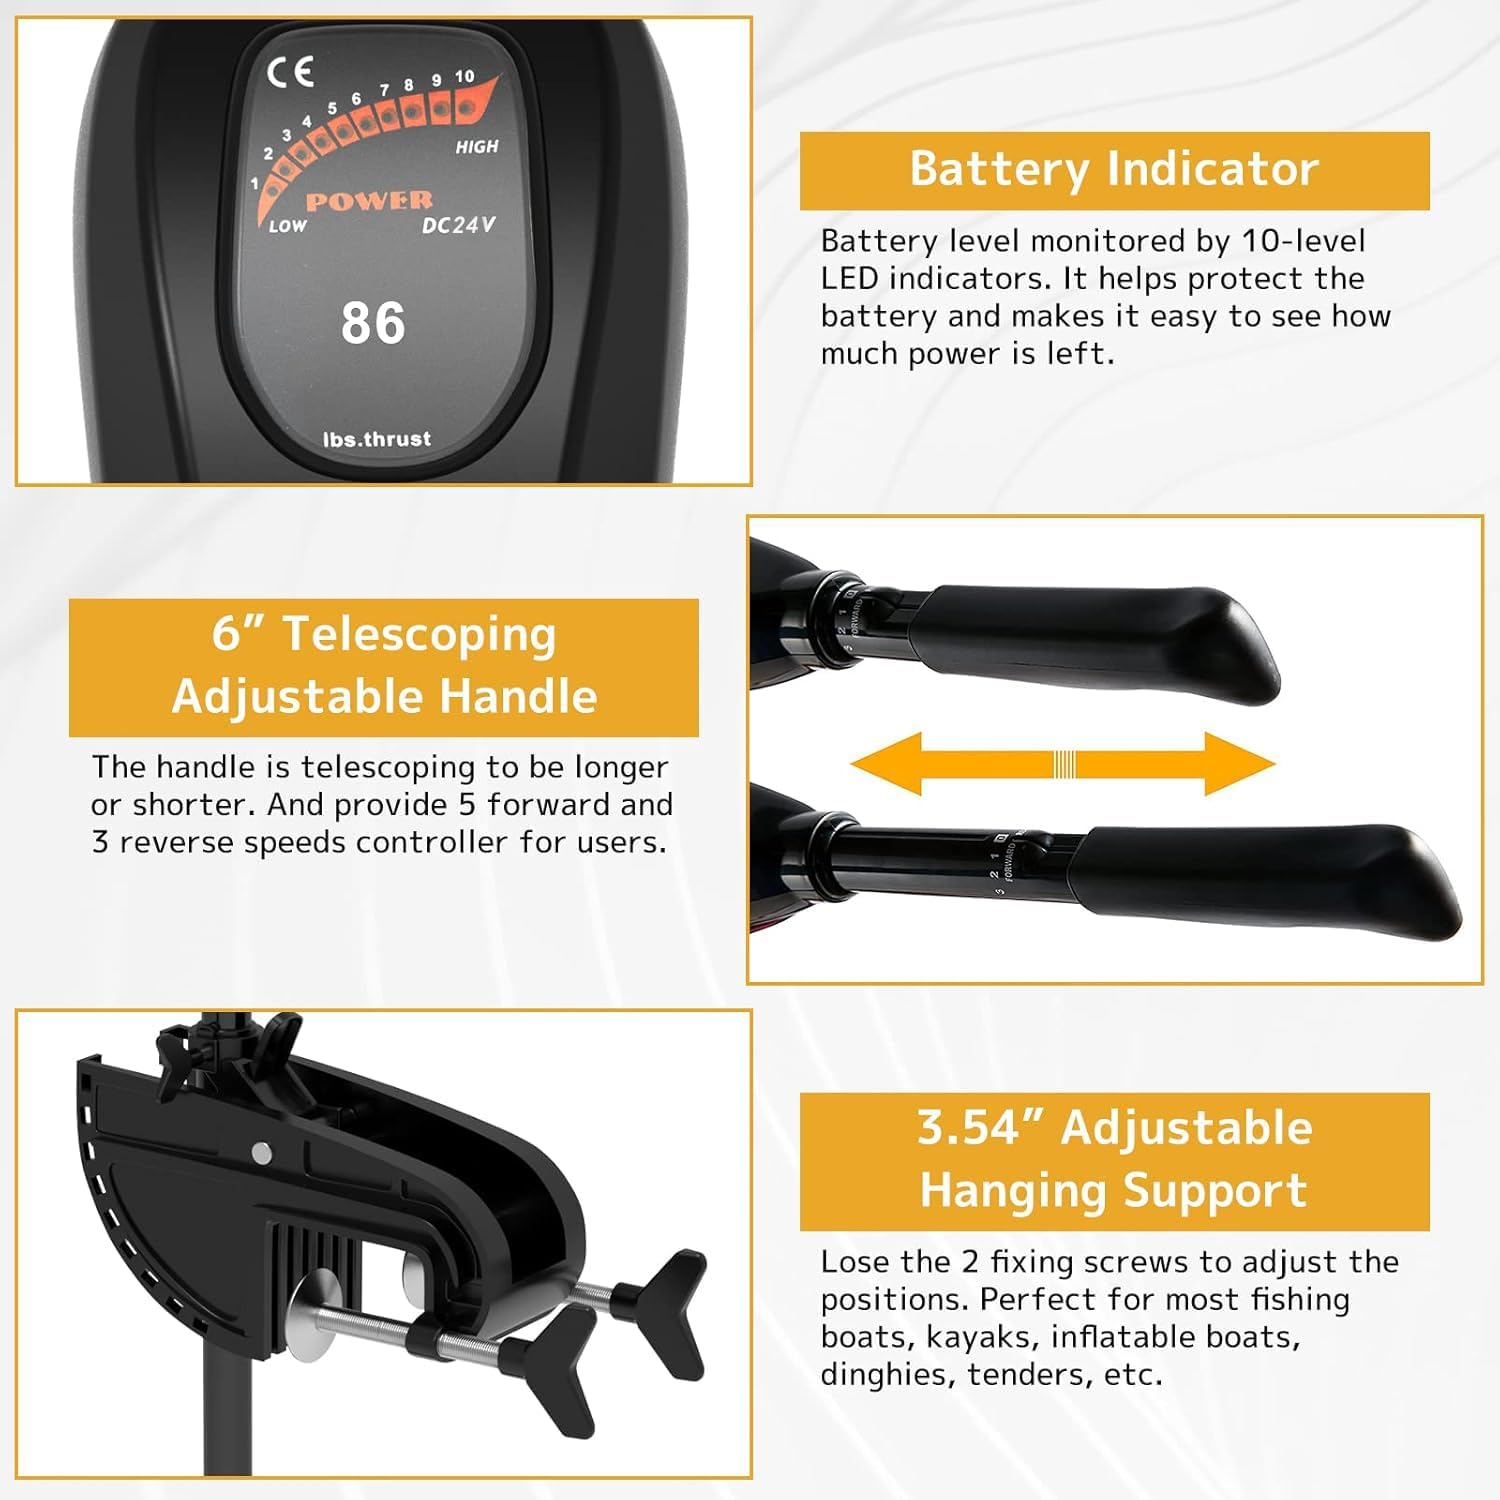
Figure 4: Adjustable Hanging Support and Battery Indicator. This image shows the 3.54-inch adjustable hanging support and the 10-point LED battery indicator.
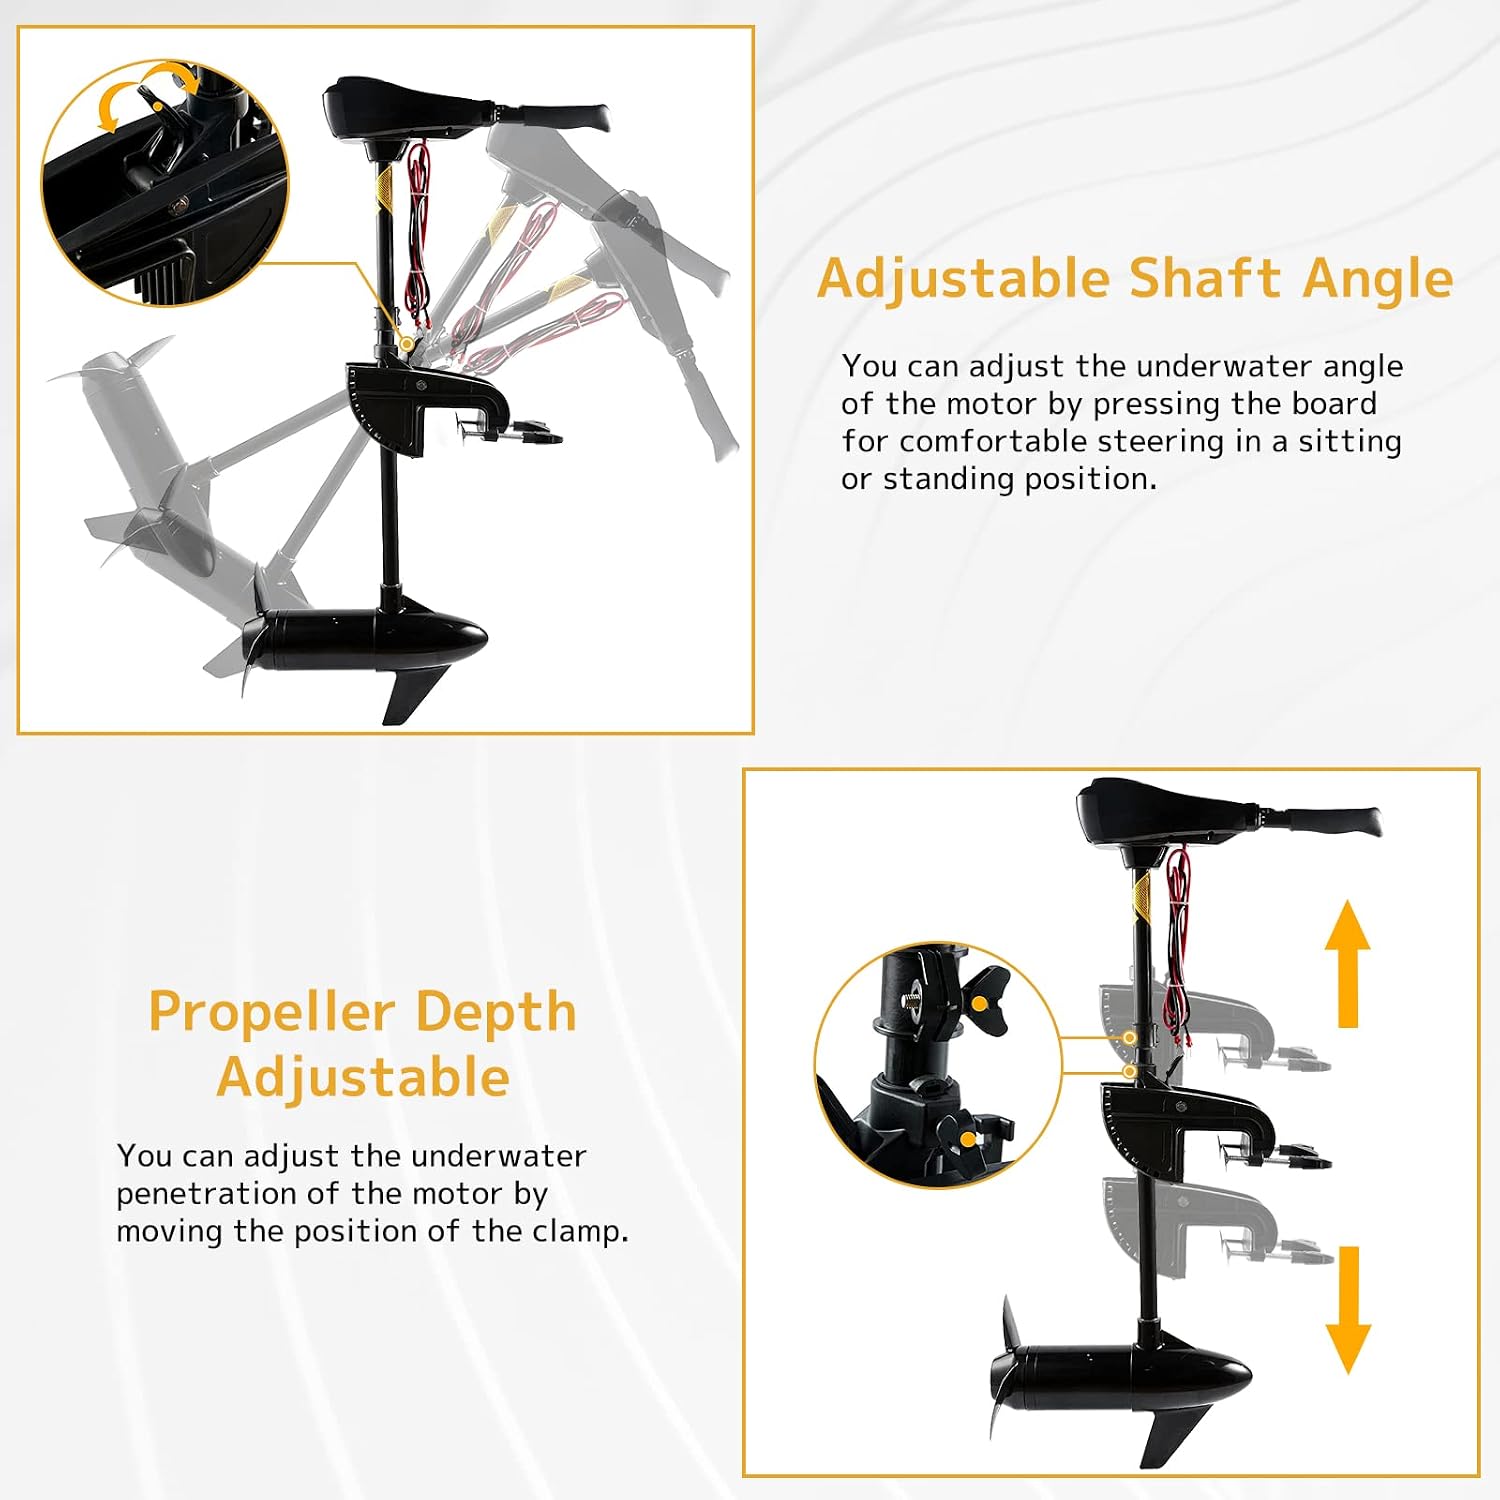
Figure 5: Adjustable Shaft Angle and Propeller Depth. These diagrams illustrate how to adjust the motor's underwater angle and the propeller's depth by moving the clamp position.

Figure 6: Motor Adjustments. This image shows how to adjust the telescoping handle, and the thickness, depth, and height of the motor.
Battery Connection
This 86 LBS thrust motor requires a 24V power source. This typically means connecting two 12V deep cycle marine batteries in series. Batteries are not included with the motor.
- Safety First: Ensure the motor is turned off and disconnected from any power source before making battery connections. Wear appropriate safety gear, including eye protection.
- Wiring: Connect the positive (+) terminal of the motor's power cord to the positive (+) terminal of your 24V battery system. Connect the negative (-) terminal of the motor's power cord to the negative (-) terminal of your 24V battery system. If using two 12V batteries in series, connect the positive terminal of one battery to the negative terminal of the other battery, then connect the motor to the remaining free positive and negative terminals.
- Secure Connections: Ensure all connections are tight and free from corrosion. Loose connections can lead to power loss or overheating.
- Battery Indicator: Once connected, the 10-point LED battery indicator on the control box will display the current battery level.
Operating Instructions
Before Operation
- Verify all connections are secure.
- Ensure the propeller is fully submerged and clear of any obstructions.
- Check the battery indicator to confirm sufficient power.
Starting and Speed Control
The motor features an ergonomic telescoping handle with integrated speed control.
- Extend Handle: Pull the telescoping handle outwards to your desired length for comfortable steering. The handle extends up to 6 inches.
- Select Speed: Rotate the handle to select your desired speed.
- There are 5 forward speeds (1-5).
- There are 3 reverse speeds (R1-R3).
- The speed settings softly lock/click into place, allowing you to release the handle and maintain the selected speed.
- Steering: Rotate the entire motor assembly using the handle to steer your boat.

Figure 7: Operating the Trolling Motor. This image shows a person steering the motor on an inflatable boat, demonstrating typical usage.
Battery Level Monitoring
The 10-point LED battery indicator on the control box provides a visual representation of your battery's charge level. Monitor this indicator regularly to avoid running out of power during your voyage. Recharge your batteries as needed.
Maintenance
Regular maintenance ensures the longevity and optimal performance of your trolling motor.
- After Each Use:
- Rinse the motor, especially the propeller and shaft, with fresh water if used in saltwater or murky conditions.
- Inspect the propeller for any fishing line, weeds, or debris. Remove any obstructions carefully.
- Check all electrical connections for corrosion. Clean with a wire brush if necessary and apply dielectric grease to prevent future corrosion.
- Propeller Inspection: Periodically check the propeller for chips, cracks, or bends. A damaged propeller can reduce efficiency and cause vibration. Replace if necessary.
- Shaft and Mount: Inspect the fiberglass composite shaft and nylon mounting bracket for any signs of damage or wear. Ensure the mounting screws remain tight.
- Storage: When not in use, store the motor in a dry, cool place, away from direct sunlight and extreme temperatures. If storing for extended periods, ensure batteries are fully charged and disconnected.

Figure 8: Internal Components and Propeller. This image shows the all-copper core motor windings, highlighting durability, and the thicken three-blade propeller, emphasizing smooth movement.
Troubleshooting
This section provides solutions to common issues you might encounter.
| Problem | Possible Cause | Solution |
|---|---|---|
| Motor does not run or runs intermittently. |
|
|
| Reduced thrust or unusual vibration. |
|
|
| Motor runs, but boat does not move or moves slowly. |
|
|
| Battery indicator shows low power quickly. |
|
|
Specifications
| Feature | Detail |
|---|---|
| Brand | Cloud Mountain |
| Model | Trolling Motor 86 (CM0207) |
| Thrust | 86 LBS |
| Voltage | 24 Volts |
| Rated Current | 48.5 Amps |
| Rated Power | 1164 Watts |
| Shaft Length | 30 inches (76 cm) |
| Control Type | Telescoping Handle |
| Speed Settings | 5 Forward, 3 Reverse |
| Propeller Type | 3-Blade Machete Propeller |
| Mounting Type | Transom Mount |
| Material | Aluminum (motor head), Fiberglass Composite (shaft), Reinforced Nylon (bracket) |
| Color | Black |
| Net Weight | 22.3 LBS (9.21 Kilograms) |
| Product Dimensions | 43.3 x 18.9 x 6.3 inches |
| Recommended Boat Length | 4m - 7m (approximately 13-23 feet) |
| UPC | 616050360553 |
| ASIN | B0BWWTG96Y |
| Date First Available | February 26, 2023 |

Figure 9: Detailed Product Specifications. This image provides a summary of the motor's technical specifications including thrust, voltage, shaft length, and speed settings.
Warranty and Support
For warranty information, product support, or to purchase replacement parts, please contact Cloud Mountain customer service. Refer to your purchase documentation for specific warranty terms and contact details.
You can also visit the official Cloud Mountain store on Amazon for more information: Cloud Mountain Store
Ask a question about this manual
Ask about setup, troubleshooting, compatibility, parts, safety, or missing instructions. Manuals+ will review the question and use this page’s manual context to help answer it.