1. Introduction
This manual provides essential information for the safe and efficient operation of your EDECOA 1600W Hybrid Inverter. This device integrates an inverter, MPPT solar charger, and battery charger into a single unit, providing a pure sine wave output from a 12V DC input to 230V AC. It is designed for off-grid solar energy systems, offering versatile charging and output modes. Please read this manual thoroughly before installation and use.
2. Safety Instructions
Always observe the following safety precautions to prevent injury and damage to the inverter:
- Qualified Personnel: Installation and maintenance should only be performed by qualified personnel.
- Ventilation: Ensure adequate ventilation around the inverter to prevent overheating.
- Environment: Install in a dry, cool, and dust-free environment, away from flammable materials.
- Battery Connection: Connect batteries with correct polarity. Incorrect connection will damage the unit.
- Grounding: The inverter must be properly grounded.
- Protection Features: The unit includes multi-protection functions against overload, over-temperature, and short circuits. Do not bypass these safety features.
- Emergency Shutdown: Know how to quickly disconnect power in an emergency.

Figure 2.1: The inverter features an ultra-durable design with 6X intelligent safety protections and electronic components rated for 60,000 hours of life expectancy.
3. Package Contents
Upon unpacking, please verify that all items listed below are included:
- EDECOA 1600W Hybrid Inverter (Model: 2.2KVA/1600W 12v 230v)
- 1 meter 25mm² DC Cables (Positive and Negative)
- 1.8 meter RJ45 to USB Cable (RS232)
- User Manual

Figure 3.1: Inverter unit and included accessories: DC battery cables and communication cables.

Figure 3.2: Detailed view of the included 1m 25mm² DC cables and 1.8m RJ45 to USB (RS232) cable.
4. Product Overview
4.1 Key Features
- All-in-One Design: Combines inverter, MPPT solar charger (80A), and battery charger (60A AC max) functions.
- Pure Sine Wave Output: Provides stable and clean power suitable for all types of electronic devices, including sensitive equipment.
- Battery Compatibility: Supports various 12V battery types including FLD, AGM, Gel, and LiFePo4, adjustable via LCD.
- High Solar Input: Max PV input of 2000W with a wide MPPT voltage range (90-430Vdc), allowing flexibility with solar panel configurations.
- Multiple Operating Modes: Features 4 charging modes and 3 output modes, including an ECO mode for reduced power consumption (<15W).
- Safety Protections: Built-in multi-protection against overload, over-temperature, and short circuits.

Figure 4.1: The EDECOA hybrid inverter integrates an AC charger, MPPT solar charger, and pure sine wave inverter.

Figure 4.2: The inverter produces a pure sine wave, identical to utility power, ensuring compatibility with all appliances.
4.2 Component Identification
Familiarize yourself with the various components and ports of the inverter:
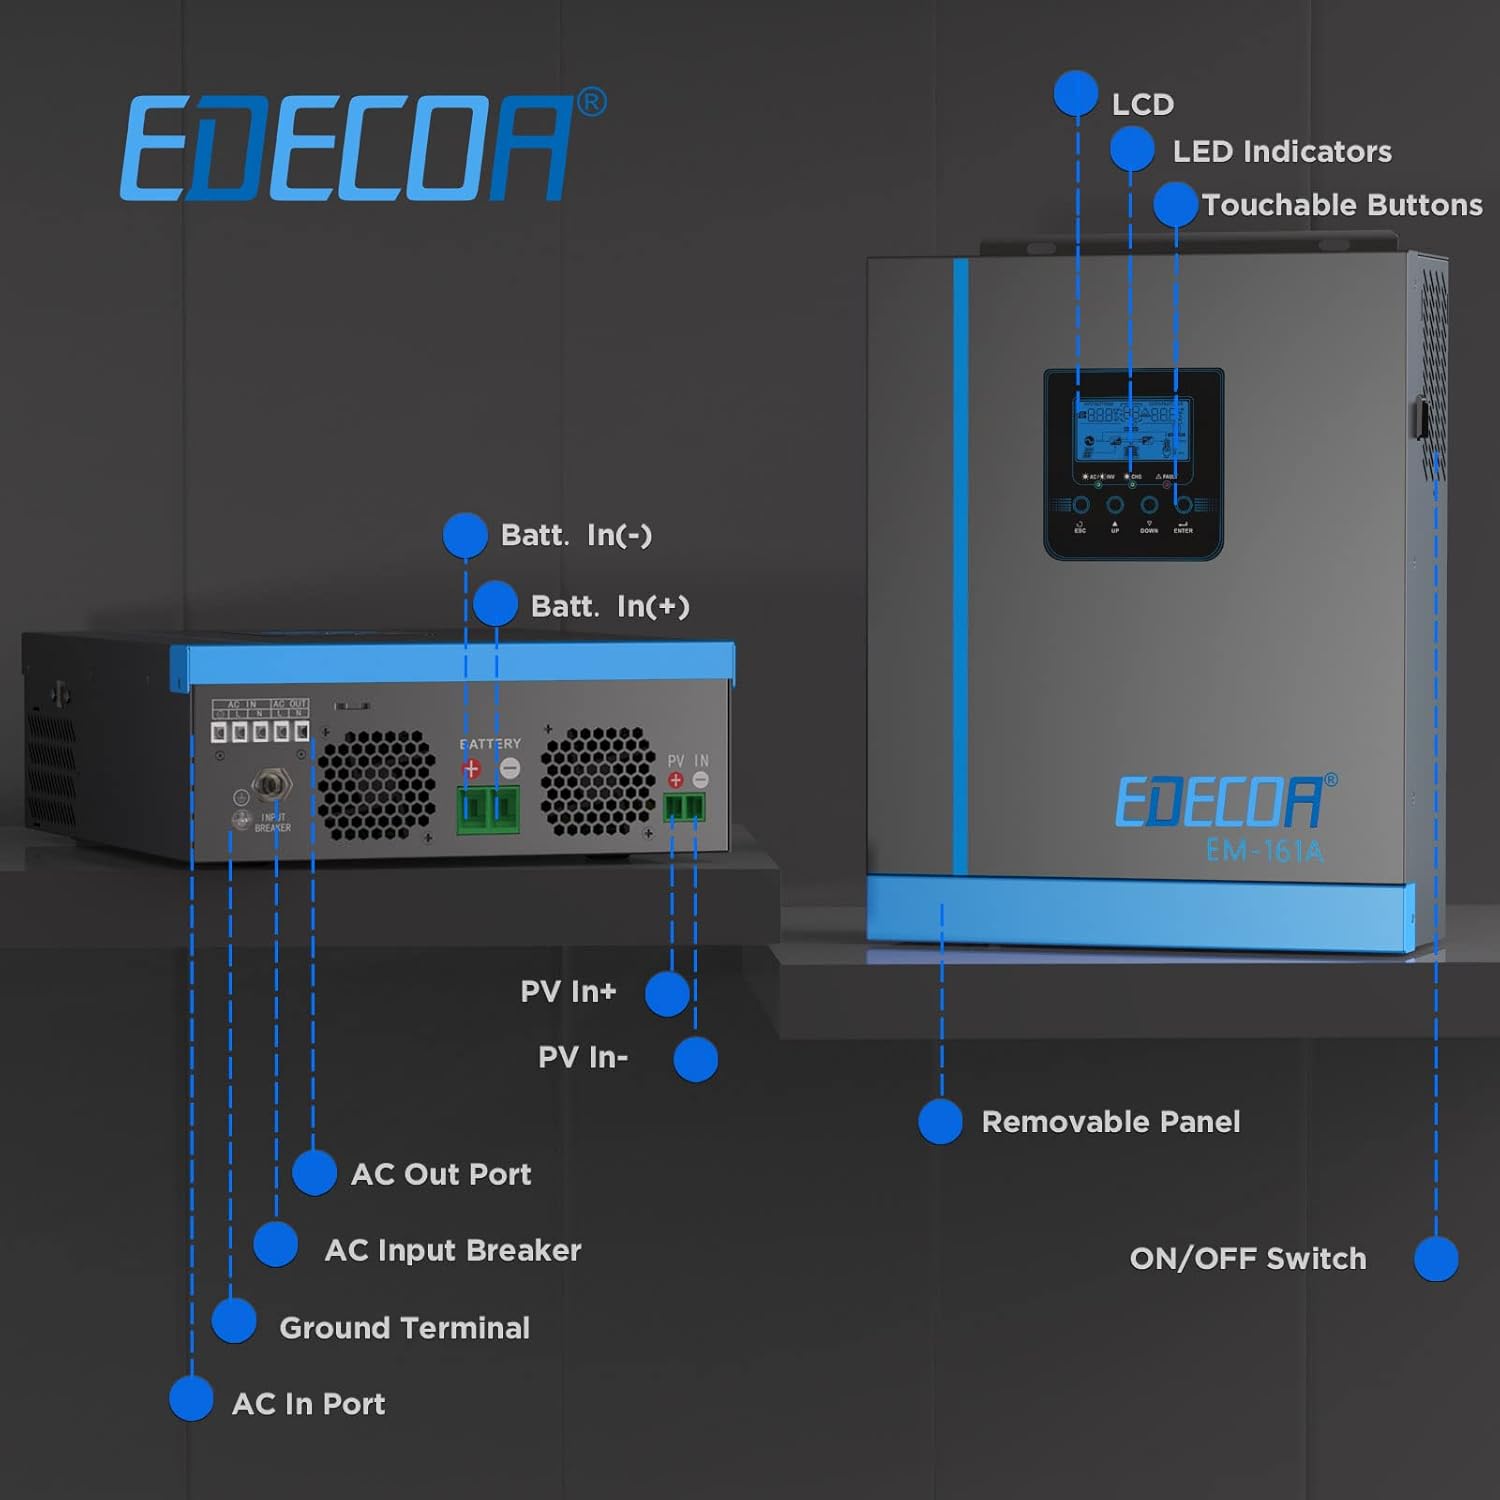
Figure 4.3: Front and rear view of the inverter with labeled components.
- LCD Display: Shows system status, settings, and error codes.
- LED Indicators: Provide quick visual status of operation.
- Touchable Buttons: For navigating menus and adjusting settings.
- Battery Input (Batt. In +/-): Connects to the 12V battery bank.
- PV Input (PV In +/-): Connects to the solar panel array.
- AC Out Port: Provides 230V AC output for loads.
- AC Input Breaker: Safety device for the AC input.
- Ground Terminal: For system grounding.
- AC In Port: Connects to the utility grid or generator for battery charging and bypass.
- ON/OFF Switch: Main power switch for the inverter.
5. Installation (Setup)
5.1 Choosing a Location
Select a suitable location for the inverter:
- Mount vertically on a non-flammable surface.
- Ensure sufficient clearance (at least 20 cm) around the unit for proper airflow.
- Avoid direct sunlight, high temperatures, humidity, and corrosive gases.
5.2 Battery Voltage Selection (12V System)
This inverter is designed for a 12V battery system. Ensure your battery bank is configured for 12V. Connecting a 24V battery bank to a 12V inverter will cause immediate damage.

Figure 5.1: This inverter requires a 12V battery system. Do not connect to 24V.
5.3 Wiring Connections
Follow these steps for wiring connections. Always ensure the inverter is OFF before making any connections.
- Grounding: Connect the ground terminal of the inverter to a reliable earth ground.
- Battery Connection: Connect the positive (+) and negative (-) terminals of your 12V battery bank to the corresponding Battery Input terminals on the inverter. Ensure tight connections. The inverter is compatible with FLD, AGM, Gel, and LiFePo4 12V batteries.
- Solar Panel Connection: Connect your solar panel array to the PV Input terminals. Ensure the total PV power does not exceed 2000W and the MPPT voltage range (90-430Vdc) is respected.
- AC Input Connection: Connect the utility grid or a generator to the AC In Port.
- AC Output Connection: Connect your AC loads (appliances) to the AC Out Port.

Figure 5.2: Example of battery and solar panel connections to the inverter.

Figure 5.3: The inverter operates as an off-grid system, providing power from solar and battery sources.
6. Operation
6.1 LCD Display and Controls
The LCD display provides real-time information about the system status, input/output voltages, battery charge, and load levels. Use the touchable buttons (ESC, UP, DOWN, ENTER) to navigate through menus and adjust settings.

Figure 6.1: The LCD screen provides comprehensive system information and allows for configuration adjustments.
6.2 Charging Modes
The inverter offers four optional charging modes to optimize battery charging:
- Solar Priority: Solar power is prioritized for charging.
- AC Priority: AC utility/generator power is prioritized for charging.
- Solar and AC: Both solar and AC power are used for charging.
- Solar Only: Only solar power is used for charging.
The MPPT (Maximum Power Point Tracking) solar charger maximizes efficiency by continuously monitoring and adjusting the solar panel's operating voltage to extract the maximum available power. The AC charger supports a 6-phase charging process for extended battery life.

Figure 6.2: MPPT technology ensures maximum power harvest from solar panels within the 90-430Vdc range.

Figure 6.3: The 6-phase AC charging mode optimizes battery health and longevity.
6.3 Output Modes
The inverter provides three output modes:
- Utility Priority: AC loads are primarily powered by the utility grid.
- Solar Priority: AC loads are primarily powered by solar energy and batteries.
- Battery Priority: AC loads are primarily powered by batteries.
ECO Mode: This mode reduces power consumption to less than 15W when the load is low, preventing unnecessary battery discharge. The inverter will automatically restart when AC power is restored.

Figure 6.4: The inverter offers various priority settings and an ECO mode to maximize solar energy utilization and minimize consumption.

Figure 6.5: The 1600W output capacity can power a range of household appliances.
6.4 Monitoring
The inverter can be monitored via PC software using the provided RS232 cable. This allows for detailed tracking of system performance and parameter adjustments.

Figure 6.6: PC monitoring software provides detailed insights into the inverter's operation.
7. Maintenance
Regular maintenance ensures optimal performance and longevity of your inverter:
- Cleanliness: Keep the inverter clean and free from dust. Use a dry cloth for cleaning.
- Ventilation: Ensure ventilation openings are not blocked.
- Connections: Periodically check all electrical connections for tightness and corrosion.
- Battery Health: Monitor battery voltage and health, especially for lead-acid batteries.
- Environmental Check: Ensure the installation environment remains within specified temperature and humidity ranges.
8. Troubleshooting
This section addresses common issues you might encounter:
| Problem | Possible Cause | Solution |
|---|---|---|
| Inverter alarm sounds constantly. | The inverter is in protection mode (e.g., overload, low voltage). | Check the LCD for specific error codes. Identify and resolve the underlying issue (e.g., reduce load, check battery voltage). |
| Low voltage alarm sounds even with a fully charged battery. | Insufficient battery capacity (Ah) for the load, or long/thin battery cables causing voltage drop. | Increase battery bank capacity or use thicker, shorter battery cables to minimize voltage drop. |
| Inverter does not recognize solar panels. | Incorrect PV wiring, PV voltage outside MPPT range, or faulty panels/connections. | Verify PV wiring polarity and connections. Check PV voltage to ensure it's within the 90-430Vdc MPPT range. Inspect panels for damage. |
| No AC output. | Inverter is off, battery is low, overload, or fault condition. | Ensure inverter is ON. Check battery voltage. Reduce load. Check for error codes on LCD. |

Figure 8.1: An alarm indicates a system issue requiring attention.
9. Specifications
| Feature | Specification |
|---|---|
| Model | 2.2KVA/1600W 12v 230v |
| Rated Power | 1600 Watts |
| Input Voltage (DC) | 12 Volts |
| Output Voltage (AC) | 230 Volts |
| Output Waveform | Pure Sine Wave |
| Frequency | 50 Hz |
| Max PV Array Power | 2000W |
| MPPT Range @ Operating Voltage | 90-430 Vdc |
| Max MPPT PV Voltage | 450 Vdc |
| Max Solar Charge Current | 80A |
| Max AC Charge Current | 60A |
| Compatible Battery Types | FLD, AGM, Gel, LiFePo4 (12V) |
| Dimensions (L x W x H) | 34.8 x 28.2 x 10.5 cm |
| Weight | 4.75 kg |
| Display Type | LCD |
| ECO Mode Consumption | <15W |
10. Warranty and Support
For warranty information and technical support, please refer to the documentation provided with your purchase or contact EDECOA customer service. Keep your purchase receipt as proof of purchase for warranty claims.


