
Introduction
The Reboot RBM2500 is an advanced 5-in-1 multi-function welding machine designed for a wide range of welding applications. This manual provides essential information for safe operation, setup, maintenance, and troubleshooting to ensure optimal performance and longevity of your welding equipment.
Safety Precautions
General Safety
- Always wear appropriate Personal Protective Equipment (PPE), including a welding helmet with proper shade, welding gloves, protective clothing, and safety shoes.
- Ensure adequate ventilation in the work area to disperse welding fumes.
- Keep a fire extinguisher readily available.
- Do not operate the machine in damp or wet conditions.
- Ensure the machine is properly grounded.
Electrical Safety
- Before connecting or disconnecting cables, ensure the machine is turned off and unplugged from the power source.
- Do not touch live electrical parts.
- Inspect power cords and welding cables for damage before each use.
Welding Fumes and Gases
- Welding fumes and gases can be hazardous to your health. Use a fume extractor or work in a well-ventilated area.
- Avoid breathing fumes and gases.
Arc Rays
- Arc rays can cause eye and skin burns. Protect your eyes with a welding helmet and your skin with appropriate clothing.
Package Contents
The RBM2500 welding machine package typically includes the following items:

Figure 1: Contents of the RBM2500 package. This image displays the main welding unit, a MIG welding torch, a ground clamp with cable, an electrode holder with cable, a gas hose with clamps, a small spool of flux-cored wire, ceramic nozzles, and the user manual.
- Reboot RBM2500 Welding Machine
- Ground Clamp with 2m Cable
- Electrode Holder with 2m Cable
- MB15 MIG Welding Torch with 3m Cable
- 500g Flux-Cored Wire Spool
- 3m Gas Hose with Clamps
- Ceramic Nozzles (3 pcs) and Copper Tips (3 pcs)
- 'V' Groove Roller for Steel Wire (reversible 0.8 & 1mm)
- Flux-Cored Wire Roller (reversible 0.8 & 1mm)
- Operation Manual
Note: The spool gun, TIG torch, and 0.9mm wire feed wheel are not included with the standard package.
Product Overview
Front Panel Controls and Indicators
The front panel of the RBM2500 provides all necessary controls and indicators for operation.
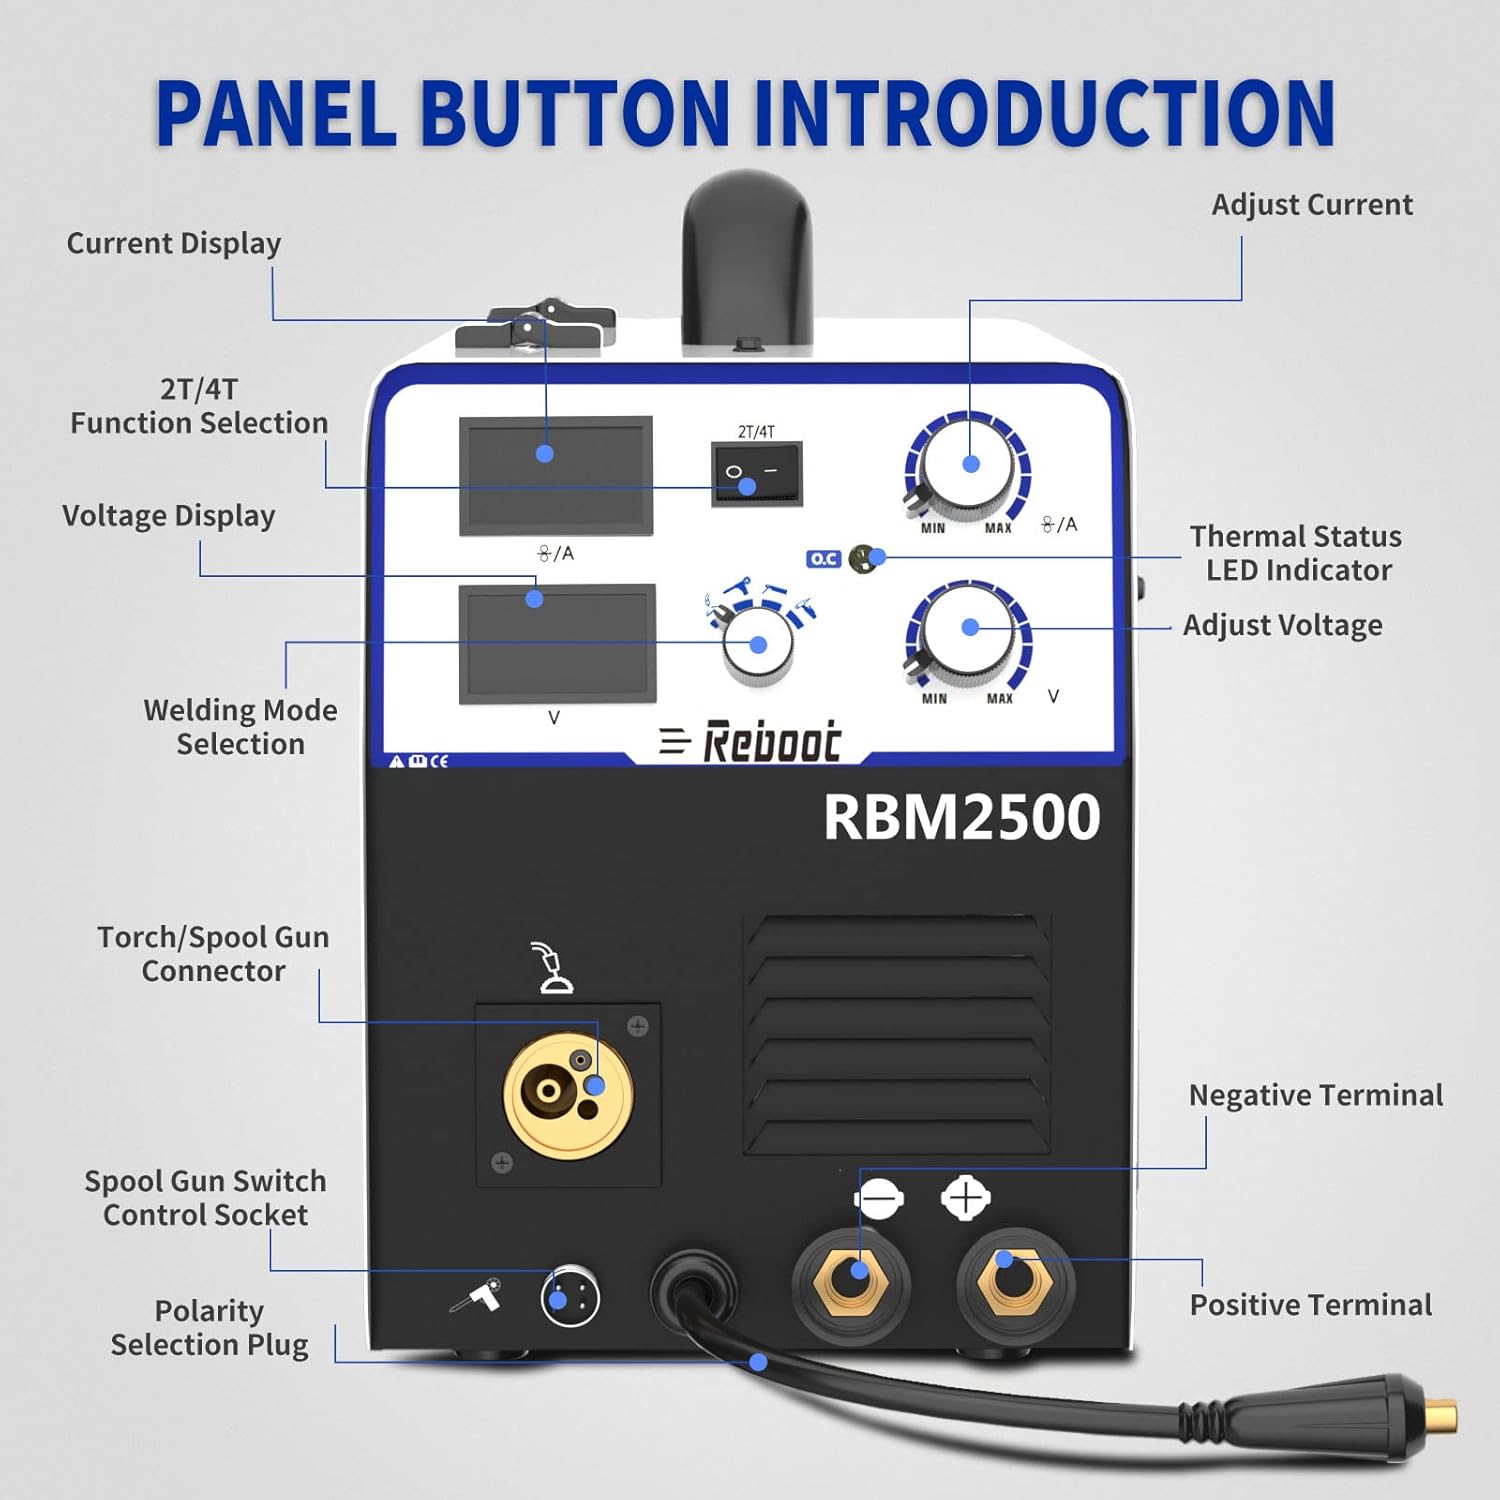
Figure 2: Front Panel Layout and Functions.
- Current Display: Shows the set or actual welding current (Amperes).
- 2T/4T Function Selection: Toggles between 2-stroke (trigger held) and 4-stroke (trigger press for start, press again for stop) operation.
- Voltage Display: Shows the set or actual welding voltage (Volts).
- Welding Mode Selection: Allows selection of MIG (Gas/Gasless), MMA, or LIFT TIG welding modes.
- Torch/Spool Gun Connector: Connection point for the MIG torch or optional spool gun.
- Spool Gun Switch Control Socket: Socket for connecting the control cable of an optional spool gun.
- Polarity Selection Plug: Used to change welding polarity (DCEN/DCEP) depending on the welding process and wire type.
- Negative Terminal (-): Connection point for the ground clamp or electrode holder (depending on polarity).
- Positive Terminal (+): Connection point for the ground clamp or electrode holder (depending on polarity).
- Thermal Status LED Indicator: Illuminates to indicate overheating or overload, triggering automatic shutdown for protection.
- Adjust Current Knob: Controls the welding current (Amperes).
- Adjust Voltage Knob: Controls the welding voltage (Volts).
Key Features
The Reboot RBM2500 is equipped with several features to enhance welding performance and user experience.
5-in-1 Multi-function Welding
The RBM2500 supports five distinct welding processes, making it highly versatile:
- Gas MIG: For welding with shielding gas and solid wire.
- Flux Core MIG: For gasless welding with flux-cored wire.
- MMA (Stick Welding): For welding with coated electrodes.
- LIFT TIG: For precise TIG welding (requires optional TIG torch).
- Spool Gun: For welding aluminum or other soft wires (requires optional spool gun).
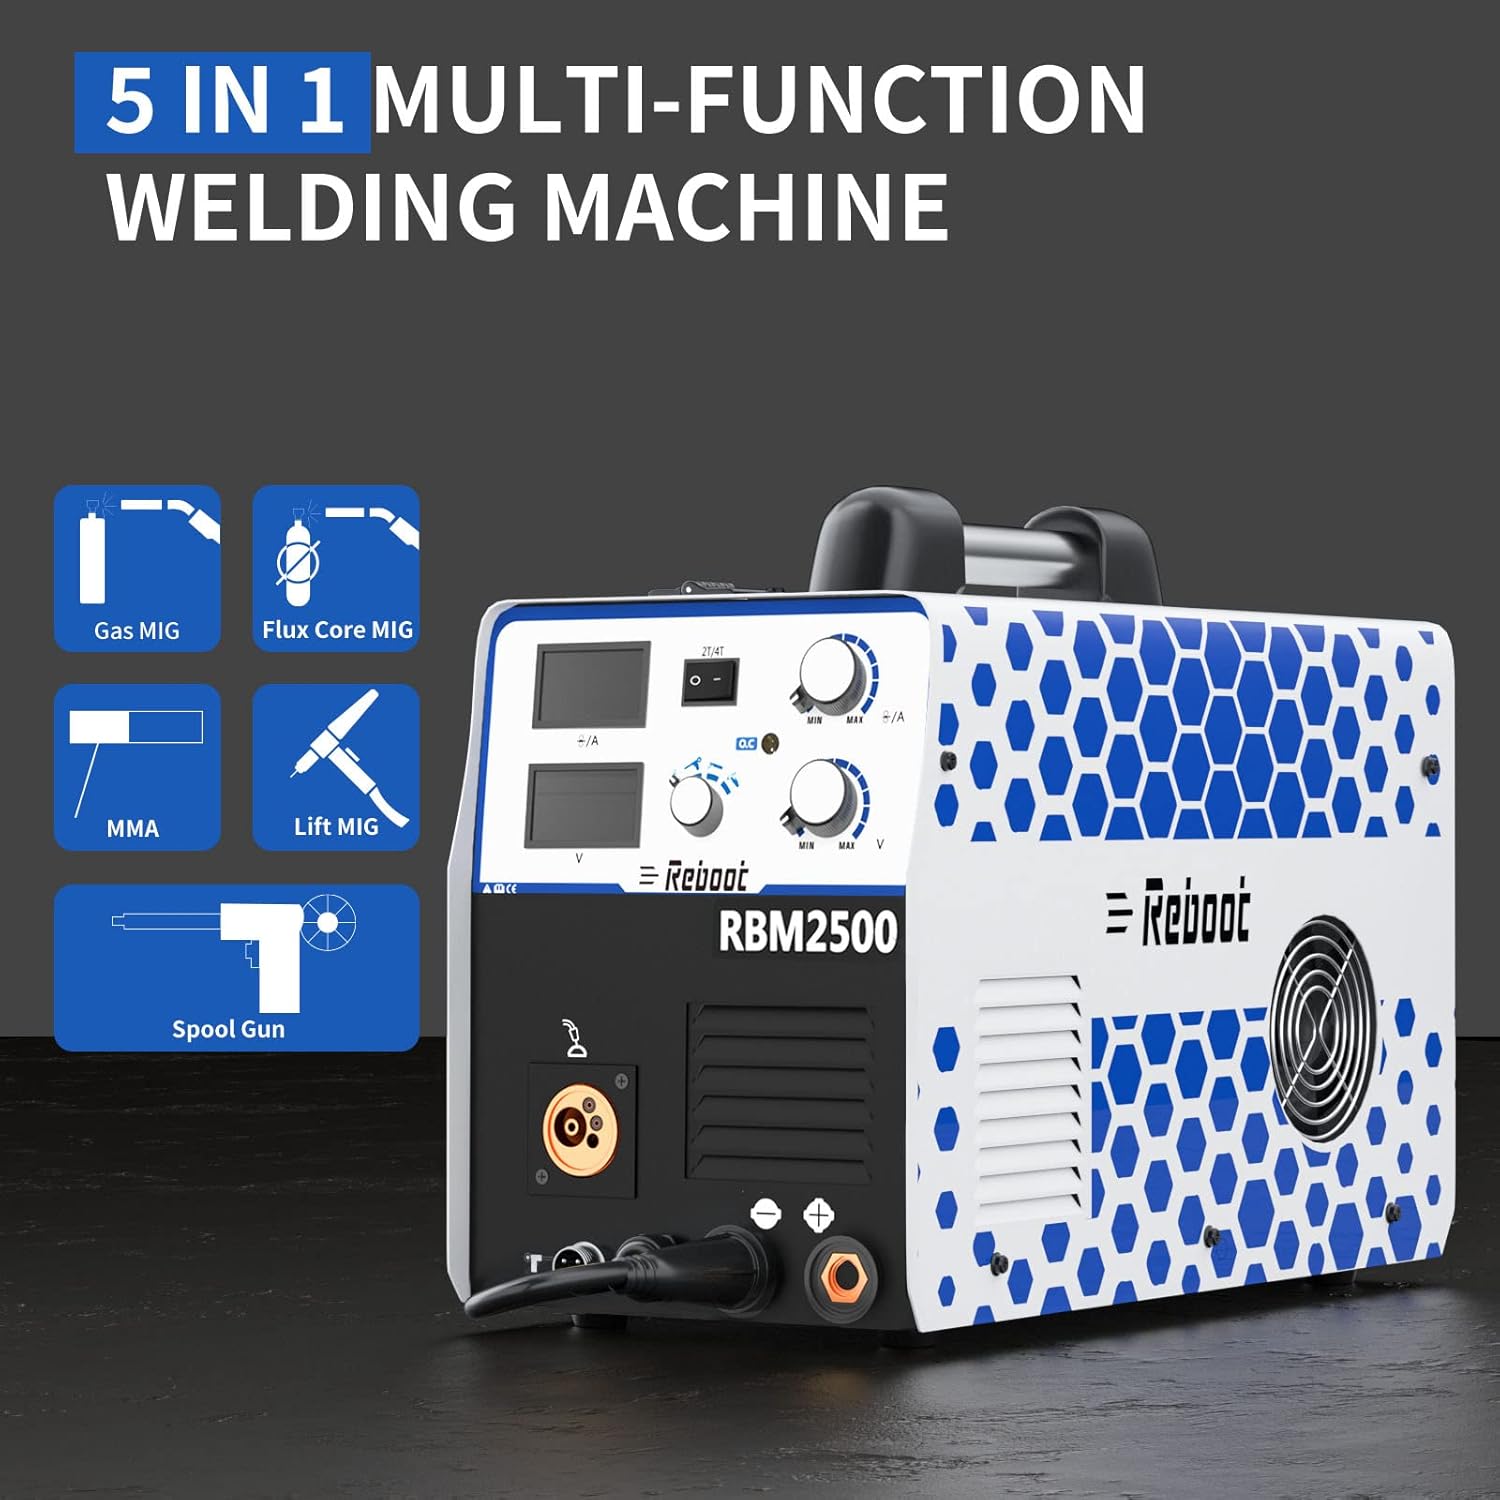
Figure 3: RBM2500 Multi-function Capabilities.
Rapid Heat Dissipation System
The RBM2500 incorporates an optimized cooling system with a high-speed fan to ensure continuous operation and prevent overheating, even during prolonged use at high currents. This enhances machine longevity and user safety.

Figure 4: Efficient Cooling System.
Wire Spool Compatibility
The machine is designed to accommodate D100 (1kg) and D200 (5kg) wire spools, offering flexibility for various project sizes and wire types.

Figure 5: Wire Spool Installation.
Setup Guide
Power Connection
- Connect the power cord to a single-phase 230V ± 15% power supply. Ensure the outlet is properly grounded and can handle the machine's maximum current draw.
Ground Clamp Connection
- Connect the ground clamp cable to the appropriate terminal on the front panel. For most MIG and MMA welding, the ground clamp connects to the negative (-) terminal. For LIFT TIG, it typically connects to the positive (+) terminal. Refer to the specific welding process polarity requirements.
- Attach the ground clamp securely to the workpiece or a clean, bare metal part of the welding table.
MIG Torch / Electrode Holder Connection
- MIG Welding: Connect the MIG torch to the Torch/Spool Gun Connector. Ensure the polarity selection plug is set correctly for your wire type (e.g., positive for solid wire with gas, negative for flux-cored wire).
- MMA Welding: Connect the electrode holder cable to the appropriate terminal based on the electrode type (e.g., positive for E6010, negative for E7018).
- LIFT TIG Welding: Connect the TIG torch (optional) to the Torch/Spool Gun Connector. The ground clamp typically connects to the positive (+) terminal for DC TIG.
Wire Spool Installation (MIG/Flux Core)
- Open the side panel of the machine.
- Place the wire spool onto the spool holder. Ensure the wire unwinds from the bottom.
- Thread the wire through the wire feeder mechanism and into the MIG torch liner.
- Adjust the wire feed roller tension. The machine includes reversible rollers for 0.8mm and 1.0mm wire. Ensure the correct groove matches your wire diameter.
Gas Connection (Gas MIG)
- Connect one end of the gas hose to the gas inlet on the back of the welding machine.
- Connect the other end of the gas hose to your shielding gas regulator (not included) on the gas cylinder.
- Ensure all connections are tight to prevent gas leaks.
Operating Instructions
Selecting Welding Mode
- Turn on the machine.
- Use the "Welding Mode Selection" button on the front panel to cycle through MIG, MMA, and LIFT TIG modes.
Adjusting Parameters
- Current (Amperes): Use the "Adjust Current" knob to set the desired welding current. The range is 30-250A.
- Voltage (Volts): Use the "Adjust Voltage" knob to set the desired welding voltage. The range is 5.5-26.5V for MIG and 20.8-26.4V for MMA/TIG.
- Refer to the welding parameter chart (often found inside the wire spool compartment cover) for recommended settings based on material thickness and wire/electrode type.
2T/4T Function
- 2T (2-Stroke): Press and hold the torch trigger to start welding; release to stop. Ideal for short welds.
- 4T (4-Stroke): Press and release the trigger to start welding; press and release again to stop. Useful for long welds, reducing hand fatigue.
Welding Process Specifics
MIG Welding (Gas/Gasless)
- Ensure correct wire type and polarity are selected.
- Set appropriate current and voltage.
- Maintain proper stick-out and travel speed for a clean weld bead.
MMA (Stick) Welding
- Select MMA mode.
- Connect electrode holder and ground clamp with correct polarity.
- Strike the arc by lightly touching and quickly lifting the electrode from the workpiece.
- Maintain a consistent arc length and travel speed.
LIFT TIG Welding
- Select LIFT TIG mode.
- Ensure TIG torch (optional) and ground clamp are connected with correct polarity.
- Gently touch the tungsten electrode to the workpiece to initiate the arc, then lift slightly to establish the arc.
- Add filler metal manually as needed.
Maintenance
Regular maintenance ensures the longevity and safe operation of your welding machine.
- Cleaning: Regularly clean the machine's exterior with a dry cloth. Use compressed air to blow out dust and debris from inside the machine, especially around the fan and circuit boards. Do this with the machine unplugged.
- Cable Inspection: Periodically inspect all welding cables, power cords, and connectors for cuts, abrasions, or loose connections. Replace damaged cables immediately.
- MIG Torch Maintenance: Clean the MIG torch liner regularly to prevent wire feeding issues. Replace worn contact tips and nozzles.
- Wire Feed Roller: Keep the wire feed rollers clean and free of debris. Ensure the correct roller groove is used for the wire diameter.
- Electrode Holder/Ground Clamp: Ensure good electrical contact by keeping the jaws of the ground clamp and electrode holder clean.
- Storage: Store the welding machine in a clean, dry environment when not in use.
Troubleshooting
This section addresses common issues you might encounter with your RBM2500 welding machine.
| Problem | Possible Cause | Solution |
|---|---|---|
| Machine does not power on. | No power supply; tripped circuit breaker; faulty power cord. | Check power outlet and circuit breaker. Inspect power cord for damage. |
| No welding output. | Loose connections; incorrect mode selection; thermal overload. | Check all cable connections. Ensure correct welding mode is selected. Allow machine to cool if thermal indicator is on. |
| Poor wire feeding (MIG). | Incorrect wire tension; clogged liner; wrong roller groove; worn contact tip. | Adjust wire tension. Clean or replace liner. Ensure correct roller groove. Replace contact tip. |
| Unstable arc. | Poor ground connection; incorrect parameters; damp electrodes (MMA). | Ensure ground clamp has good contact. Adjust current/voltage. Use dry electrodes. |
| Overheating / Thermal LED on. | Exceeded duty cycle; blocked ventilation; high ambient temperature. | Allow machine to cool down. Ensure clear airflow around the machine. Reduce welding time or current. |
If problems persist after following these steps, please contact customer support.
Technical Specifications
General Specifications
- Model: RBM2500
- Input Power: 1 Phase 230V ± 15%
- Frequency: 50/60 Hz
- No-Load Voltage: 58 V
- Output Current Adjustment Range: 30-250 A
- Output Voltage: 5.5-26.5V (MIG) / 20.8-26.4V (MMA) / 20.8-26.4V (TIG)
- Duty Cycle: 60% @ 250 A
- Power Factor: > 0.7
- Efficiency: ≥ 80%
- Wire Feed Type: Internal
- Welding Wire Diameter: 0.8mm, 0.9mm, 1.0mm (solid/flux-cored), 1.0mm, 1.2mm (aluminum)
- Insulation Grade: F
- Protection Class: IP21S
- Net Weight: 7.7 kg
- Dimensions (L x W x H): 410 x 177 x 315 mm
Additional Specifications (from product data)
- Manufacturer: Reboot-EU
- Package Dimensions: 51.9 x 37.5 x 37 cm; 13.18 kilograms
- Reference (Model Number): MB15
- Color: White / Blue
- Power Source Type: AC
- Included Components: Welding Consumables
Warranty and Support
Reboot offers comprehensive after-sales support for the RBM2500 welding machine.
- Return Policy: 30-day no-questions-asked return policy.
- Warranty: Limited 3-year warranty.
- Customer Service: A professional customer service team and engineering team are available 24 hours a day to assist you.
- European Agents: Professional agents are available in Europe to provide local support.
For any inquiries or assistance, please contact Reboot customer support through the official channels provided at the time of purchase or on the product packaging.