
1. Introduction
The YoLink LoRa Smart Water Leak Protection System provides advanced water leak detection and automatic shut-off capabilities for your home or business. This system utilizes LoRa technology for extended wireless range and includes a smart motorized valve, water leak sensors, and a YoLink Hub to prevent water damage by automatically turning off your water supply when a leak is detected.

Image: Overview of the YoLink LoRa Smart Water Leak Protection System components.
2. Product Components
Your YoLink Smart Water Leak Protection System includes the following main components:
- YoLink Smart Motorized Stainless Steel Valve (Model YS5002): An integrated smart motorized ball valve with a stainless steel body, IP65 outdoor rating, and manual control. It operates on two AA batteries (included) and offers device-to-device pairing for offline functionality.
- YoLink Water Leak Sensor 1 (Model YS7903): Three 'puck' style water leak sensors optimized for detecting dripping and pooling water. These sealed and waterproof sensors are reusable, battery-powered (two AAA batteries included), and offer a 5+ year battery life.
- YoLink Hub (Model YS1603-UC): The central gateway that provides an internet connection for all YoLink devices, generating the YoLink wireless network. It supports both Ethernet and 2.4GHz WiFi connections and is USB-powered.
2.1 YoLink Smart Motorized Valve

Image: YoLink Smart Motorized Valve (Model YS5002) highlighting its features.
2.2 YoLink Water Leak Sensor 1

Image: YoLink Water Leak Sensor 1 (Model YS7903) highlighting its features.
2.3 YoLink Hub
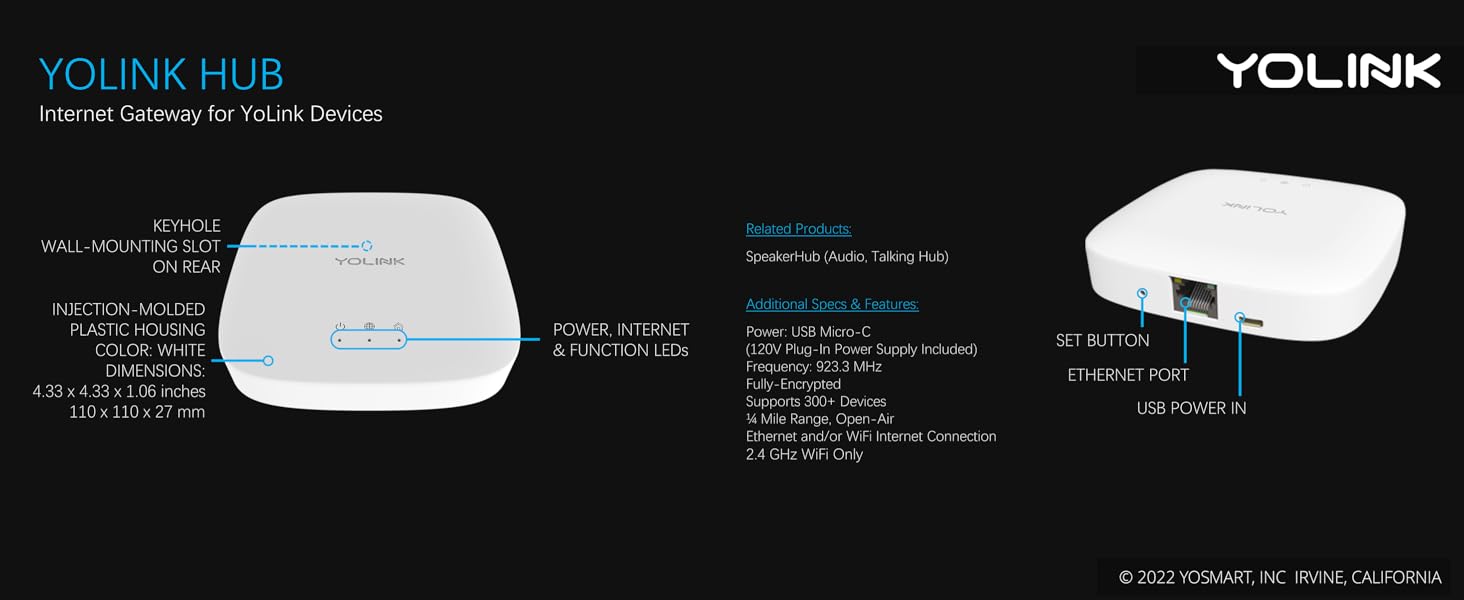
Image: The YoLink Hub as the central component for a smart home system.
3. Setup
3.1 YoLink Hub Setup
The YoLink Hub provides the internet connection for your YoLink devices. Follow these steps for initial setup:
- Plug the USB cable and power adapter into a wall outlet.
- Plug the Ethernet cord into the Hub and your router or switch.
- Using the YoLink app, scan the Hub's QR code.
- Scan in your other devices, set notification preferences, and test your devices.

Image: YoLink Hub setup step 1: Connecting power.

Image: YoLink Hub setup step 2: Connecting to the internet via Ethernet.

Image: YoLink Hub setup step 3: Pairing the Hub using the YoLink app.

Image: YoLink Hub setup step 4: Completing device setup and testing.
3.2 Smart Motorized Valve Installation
Installation of the motorized valve requires basic plumbing tools and comfort with cutting copper pipe. SharkBite fittings (not included) can simplify the process for various pipe types.
Required Tools:
- Pipe Wrench
- Locking Pliers
- Copper Pipe Cutting Tool
- Pipe Fittings or Adapters (e.g., SharkBite)
- Thread Seal Tape
- Sandpaper

Image: Tools necessary for installing the motorized valve on copper pipe.
Installation Steps:
- Shut off the water supply to the pipe where the valve will be installed. Drain the water from the pipe by opening a faucet or using another method.
- Depending on the adapter fitting used, measure and mark the length of pipe to be cut.
- Cut the pipe through the mark using a pipe cutting tool, then remove the cut section.
- Sand both ends of the cut pipe to remove any burrs or rough edges. Handle cut edges with care as they may be sharp. Wipe off the cut section of pipe with a clean cloth.
- Install your adapter fittings in the pipe ends according to the fitting manufacturer's instructions.
- Wrap each adapter's threaded end with thread seal tape as per the tape manufacturer's instructions.
- Install the motorized valve onto the adapter fittings, ensuring a secure connection at each fitting.
- Turn the water supply back on.
- Verify there are no leaks and no visible water on the motorized valve.

Image: Marking the pipe for cutting before valve installation.

Image: Cutting and sanding the pipe for valve installation.

Image: Installing adapter fittings and applying thread seal tape.

Image: Final installation of the motorized valve and leak check.

Image: Various adapter types for the YoLink Smart Motorized Valve.
3.3 Water Leak Sensor Placement
The YoLink Water Leak Sensor 1 is designed for easy installation. Simply place it near or under equipment you wish to monitor for leaks.
- Place near or under toilets, water heaters, laundry machines, dishwashers, sinks, or fish tanks.
- Position in or near sump pumps, or any other location prone to water leaks and flooding.

Image: Easy placement of the YoLink Water Leak Sensor.

Image: Examples of optimal placement for water leak sensors.
4. Operating the System
The YoLink Smart Water Leak Protection System offers multiple methods for control and interaction.
4.1 Manual Control
The Smart Motorized Valve can be controlled manually:
- Mechanical Control: Manually turn the control knob on the valve.
- Electronic Control: Press the SET button on the valve or a paired controller.

Image: Manual control options for the Smart Motorized Valve.
4.2 App Control
Control your valve from anywhere with an internet connection using the convenient YoLink app on your smartphone.

Image: Controlling the valve remotely via the YoLink app.
4.3 Device-to-Device Pairing (Control-D2D)
YoLink's Control-D2D feature allows two or more devices to be paired directly. Once paired, they will perform their programmed action even if the internet is down or power is out. For example, a leak sensor can be paired directly with the valve to trigger an automatic shut-off.

Image: Device-to-Device pairing in action: leak detection triggering valve closure.
4.4 Voice Control
Integrate your YoLink system with voice assistants for convenient control:
- Alexa Assistant: Use voice commands like "Alexa, shut off the water."
- Google Assistant: Control your valve using Google Assistant voice commands.

Image: Voice command integration with Alexa for water shut-off.

Image: Voice control options with Google Assistant and Alexa Assistant.
4.5 Third-Party Integrations
Expand the functionality of your YoLink system through integrations with other smart home platforms:
- IFTTT Applets: Create custom automations using IFTTT (If This Then That) applets.
- Home Assistant: Control your valve and integrate with Home Assistant automations.
- Raedius Web Console: Manage larger systems and view data through YoLink's Raedius Web Console dashboard.

Image: IFTTT Applets for controlling the valve.

Image: Home Assistant integration for valve control.

Image: Raedius Web Console for managing large YoLink systems.
5. Maintenance
5.1 Battery Replacement
The YoLink system components are designed for long battery life, but eventual replacement is necessary.
- Smart Motorized Valve: Requires two AA batteries, with an expected life of up to 3 years.
- Water Leak Sensor 1: Requires two AAA batteries, with an expected life of 5+ years.
The YoLink app will provide notifications when battery levels are low, indicating it is time for replacement.

Image: Internal view of the Water Leak Sensor 1, showing replaceable batteries.
6. Troubleshooting
This section addresses common issues you might encounter with your YoLink system.
6.1 Hub Connectivity Issues
- No Internet Connection: Ensure the Ethernet cable is securely connected to both the Hub and your router. If using WiFi, confirm the Hub is connected to a 2.4GHz network.
- Hub Offline: Check the power supply to the Hub. If the internet connection is stable, try restarting the Hub by unplugging and re-plugging the power adapter.

Image: Common questions and answers regarding the YoLink Hub's functionality.
6.2 Device Not Responding
- Check Battery: Verify that the device (valve or sensor) has sufficient battery power. Replace batteries if necessary.
- Range Issues: Ensure the device is within the 1/4-mile open-air LoRa range of the Hub. Obstructions can reduce range.
- Device Offline: The YoLink cloud server monitors device integrity. If a device appears offline in the app, check its physical location and battery.

Image: YoLink app notifications showing leak alerts and an offline detector.
7. Specifications
| Component | Specification |
|---|---|
| YoLink Smart Motorized Valve (YS5002) | |
| Model Number | YS5002-UC |
| Size | 0.75" |
| Material | Stainless Steel Body |
| Ingress Protection | IP65 Outdoor-Rated |
| Power Source | 2 AA Batteries (included) |
| Battery Life | 2+ Years Standby |
| Wireless Range | Up to 1/4 Mile (open-air) |
| YoLink Water Leak Sensor 1 (YS7903) | |
| Model Number | YS7903-UC |
| Type | 'Puck' Style Water Leak Detector |
| Power Source | 2 AAA Batteries (included) |
| Battery Life | 5+ Years |
| Dimensions | 2.44 x 2.44 x 0.96 inches (62 x 62 x 24.5 mm) |
| YoLink Hub (YS1603-UC) | |
| Model Number | YS1603-UC |
| Connectivity | Ethernet, 2.4GHz WiFi |
| Power Source | USB-Powered (120V Plug-in Power Supply Included) |
| LoRa Frequency | 923.3 MHz Chirp Spread-Spectrum |
| Security | Two-way Encrypted & Secure |
| Dimensions | 4.33 x 4.33 x 1.06 inches (110 x 110 x 27 mm) |
8. Warranty and Support
For warranty information and technical support, please refer to the official YoLink website or contact YoSmart customer service. Product registration may be required to activate your warranty.
Manufacturer: YoSmart
Brand: YoLink
