
1. Introduction
This manual provides essential information for the safe and efficient operation of your Cecotec Food Processor Paprika 2000 Full. Please read these instructions carefully before first use and retain them for future reference. This appliance is designed for various food preparation tasks including chopping, blending, juicing, kneading, emulsifying, grating, and slicing.
2. Safety Instructions
- Always ensure the appliance is unplugged before assembly, disassembly, or cleaning.
- Keep hands and utensils away from moving blades or discs while operating the appliance. Blades are sharp. Handle with care.
- Do not immerse the motor base in water or any other liquid. Clean with a damp cloth only.
- Ensure all parts are correctly assembled and locked into place before operating.
- Do not operate the appliance if the power cord, plug, or any other part is damaged. Contact authorized service personnel for repair.
- This appliance is for household use only. Do not use outdoors.
- Supervise children to ensure they do not play with the appliance.
- Avoid overloading the appliance. Refer to the maximum fill lines on the bowls and jugs.
- Allow hot liquids to cool before processing to prevent pressure buildup and potential injury.
3. Product Components
The Cecotec Food Processor Paprika 2000 Full comes with several components designed for versatile food preparation.

Figure 3.1: Overview of the Cecotec Food Processor Paprika 2000 Full and its included accessories. This image displays the main motor unit, the large processing bowl, the blender jug, the juicer attachment, and various cutting discs and blades.

Figure 3.2: Detailed view of all individual components, including the motor base, 3.5L processing bowl, 1.8L blender jug, juicer cone, filter, pusher, main chopping blade, kneading blade, cream disc, and three different cutting/grating discs.
- Motor Base: The main unit housing the 2000W motor and control dial.
- 3.5L Processing Bowl: Large capacity bowl for chopping, slicing, grating, and kneading.
- 1.8L Blender Jug: For blending liquids, smoothies, and purees.
- Lids: Specific lids for the processing bowl and blender jug, with feed chutes and pushers.
- Chopping Blade: Stainless steel blade for general chopping and mincing.
- Kneading Blade: Plastic blade for mixing and kneading dough.
- Cream Disc: For whipping cream or emulsifying sauces.
- Cutting Discs (3 types): For slicing, fine grating, and coarse grating.
- Juicer Attachment: Cone and filter for extracting juice from citrus fruits.
- Pusher: Used to guide food through the feed chute.
4. Setup
Before first use, wash all removable parts in warm soapy water, rinse thoroughly, and dry. Wipe the motor base with a damp cloth.
4.1 Assembling the Processing Bowl
- Place the motor base on a stable, flat surface.
- Fit the processing bowl onto the motor base, aligning the handle with the locking mechanism. Turn clockwise until it locks securely.
- Insert the desired blade or disc onto the central shaft inside the bowl. Ensure it sits firmly.
- Place the lid onto the processing bowl, aligning the tab on the lid with the slot on the bowl handle. Turn clockwise until it locks. The appliance will not operate unless the lid is correctly locked.
- Insert the pusher into the feed chute.
4.2 Assembling the Blender Jug
- Ensure the blade assembly is securely attached to the bottom of the blender jug.
- Place the blender jug onto the motor base, aligning it correctly. Turn clockwise until it locks.
- Place the lid onto the blender jug and secure it.
5. Operating Instructions
Always ensure the appliance is correctly assembled and plugged into a suitable power outlet before operation.
5.1 Control Dial

Figure 5.1: The control dial allows selection of two continuous speeds (1 and 2) and a pulse function (P).
- Off (0): The appliance is off.
- Speed 1: Lower speed for softer ingredients or lighter tasks.
- Speed 2: Higher speed for harder ingredients or more intensive tasks.
- Pulse (P): Provides short bursts of maximum power. Hold the dial in the 'P' position for desired duration, then release. Useful for coarse chopping or when precise control is needed.
5.2 Chopping, Slicing, and Grating

Figure 5.2: The processing bowl with the chopping blade effectively processing bell peppers.

Figure 5.3: Illustrates the appliance's capability for grating carrots (top half) and kneading dough (bottom half).
Use the chopping blade for mincing, chopping, and pureeing. For slicing and grating, insert the appropriate disc. Place ingredients into the processing bowl or feed them through the chute using the pusher. Select desired speed or use the pulse function.
5.3 Blending

Figure 5.4: The blender jug attached to the motor base, prepared for blending fruits into a smoothie.
Attach the blender jug to the motor base. Add liquids and solid ingredients, ensuring not to exceed the maximum fill line. Secure the lid. Select speed 1 or 2 for continuous blending, or use the pulse function for controlled mixing.
5.4 Juicing
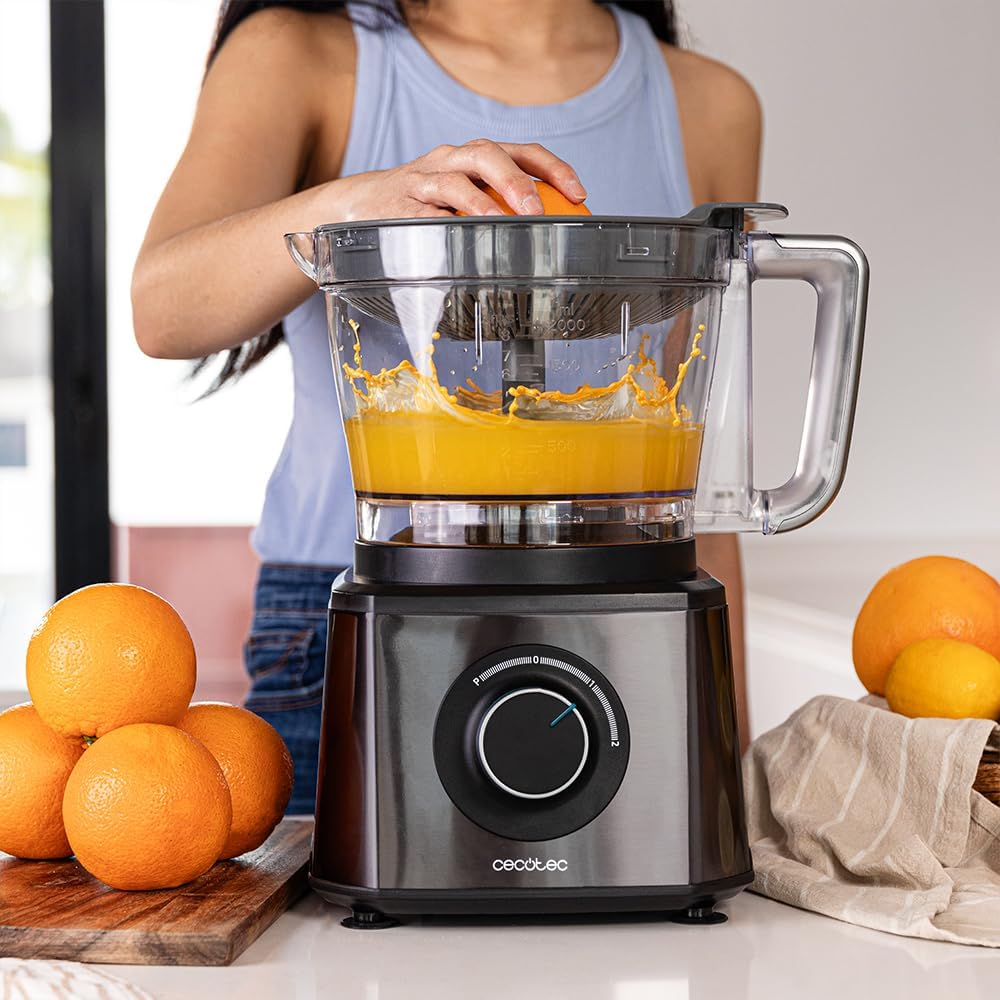
Figure 5.5: Demonstrates the use of the juicer attachment for extracting fresh orange juice directly into the processing bowl.
Assemble the juicer attachment (cone and filter) onto the processing bowl. Cut citrus fruits in half. Place a fruit half onto the rotating cone and apply gentle downward pressure. The juice will collect in the bowl below.
5.5 Kneading and Emulsifying

Figure 5.6: The processing bowl containing a smooth, emulsified mixture, demonstrating the appliance's capability for creating purees or sauces.
For kneading, attach the plastic kneading blade. Add ingredients for dough and select speed 1 or 2. For emulsifying or whipping, use the cream disc. Add liquids or ingredients for sauces/creams and process until desired consistency is achieved.
6. Cleaning and Maintenance
Regular cleaning ensures optimal performance and extends the life of your appliance.
- Always unplug the appliance before cleaning.
- Motor Base: Wipe the motor base with a soft, damp cloth. Do not immerse in water.
- Removable Parts: All removable parts (bowls, jugs, lids, blades, discs, pusher) can be washed in warm soapy water. Rinse thoroughly and dry immediately. Some parts may be dishwasher safe; refer to specific markings on the parts.
- Blades and Discs: Handle blades and cutting discs with extreme care as they are very sharp. Use a brush for cleaning to avoid direct contact with sharp edges.
- Storage: Store the appliance and its accessories in a dry, safe place, out of reach of children.
7. Troubleshooting
| Problem | Possible Cause | Solution |
|---|---|---|
| Appliance does not start. | Not plugged in; bowl/lid not correctly locked; thermal cut-out activated. | Check power connection; ensure bowl and lid are securely locked; allow appliance to cool down for 30 minutes if overheated. |
| Motor runs, but blades do not turn. | Blade/disc not correctly installed; food jammed. | Ensure blade/disc is fully seated on the shaft; unplug and clear any obstructions. |
| Excessive noise or vibration. | Uneven load; appliance not on a stable surface. | Distribute ingredients evenly; place appliance on a flat, stable surface. |
| Leakage from bowl/jug. | Lid not sealed properly; overfilling. | Ensure lid is correctly fitted and sealed; do not exceed maximum fill lines. |
8. Specifications
- Model: Paprika 2000 Full
- Item Model Number: 04361
- Brand: Cecotec
- Power: 2000 Watts
- Processing Bowl Capacity: 3.5 Liters
- Blender Jug Capacity: 1.8 Liters
- Speeds: 2 (continuous) + Pulse function
- Material: Stainless Steel (housing), Plastic (bowls/jugs)
- Product Dimensions: 92 x 26 x 46 cm
- Item Weight: 6.07 Kilograms
- Special Feature: Multiple speed settings
- Recommended Uses: Emulsify, Grate, Knead, Liquefy, Slice
9. Warranty and Support
This product is covered by a manufacturer's warranty. For detailed warranty terms and conditions, please refer to the warranty card included with your purchase or visit the official Cecotec website. For technical support, spare parts, or service inquiries, please contact Cecotec customer service directly. Keep your proof of purchase for warranty claims.


