Introduction
Thank you for purchasing the KOSUMOSU 3D LED Digital Clock. This manual provides detailed instructions for the setup, operation, and maintenance of your new clock. Please read this manual thoroughly before use to ensure proper functionality and to maximize your product experience. Keep this manual for future reference.
Safety Information
- Ensure the power adapter (not included) is 5V/1A. Using an incorrect adapter may damage the device.
- Keep the clock away from water and high humidity environments.
- Do not attempt to disassemble or repair the clock yourself. Refer to qualified service personnel.
- Avoid placing the clock in direct sunlight or near heat sources to prevent overheating.
- Handle the remote control and its battery with care. Keep button batteries out of reach of children.
Package Contents
Verify that all items are present in the package:
- KOSUMOSU 3D LED Digital Clock (9.7 inches)
- Remote Control (with CR2025 button battery included)
- 3-meter USB Power Cable
- Desk Stand Bracket
- Wall Mounting Accessories (screws, anchors)
- User Manual (this document)

Image: The KOSUMOSU 3D LED Digital Clock with its remote control, showcasing its modern design and warm light display.

Image: A visual representation of the KOSUMOSU 3D LED Digital Clock's package contents, including the clock, remote, USB cable, and mounting hardware.
Product Overview
The KOSUMOSU 3D LED Digital Clock features a large, clear display with warm light, suitable for various rooms. It includes a remote control for easy adjustments and offers multiple display modes.
Key Features:
- Large 3D LED Display: 9.7 inches for clear visibility.
- Remote Control: Conveniently adjust settings from a distance.
- Brightness Adjustment: 3 manual levels (High/Medium/Low) and 8 automatic levels via built-in light sensor.
- Multi-function Display: Shows time, date, and temperature (℃/℉).
- Alarm with Snooze: Customizable alarm with a 5-minute snooze function.
- 12/24 Hour Mode: Easily switch between time formats.
- Versatile Placement: Can be used as a desk clock with the included stand or wall-mounted.

Image: The KOSUMOSU 3D LED Digital Clock showcasing its ability to display time, date, and temperature, highlighting its multi-functional capabilities.
Setup
1. Power Connection
- Connect the provided 3-meter USB power cable to the clock's power input port.
- Plug the other end of the USB cable into a 5V/1A AC adapter (not included).
- Plug the AC adapter into a standard wall outlet. The clock display will light up.
Note: The built-in super farad capacitor provides approximately 2 hours of time memory during power failure; it does not power the clock for regular operation.
2. Remote Control Battery
The remote control comes with a CR2025 button battery pre-installed. If the remote does not respond, check or replace the battery.
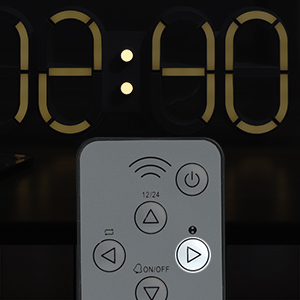
Image: A close-up view of the remote control, indicating the location of the CR2025 button battery for operation.
3. Placement Options
Desk Placement:
Attach the included desk stand bracket to the bottom of the clock for stable placement on any flat surface, such as a desk, bedside table, or shelf.
Wall Mounting:
The clock features a wall-mounted hanging hole. Use the provided screws and anchors to securely mount the clock on a wall. Ensure the power cable can reach an outlet.

Image: The KOSUMOSU 3D LED Digital Clock displayed as a wall-mounted unit, illustrating its versatility in placement.
Operating Instructions
All settings are controlled via the remote control.
1. Setting Time and Date
- Press the SET button on the remote control to enter setting mode.
- Use the UP (▲) and DOWN (▼) buttons to adjust the value.
- Press SET again to confirm and move to the next setting (e.g., Hour → Minute → Year → Month → Day).
- Once all settings are complete, the clock will return to normal display.
2. 12/24 Hour Mode
Press the 12/24H button on the remote control to switch between 12-hour and 24-hour time formats.
3. Brightness Adjustment
Automatic Dimming:
The clock has a built-in light sensor that automatically adjusts brightness across 8 levels based on ambient light conditions. This feature is enabled by default.
Manual Dimming:
Press the BRIGHT button on the remote control to cycle through 3 manual brightness levels: High, Medium, Low. Pressing it again will return to automatic dimming mode.

Image: Illustration of the KOSUMOSU 3D LED Digital Clock's dimming capabilities, demonstrating both automatic adjustment via a light sensor and manual control with three brightness levels.
4. Alarm Function
- Press the ALARM button on the remote control to enter alarm setting mode.
- Use the UP (▲) and DOWN (▼) buttons to set the desired alarm time.
- Press ALARM again to confirm the alarm time.
- To activate/deactivate the alarm, press the ON/OFF button (often shared with the alarm icon). An alarm icon will appear on the display when active.
Snooze Function:
When the alarm rings, press any button on the remote (except ON/OFF or POWER) to activate the snooze function. The alarm will pause for 5 minutes and ring again. This can be repeated up to 3 times.
5. Loop Display (Time, Date, Temperature)
The clock can cycle through displaying time, date, and temperature. Press the LOOP button (often indicated by a refresh icon) on the remote control to enable or disable this feature.

Image: The KOSUMOSU 3D LED Digital Clock demonstrating its loop display feature, cycling between showing the current time, date, and temperature.
Maintenance
- Cleaning: Use a soft, dry cloth to wipe the clock's surface. Do not use abrasive cleaners or solvents.
- Power: Disconnect power before cleaning or if the clock will not be used for an extended period.
- Remote Control: Replace the CR2025 battery in the remote control when its range decreases or it stops responding.
Troubleshooting
| Problem | Possible Cause | Solution |
|---|---|---|
| Clock does not light up. | No power supply; incorrect adapter; loose connection. | Ensure 5V/1A AC adapter is connected and plugged in. Check USB cable connection. |
| Remote control not working. | Battery drained; remote not pointed at clock; obstruction. | Replace CR2025 battery. Point remote directly at the clock. Remove any obstructions. |
| Display is too dim/bright. | Automatic dimming active; manual setting needed. | Press the BRIGHT button on the remote to adjust manually or return to auto mode. |
| Alarm does not sound. | Alarm not activated; volume too low (not applicable for this model). | Ensure the alarm is set and activated using the remote control. |
| Time/Date incorrect after power outage. | Power outage exceeded capacitor memory. | Reset time and date using the remote control. |
Specifications
| Feature | Detail |
|---|---|
| Brand | KOSUMOSU |
| Model Number | 9.7IN Digital Clock-ACD310Y |
| Display Type | Digital LED |
| Product Dimensions | 9.7"W x 3.9"H x 0.9"D |
| Item Weight | 5.1 ounces (146g) |
| Power Source | Corded Electric (5V/1A AC adapter, not included) |
| Battery (for remote) | 1 CR2025 (included) |
| Time Memory | Built-in super farad capacitor (approx. 2 hours) |
| Brightness Control | 8-level auto dimming, 3-level manual dimming (High/Medium/Low) |
| Special Features | Alarm with Snooze, Temperature Display (℃/℉), Date Display, 12/24H Mode, Remote Control |
| Mounting Type | Desk Clock, Wall Mount |
| Material | Plastic (Acrylonitrile Butadiene Styrene) |

Image: A detailed diagram showing the dimensions and key specifications of the KOSUMOSU 3D LED Digital Clock, including its weight and power requirements.
Warranty and Support
KOSUMOSU provides a 2-year warranty for this product. If you encounter any quality or operational issues with your KOSUMOSU 3D LED Digital Clock, please contact our customer service team. We are committed to providing support, guidance, and replacements as needed.
For assistance, please refer to the contact information provided on the product packaging or the official KOSUMOSU website.


