
HIWONDER xArm ESP32 Robotic Arm
HIWONDER xArm ESP32 Robotic Arm Instruction Manual
Model: xArm ESP32 Robotic Arm | Brand: HIWONDER
1. Introduction
The HIWONDER xArm ESP32 Robotic Arm is an open-source robotic arm designed for educational and secondary development purposes. It features an ESP32 main control system, supporting MicroPython programming, and offers various control methods and sensor integration capabilities. This manual provides detailed instructions for assembly, operation, and programming to help users maximize the potential of their robotic arm.

Image: The HIWONDER xArm ESP32 Robotic Arm, showcasing its design and components.
2. Package Contents
Verify that all components are present in your package. The "Unassemble robotic arm + Sensor kit" variant includes the following:
- Robotic arm components (for assembly)
- 7.5V adapter
- PS2 handle and receiver
- USB cable
- Screwdriver
- Colored blocks (for testing)
- Accessory kit
- Sensor expansion package:
- Ultrasonic glowing module
- Infrared obstacle avoidance sensor
- Color sensor
- Touch sensor
- Joystick module
- OLED display screen
- Knob module
- 4PIN wires
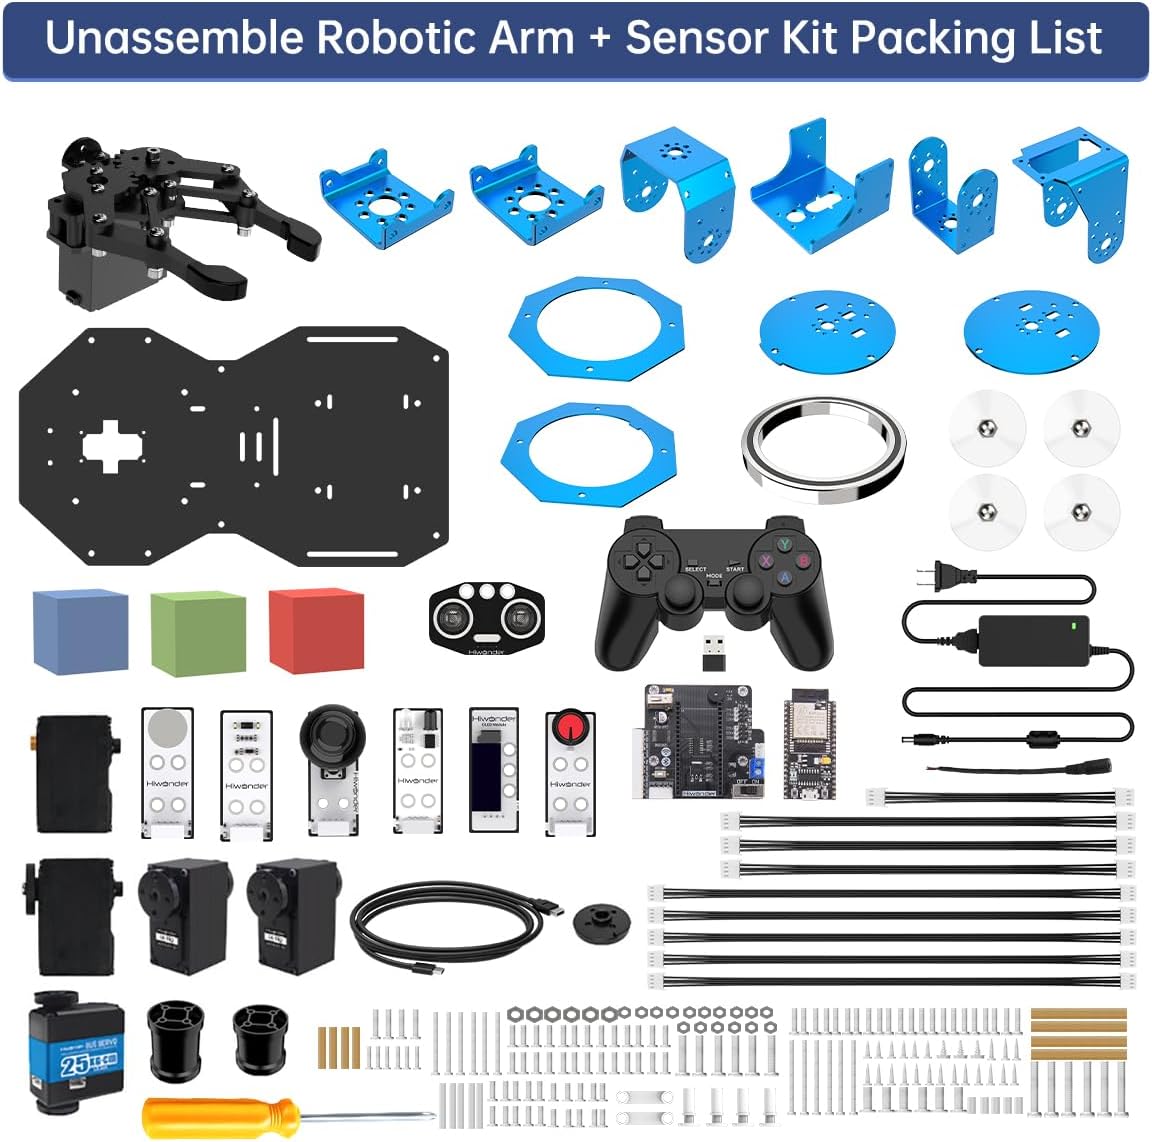
Image: Detailed view of all components included in the Unassemble Robotic Arm + Sensor Kit package.
3. Product Structure and Dimensions
The xArm ESP32 Robotic Arm features a robust metal body and intelligent bus servos for precise movement. Understanding its structure is key to assembly and operation.

Image: Diagram illustrating the main components of the robotic arm, including the mechanic gripper, servos (LX-15D, LX-225, ID1), metal brackets, ESP32 open-source controller, metal rotational station, metal plate, and suction cups.
Refer to the dimensional diagram for physical measurements:
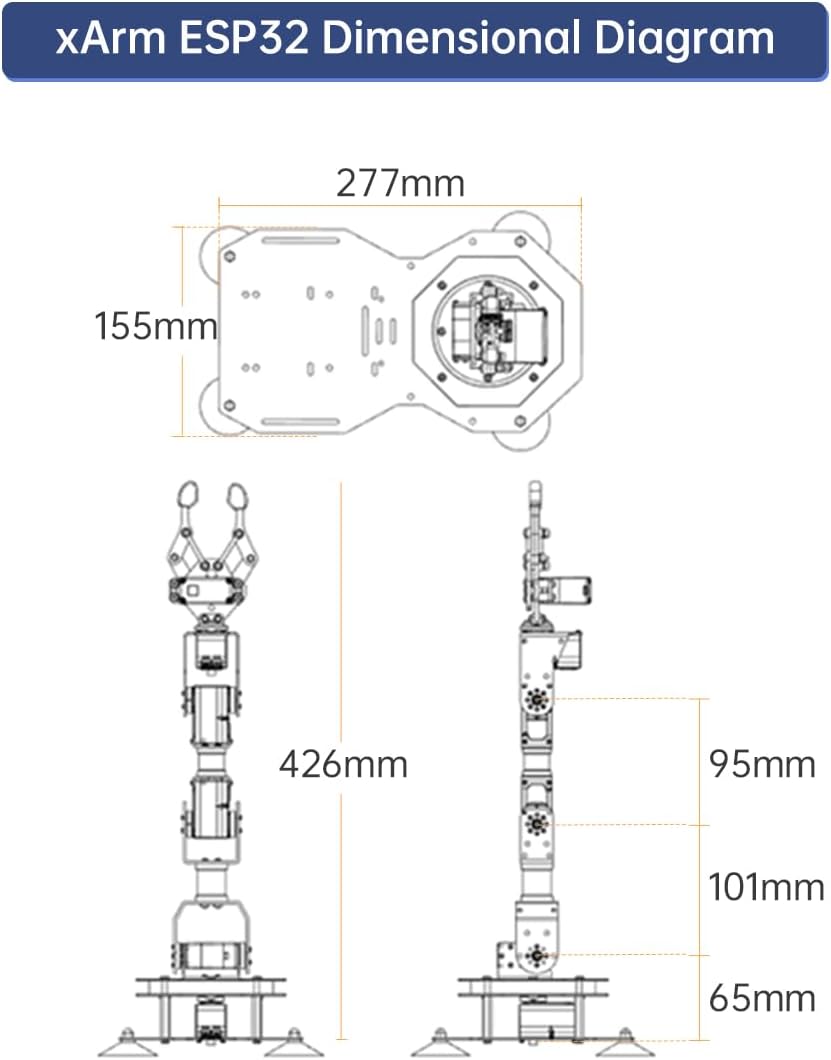
Image: Technical drawing showing the dimensions of the xArm ESP32 Robotic Arm, including height (426mm) and base measurements (277mm x 155mm).
4. Setup and Assembly
This section outlines the steps for assembling your xArm ESP32 Robotic Arm and preparing it for first use. If you purchased the unassembled kit, follow the detailed assembly instructions provided in the separate assembly guide. Ensure all connections are secure before powering on the device.
4.1 Initial Power-On
- Connect the 7.5V adapter to the robotic arm's power input.
- Connect the USB cable from the ESP32 controller to your computer for programming and initial setup.
- Observe the indicator lights on the ESP32 board to confirm power.
4.2 Software Installation and MicroPython Setup
The xArm ESP32 supports MicroPython programming. You will need to install the necessary drivers and the MicroPython editor on your computer.
- Download and install the appropriate USB-to-serial drivers for your operating system.
- Install the MicroPython editor (e.g., Thonny IDE or a dedicated Hiwonder editor).
- Connect the robotic arm via USB. The editor should automatically detect the device and display the open-source code.
- Familiarize yourself with the editor's functions for editing, downloading, and running code, including ESP32 command code completion and syntax checking.
Video: An overview of the HIWONDER xArm ESP32 Robotic Arm, demonstrating its features, programming capabilities with MicroPython, and various control methods. This video highlights the metal body, intelligent bus servos, and the ESP32 controller.
5. Operating Instructions
The xArm ESP32 Robotic Arm offers multiple control methods and supports secondary development with various sensors.
5.1 Control Methods
You can control the robotic arm using several interfaces:
- APP Control: Use the dedicated mobile application to control the arm wirelessly.
- Mouse Control: Connect a mouse to your computer and use it to manipulate the arm's movements.
- Handle Control: Utilize the included PS2 handle for direct, tactile control.
- Wireless Glove Control: For advanced interaction, a wireless glove can be used (if supported and configured).
- Synchronization Controller: Mimic movements with a separate synchronization controller for precise replication.
- Bluetooth Group Control: Control multiple xArm ESP32 units simultaneously via Bluetooth.

Image: Demonstrates various control methods including mouse, wireless handle, and somatronic gloves controlling the robotic arm.

Image: Shows the robotic arm being controlled via a synchronization controller and a mobile application (APP Control).
5.2 Sensor Integration and Gripping Functions
The sensor expansion kit allows for advanced gripping and interaction capabilities:
- Color Recognition Gripping: Use the color sensor to identify and sort objects by color.
- Touch Detection Gripping: Employ the touch sensor for precise object detection and gentle gripping.
- Infrared Detection Gripping: Utilize the IR obstacle avoidance sensor to detect objects and avoid collisions.
- Ultrasonic Ranging Gripping: The ultrasonic sensor enables distance measurement for accurate object positioning and gripping.
- Joystick Control Gripping: Directly control gripping actions using the joystick module.
- Knob Control Gripping: Adjust gripping parameters with the knob module for fine control.

Image: The robotic arm demonstrating color recognition gripping, picking up a pink block and placing it into a red container.
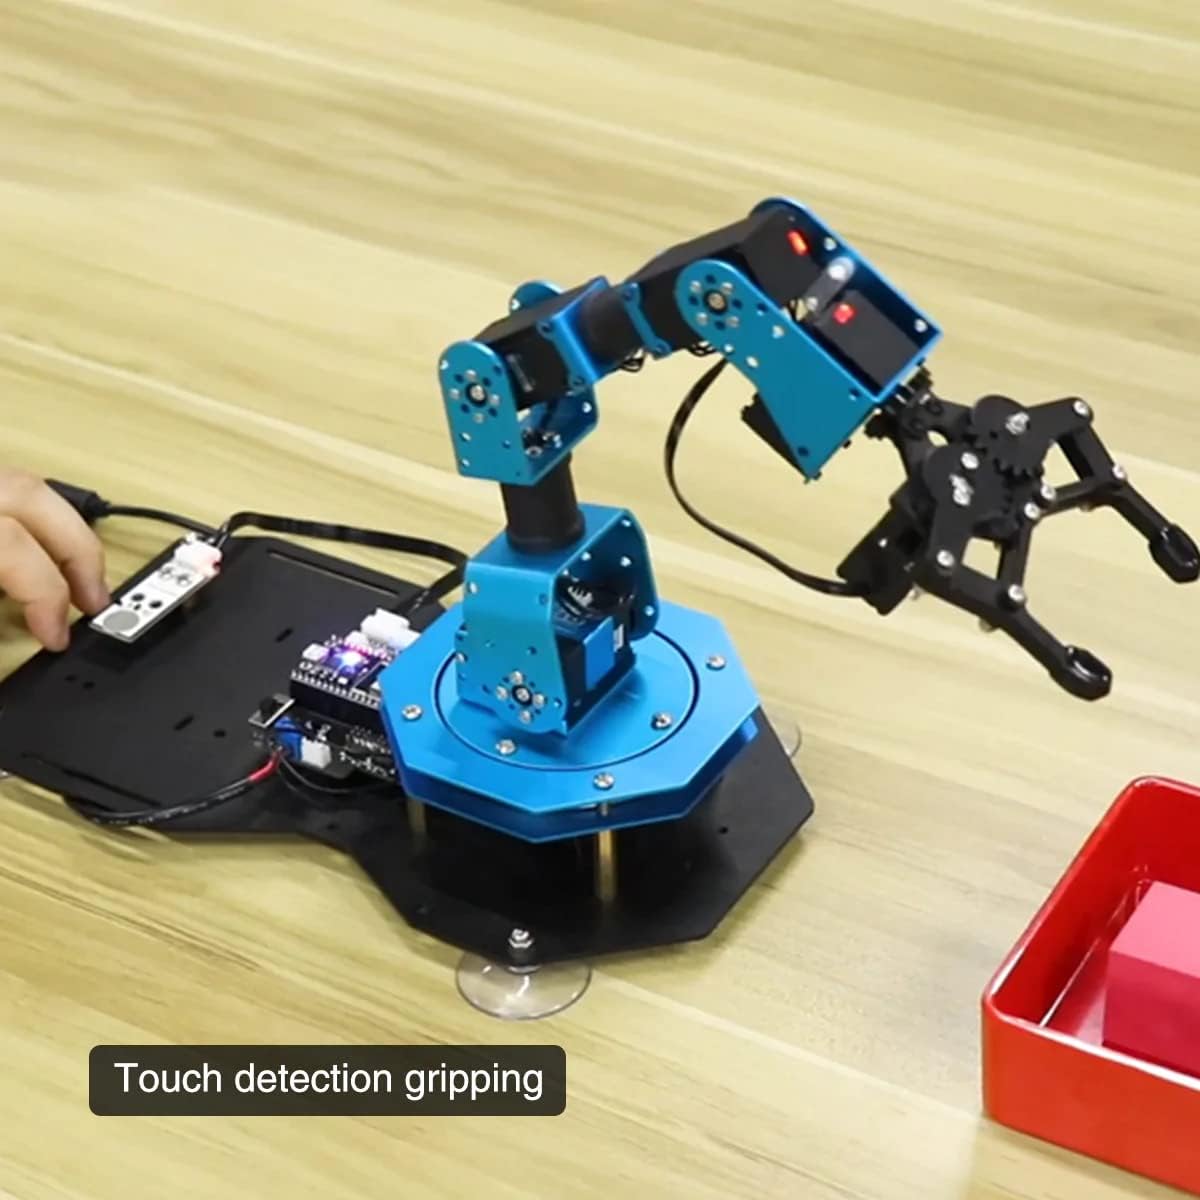
Image: The robotic arm performing touch detection gripping, carefully picking up a block.
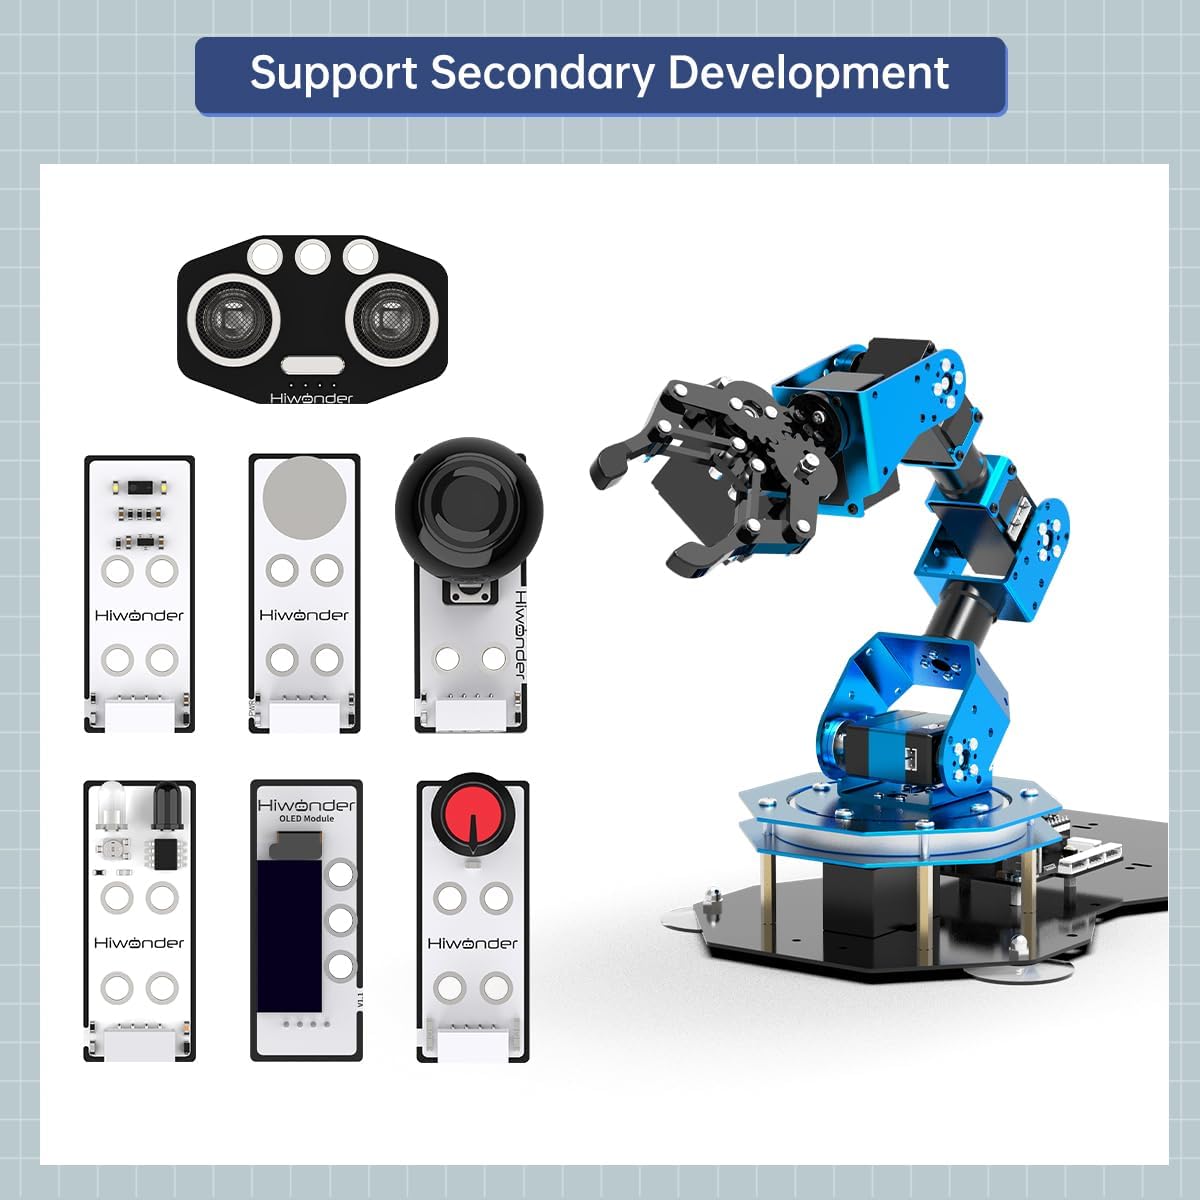
Image: Various sensor modules included in the expansion kit, such as ultrasonic, IR, color, touch, joystick, OLED, and knob modules, enabling secondary development.
5.3 Programming and Secondary Development
The xArm ESP32 is designed for secondary development, offering an open-source platform and MicroPython support. You can create custom programs and integrate additional sensors or modules.
- MicroPython Programming: Leverage the ESP32's capabilities with MicroPython for custom control logic.
- Inverse Kinematics: Understand and apply inverse kinematics algorithms for precise arm positioning.
- Sensor Expansion: Connect and program the included sensor modules to expand the arm's functionality.

Image: A laptop screen displaying the programming interface for the xArm ESP32, showing MicroPython code and a visual representation of the robotic arm.
6. Specifications
Detailed technical specifications for the HIWONDER xArm ESP32 Robotic Arm:
| Feature | Detail |
|---|---|
| Product Dimensions | 10.9 x 6.1 x 16.77 inches |
| Item Weight | 4.8 pounds |
| Main Control System | ESP32 |
| Programming Language | MicroPython |
| Servo Type | Intelligent Serial Bus Servos (LX-15D, LX-225, ID1) |
| Control Methods | APP, Mouse, Handle, Wireless Glove, Synchronization Controller, Bluetooth Group Control |
| Recommended Age | 15 years and up |
6.1 Servo Features
The robotic arm utilizes intelligent serial bus servos with high precision and feedback functions. The base servo is upgraded to a 25KG torque servo, allowing the arm to handle objects over 500g with stable movement.

Image: Table detailing the specifications of the LX-15D, LX-225, and ID1 servos, including rotation speed, torque, accuracy, protection features, and feedback functions.
7. Maintenance
To ensure the longevity and optimal performance of your xArm ESP32 Robotic Arm, follow these maintenance guidelines:
- Cleaning: Gently wipe the robotic arm with a dry, soft cloth to remove dust. Avoid using liquid cleaners or solvents.
- Storage: Store the robotic arm in a dry, cool environment away from direct sunlight and extreme temperatures.
- Connections: Periodically check all cable connections to ensure they are secure and free from damage.
- Software Updates: Regularly check for firmware and software updates from HIWONDER to ensure compatibility and access to new features.
- Avoid Overloading: Do not attempt to lift objects heavier than the specified maximum load (e.g., 500g for the gripper) to prevent damage to the servos.
8. Troubleshooting
This section provides solutions to common issues you might encounter with your robotic arm.
- Arm Not Responding:
- Ensure the power adapter is correctly connected and the arm is receiving power.
- Verify all servo connections are secure.
- Check the USB connection to your computer if programming or controlling via PC.
- Restart the robotic arm and the control software/APP.
- Programming Errors:
- Review your MicroPython code for syntax errors.
- Ensure the correct COM port is selected in your programming environment.
- Check for updated drivers or firmware for the ESP32 controller.
- Inaccurate Movements:
- Recalibrate the servos if available through the software.
- Ensure the arm is placed on a stable, level surface.
- Verify that no physical obstructions are impeding movement.
- Sensor Malfunction:
- Check the physical connection of the sensor module to the expansion board.
- Ensure the sensor is correctly configured in your program.
- Clean the sensor surface if it's an optical sensor (e.g., color sensor).
If you encounter issues not covered here, please refer to the official HIWONDER support resources or community forums.
9. Warranty and Support
The HIWONDER xArm ESP32 Robotic Arm comes with a standard manufacturer's warranty. Please refer to the warranty card included in your package or visit the official HIWONDER website for detailed warranty terms and conditions.
For technical support, troubleshooting assistance, or inquiries about spare parts, please contact HIWONDER customer service through their official channels. Online resources, including FAQs, tutorials, and community forums, may also be available to assist you.
Manufacturer: Hiwonder
Recommended Age: 15 years and up
Related documentsxArm ESP32 Robotic Arm


Ask a question about this manual
Ask about setup, troubleshooting, compatibility, parts, safety, or missing instructions. Manuals+ will review the question and use this page’s manual context to help answer it.