1. Introduction and Overview
The Cooler Master TD500 Mesh V2 is an ATX mid-tower case designed for optimal airflow and system visibility. It features a distinctive polygonal mesh front panel, crystalline tempered glass side panel, and includes three 120mm PWM ARGB fans for effective cooling and customizable lighting. This manual provides essential information for setup, operation, maintenance, and troubleshooting of your PC case.
2. Key Features
Polygonal FineMesh
The front panel features a 3D contoured polygonal FineMesh design, providing both high airflow for cooling and effective dust filtration to maintain system cleanliness.

Image: Detailed view of the polygonal FineMesh structure on the front panel.
Triple ARGB Fans
Three pre-installed 120mm PWM ARGB fans illuminate the front panel, ensuring ample airflow and optimal temperatures for system components. These fans are customizable for various lighting effects.

Image: A single CF120 ARGB fan highlighting its air flow (62 CFM) and static pressure (2.5 mmH2O) specifications.
USB 3.2 Gen 2 Type C Support
The I/O panel includes a USB 3.2 Gen 2 Type C port, facilitating efficient and versatile high-speed data transmission for various applications.

Image: Top-front view of the case's I/O panel, featuring USB 3.2 Gen 2 Type C, USB 3.0 Type A ports, audio jacks, and power/reset buttons.
Versatile Cooling Options
The case supports up to seven 120mm or 140mm fans and can accommodate dual 360mm radiators at both the front and top, ensuring comprehensive cooling capabilities for high-performance systems.

Image: Internal diagram illustrating various fan and radiator mounting positions and sizes (120mm, 140mm, up to 360mm radiators).
Removable Top Panel
The top panel is fully removable, simplifying access during component assembly and making the installation of cooling solutions more convenient.

Image: The top panel detached from the case, showing the internal mounting points for fans/radiators.
Removable PSU Cover
The power supply unit (PSU) cover is removable, offering flexibility to either showcase or conceal the PSU based on user preference.

Image: Two views of the PSU cover, one showing it closed and the other revealing a PSU with branding.
Screwless & Tool-Free Tempered Glass
The crystalline tempered glass side panel features a tool-free design, allowing for quick and easy access to the internal components of the PC.

Image: The tempered glass side panel partially open, demonstrating its tool-free removal mechanism.
ARGB/PWM Hub
An included hub simplifies cable management by offering 5 ARGB and 4 PWM ports, enabling control of multiple fans with a single power and PWM connector.

Image: A close-up of the ARGB/PWM hub, showing its various connection ports for fans and lighting.
Spacious Interior
The case provides ample internal space to accommodate Micro-ATX or ATX motherboards, facilitating easy installation, efficient cable management, and future expansion possibilities.

Image: An internal diagram illustrating the compatible motherboard form factors: Mini-ITX, Micro-ATX, and ATX, with their respective dimensions.
3. Setup and Installation
3.1 Front Panel Removal
- Locate the bottom edge of the front panel.
- Gently pull the panel outwards from the bottom until the clips disengage.
- Carefully detach the entire front panel. This provides access to the front intake fans.
3.2 Top Panel Removal
- Locate the magnetic dust filter on the top panel and remove it.
- Identify the screws securing the top panel to the chassis.
- Unscrew these fasteners and carefully lift the top panel away from the case. This allows for easier installation of top-mounted fans or radiators.
3.3 Side Panel Access
- For the tempered glass side panel, locate the thumbscrew at the rear of the case.
- Unscrew the thumbscrew. The panel will then be loose.
- Gently pull the panel upwards to disengage it from the chassis.
- For the solid steel side panel, locate the two thumbscrews at the rear.
- Unscrew both thumbscrews and slide the panel backward, then lift it away.
3.4 Motherboard Installation
- Ensure the correct standoffs are installed for your motherboard form factor (Mini-ITX, Micro-ATX, ATX).
- Carefully place your motherboard onto the standoffs, aligning the screw holes.
- Secure the motherboard with the provided screws.
3.5 Storage Drive Installation
- For 2.5-inch SSDs, mounts are available on the back of the motherboard tray and on the PSU shroud. Secure drives using the push-pin style mounts or screws.
- For 3.5-inch HDDs, use the removable hard drive cage located in the bottom compartment. Slide the drives into the trays and secure them.
3.6 Power Supply Installation
- Slide the PSU into the bottom compartment from the rear of the case.
- Secure the PSU with screws from the outside of the case.
- Connect the necessary power cables to your motherboard and components.
3.7 Cable Management
Utilize the cable routing holes and tie-down points located behind the motherboard tray to organize and conceal cables. The included ARGB/PWM hub helps manage fan and lighting cables efficiently.
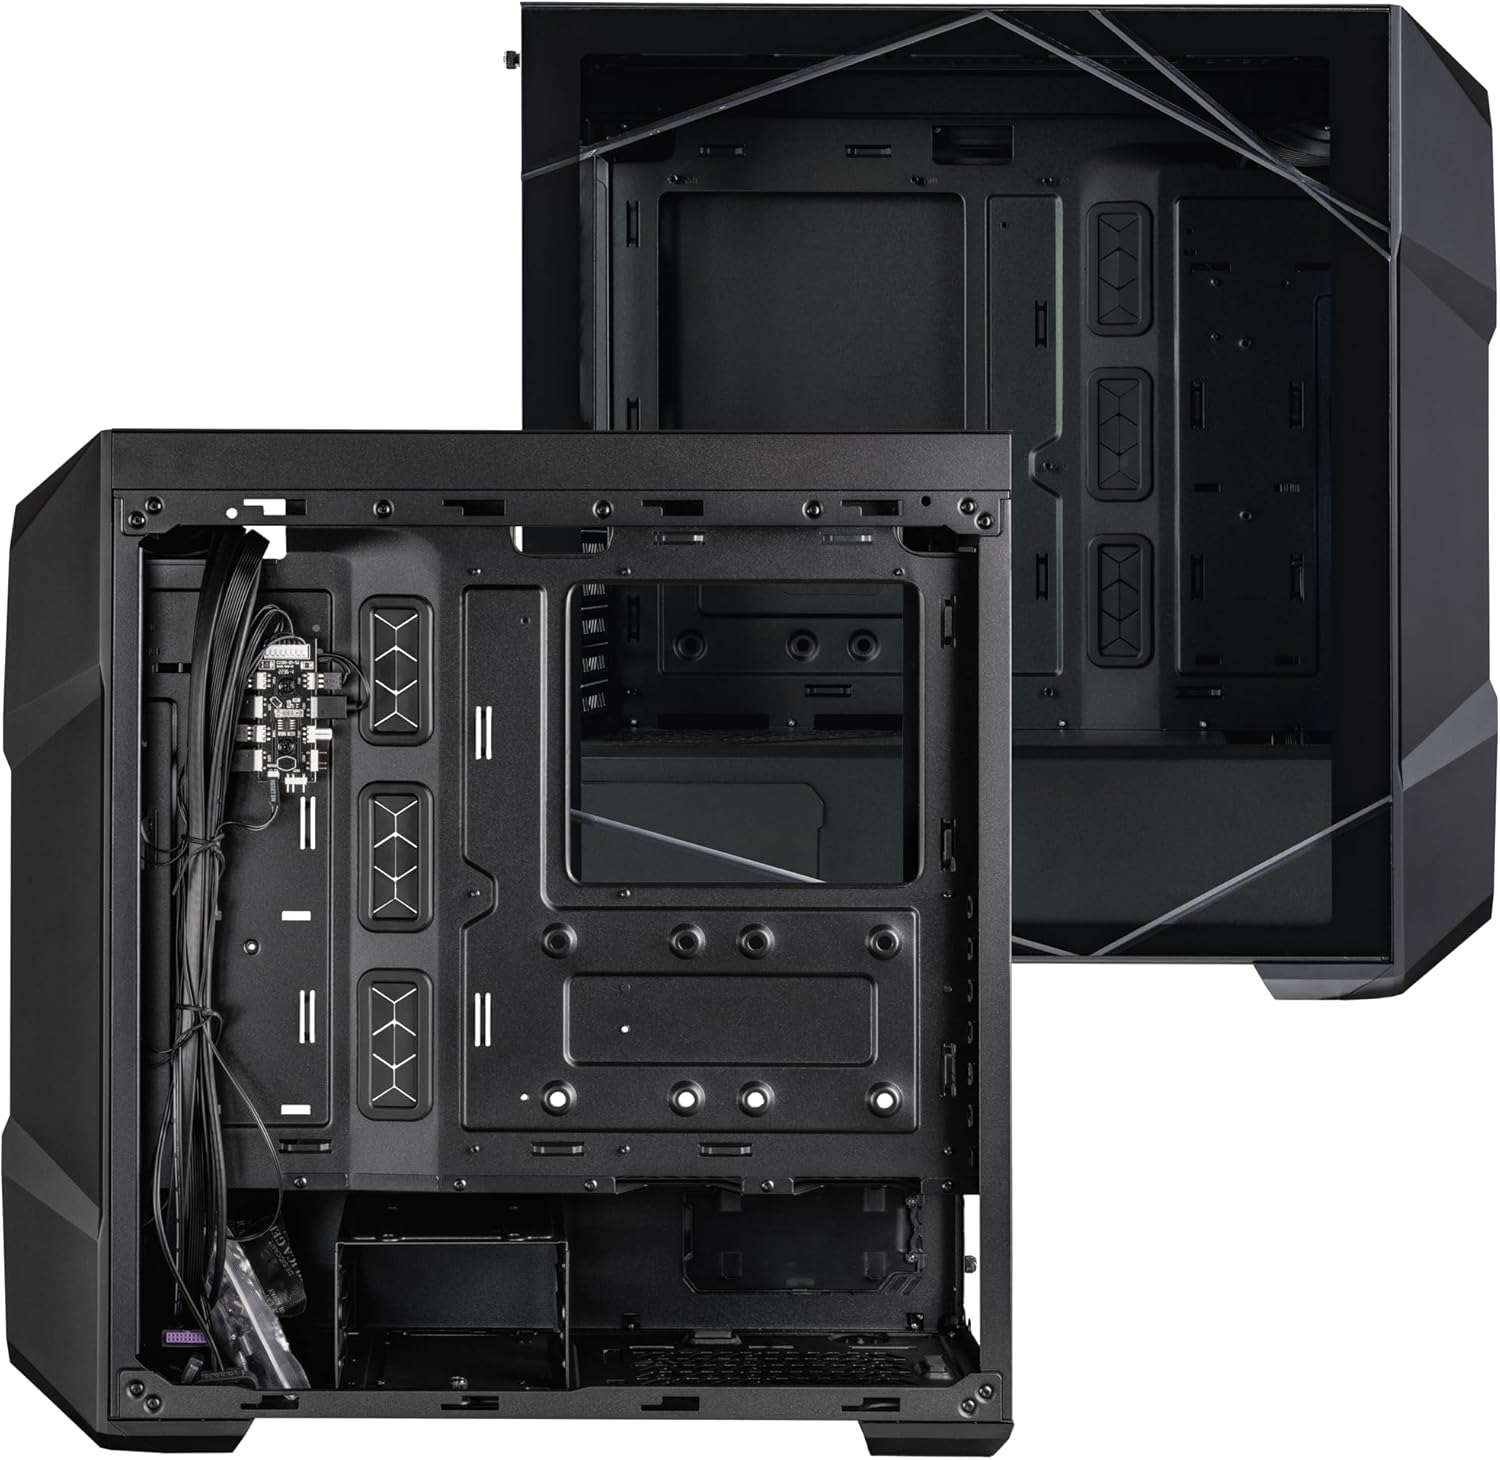
Image: The back of the motherboard tray, illustrating cable routing channels and tie-down points for organized cable management.
3.8 GPU Installation
Install your graphics card into the appropriate PCIe slot on the motherboard. The case supports GPUs up to 410mm in length.

Image: A diagram detailing maximum clearances for CPU coolers (165mm), GPUs (410mm), and PSUs (200mm recommended up to 170mm).
4. Operating Instructions
4.1 Power On/Off
Press the large hexagonal power button on the top I/O panel to power on or shut down your system.
4.2 ARGB Lighting Control
Use the dedicated button on the top I/O panel (often marked with a light bulb icon) to cycle through various ARGB lighting effects and colors for the pre-installed fans. Hold the button down to turn the lighting completely off or on.
5. Maintenance
5.1 Dust Filter Cleaning
The case features magnetic dust filters on the top and front panels, and a pull-out filter for the PSU at the bottom. Regularly remove and clean these filters to maintain optimal airflow and prevent dust buildup inside the system.
5.2 General Cleaning
Use a soft, dry cloth to clean the exterior surfaces of the case. For the tempered glass panel, use a glass cleaner and a microfiber cloth to avoid scratches.
6. Troubleshooting
6.1 Fans Not Spinning/Lighting Not Working
- Check all fan and ARGB connections to the motherboard or the included ARGB/PWM hub.
- Ensure the ARGB/PWM hub is correctly powered (usually via SATA power).
- Verify that the lighting control button on the I/O panel is functioning.
6.2 System Overheating
- Ensure all case fans are spinning correctly and oriented for proper airflow (front intake, rear/top exhaust).
- Clean all dust filters and internal components to remove any dust buildup restricting airflow.
- Verify that CPU cooler and GPU fans are functioning properly.
7. Specifications
- Brand: Cooler Master
- Series: TD500 Mesh V2
- Model Number: TD500V2-KGNN-S00
- Case Type: Mid Tower
- Motherboard Compatibility: Mini-ITX, Micro-ATX, ATX
- Dimensions (LxWxH): 16.65 x 8.27 x 19.68 inches
- Item Weight: 16.94 pounds
- Color: Black
- Material: Tempered Glass
- Pre-installed Fans: 3x 120mm PWM ARGB Fans (Front)
- Fan Size: 120 Millimeters
- Cooling Method: Air
- Number of USB 3.0 Ports: 1 (Note: JSON indicates 1 USB 3.0, product description mentions USB 3.2 Gen 2 Type C)
- Recommended Uses For Product: Gaming
8. Warranty and Support
For warranty information, technical support, or to access additional resources, please visit the official Cooler Master website or contact their customer service. Keep your proof of purchase for warranty claims.
Visit the Cooler Master Store for more products and support.


