
Vikye Vikyet032pd8vgf1112
Vikye X99 D4 Motherboard User Manual
Brand: Vikye
Model: Vikyet032pd8vgf1112
1. Product Overview
Key Features
- LGA 2011 V3 Socket: Support for E5 V3 V4 series processors, X99 desktop motherboard with RTL8111G Gigabit LAN, providing fluent network connectivity.
- Ultra Fast Transfer Speed: M.2 hard drive interface, can support NVME M.2 and SATA M.2 interface type. PCIe 3.0 standard, data transfer speed up to 32Gbps.
- 2 Channel DDR4 Memory Slots: This gaming motherboard has 2 DDR4 memory slots. It supports both normal memory and ECC server memory with memory capacity up to 64GB.
- Stable Performance: 8 layer PCB material design, strong signal immunity, 6 phase power supply to ensure stable CPU operation.
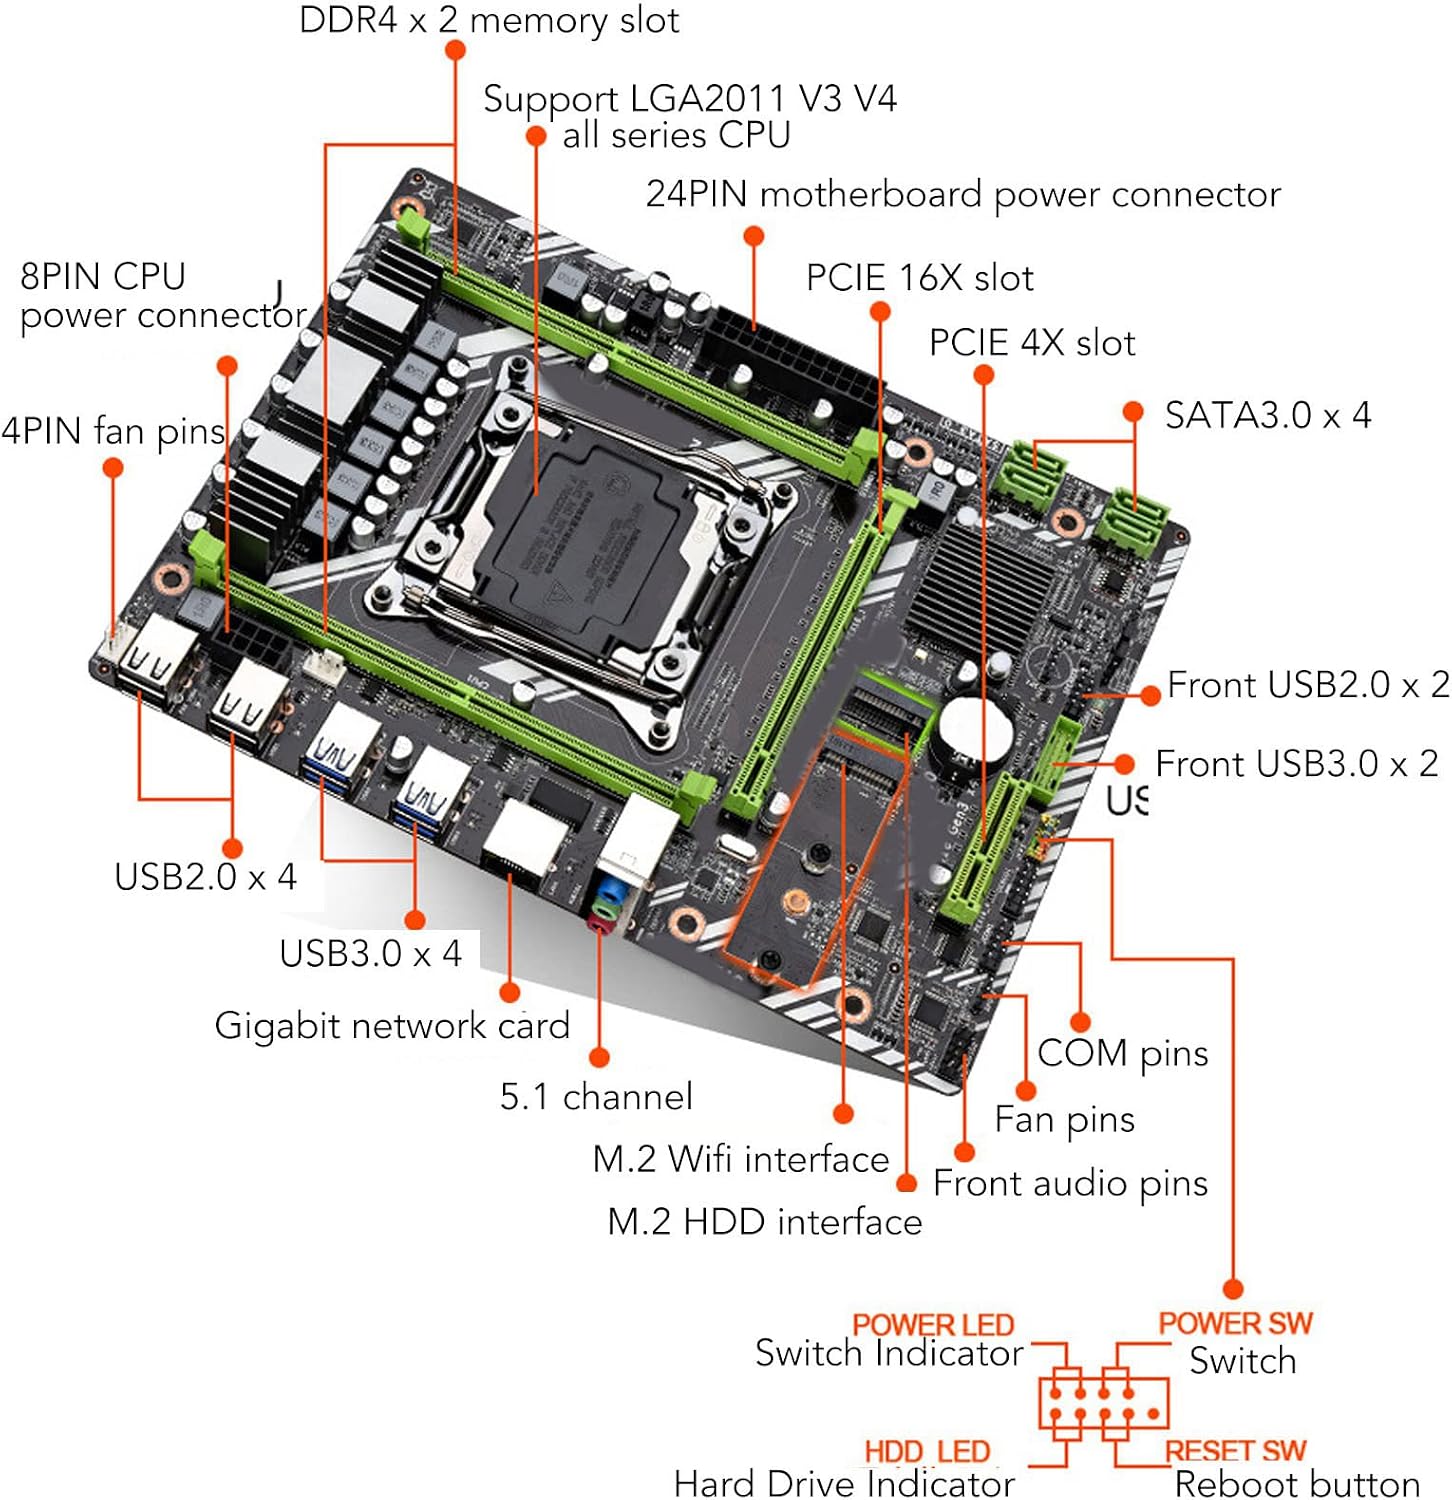
- Multiple Expansion Slots: Expansion slots include 1 x PCIE 16X graphics card slot, 1 x PCIE 1X slot, USB3.0 x 6 (front USB3.0 x 2), USB2.0 x 6 (front USB2.0 x 2), 4 x SATA 3.0 slots, 1 x NVME M.2 interface and 1 x M.2 WiFi interface.
Product Description
The Vikye X99 D4 Motherboard is an M ATX form factor motherboard designed to support LGA 2011 V3 V4 full series processors. It features a Gigabit Network Card for reliable connectivity and a PCIE 3.0 16X graphics card slot. The motherboard supports 2 x DDR4 memory types with a maximum capacity of 64GB. It includes multiple storage interfaces such as 4 x SATA3.0 and 1 x M.2 NVME interface. Connectivity options include 6 x USB3.0 (2 front) and 6 x USB2.0 (2 front) ports. An on-board sound card supports 5.1 Channel audio. Power is supplied via 24 Pin and 8 Pin connectors. Additional expansion interfaces include 1 x PCIE 4X, 1 x M.2 WiFi Interface, and COM Pins.
2. Package Contents
Upon opening the package, please verify that all the following items are included:
- 1 x X99 D4 Motherboard
- 1 x SATA Cable
- 1 x I/O Bezel
3. Technical Specifications
| Feature | Specification |
|---|---|
| Item Type | X99 D4 Motherboard |
| Material | PCB |
| Model | X99D4 |
| Motherboard Architecture | M ATX |
| Motherboard Size | Approx. 242 x 180mm / 9.5 x 7.1in |
| CPU Slot Type | Support LGA 2011 V3 V4 Full Series |
| Network Card | Gigabit Network Card |
| Graphics Card Slot | PCIE 3.0 16X x 1 |
| Support Memory Type | 2 x DDR4 |
| Maximum Memory Capacity | 64GB |
| SATA Interface | SATA3.0 x 4, M.2 NVME Interface x 1 |
| USB Interface | USB3.0 x 6 (Front USB3.0 x 2), USB2.0 x 6 (Front USB2.0 x 2) |
| On Board Sound Card | Support 5.1 Channel |
| Power Connector | 24 Pin x 1, 8 Pin x 1 |
| Expansion Interface | PCIE 4X x 1, M.2 WiFi Interface x 1, COM Pins x 1 |
| Battery Type | CR2032 Button Cell (Built in) |
| Battery Capacity | 240mAh |
4. Setup and Installation
Proper installation of the motherboard is crucial for system stability and performance. Please follow these steps carefully:
- Preparation: Before handling the motherboard, ensure you are grounded to prevent electrostatic discharge (ESD). Use an anti-static wrist strap or touch a grounded metal object.
- Mounting the Motherboard: Carefully align the motherboard with the standoffs in your computer case. Gently lower the motherboard onto the standoffs. Secure it with the appropriate screws, ensuring not to overtighten.
- CPU Installation: Open the CPU socket retention arm. Carefully place your LGA 2011 V3/V4 series processor into the socket, aligning the gold triangle on the CPU with the triangle on the socket. Close the retention arm to secure the CPU.
- CPU Cooler Installation: Install your CPU cooler according to its manufacturer's instructions. Ensure proper thermal paste application and secure mounting for effective heat dissipation.
- Memory (RAM) Installation: Open the clips on the DDR4 memory slots. Align the notch on the memory module with the key in the slot. Press down firmly on both ends of the module until the clips snap into place. Install memory in the designated dual-channel slots for optimal performance.
- Storage Device Connection: Connect your SATA storage devices (HDDs/SSDs) to the SATA 3.0 ports using the provided SATA cable. For M.2 NVME SSDs, insert the module into the M.2 slot and secure it with the screw.
- Graphics Card Installation: Insert your PCIE 3.0 16X graphics card into the primary PCIe x16 slot. Ensure it is fully seated and secured with the case latch or screw.
- Power Connections: Connect the 24-pin ATX power connector from your power supply to the motherboard. Also, connect the 8-pin CPU power connector to the corresponding port near the CPU socket.
- Front Panel Connections: Connect the front panel headers (Power SW, Reset SW, HDD LED, Power LED, USB, Audio) to their respective pins on the motherboard. Refer to the motherboard diagram (see Product Images section) for pin assignments.
- Peripheral Connections: Connect any additional peripherals such as USB devices, network cables, and audio devices to the appropriate ports on the rear I/O panel.
Once all components are installed, double-check all connections before attempting to power on the system.
5. Operating Instructions
The Vikye X99 D4 Motherboard functions as the central hub of your computer system. Its operation is integrated with other components such as the CPU, RAM, storage, and operating system.
- Initial Power On: After completing the installation, connect your monitor, keyboard, and mouse. Press the power button on your computer case. The system should initiate the boot process.
- BIOS/UEFI Setup: During the initial boot, you may need to enter the BIOS/UEFI setup utility (typically by pressing DEL or F2 during startup) to configure settings such as boot order, date/time, and enable specific features like XMP for memory.
- Operating System Installation: Install your preferred operating system (e.g., Windows, Linux) from a bootable USB drive or DVD. Follow the on-screen prompts for installation.
- Driver Installation: After the operating system is installed, install the necessary drivers for the motherboard's components, including chipset drivers, network drivers, audio drivers, and any specific drivers for your graphics card. These are typically provided on a CD/DVD with the motherboard or can be downloaded from the manufacturer's website.
- System Use: Once drivers are installed, your system is ready for general use. The motherboard manages communication between all connected hardware components.
6. Maintenance
To ensure the longevity and optimal performance of your Vikye X99 D4 Motherboard, consider the following maintenance tips:
- Keep it Clean: Regularly clean the inside of your computer case to prevent dust buildup on the motherboard and other components. Dust can impede airflow and lead to overheating. Use compressed air to gently blow away dust.
- Ensure Proper Ventilation: Make sure your computer case has adequate airflow. Ensure case fans are working correctly and are not obstructed.
- BIOS/UEFI Updates: Periodically check the manufacturer's website for BIOS/UEFI updates. Updates can improve compatibility, stability, and performance. Follow the update instructions carefully to avoid damaging the motherboard.
- Driver Updates: Keep your system drivers updated. Outdated drivers can cause performance issues or instability.
- Avoid Static Electricity: Always take anti-static precautions when handling the motherboard or other internal components.
7. Troubleshooting
No Power On Problem
If the device does not power on and the power indicator does not light up, follow these steps:
- Verify Power Supply Connection: Ensure the power supply unit (PSU) is connected and working properly. Check the connection of the power cord to the PSU and the wall socket. If using an extension cord, ensure it is plugged in and its main power switch is in the "on" position.
- Check PSU Functionality: You can often determine if the power supply is working by observing if the CPU fan spins when you attempt to power on the system. If the CPU fan works, the PSU is likely providing power.
- Test with Different Components: If possible, try replacing the extension cord and/or the wall socket to rule out external power issues. If the problem persists, consider testing the power supply unit with another system or a PSU tester.
- Internal Power Connections: Double-check that the 24-pin ATX power connector and the 8-pin CPU power connector are securely seated on the motherboard.
- Front Panel Connections: Ensure the power button cable from the computer case is correctly connected to the "Power SW" pins on the motherboard's front panel header.
If these steps do not resolve the issue, further diagnosis may be required, potentially involving testing individual components.
8. Product Images
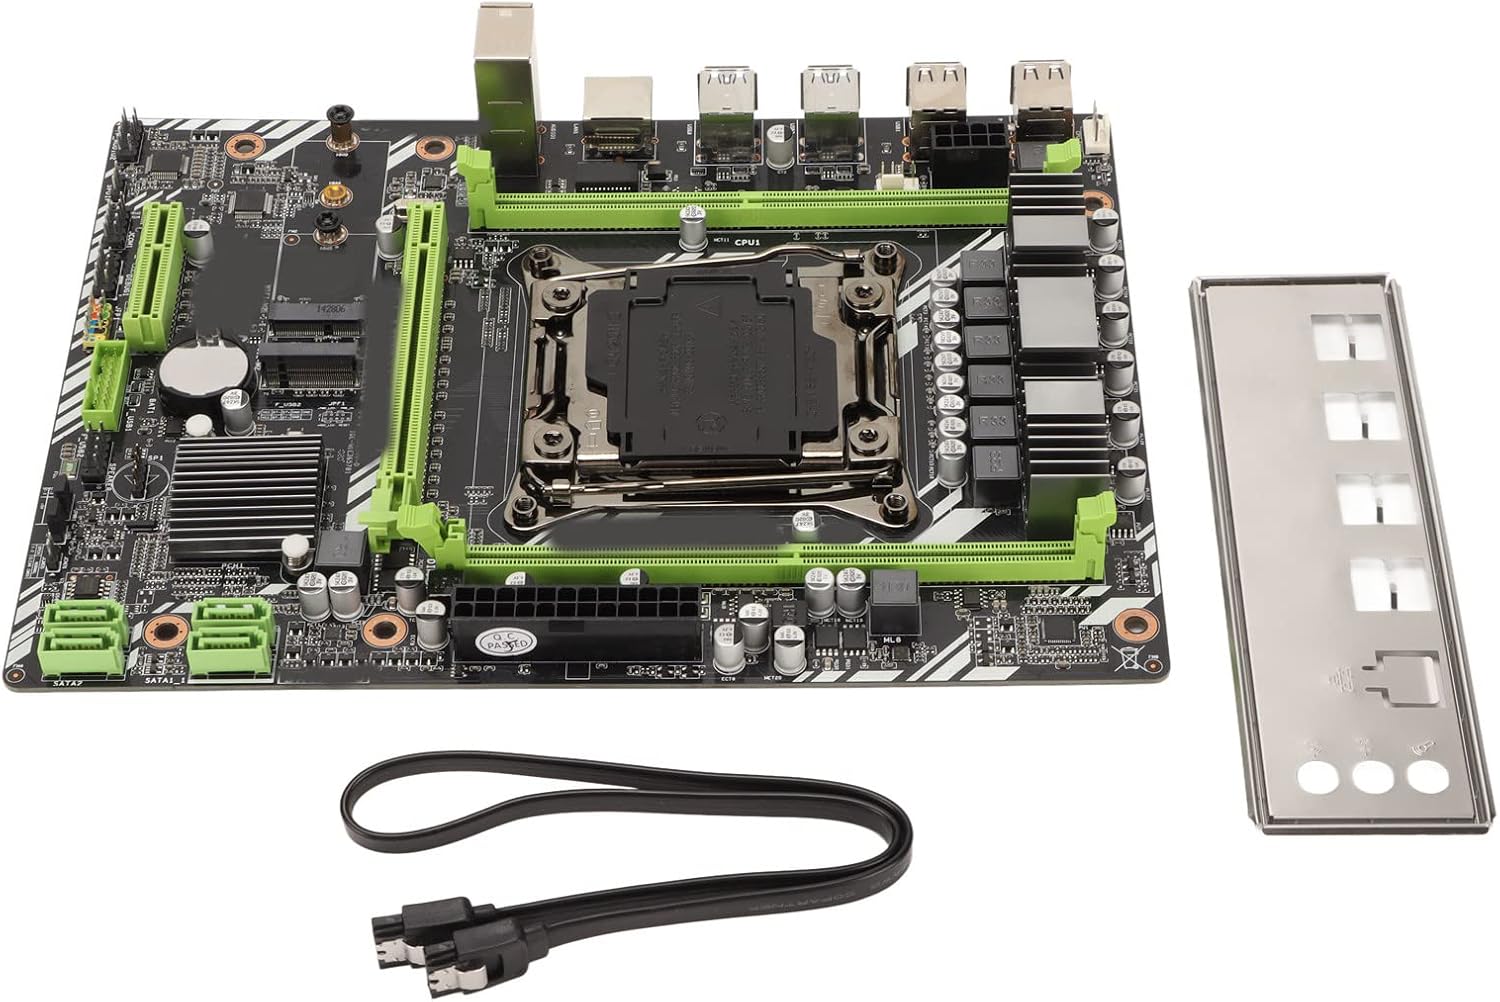




9. Official Product Videos
No official product videos from the seller are available for this product at this time.
10. Warranty and Support
Specific warranty details for the Vikye X99 D4 Motherboard are not provided in the product information. For warranty claims, technical support, or further inquiries, please contact the manufacturer directly.
You can visit the official Vikye store on Amazon for more information: Vikye Store
Ask a question about this manual
Ask about setup, troubleshooting, compatibility, parts, safety, or missing instructions. Manuals+ will review the question and use this page’s manual context to help answer it.