
1. Introduction
This manual provides detailed instructions for the setup, operation, and maintenance of your VANBAR Trail Camera, Model D300-2022-9-26. Please read this manual thoroughly before using the camera to ensure proper functionality and to maximize its performance. This camera is designed for various applications including home security, wildlife monitoring, and property surveillance.

Figure 1.1: VANBAR Trail Camera Key Features Overview
2. Package Contents
Verify that all items listed below are included in your package. If any items are missing or damaged, please contact customer support.
- VANBAR Trail Camera (Model D300-2022-9-26)
- 32GB Micro SD Card
- Mounting Strap
- Adjustable Mounting Bracket
- USB Cable
- Wall Mount Screws and Anchors
- User Manual
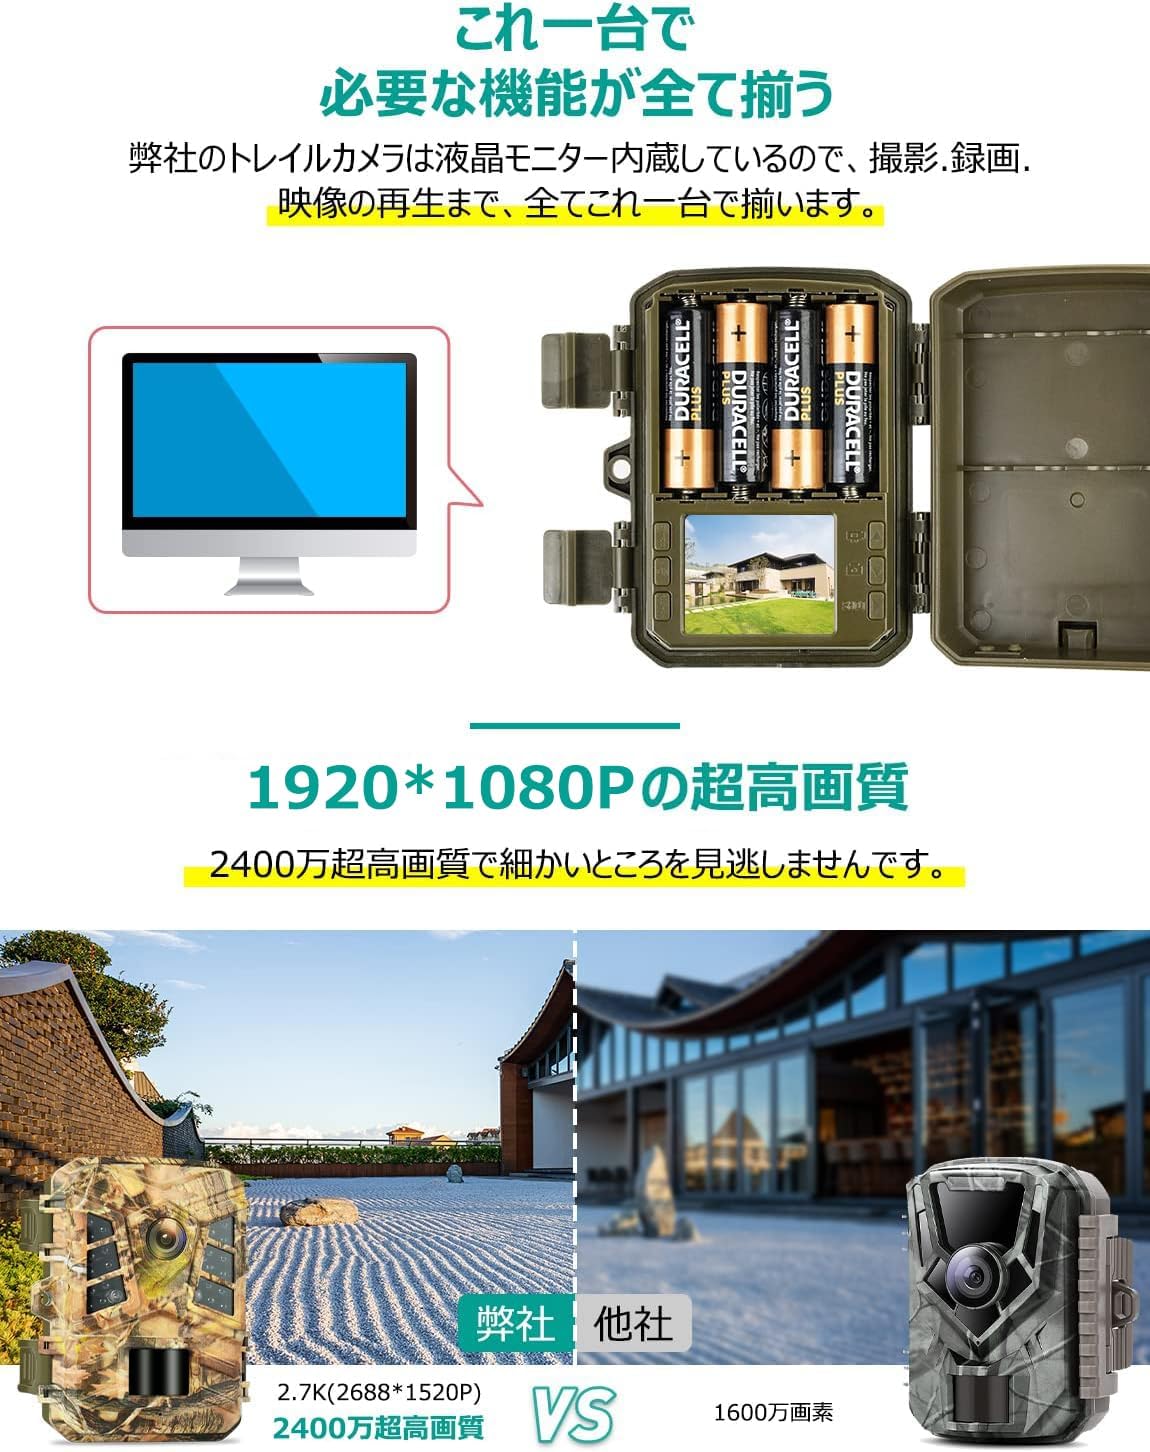
Figure 2.1: Package Contents
3. Product Overview
The VANBAR Trail Camera is a high-performance surveillance device featuring:
- High Resolution: Captures 24 Megapixel (MP) still images and 1920P Full HD (or 2.7K 2688*1520P) video.
- PIR Motion Sensor: Detects movement within a 120° wide range and up to 20 meters, triggering automatic recording.
- Night Vision: Equipped with infrared LEDs for clear monochrome recording in dark conditions up to 20 meters.
- Audio Recording: Built-in microphone captures ambient sounds.
- Weatherproof Design: IP66 rated for dust and water resistance, suitable for both indoor and outdoor use.
- Flexible Power Options: Operates on 4 AA batteries, or can be powered by an optional solar panel or AC adapter.
- Storage: Supports Micro SD cards up to 256GB (32GB card included).
- Loop Recording: Automatically overwrites older files when the memory card is full.
- Integrated LCD Screen: For easy menu navigation, live view, and playback of recorded footage.

Figure 3.1: Front View of the Trail Camera
4. Setup
4.1 Battery Installation
- Open the camera casing by unlatching the side clips.
- Locate the battery compartment.
- Insert 4 new 1.5V AA alkaline batteries, ensuring correct polarity (+/-). High-performance alkaline batteries are recommended for optimal battery life.
- Close the battery compartment securely.
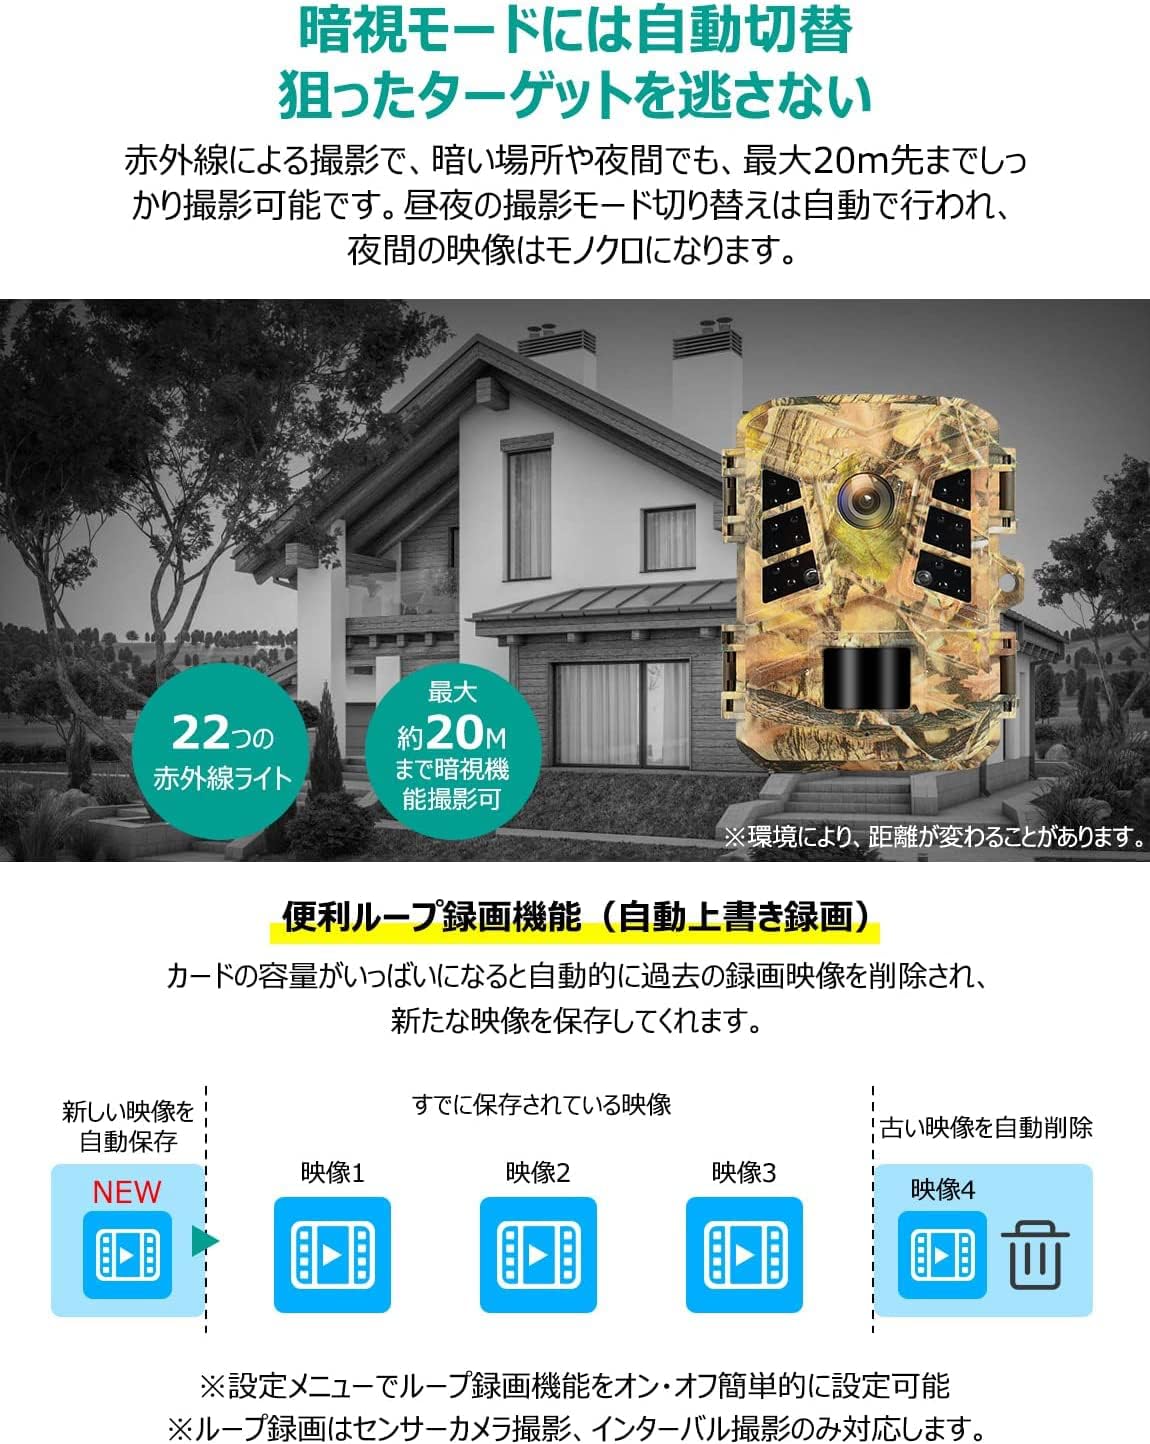
Figure 4.1: Battery Installation
4.2 Micro SD Card Installation
- With the camera casing open, locate the Micro SD card slot.
- Insert the provided 32GB Micro SD card into the slot until it clicks into place. The camera supports up to 256GB Micro SD cards.
- To remove the card, push it gently until it springs out.
4.3 Powering On/Off
- To power on the camera, slide the power switch to the 'ON' position.
- To power off, slide the switch to the 'OFF' position.
4.4 Initial Settings
Upon first use or after a reset, you may need to configure basic settings:
- Power on the camera. The LCD screen will activate.
- Use the navigation buttons (Up, Down, Left, Right, OK, Menu) to navigate the menu.
- Select 'Language' and choose 'English'.
- Set the correct 'Date' and 'Time'.
- Adjust other settings as desired (refer to Section 5 for more details).

Figure 4.2: Camera Menu Interface
5. Operating Instructions
5.1 Menu Navigation
Press the 'MENU' button to access the settings menu. Use the 'UP' and 'DOWN' buttons to scroll through options, 'OK' to select, and 'LEFT' or 'RIGHT' to change values. Press 'MENU' again to exit.
5.2 Recording Modes
The camera offers three primary recording modes:
- Video Mode: Records video clips when motion is detected.
- Photo Mode: Captures still images when motion is detected.
- Video + Photo Mode: Captures both a still image and a video clip when motion is detected.
- Interval Shooting: Captures photos or videos at pre-set intervals, useful for time-lapse observations of plants or animals. Note: PIR motion detection is not active during interval shooting.

Figure 5.1: PIR Motion Detection Recording Modes
5.3 PIR Motion Sensor Settings
Adjust the PIR sensor's sensitivity and detection range in the menu to suit your environment and reduce false triggers.
- Sensitivity: High, Medium, Low. Higher sensitivity detects smaller movements or movements at greater distances.
- Detection Range: The sensor can detect motion up to 20 meters away within a 120° field of view.
5.4 Time-Specified Recording
This feature allows the camera to record only during specific time periods. For example, you can set it to monitor from 08:00 to 11:00. Recording will only start if motion is detected within the specified time frame.

Figure 5.2: Time-Specified Recording
5.5 Audio Recording
The built-in microphone records ambient sounds along with video footage. This can provide additional context for recorded events.
5.6 Playback
You can review recorded photos and videos directly on the camera's LCD screen or by connecting the camera to a computer via USB, or by inserting the Micro SD card into a card reader.
- On-Camera Playback: Use the 'MODE' button to switch to playback mode. Use 'UP'/'DOWN' to browse files and 'OK' to play videos or view photos.
- PC Playback: Connect the camera to a PC using the USB cable or insert the SD card into a PC card reader. The camera will appear as a removable disk, allowing you to access the recorded files.

Figure 5.3: Playback Options and Battery Life Chart
6. Night Vision
The camera automatically switches to night vision mode in low-light conditions. Infrared LEDs illuminate the area, allowing the camera to capture clear monochrome images and videos up to 20 meters away. The transition between day and night mode is automatic.
7. Loop Recording
When the Micro SD card's storage capacity is full, the loop recording function automatically deletes the oldest files to make space for new recordings. This ensures continuous operation without manual intervention to clear the card.

Figure 7.1: Loop Recording Functionality
8. Battery Life and Power Options
The camera primarily operates on 4 AA alkaline batteries. Battery life can vary significantly based on usage, such as the frequency of motion detection and recording duration. The maximum standby time is approximately 6 months.
8.1 Estimated Battery Life (Alkaline Batteries)
| Setting | Max Standby Time | Max Recording Time (Test Value) | |
|---|---|---|---|
| Day | Night | ||
| 4 AA Batteries Used (Recording length 2 min / Motion detection interval 5 sec) | 6 months | Approx. 8.5 hours | Approx. 1.5 hours |
Note: Standby mode means only the front PIR sensor is active. If motion is detected and recording occurs, battery consumption increases, significantly reducing standby time. Actual operating times may vary depending on the environment.
8.2 Alternative Power Options
In addition to AA batteries, the camera supports external power sources:
- Solar Panel (Optional): Connect an external solar panel (sold separately) to provide continuous power and reduce battery changes.
- AC Adapter (Optional): For indoor use or locations with easy access to power, a 6V 1.5A AC adapter (sold separately) can be used.

Figure 8.1: Power Supply Options
9. Installation
The VANBAR Trail Camera offers flexible installation options to suit various monitoring needs.
- Strap Mounting: Use the included strap to secure the camera to trees, poles, or other vertical structures.
- Stand Mounting: The adjustable mounting bracket allows for placement on flat surfaces or attachment to a tripod.
- Wall Mounting: Use the provided screws and anchors to fix the camera to a wall or concrete surface.
Ensure the camera is positioned to capture the desired area, avoiding direct sunlight or strong light sources that could affect image quality or trigger false detections. The IP66 waterproof rating ensures reliable operation in outdoor environments.

Figure 9.1: Camera Mounted on a Tree
10. Maintenance
- Cleaning: Use a soft, dry cloth to clean the camera lens and body. Do not use abrasive cleaners or solvents.
- Battery Replacement: Replace all batteries simultaneously with new ones when the low battery indicator appears. Do not mix old and new batteries or different battery types.
- SD Card Management: Regularly check the SD card for available space. Format the SD card periodically to maintain optimal performance.
- Firmware Updates: Check the VANBAR official website for any available firmware updates to ensure your camera has the latest features and bug fixes.
11. Troubleshooting
If you encounter issues with your camera, refer to the following common problems and solutions:
- Camera not powering on:
- Ensure batteries are inserted correctly with proper polarity.
- Check if batteries are fully charged or replace them with new ones.
- Verify the power switch is in the 'ON' position.
- Camera not recording:
- Check if the Micro SD card is inserted correctly and has sufficient free space.
- Ensure the camera is in the correct recording mode (Video, Photo, or Video+Photo).
- Adjust PIR sensor sensitivity if motion is not being detected.
- Verify that time-specified recording is not preventing recording during the current period.
- Poor image/video quality:
- Clean the camera lens.
- Ensure the camera is not facing direct sunlight or strong light sources.
- For night vision, ensure there are no obstructions blocking the infrared LEDs.
- Short battery life:
- Use high-quality alkaline batteries.
- Reduce PIR sensor sensitivity or detection frequency to minimize unnecessary recordings.
- Consider using an optional solar panel or AC adapter for continuous power.
If the problem persists, please contact VANBAR customer support.
12. Specifications
| Feature | Specification |
|---|---|
| Brand | VANBAR |
| Model Number | D300-2022-9-26 |
| Photo Resolution | Up to 24MP |
| Video Resolution | 1920x1080P Full HD, 2688x1520P (2.7K) |
| Video Format | MOV |
| Connectivity Technology | Wireless (Wi-Fi for connection protocol, though primary operation is standalone) |
| Special Features | Motion Sensor, Night Vision, Audio Recording, Loop Recording, Interval Shooting |
| Indoor/Outdoor Use | Indoor, Outdoor |
| Water Resistance | IP66 |
| Power Source | Battery Powered (4x AA 1.5V), Optional Solar Panel, Optional AC Adapter (6V 1.5A) |
| Storage | Micro SD card up to 256GB (32GB included) |
| PIR Detection Range | Up to 20 meters, 120° angle |
| Night Vision Range | Up to 20 meters (Monochrome) |
| Mounting Type | Wall Mount, Strap Mount, Stand Mount |
| Controller Type | Button |
13. Warranty and Support
VANBAR offers a 1-year quality guarantee for this product. If you encounter any issues or have questions, please contact our customer support team. We provide support via email and LINE to ensure the best shopping experience before, during, and after your purchase.
For support, please refer to the contact information provided on the product packaging or the official VANBAR website.
