1. Introduction
The Lithonia Lighting BarnGuard BGS LED Security Light is an energy-efficient outdoor fixture designed to replace traditional mercury vapor and HPS lights. It provides reliable illumination for various outdoor applications such as yards, barns, garages, backyards, and alleyways. This fixture features adjustable color temperature and an integrated dusk-to-dawn photocell for automatic operation.
Key Features:
- Adjustable Color Temperature: Select between 3000K (Warm White), 4000K (Cool White), or 5000K (Daylight) to suit your preference.
- High Lumen Output: Delivers an impressive 6000 lumens for bright and effective illumination.
- Dusk-to-Dawn Photocell: Automatically turns the light on at dusk and off at dawn, optimizing energy savings and convenience.
- Durable Construction: Features a die-cast aluminum housing and an impact-resistant polycarbonate lens, designed to withstand harsh outdoor conditions.
- Versatile Mounting: Suitable for wall or pole mounting (mounting arm sold separately).
2. Safety Information
WARNING: RISK OF ELECTRIC SHOCK. Disconnect power at the circuit breaker or fuse box before installation, servicing, or removing the fixture. Failure to do so may result in serious injury or death.
- All wiring connections must be made in accordance with local and national electrical codes.
- This product must be installed by a qualified electrician.
- Ensure the supply voltage is compatible with the fixture (120-277V).
- This fixture is rated for wet locations. Ensure all connections are properly sealed to prevent moisture ingress.
- Do not handle the fixture with wet hands or when standing on wet or damp surfaces.
3. Package Contents
Verify that all components are present before beginning installation:
- BGS P2 LED Security Light Fixture
- Lag Bolts (for mounting)
- Wire Nuts
- Allen Key
- Instruction Pamphlet
Note: An optional mounting arm for pole installation is sold separately.
4. Specifications
| Model | BGS P2 SWW2 MVOLT PE DDB M2 |
| Dimensions (D x W x H) | 11.3" x 9.3" x 3.5" |
| Weight | 2.26 lbs |
| Voltage | MVOLT 120-277V |
| Wattage | 45W |
| Brightness | 6000 Lumens |
| Color Temperature | Switchable: 3000K, 4000K, 5000K |
| Material | Die-cast Aluminum Housing, Polycarbonate Lens |
| Finish | Dark Bronze |
| Mounting | Wall Mount (or pole with optional arm) |
| Ratings | UL Wet Location Rated, DLC Qualified |
| Photocell | Integrated Dusk-to-Dawn |
5. Installation
This fixture is designed for direct wiring and can be mounted to a wall or a pole (using an optional mounting arm). Refer to the included instruction pamphlet or scan the QR code on the product for detailed installation diagrams and safety guidelines.
General Installation Steps:
- Disconnect Power: Turn off power at the circuit breaker before starting installation.
- Choose Location: Select a suitable outdoor location for mounting. Ensure the mounting surface is sturdy enough to support the fixture.
- Mount Fixture: Use the provided lag bolts to secure the fixture's mounting flanges directly to the wall. For pole mounting, attach the fixture to a compatible mounting arm (sold separately).
- Wire Connections: Connect the fixture's wires to your electrical supply wires:
- Black wire (fixture) to Live/Hot wire (supply)
- White wire (fixture) to Neutral wire (supply)
- Green wire (fixture) to Ground wire (supply)
- Secure Wiring: Carefully tuck all wires into the mounting area or junction box.
- Restore Power: Once installation is complete and all connections are secure, restore power at the circuit breaker.

Figure 1: Front view of the BGS P2 LED Security Light.
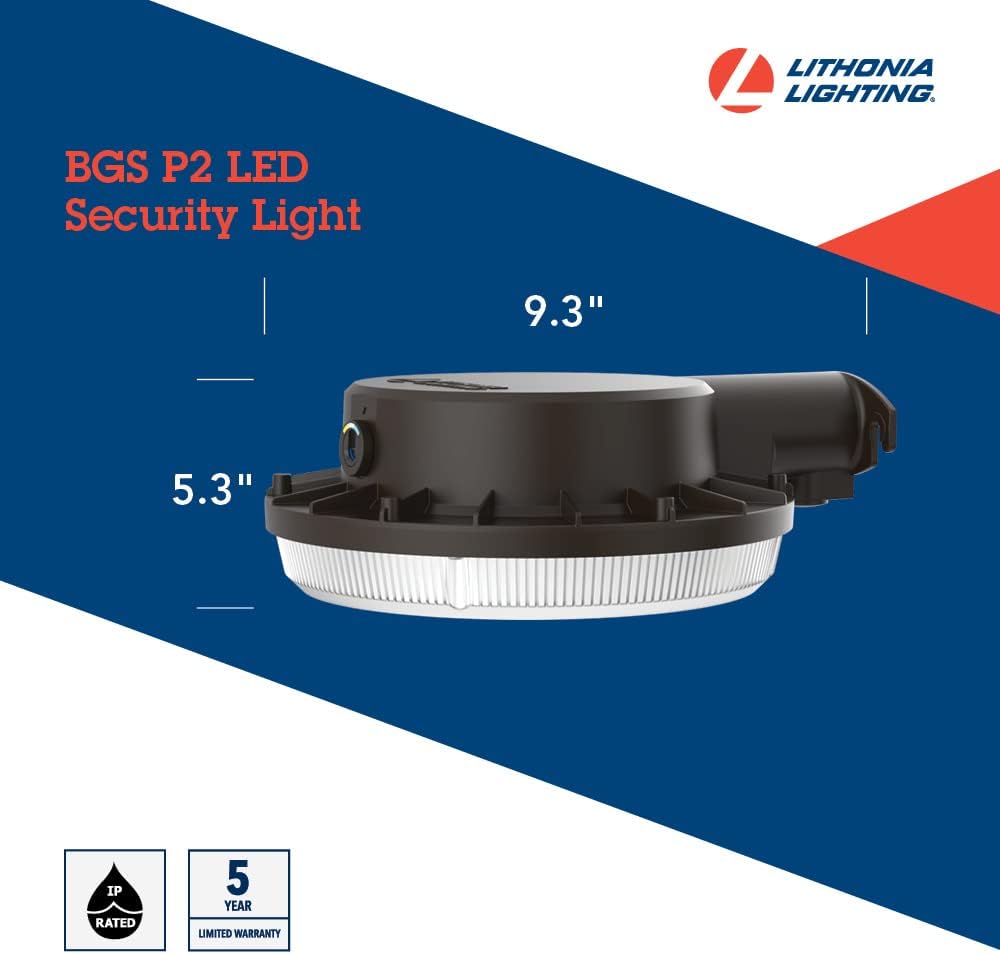
Figure 2: Dimensions of the BGS P2 LED Security Light for mounting reference.

Figure 3: Example installation of the BGS P2 LED Security Light on a barn.
Video 1: Lithonia Lighting Barn Security Light Overview 2023. This video provides a general overview of the product, including some installation considerations and features.
6. Operating Instructions
The BGS P2 LED Security Light features adjustable color temperature and an integrated dusk-to-dawn photocell.
Color Temperature Adjustment:
The fixture has a dial on the back that allows you to select one of three color temperatures:
- 3000K: Warm White
- 4000K: Cool White
- 5000K: Daylight
Rotate the outer dial to the desired color temperature setting. It is recommended to choose a warmer color temperature (e.g., 3000K) for outdoor use to minimize disruption to wildlife, as 5000K is very close to natural daylight.
Photocell Operation:
The integrated photocell automatically turns the light on when ambient light levels drop (dusk) and off when light levels rise (dawn).
- Sensitivity Adjustment: An inner dial allows you to adjust the photocell's sensitivity. Turning the dial towards the blue indicator makes the sensor more sensitive, causing the light to turn on earlier in the evening. Turning it towards the yellow indicator makes it less sensitive, causing it to turn on later.
- Manual Control: To bypass the photocell for manual control (e.g., with a timer or wall switch), rotate the inner dial to the position indicated by the blue dot. This effectively tells the light it's always dark, allowing external controls to manage its operation.

Figure 4: Bottom view of the fixture, highlighting the color temperature selection dial.

Figure 5: The fixture with the lower diffuser removed, showing the LED array and internal components.
Video 2: Lithonia Lighting BGS Outdoor LED Photocell Security Light Spin. This video demonstrates the physical appearance and features of the light.
7. Maintenance
The BGS P2 LED Security Light requires minimal maintenance.
- Cleaning: To clean the fixture, ensure power is disconnected. Use a soft, damp cloth with mild, non-abrasive soap. Do not use harsh chemicals or abrasive cleaners, as they may damage the finish or lens.
- Inspection: Periodically inspect the fixture for any signs of damage, loose connections, or wear. Address any issues promptly to ensure continued safe and optimal operation.
8. Troubleshooting
| Problem | Possible Cause | Solution |
| Light does not turn on | No power to the fixture Incorrect wiring Photocell setting too low (always off) | Check circuit breaker and power supply Verify wiring connections (Live, Neutral, Ground) Adjust photocell sensitivity or set to manual control (blue dot) |
| Light flickers | Loose wiring connection Voltage fluctuations | Check and tighten all wiring connections Consult a qualified electrician to check voltage stability |
| Light stays on during the day or off at night | Photocell obstructed or faulty Photocell sensitivity incorrectly set | Ensure photocell is not blocked by debris or external light sources Adjust photocell sensitivity dial (inner dial) |
9. Warranty and Support
Warranty:
This Lithonia Lighting BGS P2 LED Security Light is backed by a 5-year limited warranty. This warranty covers defects in materials and workmanship under normal use and service. Please refer to the full warranty statement on the manufacturer's website or in the product documentation for complete terms and conditions.
Technical Assistance:
For technical assistance, installation questions, or warranty claims, please contact our support team:
- Phone: 1-800-705-SERV (7378)
- Website: postsales.acuitybrands.com


