Introduction
This manual provides essential information for the safe operation, maintenance, and troubleshooting of your CAT DX46U 3.0-Amp 5-inch Random Orbit Sander. Please read these instructions carefully before using the tool to ensure proper function and to prevent injury or damage.
General Safety Information
Always follow basic safety precautions when using electric power tools to reduce the risk of fire, electric shock, and personal injury. Keep this manual for future reference.
- Work Area Safety: Keep the work area clean and well-lit. Cluttered or dark areas invite accidents. Do not operate power tools in explosive atmospheres, such as in the presence of flammable liquids, gases, or dust.
- Electrical Safety: Power tool plugs must match the outlet. Never modify the plug in any way. Avoid body contact with earthed or grounded surfaces. Do not expose power tools to rain or wet conditions.
- Personal Safety: Always wear eye protection, such as safety goggles or a face shield. Use hearing protection when operating noisy tools. Wear a dust mask if sanding operations create dust. Dress properly; avoid loose clothing or jewelry.
- Tool Use and Care: Do not force the power tool. Use the correct power tool for your application. Disconnect the plug from the power source before making any adjustments, changing accessories, or storing power tools.
- Dust Collection: Always use the dust collection system provided or connect to an external vacuum system to minimize dust exposure.
Product Overview
The CAT DX46U Random Orbit Sander is designed for efficient material removal and smooth finishes. Key features include a powerful 3.0-Amp motor, variable speed control, and a robust dust collection system.
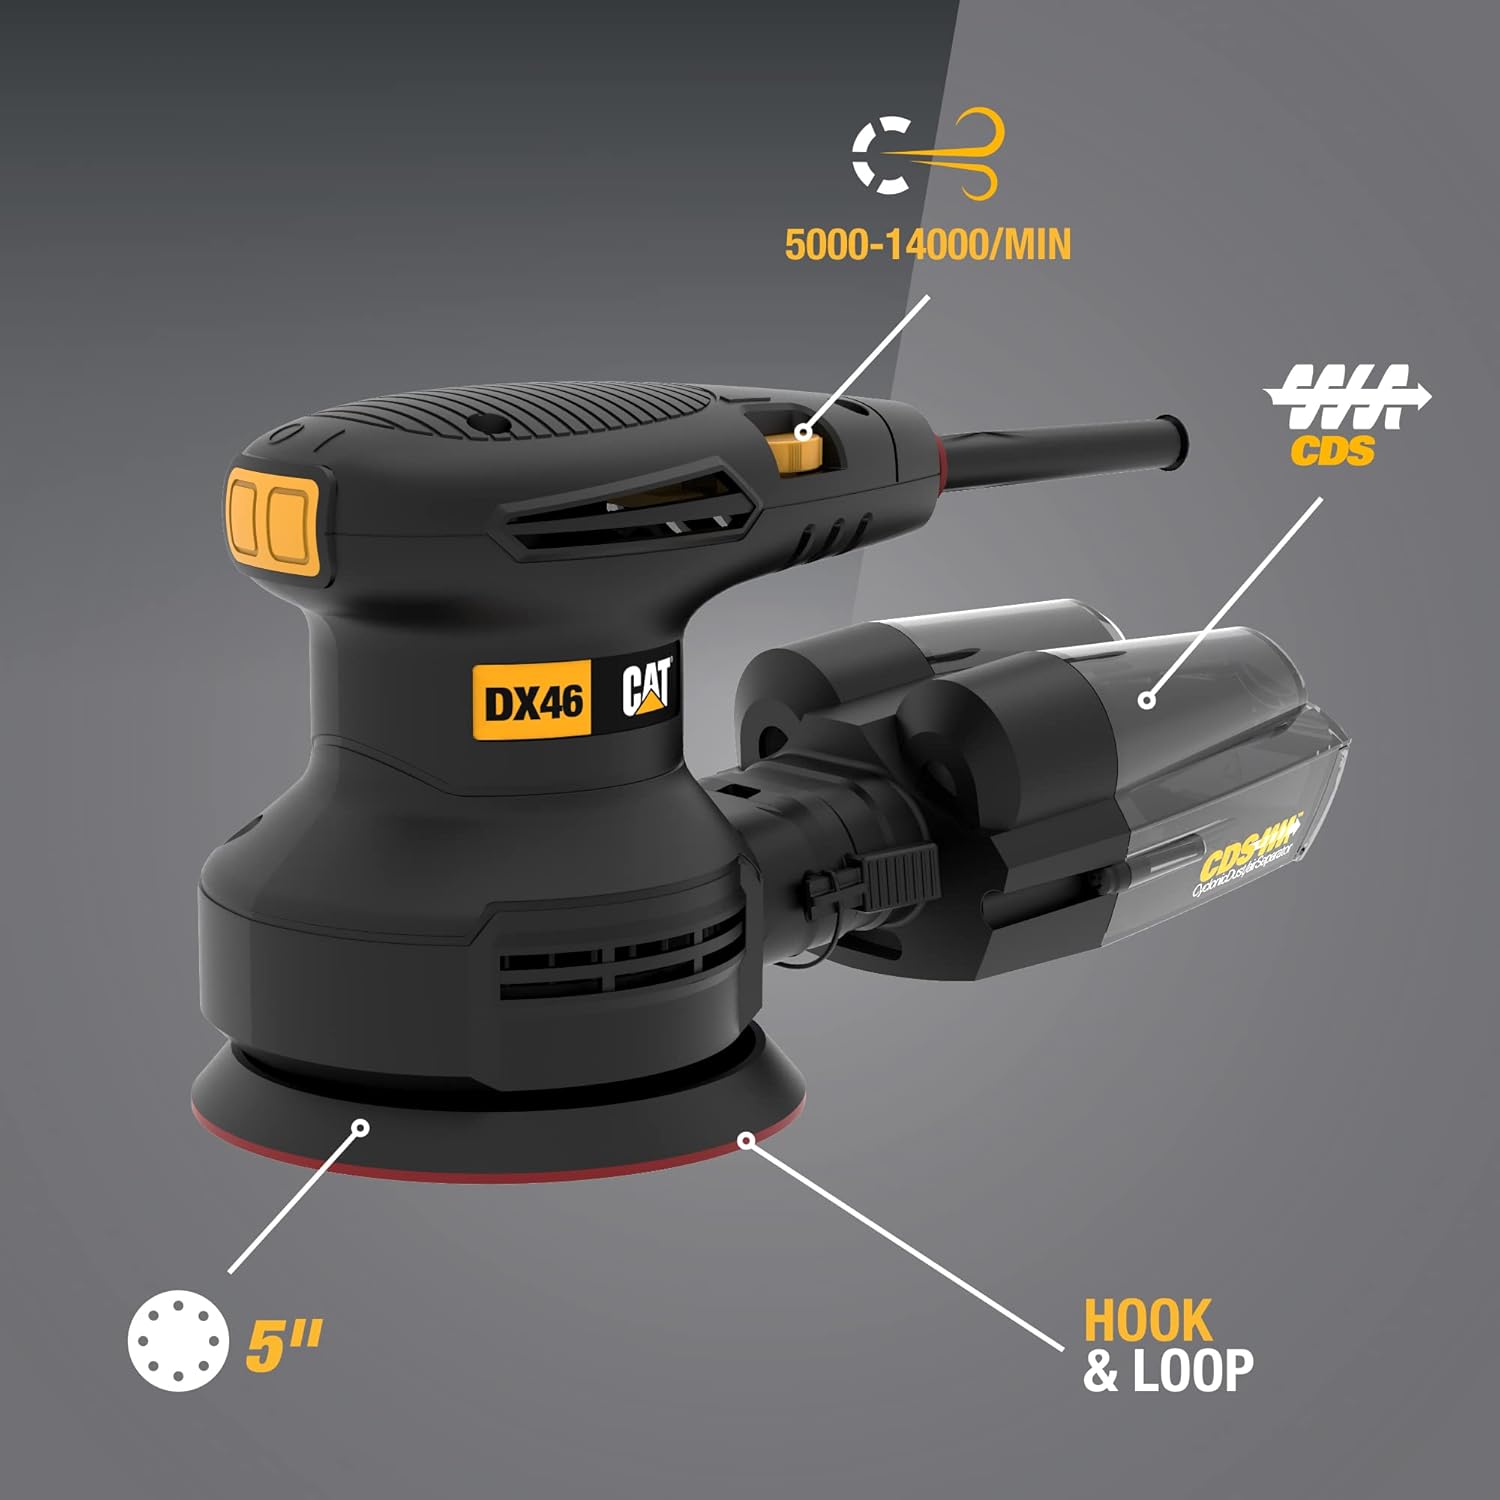
Figure 1: Overview of the CAT DX46U Random Orbit Sander, highlighting its 5-inch sanding pad, hook & loop system, variable speed control (5000-14000 OPM), and Cyclonic Dust Separator (CDS).

Figure 2: The package includes the DX46U 3.0-Amp Electric 5-inch Random Orbit Sander, 80G sandpaper, a CDS dust bin, and a vacuum adapter.
Key Features:
- Powerful 3.0-Amp Motor: Delivers consistent power for various sanding tasks.
- Variable Speed Control: Adjustable speed from 5,000 to 14,000 Orbits Per Minute (OPM) for optimal control over different materials and finishes.
- 5-inch Hook & Loop Pad: Compatible with standard 5-inch 8-hole random orbit sandpaper for quick and easy changes.
- Cyclonic Dust Separator (CDS): Efficiently collects dust, keeping the work area cleaner.
- Dust-Sealed Switch: Protects internal electronics from dust ingress, extending tool life.
- Ergonomic Design: Rubber overmold grip provides comfort and enhanced control during extended use.
- 10-ft Power Cord: Offers ample reach and flexibility in the workspace.
Setup
1. Attaching Sandpaper
- Ensure the sander is unplugged from the power source.
- Align the holes on the 5-inch 8-hole sandpaper with the holes on the sander's pad.
- Press the sandpaper firmly onto the hook & loop pad to secure it.
2. Attaching Dust Collection System
The DX46U comes with a CDS dust bin and a vacuum adapter for dust management.
- For CDS Dust Bin: Slide the CDS dust bin onto the dust port at the rear of the sander until it clicks securely into place.
- For Vacuum Adapter: If using an external vacuum, attach the vacuum adapter to the dust port, then connect your vacuum hose to the adapter.

Figure 3: The Cyclonic Dust Separator (CDS) efficiently separates dust particles from the airflow, collecting them in the bin.
3. Power Connection
Plug the 10-ft power cord into a suitable electrical outlet. Ensure the outlet matches the voltage requirements of the tool.
Operating Instructions
1. Starting and Stopping the Sander
- To start the sander, push the dust-sealed switch to the "ON" position.
- To stop the sander, push the switch to the "OFF" position.
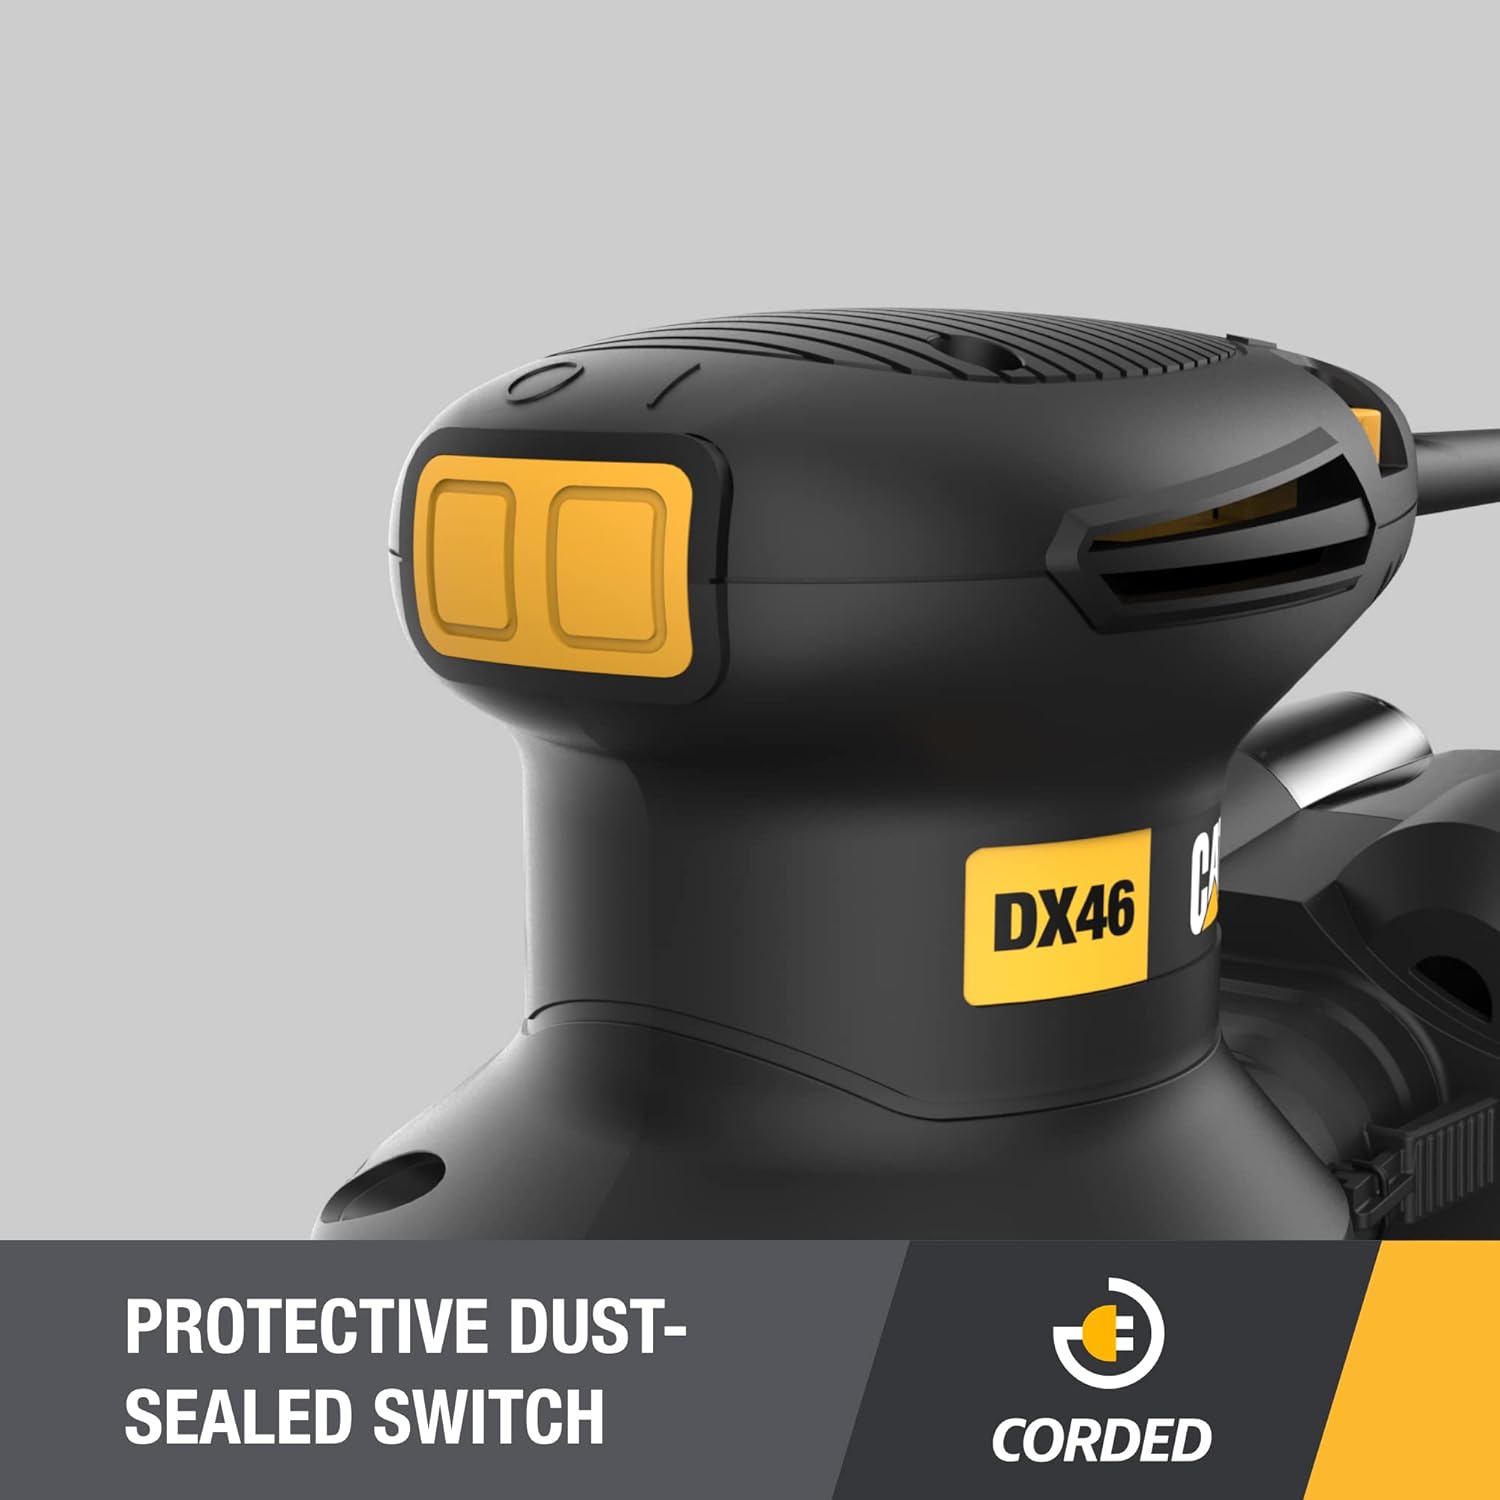
Figure 4: The protective dust-sealed switch prevents dust from entering the tool's electronics, enhancing durability.
2. Adjusting Variable Speed
The variable speed dial allows you to match the sanding speed to the material and desired finish.
- Rotate the dial to increase or decrease the OPM (Orbits Per Minute).
- Lower speeds are suitable for delicate materials or fine finishing.
- Higher speeds are effective for aggressive material removal on tougher surfaces.

Figure 5: The variable speed control dial allows precise adjustment of the sanding speed.
3. Sanding Techniques
- Place the sander flat on the workpiece before turning it on.
- Apply light, even pressure. Let the tool do the work. Excessive pressure can reduce sanding efficiency and damage the workpiece or tool.
- Move the sander in overlapping circular or back-and-forth motions for an even finish.
- Lift the sander from the workpiece before turning it off.

Figure 6: The sander is effective for smoothing various surfaces, such as tabletops.
Maintenance
Regular maintenance ensures the longevity and optimal performance of your sander. Always unplug the tool before performing any maintenance.
- Cleaning: Periodically clean the tool's exterior with a soft, damp cloth. Do not use harsh chemicals or abrasive cleaners. Ensure ventilation openings are clear of dust and debris.
- Dust Bin: Empty the CDS dust bin frequently, especially when sanding fine dust. For best efficiency, empty every 5-10 minutes of operation. To clean, detach the bin and tap out the dust.
- Sanding Pad: Inspect the hook & loop pad for wear or damage. A worn pad may not hold sandpaper effectively. Replace if necessary.
- Power Cord: Regularly inspect the power cord for cuts, fraying, or damage. If damaged, have it replaced by a qualified service technician.
Troubleshooting
| Problem | Possible Cause | Solution |
|---|---|---|
| Sander does not start. | No power supply; faulty switch. | Check power cord and outlet. Ensure switch is in "ON" position. If problem persists, seek professional service. |
| Poor sanding performance. | Worn sandpaper; incorrect grit; excessive pressure. | Replace sandpaper. Use appropriate grit for the task. Apply light, even pressure. |
| Excessive dust. | Dust bin full or improperly attached; clogged dust port. | Empty and reattach dust bin securely. Clear any blockages in the dust port. Consider using a vacuum adapter with an external vacuum. |
| Sander vibrates excessively. | Damaged sanding pad; unbalanced sandpaper. | Inspect sanding pad for damage and replace if necessary. Ensure sandpaper is correctly aligned and not torn. |
Specifications
| Feature | Specification |
|---|---|
| Model Number | DX46U |
| Power Source | Corded Electric |
| Amperage Capacity | 3 Amps |
| Maximum Rotational Speed | 14,000 OPM (Orbits Per Minute) |
| Disc Diameter | 5 inches |
| Sanding Pad Type | Hook & Loop, 8-hole |
| Included Components | Sander (DX46U), 80G sandpaper, CDS dust bin, vacuum adapter |
| Product Dimensions | 27.43 x 12.19 x 14.99 cm |
| Item Weight | 1.6 kg (3.53 lbs) |
| Country of Origin | China |
| UPC | 845534025200 |
Warranty and Support
The CAT DX46U Random Orbit Sander comes with a 2-year manufacturer's warranty. This warranty covers defects in materials and workmanship under normal use.
For warranty claims, technical assistance, or service inquiries, please refer to the contact information provided with your purchase documentation or visit the official CAT Tools website for support resources.


