
Sinotimer TM618N-2
Sinotimer Digital Programmable Timer TM618N-2 User Manual
Model: TM618N-2
1. Product Overview
The Sinotimer TM618N-2 is a versatile 7-day weekly digital programmable timer designed for automated control of electrical equipment. It allows users to set specific daily or weekly schedules for turning devices on and off, ensuring efficient energy management and convenience. This timer is suitable for a wide range of applications, including controlling lighting, heating, ventilation, and other electrical appliances.

Figure 1: Front view of the Sinotimer TM618N-2 Digital Timer, showing the display and control buttons.
2. Key Features
- Weekly Programmable: Allows up to 16 ON/OFF programs per day or week.
- Multi-functional: Includes Clock display, Timer, Countdown, Automatic weekly time deviation correction, and Sleep mode.
- High Capacity: Supports 16 Amp / 220 Volt AC loads.
- Wide Voltage Compatibility: Operates with 220V, 230V, 240V AC.
- Built-in Battery: Retains settings during power outages (Lithium battery type).
- Versatile Applications: Ideal for controlling dryers, defrosting equipment, swimming pool pumps, gates, lighting, and more.
3. Specifications
| Feature | Detail |
|---|---|
| Model | TM618N-2 |
| Brand | Sinotimer |
| Voltage | 220V / 230V / 240V AC |
| Current Rating | 16 Amp |
| Number of Programs | 16 ON/OFF programs |
| Material | Plastic |
| Battery Type | Lithium (internal, non-replaceable by user) |
| Color | Multi-color (typically white/grey) |
4. Installation
Important Safety Notice: Installation should only be performed by a qualified electrician. Ensure power is disconnected before attempting any wiring.
- Mounting: The TM618N-2 is designed for DIN rail mounting or screw mounting. Secure the timer in a suitable electrical enclosure.
- Wiring: Refer to the wiring diagram on the back of the unit.
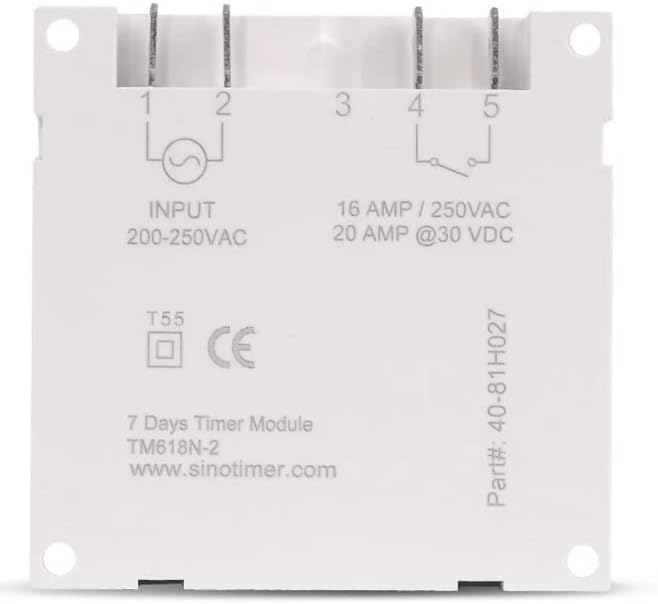
Figure 2: Back view of the Sinotimer TM618N-2, showing input/output terminals and wiring diagram.
- Input (Terminals 1 & 2): Connect your 200-250VAC power supply to these terminals.
- Output (Terminals 3, 4, & 5):
- Terminal 3: Common (COM)
- Terminal 4: Normally Open (NO) - Connect your load here for switched power.
- Terminal 5: Normally Closed (NC) - (Less commonly used for timer applications, but available).
- Power On: Once wiring is complete and secure, restore power to the circuit. The timer display should illuminate.

Figure 3: Technical drawing showing the dimensions of the Sinotimer TM618N-2 timer.
5. Operating Instructions
5.1. Button Functions
- CLOCK: Used to set the current time and day.
- PROG: Enters/exits programming mode for ON/OFF schedules.
- WEEK: Selects the day(s) of the week during time or program setting.
- HOUR: Adjusts the hour during time or program setting.
- MIN: Adjusts the minute during time or program setting.
- RECALL: Recalls or cancels a program setting.
- MANUAL: Manually overrides the timer's current state (ON/AUTO/OFF).
- R (Reset): Small button (requires a pointed object) to reset the timer to factory defaults.
5.2. Setting Current Time and Day
- Press and hold the CLOCK button.
- While holding CLOCK, press WEEK to set the current day (MO, TU, WE, TH, FR, SA, SU).
- While holding CLOCK, press HOUR to set the current hour.
- While holding CLOCK, press MIN to set the current minute.
- Release the CLOCK button to save the settings.
5.3. Programming ON/OFF Schedules
The timer supports up to 16 ON and 16 OFF programs. Each program can be set for a specific day or group of days.
- Press the PROG button once. The display will show "1 ON".
- Press WEEK repeatedly to select the desired day(s) for this program (e.g., MO, TU, WE, TH, FR, SA, SU; MO-FR; SA-SU; MO-SA; etc.).
- Press HOUR to set the desired ON hour.
- Press MIN to set the desired ON minute.
- Press PROG again. The display will show "1 OFF".
- Repeat steps 2-4 to set the desired OFF time for the first program.
- Press PROG to move to the next program ("2 ON", "2 OFF", etc.) and repeat the process for up to 16 programs.
- To exit programming mode and save settings, press the CLOCK button.
5.4. Manual Override
Press the MANUAL button to cycle through the output modes:
- ON: Output is continuously ON, ignoring programs.
- AUTO: Output follows the programmed schedules.
- OFF: Output is continuously OFF, ignoring programs.
Ensure the timer is in AUTO mode for programmed operation.
5.5. Resetting the Timer
To clear all settings and return the timer to its factory default state, insert a pointed object (like a paperclip) into the small R (Reset) hole and press gently.
6. Maintenance
The Sinotimer TM618N-2 requires minimal maintenance.
- Keep the device clean and free from dust. Use a soft, dry cloth for cleaning.
- Do not use abrasive cleaners or solvents.
- Ensure the timer is installed in a dry environment, away from direct moisture or extreme temperatures.
- The internal battery is designed for long life and is not user-replaceable. If the display goes blank or settings are not retained after a power outage, the battery may need professional service.
7. Troubleshooting
| Problem | Possible Cause | Solution |
|---|---|---|
| Display is blank. | No power supply; internal battery depleted. | Check power connections. If power is present, the internal battery may need charging (leave connected to power for several hours) or replacement (professional service required). |
| Timer not switching ON/OFF as programmed. | Timer is not in AUTO mode; incorrect program settings; wiring issue. | Press MANUAL until "AUTO" is displayed. Review and correct program settings. Verify wiring connections. |
| Settings are lost after power outage. | Internal battery is depleted or faulty. | Leave the timer connected to power for at least 4 hours to charge the internal battery. If the problem persists, the battery may need replacement (professional service recommended). |
| Buttons are unresponsive. | Temporary software glitch; unit needs reset. | Perform a full reset using the R button. If the issue continues, contact support. |
8. Warranty and Support
For warranty information and technical support, please refer to the documentation provided with your purchase or contact your retailer. Keep your proof of purchase for warranty claims.
Manufacturer: Sinotimer
Related documentsTM618N-2


Ask a question about this manual
Ask about setup, troubleshooting, compatibility, parts, safety, or missing instructions. Manuals+ will review the question and use this page’s manual context to help answer it.