
1. Introduction
Thank you for purchasing the DXQ K-1028E Universal Air Conditioner Remote Control. This remote is designed to provide convenient and comprehensive control over a wide range of air conditioning units. Its simple structure, large LCD display, and intelligent features make it an ideal replacement or secondary remote for your AC.
Key Features:
- Universal Compatibility: Controls over 1000 different global air conditioner brands.
- Easy Setup: Features a one-button setting for quick configuration.
- Large LCD Display: Provides clear visibility of settings and status.
- Long Control Distance: Effective range of approximately 8 to 10 meters.
- Humanized Design: Includes built-in clock, ON/OFF timer, and night light functions.
- Low Power Consumption: Efficient operation for extended battery life.

Image 1.1: Front and angled view of the DXQ K-1028E Universal AC Remote Control.

Image 1.2: The universal remote control demonstrating compatibility with various air conditioning units.
2. Setup
2.1 Battery Installation
The remote control requires two (2) AAA batteries (not included). Follow these steps to install them:
- Open the battery compartment cover on the back of the remote control.
- Insert two AAA batteries, ensuring the correct polarity (+ and -) as indicated inside the compartment.
- Close the battery compartment cover securely.

Image 2.1: Illustration of battery installation in the remote control.
2.2 Code Setting (Pairing with AC Unit)
There are two methods to set up the remote control with your air conditioner:
Method 1: Manual Code Input
- Turn on your air conditioner manually.
- Refer to the "Applicable Brand and Code List" (Image 2.2) to find the 3-digit code(s) for your AC brand.
- Press and hold the SET button on the remote control until the 3-digit code on the LCD display starts flashing.
- Use the Temperature + or Temperature - buttons to adjust the code until your brand's code appears.
- Once the correct code is displayed, press the OK button to confirm. The code will stop flashing.
- Test the remote control by pressing the ON/OFF button. If the AC unit responds, the setup is complete. If not, try the next code for your brand or proceed to Method 2.
Method 2: Automatic Code Search
- Ensure your air conditioner is turned on manually.
- Point the remote control towards the AC unit.
- Press and hold the SET button for approximately 6 seconds until the 3-digit code on the LCD display starts flashing and automatically cycles through codes.
- Observe your AC unit. When the AC unit responds (e.g., turns off, changes mode, or makes a sound), immediately release the SET button.
- Press the OK button to confirm the code.
- Test the remote control by pressing various function buttons. If the AC unit responds correctly, the setup is complete. If not, repeat the automatic search process.
Note: For some popular brands, the remote may work directly after battery installation without needing to set a code.

Image 2.2: Applicable Brand and Code List for the K-1028E remote.
3. Operating Instructions
3.1 Remote Control Layout and Functions
Familiarize yourself with the buttons and display on your K-1028E remote control:
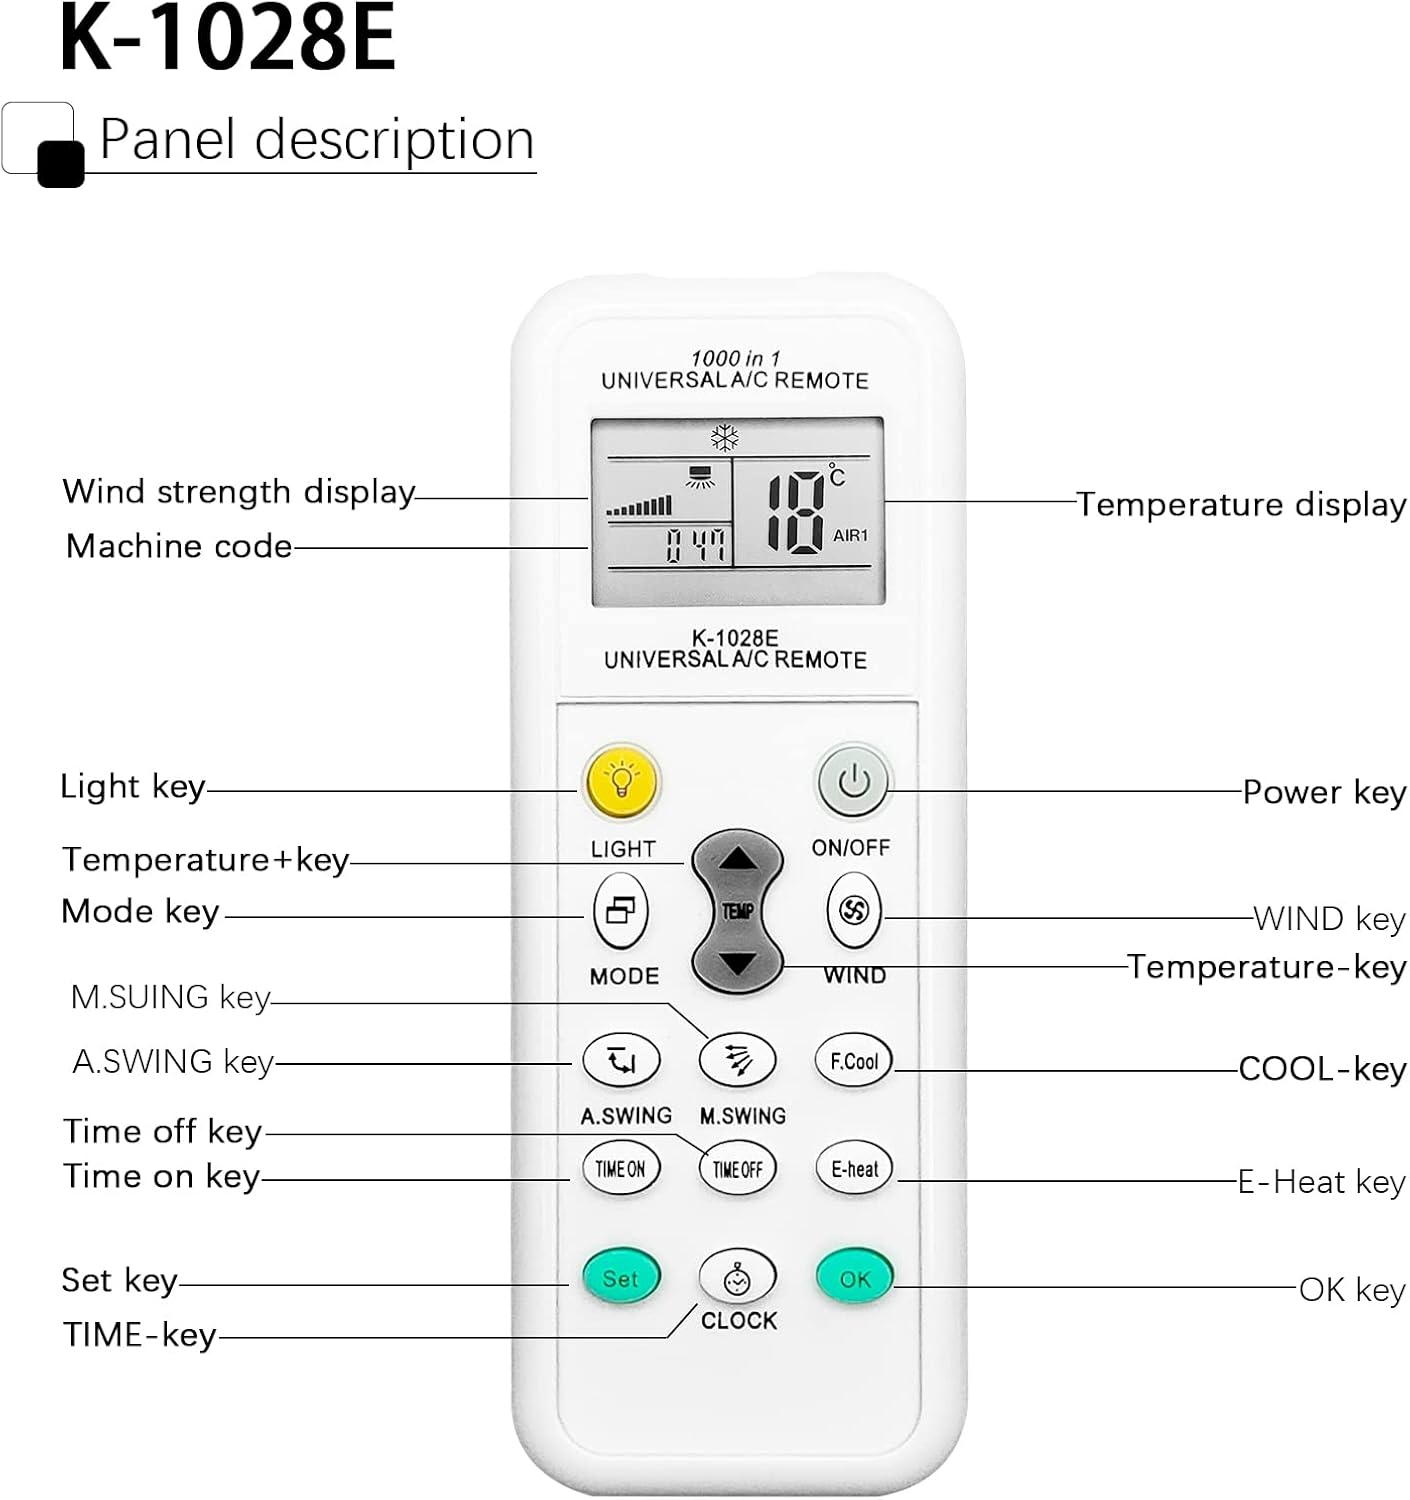
Image 3.1: Panel Description of the K-1028E Universal AC Remote.
- LCD Display: Shows temperature, mode, fan speed, timer status, and machine code.
- LIGHT Key: Activates the built-in night light function.
- ON/OFF Key: Powers the AC unit on or off.
- MODE Key: Cycles through operating modes (e.g., Cool, Heat, Fan, Dry, Auto).
- TEMP + / TEMP - Keys: Adjusts the temperature setting.
- WIND Key: Adjusts the fan speed (Auto, Low, Medium, High).
- A.SWING / M.SWING Keys: Controls the vertical (A.SWING) and horizontal (M.SWING) swing of the air deflector.
- F.Cool Key: Activates the fast cool mode (if supported by AC).
- E-Heat Key: Activates the electric heat mode (if supported by AC).
- TIME ON / TIME OFF Keys: Sets the automatic power-on or power-off timer.
- CLOCK Key: Sets the current time.
- SET Key: Used for code setting (as described in Section 2.2).
- OK Key: Confirms settings.
3.2 Basic Operation
- Power On/Off: Press the ON/OFF button.
- Select Mode: Press the MODE button repeatedly to cycle through available modes (e.g., Cool, Heat, Fan, Dry, Auto). The selected mode will be displayed on the LCD.
- Adjust Temperature: Use the TEMP + or TEMP - buttons to set your desired temperature.
- Adjust Fan Speed: Press the WIND button to cycle through fan speed options.
- Control Airflow Direction: Use A.SWING and M.SWING buttons to adjust the louver direction.

Image 3.2: Remote control effective distance and available operating modes.
3.3 Timer Functions
The remote control allows you to set a timer for the AC unit to automatically turn on or off.
- Setting Current Time: Press the CLOCK button. The time display will flash. Use TEMP + or TEMP - to adjust the hour, then press CLOCK again to adjust minutes. Press OK to confirm.
- Setting ON Timer: Press the TIME ON button. The time display will flash. Use TEMP + or TEMP - to set the desired power-on time. Press OK to confirm.
- Setting OFF Timer: Press the TIME OFF button. The time display will flash. Use TEMP + or TEMP - to set the desired power-off time. Press OK to confirm.
- Canceling Timer: Press the corresponding TIME ON or TIME OFF button again, then press OK.

Image 3.3: The remote's time switch function for automated operation.
4. Maintenance
4.1 Battery Replacement
When the remote control's display becomes dim or the remote becomes unresponsive, it's time to replace the batteries. Follow the battery installation steps in Section 2.1.
- Always replace both batteries at the same time.
- Do not mix old and new batteries, or different types of batteries.
- Remove batteries if the remote will not be used for an extended period to prevent leakage.
- Dispose of used batteries responsibly according to local regulations.
4.2 Cleaning
To clean the remote control, use a soft, dry cloth. Do not use liquid cleaners, sprays, or abrasive materials, as these can damage the remote's surface or internal components.
5. Troubleshooting
| Problem | Possible Cause | Solution |
|---|---|---|
| Remote does not work or AC does not respond. | Incorrect code setting; Dead or weak batteries; Obstruction between remote and AC unit; Remote not pointed correctly. | Re-perform code setting (Section 2.2); Replace batteries; Remove any obstructions; Ensure remote is pointed directly at the AC unit's receiver. |
| Limited control distance. | Weak batteries; Obstruction; Interference. | Replace batteries; Ensure clear line of sight to AC unit; Avoid strong light sources or other infrared devices. |
| Some functions do not work. | AC unit does not support the function; Incorrect code. | Not all AC units support every function (e.g., F.Cool, E-Heat). Verify if your AC unit has this feature. Try another code for your brand (if available). |
| LCD display is dim or blank. | Low batteries. | Replace batteries. |
6. Specifications
| Feature | Specification |
|---|---|
| Brand | DXQ |
| Model Number | K-1028E |
| Color | White |
| Connectivity Technology | Infrared |
| Compatible Devices | Air Conditioner |
| Maximum Range | 10 Meters (approx. 33 feet) |
| Number of Buttons | 20 |
| Power Source | 2 x AAA Batteries (not included) |
| Item Weight | 30 Grams |
7. Warranty and Support
7.1 Warranty Information
Specific warranty information for this product is not available in the provided documentation. Please refer to the seller or manufacturer's website for details regarding warranty coverage and terms.
7.2 Customer Support
If you encounter any issues or have questions not covered in this manual, please contact the seller or manufacturer's customer support. Keep your purchase receipt or order details handy for faster service.


