
1. Introduction
The INTERPHONE UCOM3 is a compact and advanced Bluetooth communication system designed for motorcyclists. It offers seamless connectivity, clear audio, and robust performance, ensuring you stay connected and entertained on the road. This manual provides comprehensive instructions for setting up, operating, and maintaining your UCOM3 unit.

Image: The Interphone UCOM3 unit, showcasing its compact design and intuitive button layout.
2. Key Features
- Bluetooth 5.1 Technology: Ensures stable and efficient wireless connections.
- Integrated Battery: Compact design with a long-lasting battery for extended use.
- 2-Rider Intercom: Communicate with another rider up to 500 meters (1640 feet) away.
- 10-Hour Talk Time: Enjoy prolonged conversations and audio playback.
- 32mm HD Speakers: Delivers high-quality audio with rich bass for music and communication.
- DSP and Noise Control: Advanced digital signal processing for clear audio and reduced background noise.
- Waterproof IP67 Rating: Designed to withstand various weather conditions.
- Universal Compatibility: Works with original OEM helmet systems, most intercoms from other brands (including Sena), TFT displays, and GPS systems.
- Intuitive Multilingual App: Easy control and customization via a dedicated app for iOS and Android.
3. Setup Guide
3.1 What's Included
Before you begin, ensure all components are present in your package:
- INTERPHONE UCOM3 Main Unit
- Helmet Speakers (32mm HD)
- Boom Microphone
- Wired Microphone
- Mounting Clip
- Adhesive Mount
- USB Charging Cable
- User Manual (this document)

Image: Contents of the Interphone UCOM3 package, including the main unit, speakers, microphones, and mounting options.
3.2 Installation
Proper installation is crucial for optimal performance and comfort.
3.2.1 Mounting the Unit
Choose between the mounting clip or the adhesive mount based on your helmet type and preference.
- Mounting Clip: Slide the clip between the helmet shell and the inner padding on the left side. Ensure it is securely fastened.
- Adhesive Mount: Clean the desired area on the left side of your helmet. Peel off the protective backing from the adhesive pad and firmly press the mount onto the helmet surface for at least 30 seconds. Allow 24 hours for the adhesive to fully cure before attaching the unit.
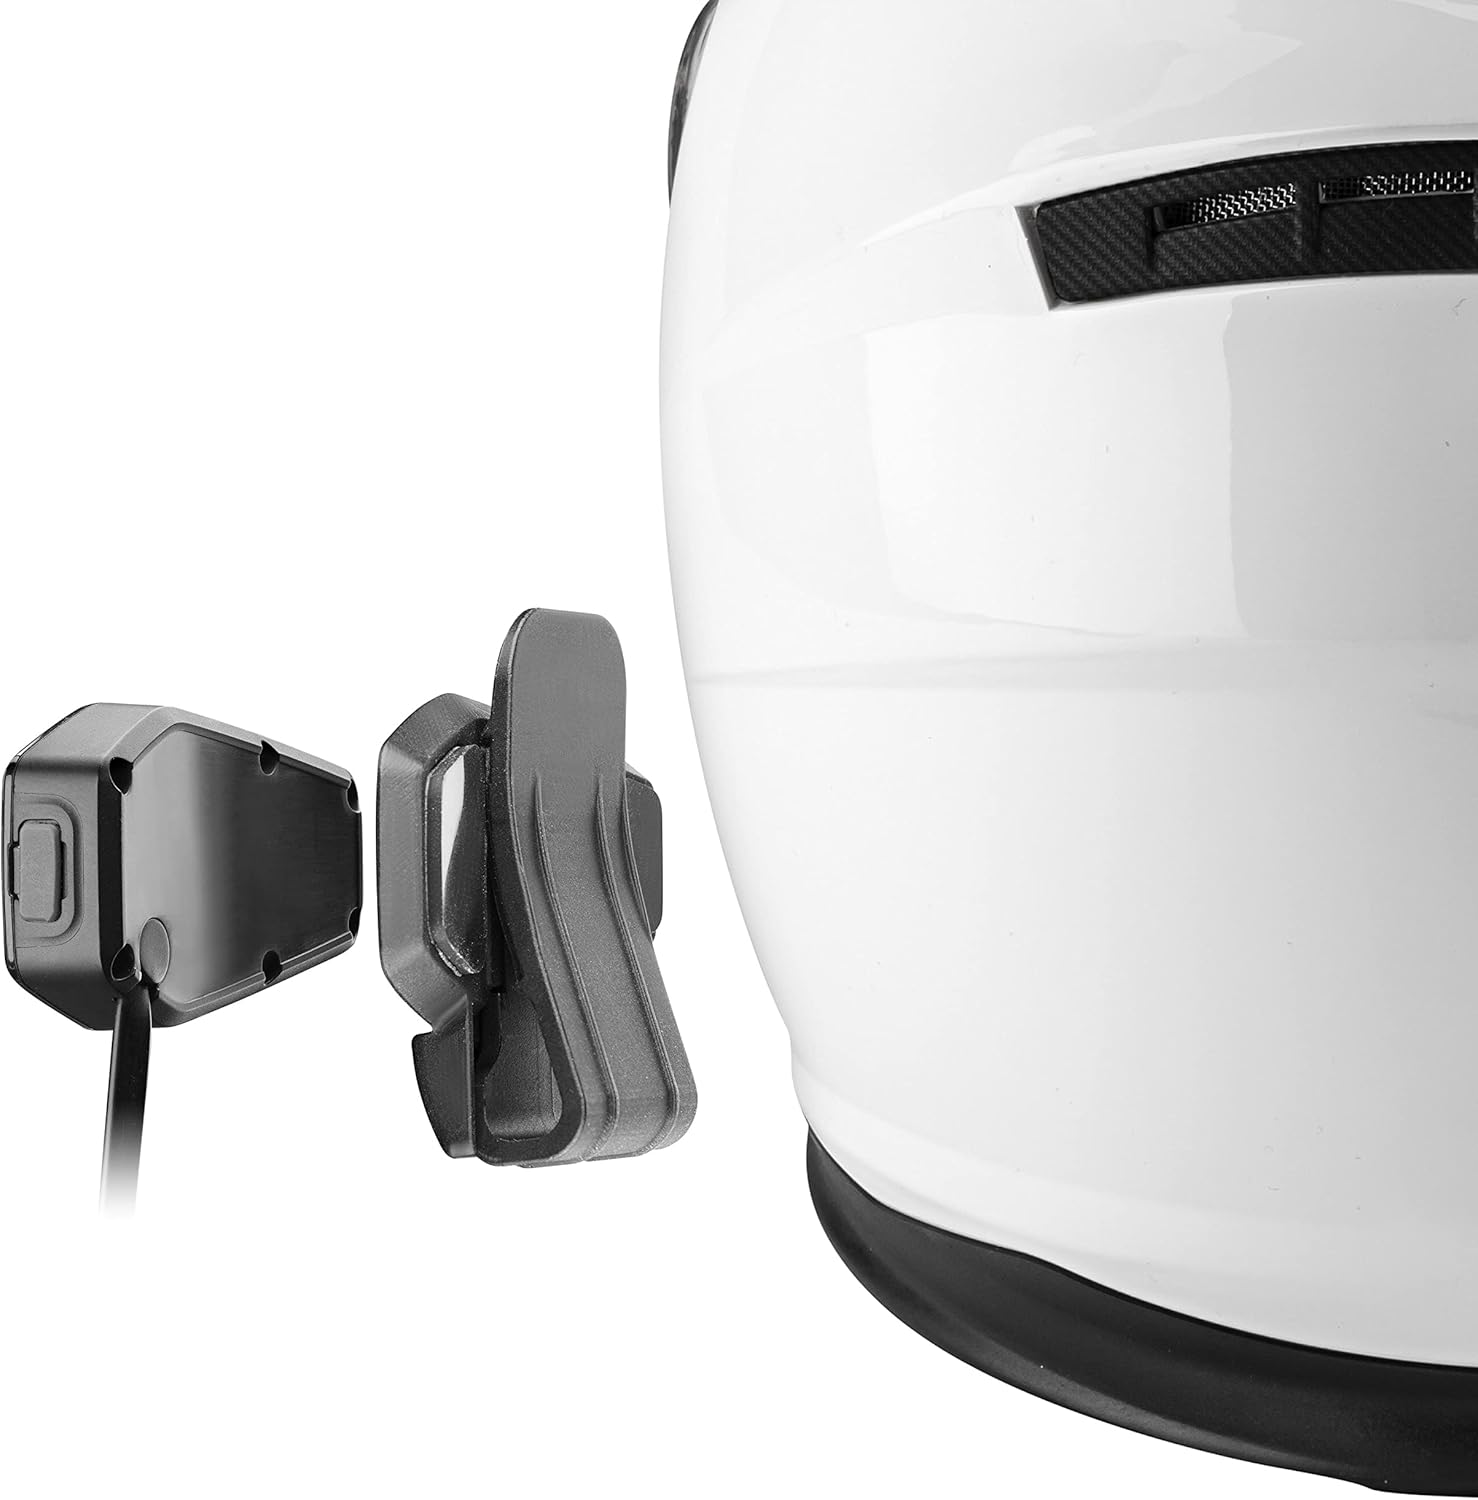
Image: Attaching the UCOM3 unit to a helmet using the secure mounting clip.

Image: Attaching the UCOM3 unit to a helmet using the strong adhesive mount.
3.2.2 Speaker and Microphone Placement
Install the speakers inside the helmet's ear pockets, ensuring they are centered over your ears for the best audio experience. Route the microphone cable and attach the microphone to the inside of the helmet near your mouth, preferably on the left side, ensuring it does not obstruct your vision or helmet closure.

Image: Internal helmet view demonstrating optimal placement for speakers and microphone for clear audio.
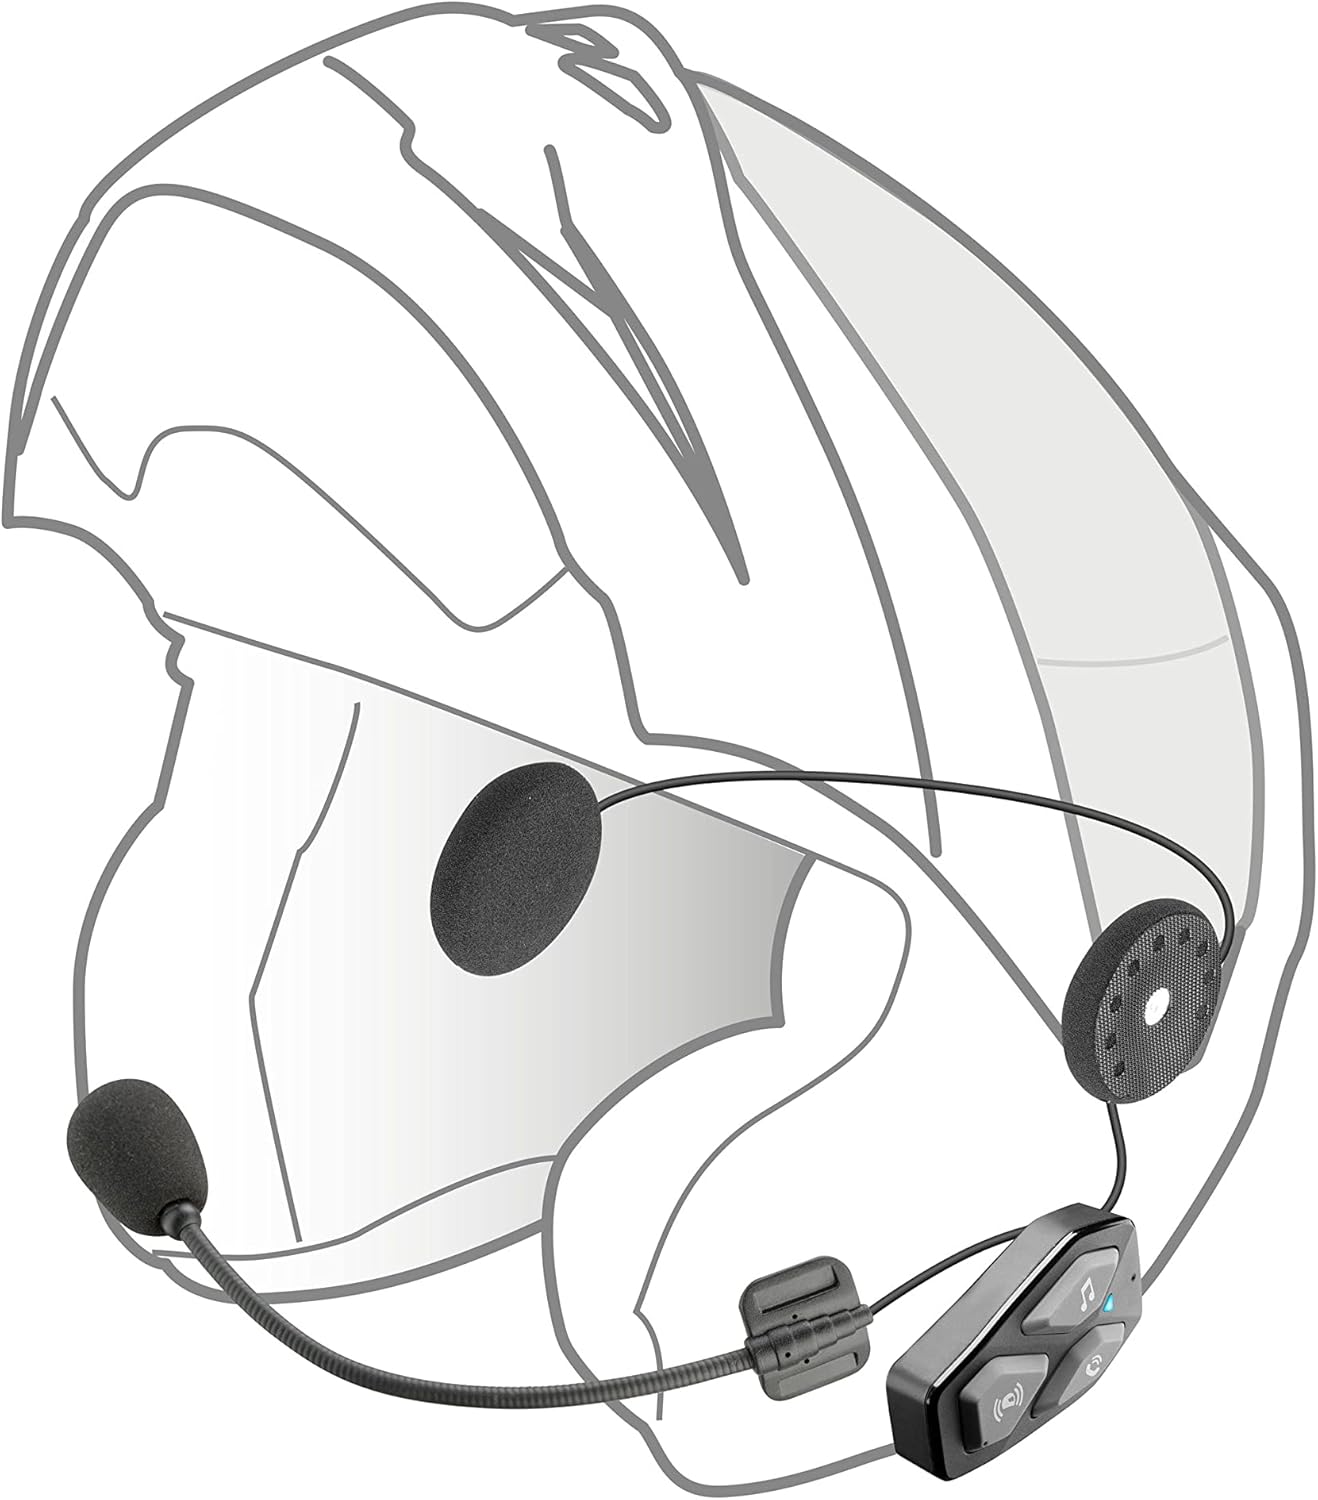
Image: External helmet view showing the UCOM3 unit mounted and the microphone positioned correctly.
3.3 Initial Charging
Before first use, fully charge the UCOM3 unit. Connect the provided USB cable to the charging port on the unit and to a USB power source. The indicator light will show charging status and turn off when fully charged. A full charge typically takes approximately 2 hours.
4. Operating Instructions
4.1 Power On/Off
- Power On: Press and hold the Intercom button for 3 seconds until the indicator light flashes blue.
- Power Off: Press and hold the Intercom button for 5 seconds until the indicator light turns red and then off.
4.2 Bluetooth Pairing (Smartphone)
- With the UCOM3 off, press and hold the Intercom button for 8 seconds until the indicator light flashes red and blue alternately, indicating pairing mode.
- On your smartphone, go to Bluetooth settings and search for new devices.
- Select "INTERPHONE UCOM3" from the list of available devices.
- Once paired, the indicator light on the UCOM3 will flash blue slowly.
4.3 Intercom Communication
The UCOM3 supports communication between two riders up to 500 meters (1640 feet) in open terrain.
- Initiate Intercom: Briefly press the Intercom button to start a conversation with a paired UCOM3 unit.
- End Intercom: Briefly press the Intercom button again to end the conversation.
4.4 Music and GPS Audio
- Play/Pause Music: Briefly press the Music button.
- Next Track: Press and hold the Volume Up button.
- Previous Track: Press and hold the Volume Down button.
- Volume Adjustment: Briefly press the Volume Up or Volume Down buttons.
- GPS navigation instructions from your paired smartphone will automatically overlay or temporarily mute music.
4.5 Call Management
- Answer Call: Briefly press the Phone button.
- End Call: Briefly press the Phone button during a call.
- Reject Call: Press and hold the Phone button for 2 seconds.
- Voice Assistant: Double-press the Phone button to activate your smartphone's voice assistant (Siri, Google Assistant).
4.6 App Control
Download the official Interphone UCOM app from the App Store (iOS) or Google Play Store (Android) for advanced settings and control. The app allows for firmware updates, audio settings customization, and managing intercom groups.
Video: Official product video showcasing the features and benefits of the Interphone UCOM3 Motorcycle Bluetooth Headset, including its compact design, integrated battery, Bluetooth 5.1, IP67 waterproof rating, and communication capabilities.
5. Maintenance
- Cleaning: Wipe the unit with a soft, damp cloth. Do not use harsh chemicals or abrasive cleaners.
- Water Resistance: The UCOM3 is IP67 waterproof. While it can withstand rain and splashes, avoid prolonged submersion. Ensure the USB port cover is securely closed.
- Battery Care: For optimal battery life, avoid fully discharging the unit frequently. Charge it regularly, especially if storing for extended periods.
- Storage: Store the unit in a cool, dry place when not in use.
6. Troubleshooting
| Problem | Possible Cause | Solution |
|---|---|---|
| Unit does not power on | Low battery; Unit frozen | Charge the unit fully; Perform a reset (refer to manual for specific reset procedure, usually holding multiple buttons). |
| Cannot pair with smartphone/intercom | Not in pairing mode; Device already paired; Interference | Ensure unit is in pairing mode (flashing red/blue); Delete previous pairings on both devices and try again; Move away from other electronic devices. |
| No sound from speakers | Volume too low; Speakers disconnected; Incorrect placement | Increase volume; Check speaker connections; Adjust speaker position inside helmet. |
| Intercom range is short or connection is unstable | Obstructions; Environmental interference; Out of range | Ensure clear line of sight between units; Avoid areas with high electromagnetic interference; Stay within the 500m range. |
If you encounter issues not listed here or if the solutions do not resolve your problem, please refer to the official Interphone support resources or contact customer service.
7. Technical Specifications
| Feature | Specification |
|---|---|
| Model Name | INTERPHOUCOM3 |
| Connectivity Technology | Wireless (Bluetooth 5.1) |
| Intercom Range | Up to 500 meters (2 riders) |
| Battery Life (Talk Time) | 10 Hours |
| Water Resistance Level | IP67 (Waterproof) |
| Speaker Size | 32mm HD |
| Control Type | Noise Control, App Control |
| Item Weight | 50 Grams (1.76 ounces) |
| Product Dimensions | 2.36 x 1.42 x 0.63 inches |
| Compatible Devices | All Helmets, Sena Intercoms, TFT, GPS Systems |
8. Warranty and Support
The INTERPHONE UCOM3 comes with a manufacturer's warranty. Please refer to the warranty card included in your product packaging for specific terms and conditions. For further assistance, technical support, or to download the latest version of the user manual (PDF), please visit the official Interphone website or contact their customer service.
You can also find the User Manual (PDF) here.


