1. Introduction
This manual provides detailed instructions for the setup, operation, and maintenance of your GOWENIC Corded Phone. Please read this manual thoroughly before using the product to ensure proper function and longevity.
Package Contents
Upon unpacking, please verify that all the following items are included:
- 1 x GOWENIC Corded Phone Host
- 2 x Straight Line Cords (One for UK, one for other regions)
- 1 x User Manual (this document)

Image: Contents of the GOWENIC Corded Phone package, showing the phone unit, coiled handset cord, and two straight line cords.
2. Product Overview
The GOWENIC Corded Phone is a versatile and easy-to-use landline telephone designed for various environments such as offices, hotels, homes, and schools. It features essential functions for reliable communication.

Image: A top-down view of the GOWENIC Corded Phone, showing the handset connected to the base unit via a coiled cord.

Image: The GOWENIC Corded Phone on a desk with a person in the background using a similar phone, illustrating typical usage.

Image: The GOWENIC Corded Phone on a desk in an office environment, with a person in the background on a call.
Video: A brief 6-second overview of the GOWENIC Corded Phone, demonstrating its design and potential use in a professional setting.
Components and Controls
Familiarize yourself with the various parts and controls of your phone:

Image: A diagram of the GOWENIC Corded Phone with numbered labels indicating its various components and buttons.
| No. | Component/Control |
|---|---|
| 01 | Base unit |
| 02 | Handset |
| 03 | Receiver (Earpiece) |
| 04 | Hook-Switch |
| 05 | Speaker (for ringer) |
| 06 | Coil cord |
| 07 | Number Keypad |
| 08 | MUTE Button |
| 09 | PAUSE Button |
| 10 | HOLD Button |
| 11 | RESET Button |
| 12 | FLASH Button |
| 13 | REDIAL Button |
3. Setup
Connecting the Phone
Follow these steps to connect your GOWENIC Corded Phone:
- Connect one end of the coiled cord (06) to the handset (02) and the other end to the designated port on the base unit (01).
- Locate the telephone line jack on the back of the base unit.
- Connect one of the provided straight line cords to the telephone line jack on the base unit.
- Connect the other end of the straight line cord to your wall telephone outlet.
- The phone does not require batteries and will draw power directly from the telephone line.

Image: The GOWENIC Corded Phone base unit and handset, shown with the coiled cord and two straight line cords for connection.
Wall Mounting (Optional)
Your GOWENIC Corded Phone can be mounted on a wall for convenience. To wall mount the phone:
- Identify a suitable location on the wall.
- Using the back of the phone as a template, mark the positions for two mounting holes. Ensure the holes align with the keyhole slots on the phone's base.
- Drill two holes at the marked positions.
- Insert appropriate wall anchors (if necessary) and screws, leaving the screw heads slightly protruding.
- Align the keyhole slots on the back of the phone with the screw heads and slide the phone downwards to secure it.
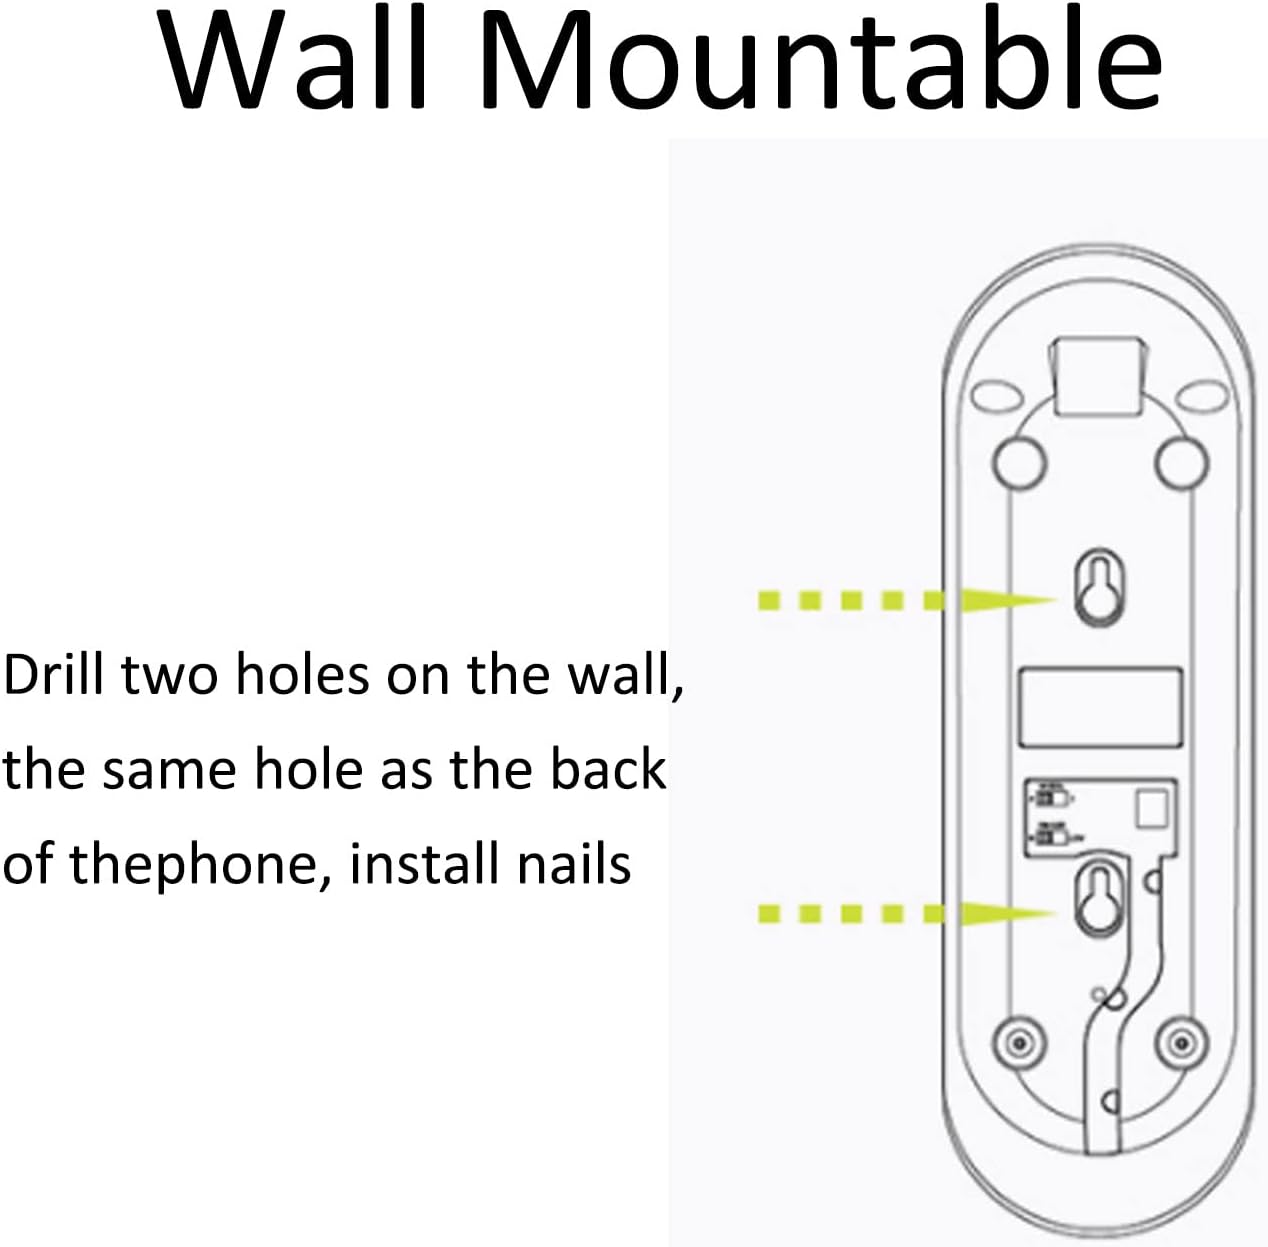
Image: A diagram illustrating the two keyhole slots on the back of the GOWENIC Corded Phone for wall mounting, with arrows indicating where to drill holes.
4. Operating Instructions
Making and Receiving Calls
- To Make a Call: Lift the handset (02), wait for a dial tone, then dial the desired number using the number keypad (07).
- To Receive a Call: When the phone rings, lift the handset (02) to answer.
- To End a Call: Place the handset (02) back onto the base unit (01).
Special Functions
The GOWENIC Corded Phone includes several useful functions:
- MUTE (08): Press the MUTE button during a call to temporarily disable your microphone. The other party will not hear you, but you can still hear them. Press MUTE again to resume speaking.
- PAUSE (09): Use the PAUSE button when dialing a number that requires a pause, such as accessing an extension or a calling card service. Press PAUSE at the point where a delay is needed in the dialing sequence.
- REDIAL (13): To redial the last number called, lift the handset (02) and press the REDIAL button.
- FLASH (12): The FLASH button is used for certain telephone network services, such as call waiting or transferring calls, depending on your service provider. Press FLASH to activate these features.
- RESET (11): The RESET button can be used to clear certain states or functions, typically after a call or to prepare for a new action.
- HOLD (10): Press the HOLD button during a call to place the current call on hold. The other party will hear hold music or silence, depending on your service provider. Press HOLD again to resume the call.

Image: A close-up view of the GOWENIC Corded Phone's keypad, highlighting the number keys and function buttons like PAUSE, REDIAL, and MUTE.
5. Maintenance
To ensure the longevity and optimal performance of your GOWENIC Corded Phone, follow these maintenance guidelines:
- Cleaning: Wipe the phone's surface with a soft, damp cloth. Do not use abrasive cleaners, solvents, or strong chemicals, as these can damage the finish.
- Storage: Store the phone in a cool, dry place away from direct sunlight and extreme temperatures when not in use for extended periods.
- Avoid Liquids: Keep the phone away from water and other liquids to prevent electrical damage.
6. Troubleshooting
If you encounter any issues with your GOWENIC Corded Phone, please refer to the following table for common problems and solutions:
| Problem | Possible Cause | Solution |
|---|---|---|
| No dial tone | Phone line not connected properly or service issue. | Check all cable connections. Ensure the phone line is securely plugged into both the phone and the wall outlet. Test with another phone if available to rule out a service provider issue. |
| Cannot make or receive calls | Incorrect dialing, line issue, or phone malfunction. | Verify the number being dialed. Check for a dial tone. Ensure the handset is properly seated when not in use. If the problem persists, contact your telephone service provider. |
| Poor call quality (static, low volume) | Loose connections, interference, or damaged cord. | Ensure all cords are securely connected. Move the phone away from other electronic devices that might cause interference. Inspect cords for visible damage. |
| Buttons not responding | Temporary software glitch or physical damage. | Disconnect the phone from the wall outlet for a few minutes, then reconnect it. If the issue persists, the unit may require service. |
7. Specifications
Below are the technical specifications for the GOWENIC Corded Phone:
| Feature | Detail |
|---|---|
| Item Type | Corded Phone |
| Product Material | ABS Plastic |
| Color | Black |
| Power Source | Corded Electric (Line Powered) |
| Dialer Type | Single Keypad |
| Answering System Type | Microcassette (Note: This phone does not include an integrated answering machine. This specification refers to a general category.) |
| Item Weight | 11.4 ounces (approx. 323 grams) |
| Package Dimensions | 8.66 x 3.15 x 2.76 inches (approx. 22 x 8 x 7 cm) |
8. Warranty and Support
Warranty Information
GOWENIC products are manufactured to high-quality standards. For specific warranty details regarding your Corded Phone, please refer to the warranty card included with your purchase or contact your retailer. Keep your proof of purchase for warranty claims.
Customer Support
If you require further assistance or have questions not covered in this manual, please contact GOWENIC customer support through the retailer where you purchased the product or visit the official GOWENIC website for contact information.


