
UNITOPSCI A3041
UNITOPSCI 9-Inch Android Car Stereo with Apple CarPlay and Android Auto (Model A3041) - User Manual
Model: A3041 | Brand: UNITOPSCI
1. Introduction
This manual provides detailed instructions for the installation, operation, and maintenance of your UNITOPSCI 9-inch Android Car Stereo. Please read this manual thoroughly before using the product to ensure proper functionality and to maximize your user experience. Keep this manual for future reference.
2. Product Overview
2.1 Key Features
- Android 13 System: Equipped with 2GB RAM and 64GB ROM for smooth operation.
- 9-Inch HD Capacitive Touchscreen: 1024x600 resolution for clear visuals.
- Wireless Apple CarPlay & Android Auto: Seamless smartphone integration for navigation, calls, and music.
- Built-in Bluetooth 4.2: Supports hands-free calling, phone book sync, and A2DP music streaming.
- GPS Navigation: Supports online and offline maps (preloaded with Here WeGo, compatible with Google Maps, Waze, Sygic).
- WiFi Connectivity: Access online functions like streaming, browsing, and social media via a WiFi hotspot.
- FM/RDS Radio: 18 preset stations for news, music, and weather broadcasts.
- Mirror Link Function: Display content from Android (via WiFi or USB) and iOS (via WiFi) phones.
- AHD Backup Camera Support: Automatic display of parking video with night vision and 170-degree viewing angle.
- HiFi EQ Setting: Customizable audio effects for enhanced sound quality.
- Split Screen Function: Run two applications simultaneously on the display.
- Steering Wheel Control (SWC): Easily manage radio channels, songs, and volume for safer driving.
- Video Output: Share video content to external monitors, such as headrest displays.
2.2 What's in the Box

Figure 2.2.1: Included Components and Product Dimensions.
This image displays the main unit with its dimensions and a detailed layout of all accessories included in the package, such as cables, antennas, and the backup camera.
- 1 x Android Car Stereo for VW
- 1 x AHD Backup Camera
- 1 x RCA Cable
- 1 x GPS Antenna
- 1 x Camera Input Cable
- 2 x Power Cables
- 2 x USB Cables
- 1 x Canbus Decoder
- 1 x Radio Adapter
3. Setup and Installation
Proper installation is crucial for the optimal performance of your car stereo. If you are unsure about any steps, it is recommended to seek professional assistance.
3.1 Compatibility Check
Before installation, confirm the compatibility of the stereo with your vehicle's original car system configuration, year, and central control map. This unit is designed for specific Volkswagen, SEAT, and Skoda models. Refer to the compatibility image below.
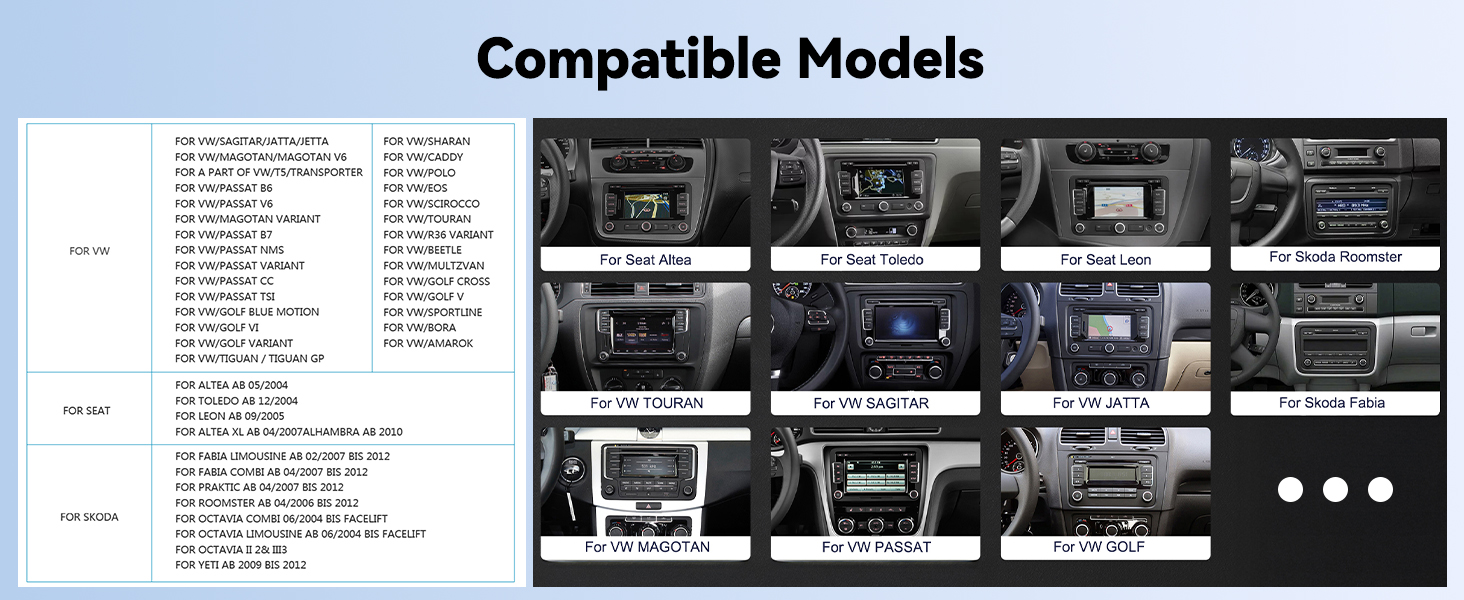
Figure 3.1.1: Compatible Vehicle Models.
This image provides a list of Volkswagen, SEAT, and Skoda models for which this car stereo is compatible. Please verify your vehicle model against this list.

Figure 3.1.2: Installation Compatibility Note.
This image shows examples of car dashboard layouts, distinguishing between configurations where the stereo can be installed (green checkmark) and where it cannot (red cross), based on the original car system's design.
3.2 Wiring Instructions
The package includes both 36-pin and 40-pin harnesses. Choose the correct harness for your car model. Refer to the diagrams below for proper wiring connections.

Figure 3.2.1: Wiring Diagram (Canbus Connection).
This diagram illustrates how to connect the ACC (A, B plug) and Canbus. It shows plugging the Canbus into the port at the back of the unit to provide power to the Canbus.

Figure 3.2.2: Detailed Wiring Harness Connections.
This image provides a detailed view of the 36-pin and 40-pin harnesses, indicating connections for power, RCA cables, reverse input, USB, Canbus, and GPS antenna. Ensure you select the correct harness for your vehicle.
- Disconnect the vehicle's battery before starting any wiring.
- Identify the correct wiring harness (36-pin or 40-pin) for your vehicle.
- Connect the main power cable to the vehicle's power supply, ensuring ACC and ground connections are secure.
- Connect the Canbus decoder if your vehicle requires it for steering wheel controls or other integrated functions.
- Connect the GPS antenna and route it to a location with a clear view of the sky.
- Connect the USB cables and route them to an accessible location (e.g., glove compartment).
- For the backup camera, connect the video input cable to the stereo and the power/ground wires to the vehicle's reverse light circuit.
- Connect any additional RCA cables for external amplifiers or video output.
- Once all connections are made, reconnect the vehicle's battery and test the unit before fully reassembling the dashboard.
4. Operating Instructions
4.1 Wireless Apple CarPlay & Android Auto
Connect your smartphone wirelessly to access navigation, make calls, send messages, and play music through the car stereo's interface.

Figure 4.1.1: Wireless CarPlay and Android Auto Interfaces.
This image shows the car stereo's display with both Apple CarPlay and Android Auto interfaces, demonstrating how smartphone apps are integrated for in-car use.
- Ensure Bluetooth and Wi-Fi are enabled on your smartphone.
- On the car stereo, select the CarPlay or Android Auto application.
- Follow the on-screen prompts to pair your phone. For Apple CarPlay, select your car stereo from your iPhone's Bluetooth settings. For Android Auto, ensure the app is installed and follow the pairing process.
- Once connected, you can use voice commands (Siri or Google Assistant) for various functions.
4.2 Bluetooth Connectivity
The built-in Bluetooth module allows for hands-free calling and wireless audio streaming.

Figure 4.2.1: Hands-Free Calling via Bluetooth.
This image illustrates the hands-free calling feature, showing a driver on a call with the car stereo displaying the call interface.
- Go to the Bluetooth settings on the car stereo.
- Enable Bluetooth on your smartphone and search for available devices.
- Select "UNITOPSCI" (or similar device name) from your phone's list and pair.
- Once paired, you can make/receive calls and play music wirelessly.
4.3 GPS Navigation
Utilize the integrated GPS for reliable navigation, with support for both online and offline maps.

Figure 4.3.1: GPS Navigation Interface.
This image shows the car stereo displaying a navigation map, along with icons representing different map applications like Google Maps, Waze, and Here WeGo.
- Access the Navigation application from the main menu.
- The unit comes preloaded with Here WeGo maps. You can download additional offline maps or use online navigation apps like Google Maps or Waze when connected to Wi-Fi.
- Enter your destination to receive turn-by-turn directions.
4.4 WiFi Connectivity
Connect to a Wi-Fi hotspot to access online features and applications.
Figure 4.4.1: WiFi and Online Applications.
This image highlights the Wi-Fi capability of the stereo, showing the Wi-Fi icon and various online applications that can be accessed, such as YouTube, Facebook, and web browsers.
- Go to Settings > Network & Internet > Wi-Fi.
- Turn on Wi-Fi and select your desired hotspot from the list.
- Enter the password if prompted.
- Once connected, you can use online navigation, stream videos, browse the internet, and use other online applications.
4.5 FM/RDS Radio
Tune into your favorite radio stations with the built-in FM/RDS tuner.

Figure 4.5.1: FM/RDS Radio Interface.
This image shows the car stereo's FM radio interface, displaying the current frequency, available preset stations, and controls for tuning.
- Select the Radio application from the main menu.
- Use the scan function to find available stations or manually tune to a specific frequency.
- Save up to 18 of your favorite stations as presets for quick access.
- RDS (Radio Data System) provides additional information like station name and program type where available.
4.6 Mirror Link Function
Mirror your smartphone's screen directly onto the car stereo display.

Figure 4.6.1: Mirror Link Functionality.
This image demonstrates the Mirror Link feature, where a smartphone's display is replicated on the car stereo screen. It also indicates connection methods for Android (WiFi or USB) and iOS (WiFi).
- For Android phones: Connect via Wi-Fi or USB cable.
- For iOS phones: Connect via Wi-Fi.
- Select the Mirror Link application on the stereo and follow the pairing instructions specific to your phone's operating system.
4.7 Split Screen Function
Display two applications simultaneously for enhanced multitasking.

Figure 4.7.1: Split Screen Display.
This image shows the car stereo's display divided into two sections, with a navigation map on one side and the FM radio interface on the other, demonstrating the split-screen capability.
- While an application is open, long-press the recent apps button or drag an app to one side of the screen (method may vary slightly based on Android version).
- Select a second application to occupy the other half of the screen.
4.8 Steering Wheel Control (SWC)
Configure your vehicle's steering wheel buttons to control the stereo functions.

Figure 4.8.1: Steering Wheel Control Setup.
This image displays a car steering wheel with its control buttons alongside the car stereo's interface for learning and configuring steering wheel controls, allowing users to map functions like volume, track skip, and mode selection.
- Go to Settings > Steering Learn (or similar option).
- Follow the on-screen instructions to program each steering wheel button to its corresponding function on the stereo.
4.9 HiFi EQ Setting
Customize your audio experience with the integrated HiFi Equalizer.
Figure 4.9.1: HiFi EQ Settings.
This image shows the car stereo's graphic equalizer interface, allowing users to adjust various frequency bands and select from predefined sound presets like Custom, Classical, Jazz, Rock, and Pop.
- Access the EQ settings from the audio menu.
- Adjust frequency bands manually or select from preset sound modes (e.g., Pop, Rock, Jazz, Classical).
4.10 AHD Backup Camera
The system automatically displays the rear view when the vehicle is in reverse gear.

Figure 4.10.1: Backup Camera Display and Wiring.
This image illustrates the clear rear-view display with parking guidelines provided by the AHD backup camera. It also includes a simplified diagram showing how to connect the camera to the stereo and the vehicle's reverse light for automatic activation.
- Ensure the backup camera is correctly installed and wired to the reverse light circuit.
- When the vehicle is shifted into reverse, the stereo will automatically switch to the camera view.
- The camera features night vision and a 170-degree viewing angle for improved visibility.
5. Maintenance
- Screen Cleaning: Use a soft, lint-free cloth to gently wipe the touchscreen. For stubborn smudges, slightly dampen the cloth with water or a screen-safe cleaner. Avoid harsh chemicals or abrasive materials.
- Software Updates: Periodically check for software updates from the manufacturer to ensure optimal performance and access to new features.
- General Care: Avoid exposing the unit to extreme temperatures, direct sunlight for prolonged periods, or excessive moisture.
6. Troubleshooting
If you encounter issues with your car stereo, refer to the following common troubleshooting steps:
- No Power:
- Check all power connections and fuses.
- Ensure the vehicle's battery is charged.
- Verify the ACC wire is correctly connected and receiving power when the ignition is on.
- No Sound:
- Check speaker wiring connections.
- Ensure the volume is not muted or set too low.
- Verify audio output settings in the stereo menu.
- Bluetooth Connection Issues:
- Ensure Bluetooth is enabled on both the stereo and your phone.
- Delete previous pairings on both devices and attempt to re-pair.
- Restart both the stereo and your phone.
- GPS Not Working / Inaccurate:
- Ensure the GPS antenna is properly connected and placed in a location with a clear view of the sky.
- Verify that location services are enabled in the stereo's settings.
- If using online maps, ensure a stable Wi-Fi connection.
- Unit Lagging / Slow Response:
- Close unnecessary background applications.
- Perform a system restart.
- Consider a factory reset if the issue persists (note: this will erase all user data and settings).
- Backup Camera Not Displaying:
- Check the camera's video input connection to the stereo.
- Verify the camera's power and ground connections to the reverse light circuit.
- Ensure the reverse trigger wire (if applicable) is correctly connected.
If these steps do not resolve the issue, please contact UNITOPSCI customer support for further assistance.
7. Specifications
| Brand | UNITOPSCI |
| Model Number | A3041 |
| Operating System | Android 13 |
| RAM | 2GB |
| ROM | 64GB |
| Display Size | 9 Inches |
| Display Resolution | 1024x600 |
| Power Output | 4x45W |
| Bluetooth Version | 4.2 |
| Connectivity | Wireless (CarPlay, Android Auto, Bluetooth, WiFi) |
| Map Type Compatibility | Google Map, Here WeGo, Waze, Sygic (North America, Worldwide) |
| Item Weight | 3.14 pounds |
| Product Dimensions | 8.58 x 2.09 x 5.12 inches |
8. Warranty and Support
8.1 Product Warranty
The UNITOPSCI A3041 car stereo comes with a 1-year warranty from the date of purchase, covering manufacturing defects. For specific warranty claims or details, please contact customer support.
8.2 Customer Support
For technical assistance, troubleshooting, or warranty inquiries, please contact UNITOPSCI customer service:
- Email: UNITOPSCI@126.com
- Return Policy: 30-day refund/replacement policy through Amazon.
- Protection Plans: Optional 2-Year and 3-Year protection plans are available for purchase separately.

Figure 8.2.1: Customer Support Information.
This image provides details on customer support, including email contact, replacement policy, response times, and lifetime after-sales technical support.
Related documentsA3041


Ask a question about this manual
Ask about setup, troubleshooting, compatibility, parts, safety, or missing instructions. Manuals+ will review the question and use this page’s manual context to help answer it.