1. Introduction
Thank you for choosing the GYMAX Walking Pad Treadmill Model B09X343QYK. This 3-in-1 folding treadmill is designed to support various fitness activities, including walking, jogging, and running, and features a removable desktop for enhanced versatility. This manual provides essential information for the safe and effective use of your new fitness equipment.
2. Safety Information
Please read all instructions carefully before operating the treadmill. Retain this manual for future reference.
- Always consult with a physician before starting any new exercise program.
- Ensure the treadmill is placed on a flat, stable surface with adequate clearance around it.
- Keep children and pets away from the treadmill during operation.
- Use the safety key feature to immediately stop the machine in case of an emergency.
- Wear appropriate athletic footwear while using the treadmill.
- Do not operate the treadmill if it is damaged or malfunctioning.
- Unplug the treadmill from the power source when not in use or before cleaning/maintenance.
3. Product Overview
The GYMAX Walking Pad Treadmill offers a versatile exercise experience with its innovative design and features:
- 3-in-1 Functionality: Supports walking (0.5-1.5 MPH), jogging (0.5-4 MPH), and running (0.5-7.5 MPH).
- Removable Desktop: A 26.7" x 13" acrylic desktop allows for working or studying while exercising.
- Folding Design: Easily folds for compact storage, reducing space requirements.
- Powerful Motor: Equipped with a 2.5 HP brushless motor for smooth and quiet operation (≤45dB).
- Advanced Running Belt: Features a 7-layer diamond-textured running belt with 4 rubber shock-absorbing pads for comfort and joint protection.
- LED Display: Tracks essential workout data including speed, distance, time, calories, and steps.
- Preset Programs: Includes 12 preset training programs and 3 countdown modes (time, distance, calories).
- Connectivity: Bluetooth enabled for connecting mobile devices and built-in speakers.
- Portability: Built-in transportation wheels for easy movement.

Figure 1: The GYMAX Walking Pad Treadmill in its primary configurations. A user is shown running on the treadmill with the desktop accessory installed, while another smaller inset image depicts a user walking on the treadmill in its flat, under-desk configuration. The remote control is also visible.

Figure 2: This image illustrates the three distinct exercise modes of the treadmill: walking (0.5-1.5 MPH), jogging (0.5-4 MPH), and running (0.5-7.5 MPH). Each mode is depicted with a user engaged in the activity, demonstrating the versatility of the machine.
4. Setup Instructions
4.1 Unpacking and Placement
Carefully remove all components from the packaging. Ensure all packing materials are removed before assembly. Place the treadmill on a firm, level surface, ensuring at least 2 feet of clear space on all sides and 6 feet at the rear for safety.
4.2 Unfolding the Treadmill
To prepare the treadmill for use, follow these steps to unfold it:
- Remove the device holder from the handrails.
- Unscrew the knobs located on the side of the frame to release the handrails.
- Carefully raise the handrails to their upright position.
- Secure the handrails by tightening the knobs.

Figure 3: This image provides a step-by-step visual guide for folding the treadmill. It shows how to remove the device holder, unscrew the frame knobs, and fold the handrails for compact storage. The treadmill's slim 4.7-inch folded height and smooth transport wheels are also illustrated.
4.3 Attaching the Removable Desktop
The treadmill includes a removable acrylic desktop for convenience. To attach it, simply place it securely onto the designated slots on the handrails. Ensure it is stable before placing any items on it.

Figure 4: This image features the removable desk workstation, made of high-quality acrylic, attached to the treadmill. A laptop is shown in use on the desk, illustrating its functionality for working or studying while exercising. The desk dimensions of 27 inches by 13 inches are indicated.
4.4 Adjusting Incline
The treadmill's incline can be manually adjusted. Refer to the following video for detailed instructions:
Video 1: This video provides a step-by-step guide on how to manually adjust the incline of the treadmill. It shows the process of pulling out the fixing screw, turning the slope adjusting device, and inserting the pin into the hole to set the desired incline level.
5. Operating Instructions
5.1 Powering On/Off
Connect the power cord to a grounded outlet. Flip the main power switch located at the front of the treadmill to the 'ON' position. The LED display will illuminate. To turn off, flip the switch to 'OFF' and unplug the unit.
5.2 Using the Remote Control
The included remote control allows you to start, stop, and adjust the speed of the treadmill. Ensure the safety key is in place before starting. Press the 'Start' button to begin, and use the '+' and '-' buttons to adjust speed. Press 'Stop' to pause or end your workout.
5.3 Selecting Preset Programs
The treadmill features 12 preset programs (P1-P12) designed for various fitness levels and goals. Consult the display or remote for program selection. Additionally, you can set countdown modes for time (5-99 minutes), distance (1-99 miles), or calories (20-990 Kcal).

Figure 5: This image showcases the treadmill's 12 preset workout programs, designed to help users achieve various fitness goals. It also highlights three countdown modes for setting exercise duration (5-99 minutes), distance (1-99 miles), and calorie targets (20-990 Kcal). A user is depicted running on the treadmill with a mobile device on the holder.
5.4 Bluetooth Connectivity and Built-in Speaker
Connect your mobile device to the treadmill via Bluetooth to play audio through the built-in speakers. This feature enhances your workout experience with music or podcasts.

Figure 6: This image illustrates the convenient pausing feature of the treadmill, allowing users to take breaks without losing workout data. It also highlights Bluetooth connectivity for entertainment and the presence of a built-in speaker. A user is shown taking a water break next to the treadmill.
5.5 Safety Key
Always attach the safety key clip to your clothing before starting a workout. If you accidentally step off the treadmill or fall, the safety key will detach, immediately stopping the running belt and preventing injury.
6. Maintenance
6.1 Lubrication
Regular lubrication of the running belt is crucial for optimal performance and longevity. Use the provided extension tube for lubricants to ensure even application. Refer to the 'Specification' image for visual reference of the lubrication port.
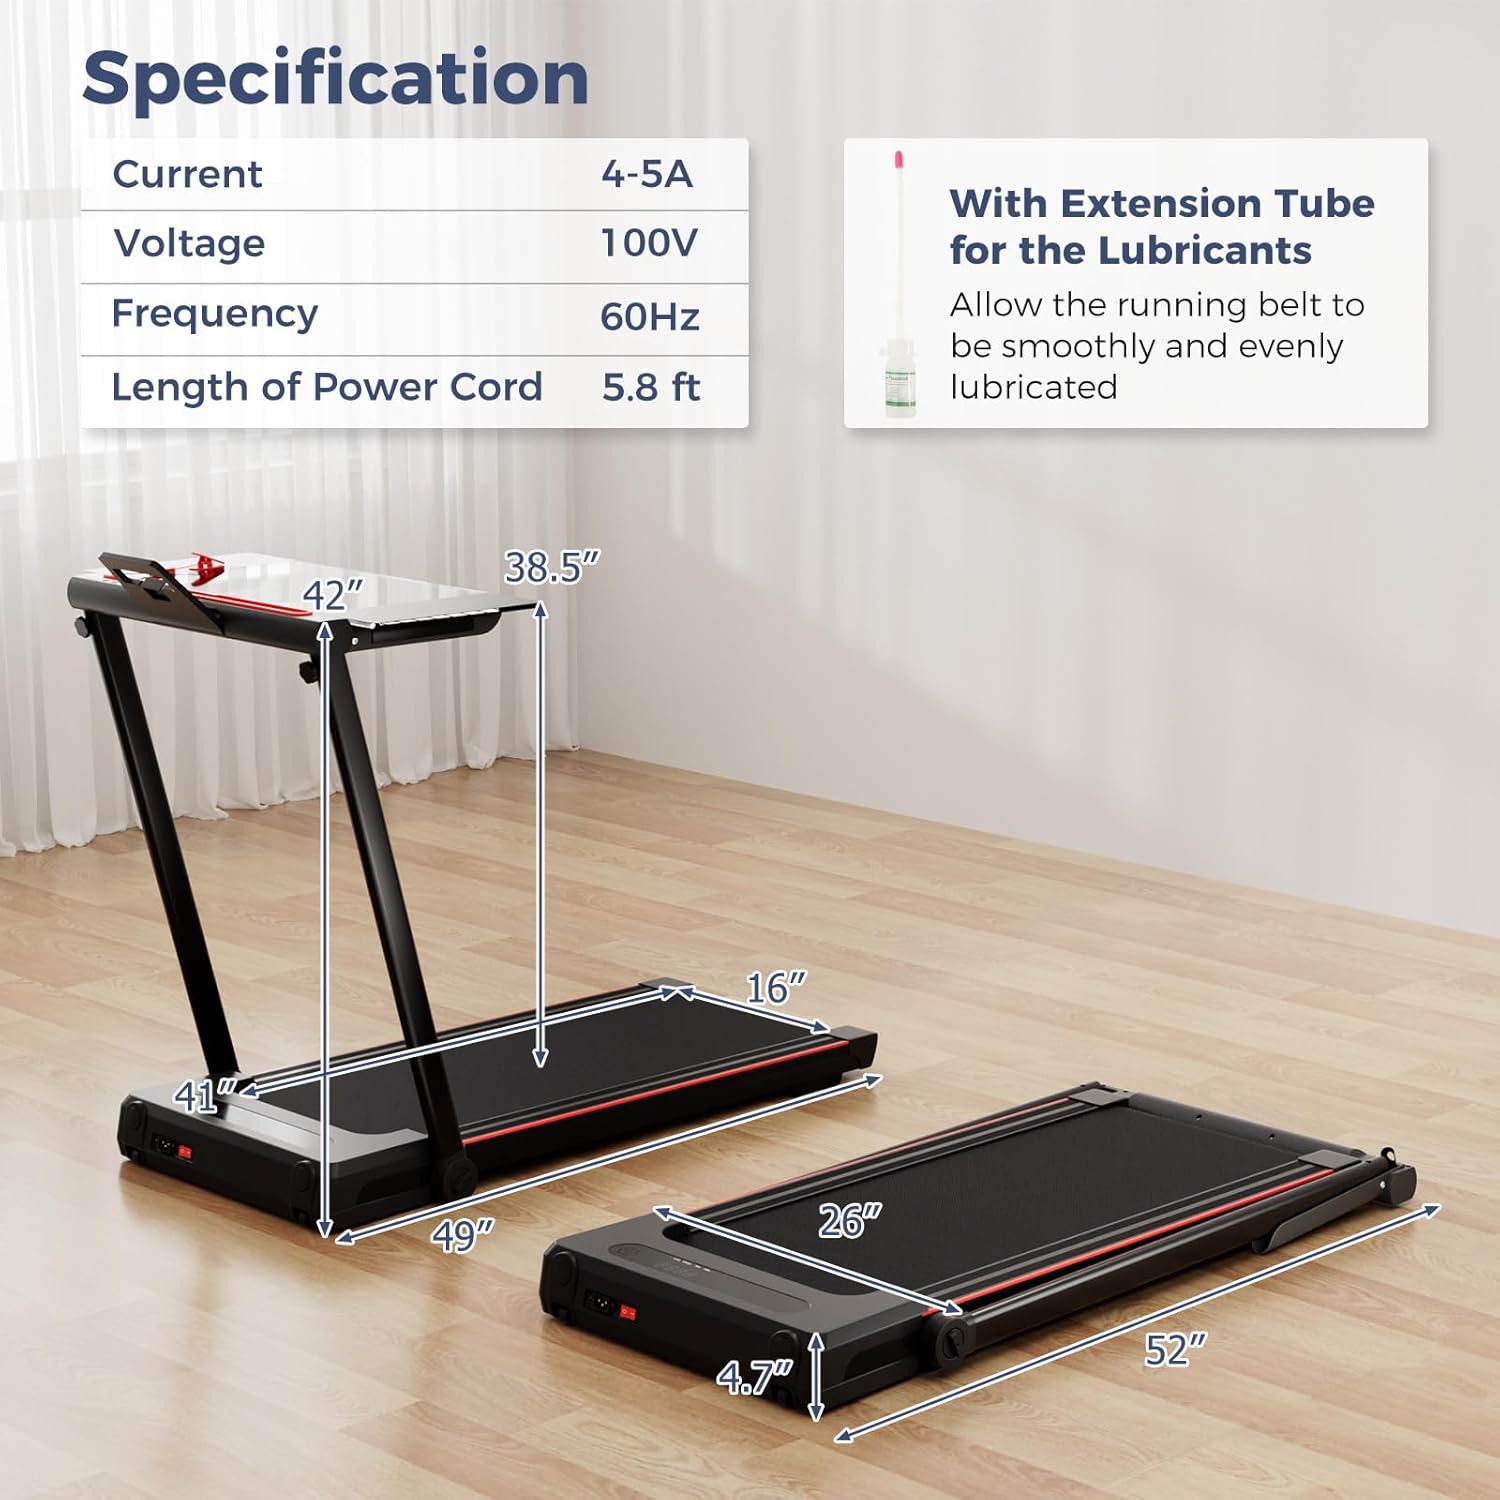
Figure 7: This image presents detailed specifications of the treadmill, including its dimensions and electrical specifications. It also highlights the mention of an extension tube for lubrication, which is essential for maintaining the running belt.
6.2 Cleaning
Wipe down the treadmill with a damp cloth after each use to remove sweat and dust. Do not use abrasive cleaners or solvents. Ensure the treadmill is unplugged before cleaning.
6.3 Belt Adjustment
If the running belt becomes misaligned or feels loose/tight, it may require adjustment. Consult the troubleshooting section or contact customer support for detailed instructions on how to adjust the belt tension and alignment.

Figure 8: This image provides a detailed view of the treadmill's running surface and shock absorption system. It highlights the 4 rubber shock-absorbing pads designed for knee and ankle protection, and the 7-layer diamond-textured running belt that ensures a secure and stable workout with a non-slip surface.
7. Troubleshooting
If you encounter any issues with your treadmill, please refer to the following common problems and solutions:
- Treadmill does not power on: Check if the power cord is securely plugged into a grounded outlet and if the main power switch is in the 'ON' position. Ensure the safety key is properly placed.
- Running belt stops unexpectedly: Verify that the safety key is correctly inserted and has not been dislodged.
- Unusual noises during operation: Inspect the running belt for any obstructions. Ensure all bolts and screws are tightened. Lubricate the running belt if necessary.
- Remote control not responding: Check the battery in the remote control and replace if needed. Ensure there are no obstructions between the remote and the treadmill's sensor.
- Belt slipping or uneven movement: The running belt may require tension adjustment or centering. Refer to the maintenance section or contact customer support for assistance.
For issues not listed here, please contact GYMAX customer support.
8. Specifications
| Feature | Detail |
|---|---|
| Product Dimensions (Unfolded) | 125 x 68 x 106 cm (49" L x 26" W x 41" H approx.) |
| Product Dimensions (Folded) | 132 x 66 x 12 cm (52" L x 26" W x 4.7" H approx.) |
| Item Weight | 30.84 kg (68 Pounds) |
| Maximum Weight Capacity | 220 Pounds |
| Colour | Black |
| Motor Horsepower | 2.5 HP |
| Speed Range | 0.5 - 7.5 MPH |
| Running Belt Dimensions | 104 x 40.6 cm (41" L x 16" W) |
| Display Type | LED (3 Inches) |
| Number of Programs | 12 Preset Programs |
| Power Source | Corded Electric |
| Voltage | 100V |
| Frequency | 60Hz |
| Included Components | Remote Control |
| Material | Acrylonitrile Butadiene Styrene (ABS), Alloy Steel |
9. Warranty and Support
Specific warranty details are not provided in the product information. For warranty claims, technical support, or replacement parts, please contact GYMAX customer service directly through their official channels or the retailer where the product was purchased.


